
Popular categories
Looking for a yarn?


Comments / Questions (63)
![]() Hoffmann, Chris wrote:
Hoffmann, Chris wrote:
Ich habe mittlerweile mehrfach versucht, diese Anleitung (rund) zu stricken. Die Anleitung zur Aufnahme an den Seiten klappt, das Abnehmen nicht. Ich verstehe die Anleitung so, daß in der Mitte des Vorder- und Rückenteils mit Abnahmetipp 1 gearbeitet wird, indem der Folgerunde die jeweils 3 M. Neben dem Markierer re gestrickt werden. Dadurch ergibt sich absolut kein Maschenbild. Was mache ich falsch?
05.10.2025 - 21:55DROPS Design answered:
Liebe Chris, das ist schwer zu analysieren, wo der Fehler liegt. So, wie Sie es beschreiben, machen Sie es richtig. Sie stricken in der Runde, in der Sie die Abnahmen das 1. Mal machen, wie folgt: 1 Rechtsmasche + 2 Linksmaschen der Vorrunde überzogen zusammenstricken, 1 Umschlag, 1 Masche rechts (über 1 Rechtsmasche der Vorrunde), Markierer, 1 Masche rechts, 1 Umschlag, 2 Linksmaschen + 1 Rechtsmasche zusammenstricken. Dann stricken Sie stets je 3 Maschen beidseitig des betreffenden Markierers rechts bzw. Sie nehmen dann ja auch wieder bei diesen Maschen ab.
04.11.2025 - 21:51
![]() Grit Meinig wrote:
Grit Meinig wrote:
Hallo, wie ist das gemeint? "Achten Sie bitte darauf: Diese M. werden auf beiden Seiten der 6 M. unter dem Ärmel aufgenommen. " Also nach der dritten und vor der drittletzten Masche? Liebe Grüße, Grit
05.10.2025 - 21:50DROPS Design answered:
Liebe Grit, die Anleitung enthielt an der Stelle eine Fehler und wurde nun korrigiert. Es ist nun hoffentlich klarer. Sie nehmen also je 1 Masche vor den 6 Maschen an der unteren Ärmelmitte und nach diesen Maschen zu (der Rundenbeginn ist in der Mitte der 6 Maschen, also passt es, wie Sie geschrieben haben.) Viel Spaß beim Stricken!
31.10.2025 - 11:02
![]() Marga wrote:
Marga wrote:
Wat betekent bij het rondbreien ‘om de naald’ steken meerderen. Is dat elke keer als je de ‘start’ markeerdraad tegenkomt , dus in elk rondje? Of is dat als je het rondje voor de 3e keer gaat doen ?
20.12.2024 - 11:08DROPS Design answered:
Dag Marga,
Met om de naald wordt bedoeld de ene naald wel en de andere naald niet.
11.01.2025 - 15:39
![]() Catherine Lejeune wrote:
Catherine Lejeune wrote:
Oups ! il faut augmenter 22 X 2 m en plus tous les 8 rangs. Si j'augmentais 22X8 m j'aurais 64 + 176 = 240m. Je crois que le problème vient plutôt du nombre de tours. Si j' augmente tous les 2 cm ça devrait aller. je vais compter le nombre de tours pour 2 cm. Merci quand même !
28.11.2024 - 17:36DROPS Design answered:
Bonjour Mme Lejeune, vous devez augmenter 2 mailles sous la manche pas 8 (augmentez 1 maille avant et 1 maille après les 6 mailles du milieu sous la manche). Avec une tension de 32 rangs jersey pour 10 cm, les 8 tours vont mesurer environ 2,5 cm, mais vérifiez sur votre propre tension en hauteur pour adapter le nombre de tours. Bon tricot!
29.11.2024 - 08:16
![]() Catherine Lejeune wrote:
Catherine Lejeune wrote:
Rebonjour, je tricote la taille L et j'ai 94 m à 46 cm. ce qui correspond à 15 augmentations tous les 8 rangs comme indiqué dans le modèle.
28.11.2024 - 10:55DROPS Design answered:
Bonjour Mme Lejeune, vous aviez 64 mailles et vous devez augmenter 22 fois 8 mailles au milieu sous la manche, vous aurez ainsi 64+(22x8)=108 mailles. La dernière augmentation doit être faite à environ 41 cm (8 cm avant la 1ère + 21x tous les 8 tours/tous les 2,5 cm environ). Bon tricot!
28.11.2024 - 16:07
![]() Catherine Lejeune wrote:
Catherine Lejeune wrote:
Bonjour, j'ai un problèmes avec les augmentations des manches. A 46cm j'en ai fait 15 sur 22 . Il manque donc 14 m et il est dit d'arrêter d'augmenter sous la manche et de faire des rangs raccourcis. Que faire ? merci de votre réponse
28.11.2024 - 07:40DROPS Design answered:
Bonjour Mme Lejeune, combien de mailles avez-vous a 46 cm, au total, et quelle taille tricotez-vous?
28.11.2024 - 09:35
![]() Linda wrote:
Linda wrote:
Ich stricke an der Passe und sehe nicht was ich mit den 6 Maschen auf der Hilfsnadel machen soll? Werden sie seperat abgekettet?
05.10.2024 - 15:42DROPS Design answered:
Liebe Linda, die mittleren 6 Maschen (mittleren Vorderteil) werden stillgelegt, dann stricken Sie in Hin- und Rückreihen weiter, gleichzeitig ketten Sie Maschen am Anfang jeder Reihe (bei den Hin- sowie bei den Rückreihen) für den Halsausschnitt ab. Viel Spaß beim Stricken!
07.10.2024 - 07:44
![]() Andrea wrote:
Andrea wrote:
Hallo, meine Maschenprobe ergibt mit glatt stricken Nadelstärke 3.5 und mit Krausrippe 3.0. Was bedeuted das für mich beim Stricken des Pullis? Danke für eine Antwort
31.08.2024 - 19:12DROPS Design answered:
Liebe Andrea, dann können Sie vielleicht mit 3,5 anfangen dann mit 3 für das Krausrechts stricken Viel Spaß beim stricken!
02.09.2024 - 08:04
![]() Stella wrote:
Stella wrote:
Buongiorno, ho difficoltà con le maniche. Sono arrivata al punto dei ferri accorciati però sono perplessa perché la parte superiore (quella col motivo) è più bassa della parte che andrà attaccata al sottomanica, esattamente di 9 cm. Pensavo che i ferri accorciati servissero a far crescere in altezza la parte più bassa (quella col motivo), invece le indicazioni si riferiscono alla parte sotto, quella dove inizia il giro. Sbaglio qualcosa? Grazie per la risposta.
07.02.2024 - 10:34DROPS Design answered:
Buonasera Stella, non ci sono errori nelle spiegazioni delle maniche, può seguire le istruzioni riportate. Buon lavoro!
17.03.2024 - 19:03
![]() Frøydis wrote:
Frøydis wrote:
Denne oppskriften stemmer rett og slett ikke. Særlig ermene blir feil, beregningen av lengde i henhold til strikkefasthet er gjort "rett opp" mens måling gjøres langs en skrå kant. Fellingen på bærestykket stemmer heller ikke, da felletips 2 faktisk ikke feller noen masker siden det som strikkes sammen kompenseres av kast. Dermed sitter man igjen med alt for mange masker. Grethe som stilte gjentatte spørsmål i 2013 har helt rett... Genseren er flott, men oppskriften er feil.
20.01.2022 - 22:27
|
|
Rib Romance#ribromancesweater |
|
|
|
|
Knitted DROPS jumper in rib and garter st in ”Alpaca”. Size S - XXXL.
DROPS 122-18 |
|
|
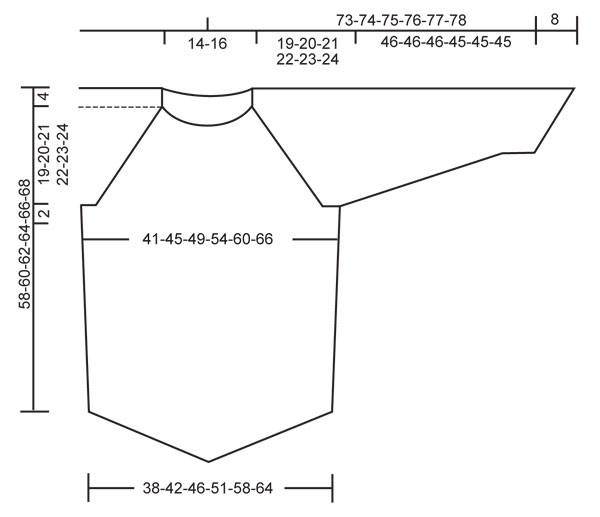
GARTER ST (in the round): K 1 round, P 1 round. MEASUREMENT TIP: Because of the weight of the yarn make all measurements while the garment is hanging. INCREASING TIP: Inc 1 st each side of the 2 K sts each side on body piece and each side of the 2 K sts mid under sleeve. Inc 1 st by making 1 YO, on next row work YO into back of loop to avoid a hole – incorporate inc sts in rib/garter st as you go along. DECREASING TIP-1 (applies to the rib mid front and mid back on body piece): Beg 4 sts before marker and dec as follows: Slip 1 st as if to K, K2 tog, psso, 1 YO, K2 (marker sits mid between these 2 sts), 1 YO, K3 tog. On next round K the middle 6 sts. DECREASING TIP-2 (applies to garter st mid front and mid back on body piece and at top of sleeves – hole pattern): Beg 3 sts before marker and dec as follows: slip 1 st as if to K, K1, psso, 1 YO, K2 (marker sits mid between these 2 sts), 1 YO, K2 tog. On next round work the 6 middle sts as follows: K2, P2, K2. DECREASING TIP-3 (applies to garter st on bottom part of sleeve): Dec as described under DECREASING TIP-1, but work the 6 sts as follows on next round: K2, P2, K2 (instead of K6). DECREASING TIP-4 (applies to raglan): Dec as follows in each transition between body piece and sleeves (beg 3 sts before marker): K2 tog, K2 (marker sits mid between these 2 sts), slip 1 st as if to K, K1, psso. -------------------------------------------------------- JUMPER: Worked in the round. BODY PIECE: Cast on 272-304-336-368-416-464 sts on circular needle size 3 mm with Alpaca. Work 2 rounds rib as follows: K1, * P2, K2 *, repeat from *-* to end and finish with P2 and K1. Now insert 4 markers in piece with 68-76-84-92-104-116 sts between each (insert first marker at beg of round). Continue in rib AT THE SAME TIME inc 1 st each side of 1st and 3rd marker (= at the sides) - See INCREASING TIP - and dec 1 st each side of 2nd and 4th marker (= mid front/mid back) - See DECREASING TIP-1. Continue the inc and dec on every other round (no of sts will be constant). When piece measures 33-34-35-36-37-38 cm - See MEASUREMENT TIP (measured along the side) – K 1 round AT THE SAME TIME dec 76-88-104-112-128-148 sts evenly – NOTE: 19-22-26-28-32-37 sts on left front piece, 19-22-26-28-32-37 sts on right front piece, 19-22-26-28-32-37 sts on right back piece and 19-22-26-28-32-37 sts on left back piece (i.e. 38-44-52-56-64-74 sts in total on front piece and on back piece) – do not dec on the 6 sts mid front and mid back = 196-216-232-256-288-316 sts. Continue in GARTER ST - see above - AT THE SAME TIME continue the hole pattern mid front and mid back - See DECREASING TIP-2 (the side inc are now complete). REMEMBER THE KNITTING TENSION! When piece measures 35-36-37-38-39-40 cm cast off 12-12-12-16-16-16 sts each side for armhole (i.e. 6-6-6-8-8-8 sts each side of marker 1 and 3) = 86-96-104-112-128-142 sts left on front and back piece. Put piece aside and knit the sleeves. SLEEVE: Cast on 64-66-68-68-70-70 sts on double pointed needles size 3 mm with Alpaca. Insert a marker after 32-33-34-34-35-35 sts (= mid upper sleeve), and let the marker follow the piece as you go along. Work first round as follows: K 29-30-31-31-32-32, slip 1 st as if to K, K1, psso, K2 (marker sits mid between these 2 sts), K2 tog and K 29-30-31-31-32-32. P 1 round. Now work next round as follows: K 29-30-31-31-32-32, slip 1 st as if to K, K1, psso, K2 tog and K 29-30-31-31-32-32. There are now 60-62-64-64-66-66 sts on needle. P 1 round and now continue in garter st. AT THE SAME TIME inc 2 sts mid under sleeve - See INCREASING TIP - and dec 1 st each side of marker mid upper sleeve - See DECREASING TIP-3. Continue the inc and dec on every other round (no of sts will be constant). When piece measures 9-8-8-8-6-9 cm inc 2 extra sts mid under sleeve – NOTE: inc these each side of the middle 6 sts under sleeve. Repeat this inc a total of 19-21-22-24-26-28 times in SIZE S: on every 9th round, SIZE M + L: on every 8th round, SIZE XL + XXL: on every 7th round and SIZE XXXL: on every 6th round = 98-104-108-112-118-122 sts. When piece measures 46-46-46-45-45-45 cm, measured mid under sleeve – see MEASUREMENT TIP and adjust to the same no of garter st rows as on body piece – work shortened rows back and forth as follows (NOTE: K every row and continue the hole pattern mid upper sleeve on every row from RS acc to DECREASING TIP-2 – discontinue the inc mid under sleeve): Beg from RS mid under sleeve and work 16-16-18-18-20-20 sts past marker, turn piece, slip first st as if to K, tighten thread and work 32-32-36-36-40-40 sts. Turn piece, slip 1 st as if to K, tighten thread and work 48-48-54-54-60-60 sts, turn piece, slip 1 st as if to K, tighten thread and work 64-64-72-72-80-80 sts. Turn piece, slip first st as if to K, tighten thread and work 80-80-90-90-100-100 sts, turn piece, slip first st as if to K, tighten thread and work row back to mid under sleeve. Now cast off the first 6-6-6-8-8-8 sts at beg of round, work 86-92-96-96-102-106 sts and cast off the remaining 6-6-6-8-8-8 sts. Put piece aside and knit the other sleeve. YOKE: Slip sleeves on the same circular needle as body piece where cast off for armholes = 344-376-400-416-460-496 sts. Insert a marker in each transition between body piece and sleeves (= 4 markers). READ ALL OF THE FOLLOWING SECTION BEFORE CONTINUING! Continue in garter st and hole pattern as before (on sleeves continue hole pattern acc to DECREASING TIP-2 as on body piece, i.e. the hole pattern continues mid front/mid back and mid upper sleeves, but no inc are made). AT THE SAME TIME dec for raglan as follows - See DECREASING TIP-4: Beg on the first K round and then dec on every 4th round (i.e. on every other K-round) a total of 13-13-13-16-15-15 times and then on every other round (i.e. on every K-round) a total of 20-23-25-22-26-28 times. AT THE SAME TIME when piece measures 53-54-56-57-59-60 cm – measured along the side - slip the middle 6-6-10-12-12-24 sts on a stitch holder for neck. Continue back and forth on circular needle from mid front, AT THE SAME TIME cast off for neck at beg of row each side as follows: 2 sts 1-1-2-3-3-4 times and 1 st until piece measures 58-60-62-64-66-68 cm - measured along the side all the way to shoulder - REMEMBER MEASUREMENT TIP. After all dec for raglan and neck there are approx 64 to 100 sts left on needle, cast off loosely. NECKLINE: Pick up approx 80-100 sts round neck (includes sts on stitch holder at front) on small circular needle size 3 mm with Alpaca. K 1 round AT THE SAME TIME dec evenly to 78-82-86-90-94-96 sts. P 1 round. Then K 1 round, AT THE SAME TIME inc evenly to 120-128-132-132-136-140 sts. Work rib, K2/P2 - make sure to have K2 mid front. When rib measures 8-8-9-9-10-10 cm cast off loosely with K over K and P over P. ASSEMBLY: Sew openings under sleeves. |
|
 |
|
Have you finished this pattern?Tag your pictures with #dropspattern #ribromancesweater or submit them to the #dropsfan gallery. Do you need help with this pattern?You'll find 22 tutorial videos, a Comments/Questions area and more by visiting the pattern on garnstudio.com. © 1982-2026 DROPS Design A/S. We reserve all rights. This document, including all its sub-sections, has copyrights. Read more about what you can do with our patterns at the bottom of each pattern on our site. |


With over 40 years in knitting and crochet design, DROPS Design offers one of the most extensive collections of free patterns on the internet - translated to 17 languages. As of today we count 324 catalogues and 12290 patterns translated into English (UK/cm). 12290
We work hard to bring you the best knitting and crochet have to offer, inspiration and advice as well as great quality yarns at incredible prices! Would you like to use our patterns for other than personal use? You can read what you are allowed to do in the Copyright text at the bottom of all our patterns. Happy crafting!
Post a comment to pattern DROPS 122-18
We would love to hear what you have to say about this pattern!
If you want to leave a question, please make sure you select the correct category in the form below, to speed up the answering process. Required fields are marked *.