
Popular categories
Looking for a yarn?


Comments / Questions (94)
![]() Jopie wrote:
Jopie wrote:
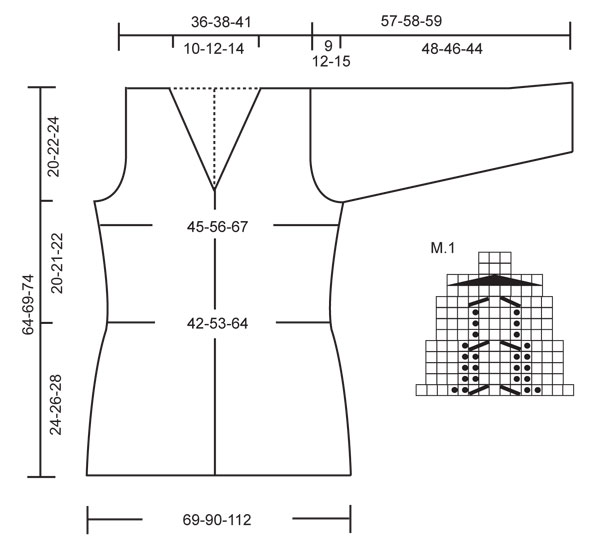
Bij 699 st , eindig ik met eerste nld patroon nooit op M1-12 st-6 voorbies. Op 680-689 st is de laatste M1. Eén na laatste M1 is op 633-641 st. Hoe dan?
11.01.2024 - 14:51DROPS Design answered:
Dag Jopie,
Je herhaalt steeds wat tussen sterretjes staat, dus 6 voorbiessteken, 12 steken in boordsteek, herhaal steeds M1(15st)+39 st in boordsteek tot er 27 steken over zijn op de linker naald. Dan brei je M.1 nog een keer en 12 steken in boordsteek en nog eens 6 steken in ribbelsteek. Als je M1 + 39 steken in totaal 12 keer breit dan komt het precies uit.
14.01.2024 - 18:34
![]() Barbara Schmidt wrote:
Barbara Schmidt wrote:
Betrifft das Diagramm M1, wie stricke ich die letzten sechs Maschen zusammen. gibt es da ein Video zum ansehen ? Freundliche Grüße
17.12.2022 - 20:28DROPS Design answered:
Liebe Frau Schmidt, die stricken Sie gleichzeitig als man den Zopf bei dem letzten Symbol strickt, dh die ersten 3 M hinter die Arebeit legen, die nächsten 3 vor die Arbeit legen, dann stricken Sie die 1. Maschen der Nadel vor die Arbeit + die 1. Masche auf der Nadel + die 1. Masche hinter die Arbeit zusammen, und genau so mit den 2 nächsten Maschen jeder Nadel stricken. Viel Spaß beim stricken!
19.12.2022 - 10:26
![]() Sab wrote:
Sab wrote:
De tous les modèles Drops que j'ai tricoté (une trentaine) c'est celui que je trouve le plus chouette. Il est bien structuré/ajusté avec des détails intéressants. Cependant j'aurais dû prendre la taille au-dessus, je l'ai fait en S/M, comme je suis S cela aurait dû bien convenir, pourtant il est légèrement serré.
05.02.2022 - 12:59
![]() Christine ROBERT wrote:
Christine ROBERT wrote:
Bonjour, Je butte sur la réalisation de la 11ème ligne du diagramme M1 (diminution de 6 mailles) du modèle 123-1. Je n'arrive pas à faire ces diminutions, même en utilisant un crochet. Existe-t-il une vidéo explicative ? Ou une technique particulière ? Je vois que plusieurs personnes ont réalisé ce modèle, c'est que ça ne doit pas être impossible ! Merci de votre aide.
15.01.2022 - 15:25DROPS Design answered:
Bonjour Mme Robert, tricotez ces 9 mailles ainsi: placez 3 m sur l'aiguille auxiliaire derrière l'ouvrage et les 3 m suivantes devant, essayez de placer les 3 aiguilles côte à côte ainsi: celle devant, l'aiguille avec toutes les autres mailles et celle de derrière; et tricotez maintenant ainsi: la 1ère maille de chacune de ces 3 aiguilles (= 3 mailles ensemble à l'endroit), puis tricotez ensemble la 2ème maille de ces 3 aiguilles et tricotez de la même façon la 3ème maille de ces 3 aiguilles = vous avez diminué 6 mailles et il ne reste plus que 3 mailles sur les 9 précédentes. Bon tricot!
17.01.2022 - 09:55
![]() Dianne A wrote:
Dianne A wrote:
Hi, enjoying but am stumped. Am up to where I have 303 stitches on needle. Up to 'inc 1 st in each P-section'. What does P-section mean, is it the pattern where I've 'M.1' and I increase above it? I have 15 pattern areas, and if so I would only have 15 stitches extra. Im supposed to have 351 stitches. where do the extra stitches come from?
08.10.2020 - 01:54DROPS Design answered:
Dear Dianne, A, you have now on needles: 6 front band sts, * M.1, 15 sts in rib as before *, repeat from *-*, M.1 and 6 front band sts 303 sts. The "rib as before" = K3/P3 - the P-sections are these P3 = increasing 1 st in every P section will give you rib k3/P4; happy knitting!
08.10.2020 - 11:03
![]() Anita Larsen wrote:
Anita Larsen wrote:
Jeg er begyndt på opskrift 123-1, men jeg kan ikke få maskeantallet til at passe med mønstret.... 915 masker....6 kant + 12 rib i hver side...dvs at der skal sluttes med mønster inden til. mønster er over 9 + 39 masker....... Jeg får 6 masker for meget. Min udregning.. 915 - 36 (rib+kant) - 9 (slut mønster) =870 masker :48= 18,125
15.07.2019 - 13:23DROPS Design answered:
Hei Anita. Mønstret er over 15 masker, ikke 9 masker. Du strikker 6 stolpemasker, 12 masker vrangbord, M.1 + 39 masker vrangbord (dette strikkes 16 ganger/16 rapporter = 864 masker), strikk M.1, strikk 12 masker vrangbord og til slutt 6 stolpemasker, dette blir da 6+12+864+15+12+6 = 915 masker. God Fornøyelse!
26.08.2019 - 14:28
![]() Heidi Von Pein wrote:
Heidi Von Pein wrote:
Nach 27cm macht man vor und nach der Bündchenpartie jeweils einen Umschlag. Wie werden diese Umschläge in der Rückrunde gestrickt, rechts oder links? (Gehören die Zunahmen zur Bündchenpartie oder zur glatt rechts gestrickten Partie?)
18.03.2018 - 10:51DROPS Design answered:
Liebe Frau Von Pein, diese Umschläge sollen verschränkt glatt gestrickt. Viel Spaß beim stricken!
19.03.2018 - 10:29
![]() Kat wrote:
Kat wrote:
Bonjour, Je suis en train de faire les manches de ce très beau modele, mais je les trouvent bien trop larges pour une taille S. Comment y remédier sans dénaturer le modèle? Merci!
18.02.2018 - 09:51DROPS Design answered:
Bonjour Kat, nous ne sommes malheureusement pas en mesure de pouvoir ajuster chaque modèle à chaque demande individuelle. N'hésitez pas à demander conseil à votre magasin DROPS, même par mail ou téléphone, ou à un forum de tricot. Bon tricot!
19.02.2018 - 09:49
![]() Margot Jonsson wrote:
Margot Jonsson wrote:
Hej visar mönstret endast räta varv. ska man då sticka 26 v om man räknar med de aviga v?
14.07.2017 - 09:15DROPS Design answered:
Hej. Diagrammet visar alla varv men sett från rätsidan, så det antalet varv som är i diagrammet är det antal du ska sticka. Lycka till!
14.07.2017 - 11:18ANYA wrote:
Ten sweterek moze miec nazwe "Sweter z Bastinka"
26.03.2017 - 11:13
|
||||||||||||||||
Niagara Falls |
||||||||||||||||
|
|
||||||||||||||||
Knitted DROPS jacket with rib-pattern in ”Alpaca”. Size S - XXXL.
DROPS 123-1 |
||||||||||||||||
|
GARTER ST, back and forth on needle: K all rows. PATTERN: See diagram M.1. Diagram shows the pattern from RS. DECREASING TIP: Dec as follows after front band + K3 + P3: Slip 1 st as if to K, K1, psso. Dec as follows before P3 + K3 + front band: K2 tog. BUTTONHOLES: Make buttonholes on right front band. 1 buttonhole = cast off 3rd and 4th st from mid front and cast on 2 new sts on next row. Make buttonholes when piece measures: SIZE S/M: 8, 14, 20, 26, 32, 38 and 44 cm. SIZE L/XL: 10, 16, 22, 28, 34, 40 and 46 cm. SIZE XXL/XXXL: 8, 15, 22, 29, 36, 43 and 50 cm. -------------------------------------------------------- JACKET: Worked back and forth on circular needle from mid front. Cast on 699-915-1131 sts (includes 6 front band sts each side) on circular needle size 3 mm with Alpaca. Work front bands in GARTER ST – see above – throughout. P 1 row from WS with 6 front band sts each side and continue in rib as follows (from RS): 6 front band sts, * K3, P3 *, repeat from *-* and finish with K3 and 6 front band sts. Continue like this until piece measures approx 2-3-4 cm. Now continue as follows (from RS): 6 front band sts, 12 sts in rib as before, * M.1, 39 sts in rib as before *, repeat from *-* and finish with M.1, 12 sts in rib as before and 6 front band sts. After 1 vertical repeat of M.1 there are 543-711-879 sts on needle. Continue with K over K and P over P until piece measures 7-8-9 cm. Now continue as follows (from RS): 6 front band sts, 6 sts in rib as before, * M.1, 27 sts in rib as before *, repeat from *-* and finish with M.1, 6 sts rib as before and 6 front band sts. Remember BUTTONHOLES - see above. After M.1 there are 387-507-627 sts on needle. Continue with K over K and P over P until piece measures 12-13-14 cm. Now continue as follows (from RS): 6 front band sts, * M.1, 15 sts in rib as before *, repeat from *-* and finish with M.1 and 6 front band sts. After M.1 there are 231-303-375 sts on needle. Continue with K over K and P over P until piece measures approx 17-18-19 cm. On next row from RS inc 1 st in each P-section by making 1 YO after P3 = 267-351-435 sts. On next row (from WS) work all YO into back of loop to avoid a hole. Continue with K over K and P over P until piece measures 24-26-28 cm. On next row from RS dec 1 st in each P-section by P tog the last 2 P sts = 231-303-375 sts. Work 1 row from WS with K over K and P over P. Now insert a marker in the 62nd-80th-98th st from each side (back piece = 107-143-179 sts). Continue as follows (from RS): 6 front band sts, K3, P3, stocking st on the next 39-57-75 sts AT THE SAME TIME dec 4-8-13 sts evenly, P3, K3, P3, K3 (marker sits in the middle of these sts), P3, K3, P3, stocking st on the next 87-123-159 sts AT THE SAME TIME dec 6-15-25 sts evenly, P3, K3, P3, K3 (marker sits in the middle of these sts), P3, K3, P3, stocking st on the next 39-57-75 sts AT THE SAME TIME dec 4-8-13 sts evenly, P3, K3 and 6 front band sts. There are now 217-272-324 sts on needle. Continue with K over K, P over P and stocking st over stocking st, and front bands as before. When piece measures 27-29-31 cm inc 1 st before and after rib-section (= 21 sts) each side (= 4 inc). Inc by making 1 YO. On next row work YO into back of loop and continue to work inc sts in stocking st. Repeat the inc on every 6 cm a total of 3 times = 229-284-336 sts. Continue as before until piece measures 44-47-50 cm. Now cast off 9 sts each side (i.e. st with markers + 4 sts each side of marker) for armhole and complete each piece separately. BACK PIECE: = 99-126-152 sts. Continue back and forth on needle with K over K, P over P and stocking st over stocking st. AT THE SAME TIME cast off for armhole at beg of every row each side: 2 sts 2-4-8 times and 1 st 2-9-11 times = 87-92-98 sts. Now continue in stocking st on all sts. When piece measures 62-67-72 cm cast off the middle 19-24-30 sts for neck and complete each shoulder separately. Continue in stocking st and cast off to shape the neckline at the beg of every row from mid front: 1 st 2 times = 32 sts left on shoulder. Piece measures approx 64-69-74 cm. Cast off remaining sts. RIGHT FRONT PIECE: = 56-70-83 sts. Continue back and forth on needle with K over K, P over P and stocking st over stocking st. AT THE SAME TIME cast off for armhole at the side as described for back piece. AT THE SAME TIME when piece measures 46-48-52 cm work 2 rows back and forth on the 6 front band sts only. Now dec for neck and inc for collar as follows: Inc 1 st by making 1 YO inside 6 front band sts, on next row K YO into back of loop to avoid a hole, and then include inc sts in garter st on front band. Dec 1 st inside front band + K3/P3 - See DECREASING TIP! Inc 1 st and dec 1 st on approx every 1 cm a total of 12-15-18 times = 18-21-24 front band sts. When piece measures 64-69-74 cm cast off 32 sts for shoulder, work the 18-21-24 front band sts and now continue with collar as follows (Row 1 = from RS): * Work back and forth on 8-10-12 sts only, work back and forth on all sts *, repeat from *-* until collar measures approx 6-7-8 cm (measured where shortest). Cast off. LEFT FRONT PIECE: Like right front piece, but mirrored. SLEEVE: Worked in the round. Cast on 91-103-103 sts on circular needle size 3 mm with Alpaca. K 1 round. Insert a marker at beg of round = mid under sleeve. Continue as follows: P2, * K3, P3 *, repeat from *-* and finish with K3 and P2. Continue like this until piece measures 2-3-4 cm. Now continue as follows: 17-23-23 stocking sts, rib as before on the next 21 sts, M.1, rib as before on the next 21 sts and 17-23-23 stocking sts. AT THE SAME TIME when piece measures approx 3 cm inc 2 sts mid under sleeve (i.e. 1 st each side of marker). Repeat the inc on every 2.5-2-1.5 cm a total of 18-19-25 times (work inc sts in stocking st). After M.1 continue with K over K, P over P and stocking st over stocking st until piece measures 7-8-9 cm. Now continue as follows: stocking st to the rib, 15 sts in rib as before, M.1, 15 sts in rib as before and stocking st to the end of round. After M.1 continue with K over K, P over P and stocking st over stocking st until piece measures 12-13-14 cm. Now continue as follows: stocking st to the rib, 9 sts in rib, M.1, 9 sts in rib and stocking st to the end of round. After M.1 continue with stocking st each side and 21 sts in rib mid upper sleeve. When all inc and dec are complete there are 91-105-117 sts on needle. Continue until piece measures 48-46-44 cm (less for the larger sizes because of longer sleeve cap and wider shoulders). Now cast off 8 sts mid under sleeve (i.e. 4 sts each side of marker) and continue back and forth on needle. AT THE SAME TIME cast off for sleeve cap at the beg of every row each side: 2 sts 4-5-5 times and 1 st 4-8-13 times, then 2 sts each side until sleeve measures 56-57-58 cm. Now cast off 4 sts at beg of the next 2 rows and cast off remaining sts. Piece measures approx 57-58-59 cm. ASSEMBLY: Sew shoulder seams. Set in sleeves. Sew tog collar mid back and sew to neck on back piece. Sew on buttons. |
||||||||||||||||
Diagram explanations |
||||||||||||||||
|
||||||||||||||||
 |
||||||||||||||||
Have you finished this pattern?Tag your pictures with #dropspattern or submit them to the #dropsfan gallery. Do you need help with this pattern?You'll find 22 tutorial videos, a Comments/Questions area and more by visiting the pattern on garnstudio.com. © 1982-2026 DROPS Design A/S. We reserve all rights. This document, including all its sub-sections, has copyrights. Read more about what you can do with our patterns at the bottom of each pattern on our site. |
||||||||||||||||


With over 40 years in knitting and crochet design, DROPS Design offers one of the most extensive collections of free patterns on the internet - translated to 17 languages. As of today we count 324 catalogues and 12290 patterns translated into English (UK/cm). 12290
We work hard to bring you the best knitting and crochet have to offer, inspiration and advice as well as great quality yarns at incredible prices! Would you like to use our patterns for other than personal use? You can read what you are allowed to do in the Copyright text at the bottom of all our patterns. Happy crafting!
Post a comment to pattern DROPS 123-1
We would love to hear what you have to say about this pattern!
If you want to leave a question, please make sure you select the correct category in the form below, to speed up the answering process. Required fields are marked *.