
Popular categories
Looking for a yarn?


Comments / Questions (126)
![]() Donna Pike wrote:
Donna Pike wrote:
Is there a video on sewing the shoulder and upper sleeve together?
26.05.2026 - 18:16DROPS Design answered:
Hi Donna, If you click on Videos at the top of the pattern, there is a video showing you how to sew grafting stitches, which are invisible stitches used when assembling the shoulder and sleeves. Regards, Drops Team.
27.05.2026 - 05:58
![]() Maren wrote:
Maren wrote:
Ich möchte die Jacke gerne ohne Kapuze stricken. Muss ich beim aufnehmen der Maschenaus dem Halsansatz gleichviel Maschen aufnehmen wie für die Kapuze? Und nehme ich in den letzten Reihen wieder Maschen ab?
23.11.2025 - 19:16DROPS Design answered:
Liebe Maren, dann am besten inspireren Sie sich von einer Jacke mit dem gewünschten Halsausschnitt und gleicher Maschenprobe - hier finden Sie einige. Viel Spaß beim Stricken!
24.11.2025 - 14:14
![]() Zélie wrote:
Zélie wrote:
Je ne comprend pas le montage des manches sur les devants... Comment est on censé procéder? Si il y avait une vidéo ce serait top, je suis complètement perdue... Merci beaucoup!
14.11.2025 - 22:55DROPS Design answered:
Bonjour Zélie, les mailles de la manche vont être montées en fin de rang sur l'endroit sur le devant droit pour la manche droite / en fin de rang sur l'envers pour la manche gauche, sur le devant gauche, montez les mailles, découvrez comment monter ces mailles en fin de rang sur l'endroit, en photos ici et en fin de rang sur l'envers, en vidéo ici. Bon tricot!
17.11.2025 - 07:37
![]() Gitte wrote:
Gitte wrote:
Hej, efter jeg købte garn til str. 12/18, læste jeg kommentarerne her på siden om at der ikke er nok garn. Og ganske rigtigt, jeg mangler 3/4 nøgle. Det er rigtig træls at skulle bestille igen, især fordi det ser ud som om, jeg ikke kan få samme indfarvning anden gang. I har ikke kommenteret på de tidligere kommentarer, er det noget I reagerer på? Tester i mængderne? Jeg synes det er en ret relevant feedback og det er vigtigt at man kan stole på de indikerede mængder. Mvh Gitte
13.08.2025 - 12:30DROPS Design answered:
Hei Gitte. Av de over 100 kommentarer denne jakken har fått er det kun 6-7 som nevner for lite garn. Orginal jakken er veid og garnmengden skal stemme med våre utregninger, men når man strikker med Merino Extra Fine er det lett å strikke for løst (man bruker mer garn), så vi kommer til å legge til 1 nøste i alle str. (håper du mente 3 fjerde deler av et nøste og ikke 3-4 nøster, for da har man neste nok til en dame genser :) mvh DROPS Design
08.09.2025 - 15:27
![]() Else Nielsen wrote:
Else Nielsen wrote:
Hvordan syer jeg pænest ærmerne sammen
03.05.2025 - 13:18DROPS Design answered:
Hei Else. Sy kant i kant med små pene sting. Se evnt diverse video under Tips & Hjelp - Montering - Sy sammen - Strikket arbeid. mvh DROPS Design
05.05.2025 - 14:02
![]() Jette wrote:
Jette wrote:
Kan modellen strikkes ud i et stykke? Altså for og bag samlet? Evt. med anvisning ift. halsen?
18.04.2025 - 10:20DROPS Design answered:
Hei Jette. Jakken strikkes frem og tilbake på rundpinne fra midt foran opp til ermhullet samlet, men deretter strikkes for- og bakstk ferdig for seg. Om du ønsker å strikke hele veien opp, og så klippe opp til erme må du selv tilpasse oppskriften (design avd. har ingen mulighet til å lage en egen beskrivelse på det). mvh DROPS Design
30.04.2025 - 08:42
![]() Pascale wrote:
Pascale wrote:
Je vous remercie, pour les tutos des coutures. Pouvez-vous également me conseiller une méthode pour rentrer les fils sur le point de riz aux changements de pelote svp ?
06.02.2025 - 14:30DROPS Design answered:
Bonjour Pascale, vous pouvez utiliser cette technique par exemple, elle fonctionne pour des côtes mais vous pouvez le faire aussi sur du point de riz de la même façon, en suivant juste les mailles endroit (sur l'envers). Bon tricot!
06.02.2025 - 16:47
![]() Pascale wrote:
Pascale wrote:
Bonjour. Je voudrais savoir quelle est la méthode la mieux adaptée pour la couture des épaules / dessus et dessous des manches en point de riz. Merci
05.02.2025 - 22:16DROPS Design answered:
Bonjour Pascale, vous pouvez simplement utiliser cette technique, ou bien celle-ci. Bon assemblage!
06.02.2025 - 09:28
![]() Susanne Daugaard wrote:
Susanne Daugaard wrote:
Super fin jakke
19.01.2025 - 10:17
![]() Monique Beerthuizen wrote:
Monique Beerthuizen wrote:
Goedemiddag. Is zie helaas nu dat het patroon geen losse mouwen heeft. Heb nog nooit een mouwen op deze manier gedaan. Is er soms een berekening voor losse mouwen in het vest te krijgen. Mijn dank is groot. Fijne dagen nog. Bedankt alvast voor reactie. M vr groet Monique Beerthuizen.
26.12.2024 - 12:39DROPS Design answered:
Dag Monique,
Nee, helaas is er geen beschrijving van dit patroon met aparte mouwen.
01.01.2025 - 17:22
|
|||||||||||||
Little Pixie#littlepixiejacket |
|||||||||||||
 |
 |
||||||||||||
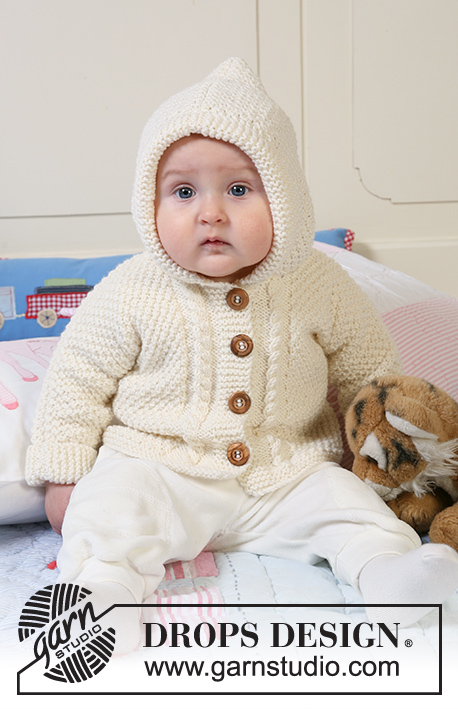
Jacket in moss st knitted in one piece with hood, textured pattern and cables for baby and children in DROPS Merino Extra Fine
DROPS Baby 19-5 |
|||||||||||||
|
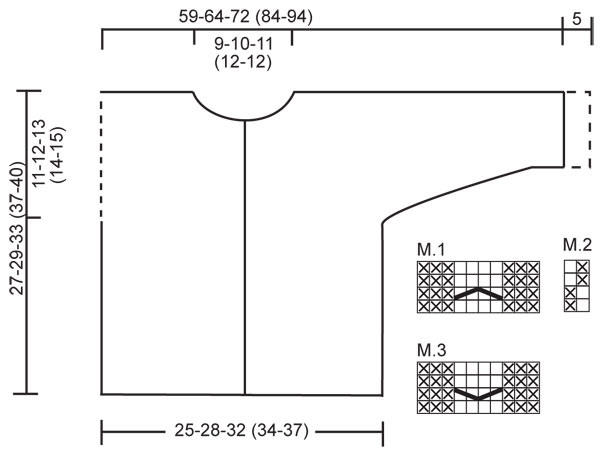
JACKET: GARTER ST (back and forth on needle): K all rows. PATTERN: See diagram M.1 to M.3. Diagram shows the pattern from RS. First row in M.1 and M.3 = WS. BUTTONHOLES: Make buttonholes on right front band. 1 buttonhole = K tog 2nd and 3rd st from mid front and make 1 YO. K YO on next row. Make buttonholes when piece measures: Size 1/3 months: 4, 10, 16 and 22 cm. Size 6/9 months: 4, 11, 18 and 24 cm. Size 12/18 months: 3, 9, 15, 21 and 27 cm. Size 2 years: 3, 10, 17, 24 and 31 cm. Size 3/4 years: 3, 11, 19, 27 and 34 cm. -------------------------------------------------------- -------------------------------------------------------- JACKET: Worked back and forth on circular needle from mid front up to the armhole. Then front and back pieces are worked separately and new sts cast on each side for sleeves. The jacket is assembled sewing the upper arm/shoulder and under arm seams. BODY PIECE: Cast on 117-131-145 (155-169) sts (includes 6 front band sts each side towards mid front) on circular needle size 4 mm with Merino Extra Fine. Work 6 rows GARTER ST – see above (first row = RS), then K 1 row from RS, AT THE SAME TIME inc 1 st in the 10th and 11th st from mid front, repeat the inc at the end of row (in 11th and 10th st on needle) = 121-135-149 (159-173) sts. Insert a marker 34-38-42 (44-48) sts in from each side (= 53-59-65 (71-77) sts between markers on back piece). Now work next row as follows from WS: 6 garter sts (= front band), M.3 (= 10 sts), M.2 on the next 89-103-117 (127-141) sts, M.1 (= 10 sts) and 6 garter sts (= front band). Continue in pattern like this - REMEMBER BUTTONHOLES ON RIGHT FRONT BAND - see above. REMEMBER THE KNITTING TENSION! When piece measures 16-17-20 (23-25) cm divide piece by markers and complete front and back pieces separately. RIGHT FRONT PIECE: = 34-38-42 (44-48) sts. Continue in pattern as before, AT THE SAME TIME cast on new sts for sleeve at the end of every row towards the side as follows: 4 sts 2-2-3 (3-3) times, 8 sts 1-1-1 (1-3) times, 10 sts 1-1-1 (2-1) times and 19-22-23 (23-24) sts 1 time = 79-86-95 (107-118) sts - NOTE: incorporate inc sts in M.2 as you go along. After the last inc continue as before but work 10 sts towards sleeve edge in garter st (= folding edge on sleeve). When 1 row remains before piece measures 23-25-28 (32-35) cm – adjust to a row from WS - dec 2 sts over cable by P2 tog twice on the 4 cable sts. On next row from RS slip 9-11-12 (12-13) sts towards mid front on a stitch holder for neck. Cast off to shape the neckline at the beg of every row from mid front: 2 sts 2 times and 1 st 2-2-3 (3-3) times = 62-67-74 (86-96) sts left on needle (= shoulder + sleeve). Continue in M.2 and cast off when piece measures 27-29-33 (37-40) cm. LEFT FRONT PIECE: Like right front piece but mirrored. BACK PIECE: = 53-59-65 (71-77) sts. Continue in M.2 as before, AT THE SAME TIME cast on new sts each side at the end of every row as described for front piece = 143-155-171 (197-217) sts. Now continue in M.2 with 10 garter sts each side on sleeve edges. When piece measures 25-27-31 (35-38) cm cast of the middle 17-19-21 (23-23) sts for neck and complete each shoulder/sleeve separately. Cast off 1 st on neckline on next row = 62-67-74 (86-96) sts left on needle (= shoulder + sleeve). Cast off when piece measures 27-29-33 (37-40) cm. Repeat on the other side. ASSEMBLY: Sew shoulder/upper arm seams, edge to edge with neat sts. Sew under arm seams. Sew on buttons. Fold the bottom 5 cm on both sleeve edges towards RS, if needed attach with a few sts. HOOD: Pick up from RS approx 55 to 75 sts round neck (includes sts from stitch holders at front) on circular needle size 4 mm with Merino Extra Fine. K 1 row from WS, then K 1 row from RS, AT THE SAME TIME inc evenly to 85-89-93 (97-101) sts. Continue in M.2 with 6 sts each side in garter st - AT THE SAME TIME cast on 6 new sts at the end of the next 2 rows for folding edge = 97-101-105 (109-113) sts – work these 6 sts in garter st. Continue in M.2 with 12 garter sts each side until hood measures 21-23-25 (27-28) cm, cast off. Fold hood double and sew tog at the top. Fold the garter st edge double towards RS and attach at the bottom each side. |
|||||||||||||
Diagram explanations |
|||||||||||||
|
|||||||||||||
 |
|||||||||||||
Have you finished this pattern?Tag your pictures with #dropspattern #littlepixiejacket or submit them to the #dropsfan gallery. Do you need help with this pattern?You'll find 10 tutorial videos, a Comments/Questions area and more by visiting the pattern on garnstudio.com. © 1982-2026 DROPS Design A/S. We reserve all rights. This document, including all its sub-sections, has copyrights. Read more about what you can do with our patterns at the bottom of each pattern on our site. |
|||||||||||||


With over 40 years in knitting and crochet design, DROPS Design offers one of the most extensive collections of free patterns on the internet - translated to 17 languages. As of today we count 325 catalogues and 12298 patterns translated into English (UK/cm). 12298
We work hard to bring you the best knitting and crochet have to offer, inspiration and advice as well as great quality yarns at incredible prices! Would you like to use our patterns for other than personal use? You can read what you are allowed to do in the Copyright text at the bottom of all our patterns. Happy crafting!
Post a comment to pattern DROPS Baby 19-5
We would love to hear what you have to say about this pattern!
If you want to leave a question, please make sure you select the correct category in the form below, to speed up the answering process. Required fields are marked *.