
Popular categories
Looking for a yarn?


Comments / Questions (7)
![]() Mariana wrote:
Mariana wrote:
Vreau să știu ce dimensiune finală are încălzitorul de ouă mie mi se pare că mi a ieșit prea mare probabil că am greșit ceva! Mulțumesc!
22.03.2026 - 22:42
![]() Yamunaa wrote:
Yamunaa wrote:
Hi, for the placemat do we follow row 1 for the subsequent rows or continuous dc in subsequent rows?
23.05.2025 - 12:20DROPS Design answered:
Dear Yamunaa, first row is just set up row: you crochet more chains than you need double crochets (UK-Crochet terminology) because foundation chain is most of the time more tight then rest of piece. So after 1st row is done, just work 1 double crochet in each double crochet to keep a total of 66 double crochets on each row. Happy crocheting!
23.05.2025 - 13:32
![]() Lisen wrote:
Lisen wrote:
Det gjelder spisebrikken: 1. rad starter med følgende instruksjon: "Hekle 1 fm i 2.lm fra nåla, deretter hekles det 1 fm i hver av de neste 7 fm," - 'de neste 7 fm' - det skal vel være 'de neste 7 lm'? ... eller er det noe jeg ikke har forstått?
25.08.2021 - 11:24DROPS Design answered:
Hei Lisen. Ja, her var det en tastefeil i den norske oppskriften. Vi skal få ordnet dette, takk for at du gjorde oss oppmerksom på dette. mvh DROPS design
27.08.2021 - 10:26
![]() Ana wrote:
Ana wrote:
Bonjour, Je souhaiterais réaliser simplement le set de table, combien faut-il de pelotes ? Je vous remercie, Cordialement,
21.02.2016 - 17:38DROPS Design answered:
Bonjour Ana, la quantité indiquée vaut pour l'ensemble complet, le couvre-oeuf et le rond de serviette ne doivent pas utiliser beaucoup de fil, comptez la quantité indiquée pour le set. Bon crochet!
22.02.2016 - 10:45
![]() Eva Nora wrote:
Eva Nora wrote:
Hei jeg er nybegynner i dette feltet kalt hekling oh strikking, men prøver meg på disse bordbrikkene, men det er en ting jeg ikke forstår; den linjen som det står første rad på, hva slags betydning har den når jeg ikke skal avslutte med den? Her får jeg nå hull siden jeg skal hoppe over en m for hver 7 fm og da lurer jeg altså på hvorfor jeg ikke skal avslutte med den også?? Mvh Eva
23.02.2013 - 19:22DROPS Design answered:
Hej Eva. Jeg forstaar ikke helt hvad du mener. Du begynder med 1 fm i 2. lm (= 2 fm da 1 lm erstatter 1 fm) + 7 fm... og slutter af med 7 fm og 2 fm. Ved at hoppe over hver 8 fm faar du en mere lös/fleksibel kant. De huller du ser forsvinder naar du haekler kant til sidst.
16.05.2013 - 13:52
![]() Leverrier wrote:
Leverrier wrote:
Bonjour, pouvez-vous préciser les explications des derniers tours du set. Merci à l'avance. Salutations. Thérèse.
17.01.2013 - 12:04DROPS Design answered:
Bonjour Madame Leverrier, tout autour du set, on crochète une bordure à picots (cf lien vidéo "Picot" légèrement différente, c'est la même idée) : 1 ms dans le set, et répétez *4 ml, 2B dans la 1ère des 4 ml, sautez 1,5 cm du contour du set environ et crochetez 1 ms dans le set*, tout le tour. Le dernier tour est un simple rang de ms piqué dans le set, sur l'endroit, à environ 0,5 cm du bord. Bon crochet !
17.01.2013 - 13:49
![]() Nancy wrote:
Nancy wrote:
I love the place mat, but the directions seem to contain a number of errors!
16.05.2012 - 23:36
|
|
Buongiorno#dropsbuongiorno |
|
 |
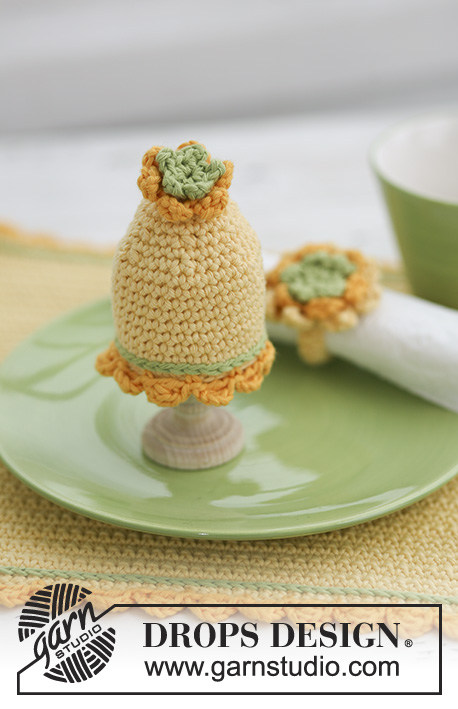 |
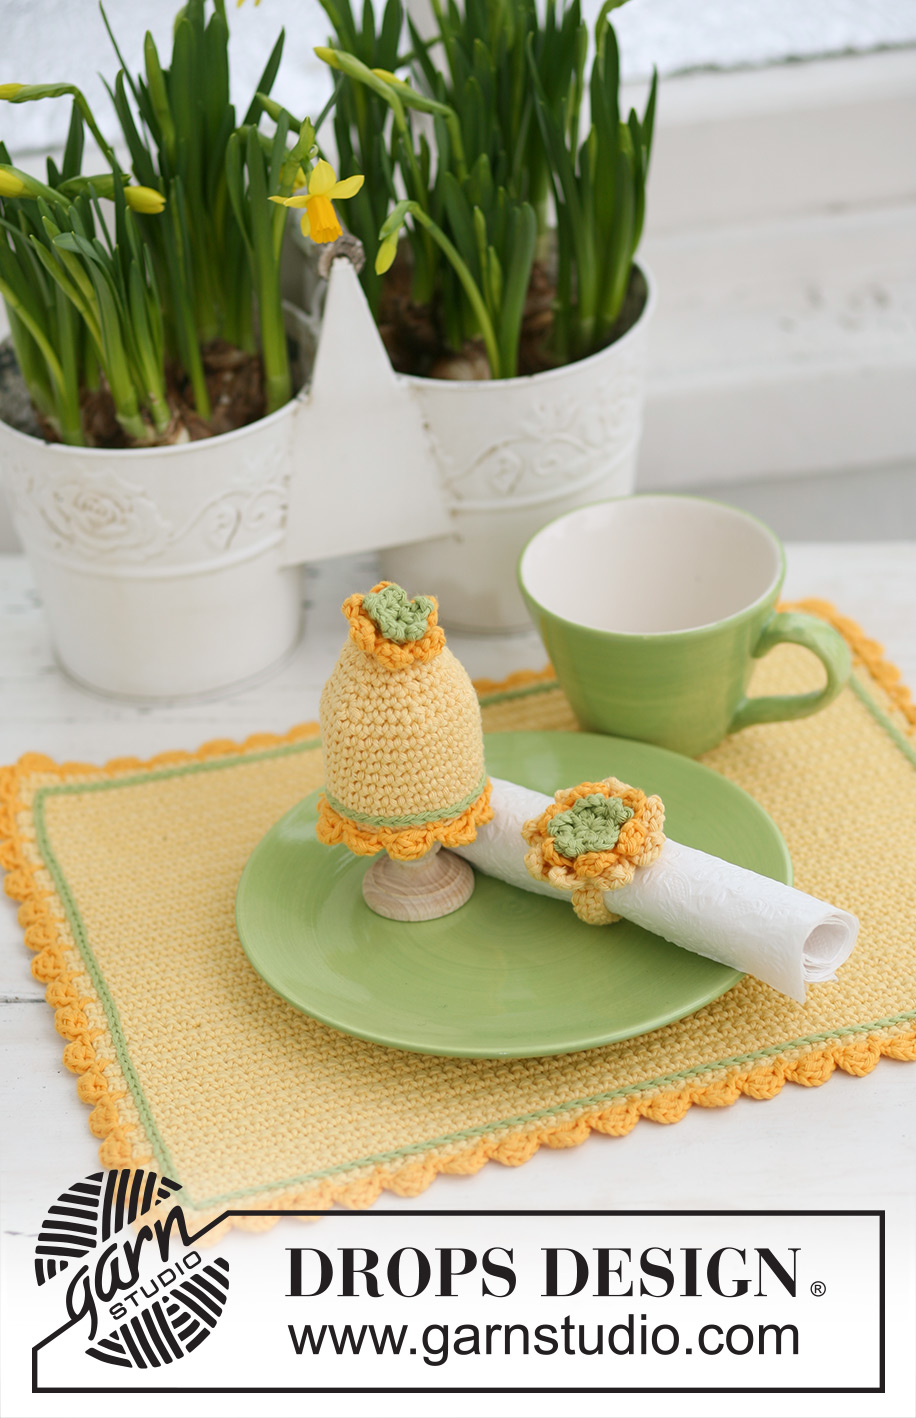
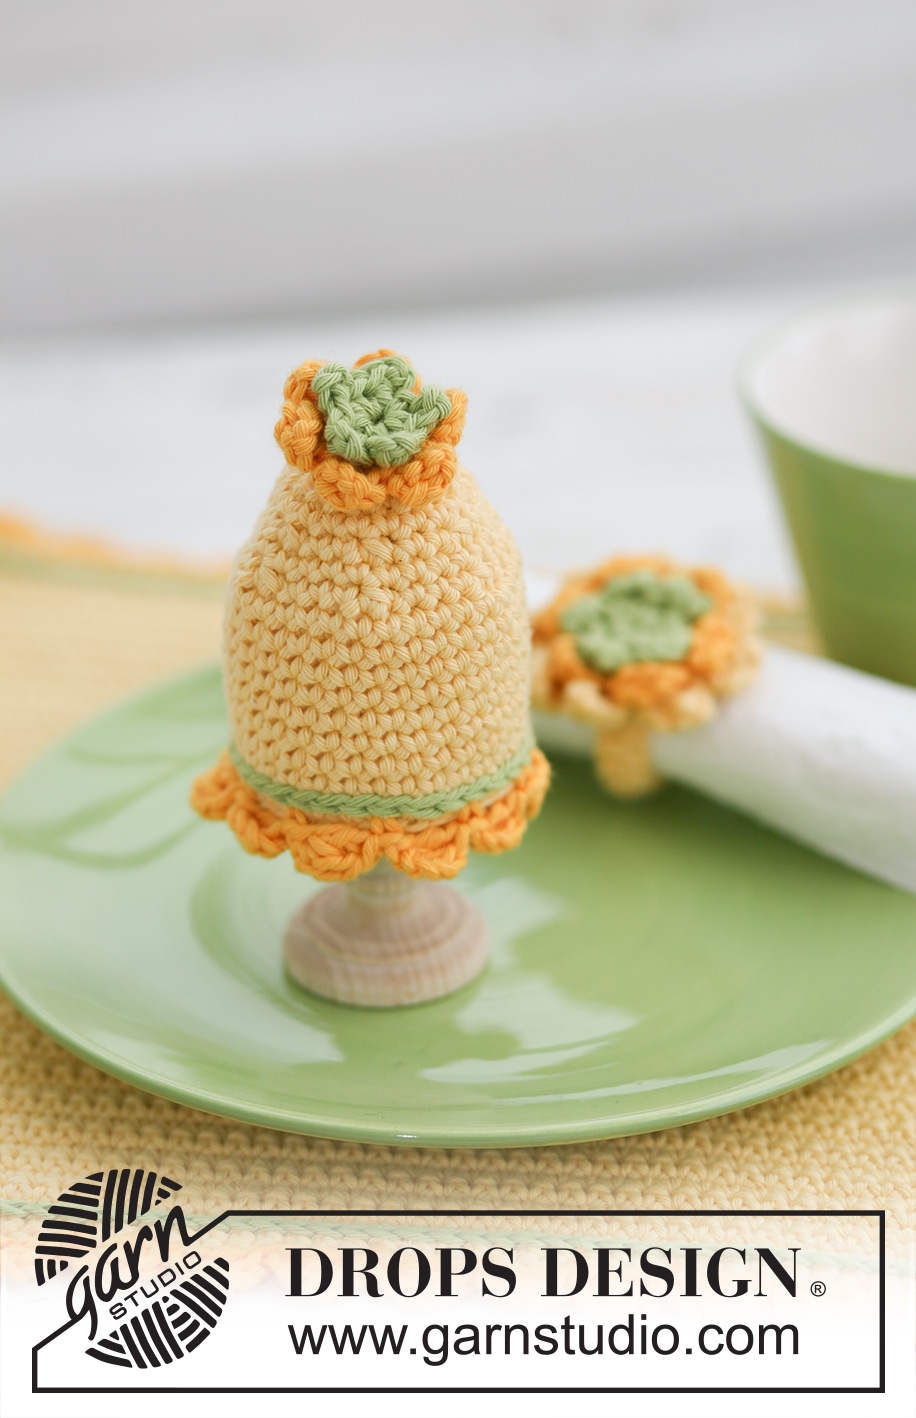
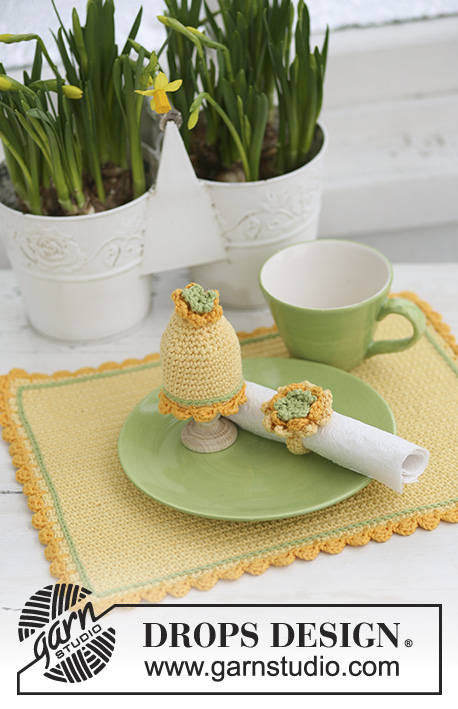
Crochet DROPS place mat, egg warmer and serviette ring for your Easter lunch in ”Paris”.
DROPS Extra 0-544 |
|
|
CROCHET INFO (egg warmer): Replace first dc on each round with 1 ch. Finish each round with 1 sl st in first ch. CROCHET 2 DC TOG: Insert hook in first dc, pull thread through, insert hook in next dc, pull thread through, yarn over needle and pull thread through all 3 loops on hook. PLACE MAT: Work 75 ch with yellow and crochet hook size 3.5 mm. ROW 1: work 1 dc in 2nd ch from hook, then 1 dc in each of the next 7 ch, * skip 1 ch, 1 dc in each of the next 7 ch *, repeat from *-* until 2 ch remain, work 1 dc in each of these = 66 dc. Continue with 1 dc in each dc – turn each row with 1 ch. Cut the thread when piece measures approx 28 cm. BORDER: Crochet a border with strong yellow round the place mat as follows: 1 dc in first st, * 4 ch, 2 tr in first ch, skip approx 1.5 cm, 1 dc *, repeat from *-* and finish with 1 sl st in first dc from beg of round. Now crochet a row of sl sts with lime approx 0.5 cm from border all the way round – keep the thread behind piece and crochet from RS. ---------------------------------------------------------- EGG WARMER: Work 36 ch with 1 thread yellow and crochet hook size 3.5 mm and form a ring with 1 sl st in first ch. SEE CROCHET INFO! ROUND 1: * 1 dc in each of the first 5 ch, skip 1 dc *, repeat from *-* = 30 dc. ROUND 2 - 9: 1 dc in each dc. ROUND 10: * 1 dc in each of the first 3 dc, then work 2 dc tog – SEE ABOVE *, repeat from *-* = 24 dc. ROUND 11: 1 dc in each dc. ROUND 12: * 1 dc in each of the first 2 dc, work 2 dc tog *, repeat from *-* = 18 dc. ROUND 13: 1 dc in each dc. ROUND 14: * 1 dc in first dc, work 2 dc tog *, repeat from *-* = 12 dc. ROUND 15: work 2 dc tog all the way round, cut the thread and tighten round the top. CROCHET BORDER: crochet at the bottom along cast on row as follows: 1 dc in first st, * 4 ch, 1 tr in first ch, skip 2 sts, 1 dc in next dc *, repeat from *-* and finish with 1 sl st in first dc from beg of round. Now crochet a row of sl sts with lime between round 1 and 2 at bottom of egg warmer – keep the thread behind piece and crochet from RS. MEDIUM FLOWER: Work 4 ch with strong yellow and form a ring with 1 sl st in first ch. ROUND 1: 6 dc in ring. ROUND 2: * 4 ch, 2 tr in the first ch, 1 dc in next dc *, repeat from *-* 6 times, cut the thread. SMALL FLOWER: Work 3 ch with lime and form a ring with 1 sl st in first ch. ROUND 1: * 4 ch, 1 tr in the first ch, 1 dc in ring *, repeat from *-* 5 times, cut the thread. ASSEMBLY: Place the small flower on top of the medium flower and attach to top of egg warmer. ---------------------------------------------------------- SERVIETTE RING: Crochet 3 flowers in 3 different sizes. LARGE FLOWER: Work 6 ch with yellow and form a ring with 1 sl st in first ch. ROUND 1: 8 dc in ring. ROUND 2: * 5 ch, 3 tr in the first ch, 1 dc in next dc *, repeat from *-* 8 times, cut the thread. Make 1 small and 1 medium flower as described under egg warmer. ASSEMBLY: Crochet a strap at the back of the large flower with yellow as follows: 1 dc in ch-ring in centre of flower, then work 21 loose ch, turn and work 1 dc in each ch on return row. Sew the end of strap to the opposite side of ch-ring. Sew the 2 other flowers tog and sew to the top of large flower. |
|
Have you finished this pattern?Tag your pictures with #dropspattern #dropsbuongiorno or submit them to the #dropsfan gallery. Do you need help with this pattern?You'll find 8 tutorial videos, a Comments/Questions area and more by visiting the pattern on garnstudio.com. © 1982-2026 DROPS Design A/S. We reserve all rights. This document, including all its sub-sections, has copyrights. Read more about what you can do with our patterns at the bottom of each pattern on our site. |
|


With over 40 years in knitting and crochet design, DROPS Design offers one of the most extensive collections of free patterns on the internet - translated to 17 languages. As of today we count 324 catalogues and 12290 patterns translated into English (UK/cm). 12290
We work hard to bring you the best knitting and crochet have to offer, inspiration and advice as well as great quality yarns at incredible prices! Would you like to use our patterns for other than personal use? You can read what you are allowed to do in the Copyright text at the bottom of all our patterns. Happy crafting!
Post a comment to pattern DROPS Extra 0-544
We would love to hear what you have to say about this pattern!
If you want to leave a question, please make sure you select the correct category in the form below, to speed up the answering process. Required fields are marked *.