
Popular categories
Looking for a yarn?


Comments / Questions (70)
![]() Isabel wrote:
Isabel wrote:
¿Dónde se hace la forma del escote?
22.02.2026 - 01:36DROPS Design answered:
Hola Isabel, comienzas el patrón trabajando el cuello. Después, recogerás puntos para la orilla del escote en la sección hombros martillo: "Ahora tejer la pieza del frente y la pieza de la espalda y los hombros en la misma aguja circular tamaño 5 mm, al mismo tiempo que se levantan puntos a lo largo de los lados de los hombros." Los puntos recogidos a los lados de los hombros son para el escote.
22.02.2026 - 23:26
![]() Tineke De Wilde wrote:
Tineke De Wilde wrote:
Dag na de markeerdraden en de 1e meerdering van 8 steken: Brei je de mouw en pasmeerderingen tegelijk in dezelfde naald? of na elkaar
12.01.2026 - 14:12DROPS Design answered:
Dag Tineke,
Ja, tegelijkertijd in dezelfde naald.
14.01.2026 - 19:27
![]() Tineke wrote:
Tineke wrote:
Kan ik ipv de patentesteek een gewone boordsteek gebruiken? Is het dan 2 averecht, 1 recht?
29.11.2025 - 12:30DROPS Design answered:
Dag Tineke,
Jazeker, dat kan prima.
30.11.2025 - 16:01
![]() Marie wrote:
Marie wrote:
Ik heb heel veel zin om deze te maken, maar ik vind het niet prettig om een col te dragen. Hebben jullie tips hoe ik dit een lagere hals kan maken?
03.10.2025 - 13:57DROPS Design answered:
Dag Marie,
Het is voor ons helaas niet mogelijk om patronen aan te passen naar persoonlijke wensen. Je zou de col een stuk minder hoog kunnen maken en dan dubbel vouwen om aan de binnenkant vast te naaien.
08.10.2025 - 20:15
![]() Christine wrote:
Christine wrote:
Bonjour. Merci pour votre réponse. Je comprends le principe, mais j'aimerais retrouver l'aisance de ce modèle tel qu'il est porté par la mannequin. Cette information n'est peut-être pas disponible. Bien cordialement, Christine.
27.07.2025 - 15:12DROPS Design answered:
Bonjour Christine, nous ne travaillons effectivement pas avec ce concept d'aisance, chacune trouvera l'aisance souhaitée en comparant simplement un modèle similaire dont la forme lui convient en fonction de sa propre morphologie. Bon tricot!
28.07.2025 - 07:58
![]() Christine wrote:
Christine wrote:
Bonjour, Pourriez-vous me dire l'aisance du pull porté par le mannequin, pour me permettre de choisir la taille qu'il me faut. Par avance, merci.
22.07.2025 - 19:23DROPS Design answered:
Bonjour Christine, pour trouver votre taille, mesurez un vêtement similaire que vous avez et dont vous aimez la forme, et comparez ces mesures à celles du schéma - vous pourrez ainsi trouver l'aisance souhaitée. Retrouvez plus d'infos ici. Bon tricot!
23.07.2025 - 11:56
![]() Clair wrote:
Clair wrote:
Bonjour, Pour les diagrammes, le rond noir dans le carré blanc. , je ne comprends pas la technique de la côte anglaise L'explication n'a t'elle pas oublié de rajouter un jeté ? Merci pour votre aide
08.04.2025 - 17:14DROPS Design answered:
Bonjour Clair, dans ce modèle, on ne tricote pas des côtes anglaises avec jeté mais en piquant dan la maille du rang précédent, vous retrouverez cette technique dans cette vidéo. Bon tricot!
09.04.2025 - 08:09
![]() Mina wrote:
Mina wrote:
I would like the sweater to be a bit less "airy". Can I exchange one of the two strands to something else? I still want to keep one mohair strand. If yes, what would you recommend I combine it with and how do I convert the amount? (Tried your calculator, but it doesn't specify how to only change out one of two strands)
19.01.2025 - 12:01DROPS Design answered:
Dear Mina, yes, you can use another of our Group A yarns to combine 1 thread of Mohair (like DROPS Alpaca, DROPS Flora or DROPS Baby Merino); in each yarn's page you should be able to find some yarn combinations to see how that yarn and Kid-Silk will look together. In the calculator, you can put half the amount indicated for DROPS Kid-Silk (so approx. the amount of 1 thread needed) and choose to replace for 1 thread, to give you an approximation, but you can also calculate it yourself using the information in the following lesson: https://www.garnstudio.com/lesson.php?id=14&cid=19. Happy knitting!
19.01.2025 - 20:49
![]() Anna wrote:
Anna wrote:
Hallo, soll man die Maschenprobe vor dem Auszählen eigentlich waschen (gilt für alle Anleitungen)? Danke
04.01.2025 - 18:26DROPS Design answered:
Liebe Anna, das wird nicht gemacht, aber wenn Sie denken, bei Ihrer Maschenprobe es unterschiedlich wird, dann denken Sie daran. Viel Spaß beim Stricken!
06.01.2025 - 09:15
![]() Lindsay wrote:
Lindsay wrote:
Hi, I really like a lot of your patterns, but there's never a reference to which size the model is wearing. In most clothes, I normally wear a size S, but for sweaters, I like to go a size up. However, this sweater seems loose enough to make in an S. Please indicate which size the model is wearing, so I know which size to knit in the future. Thank you!
27.12.2024 - 19:07
|
||||||||||
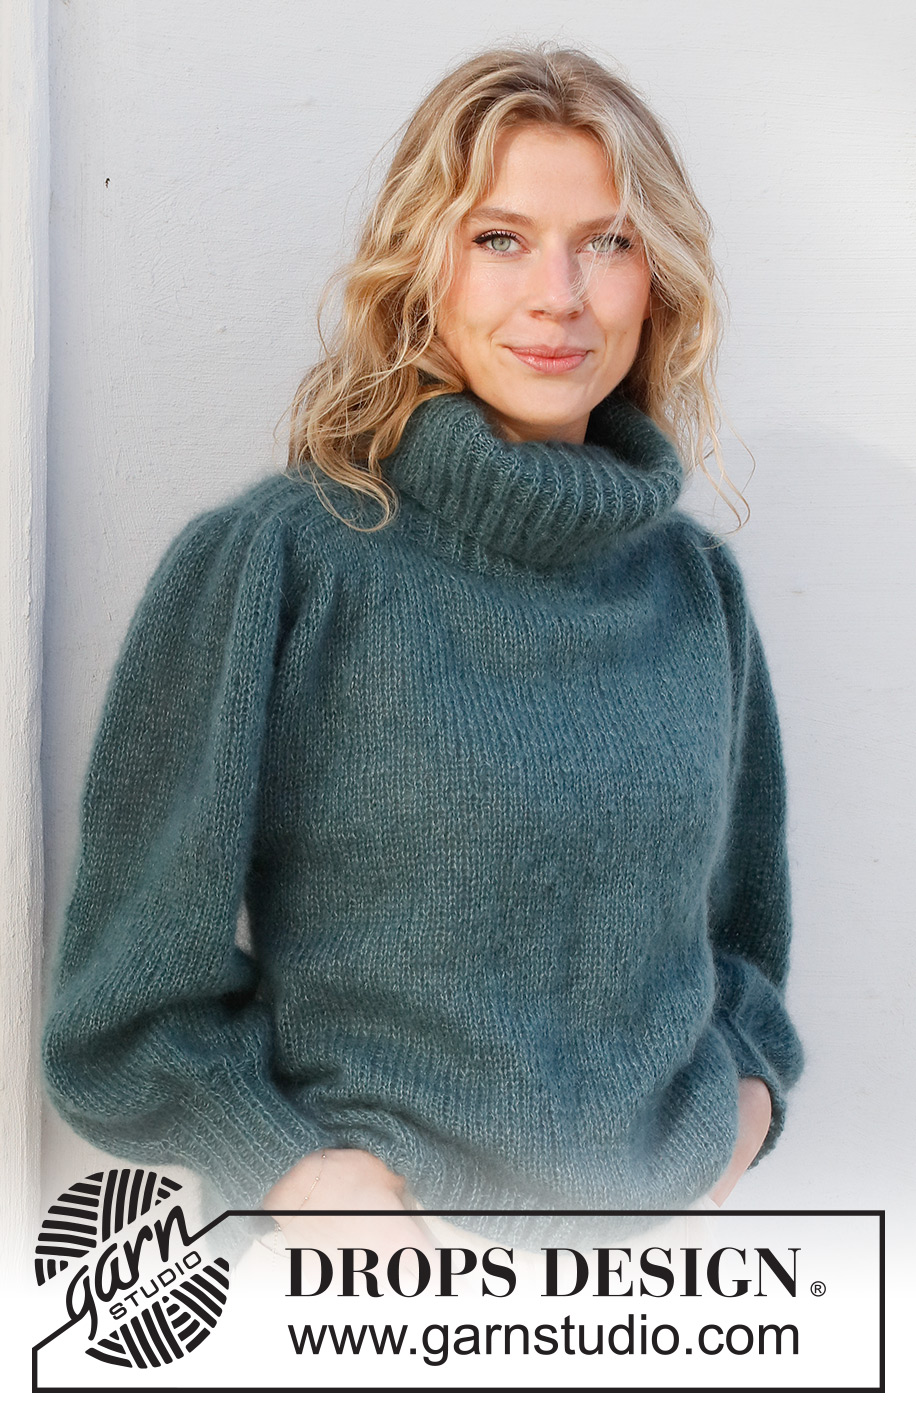
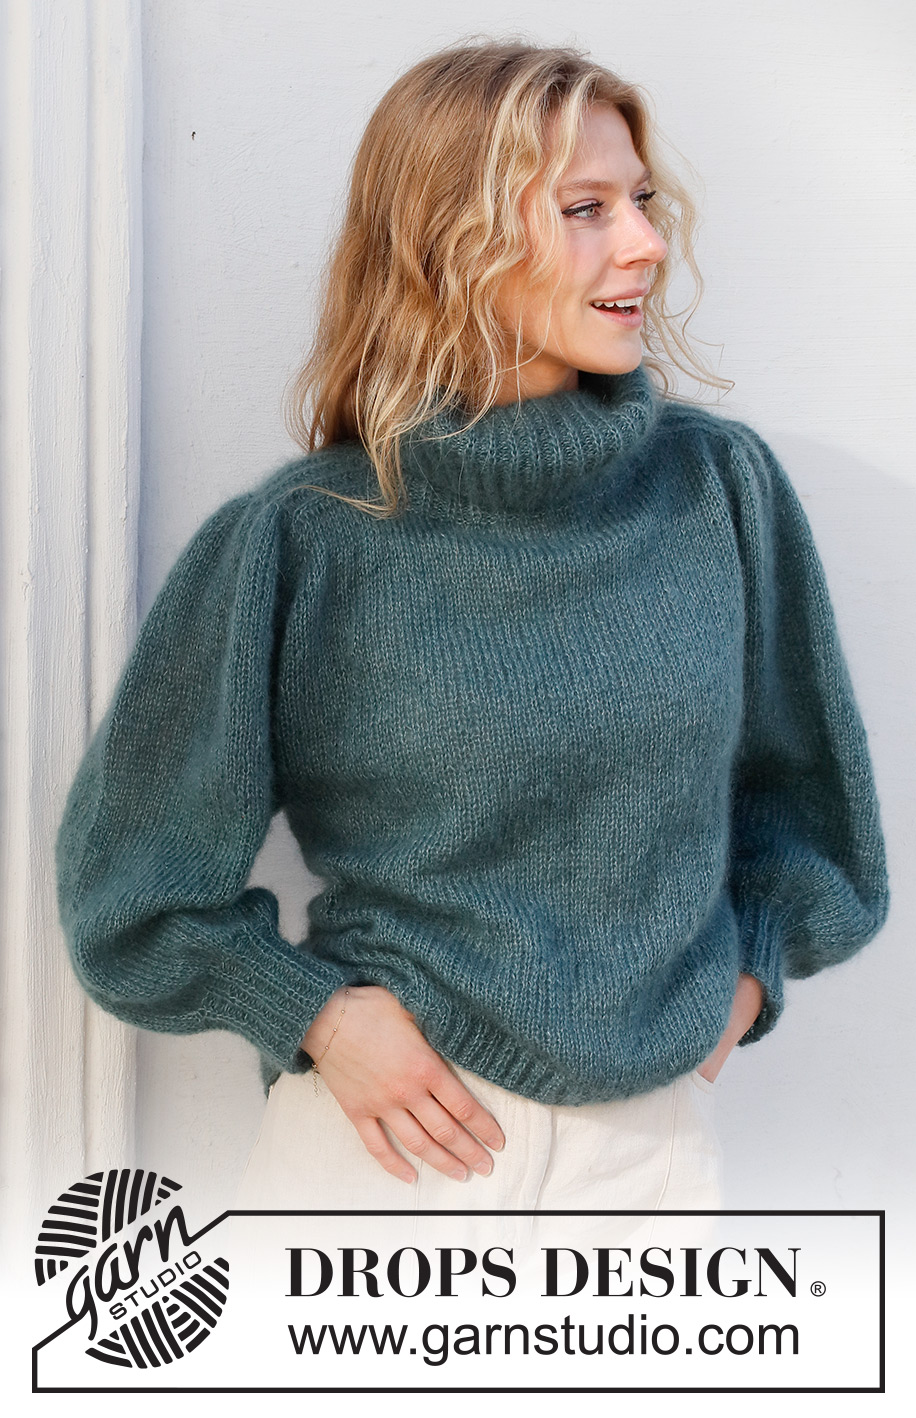
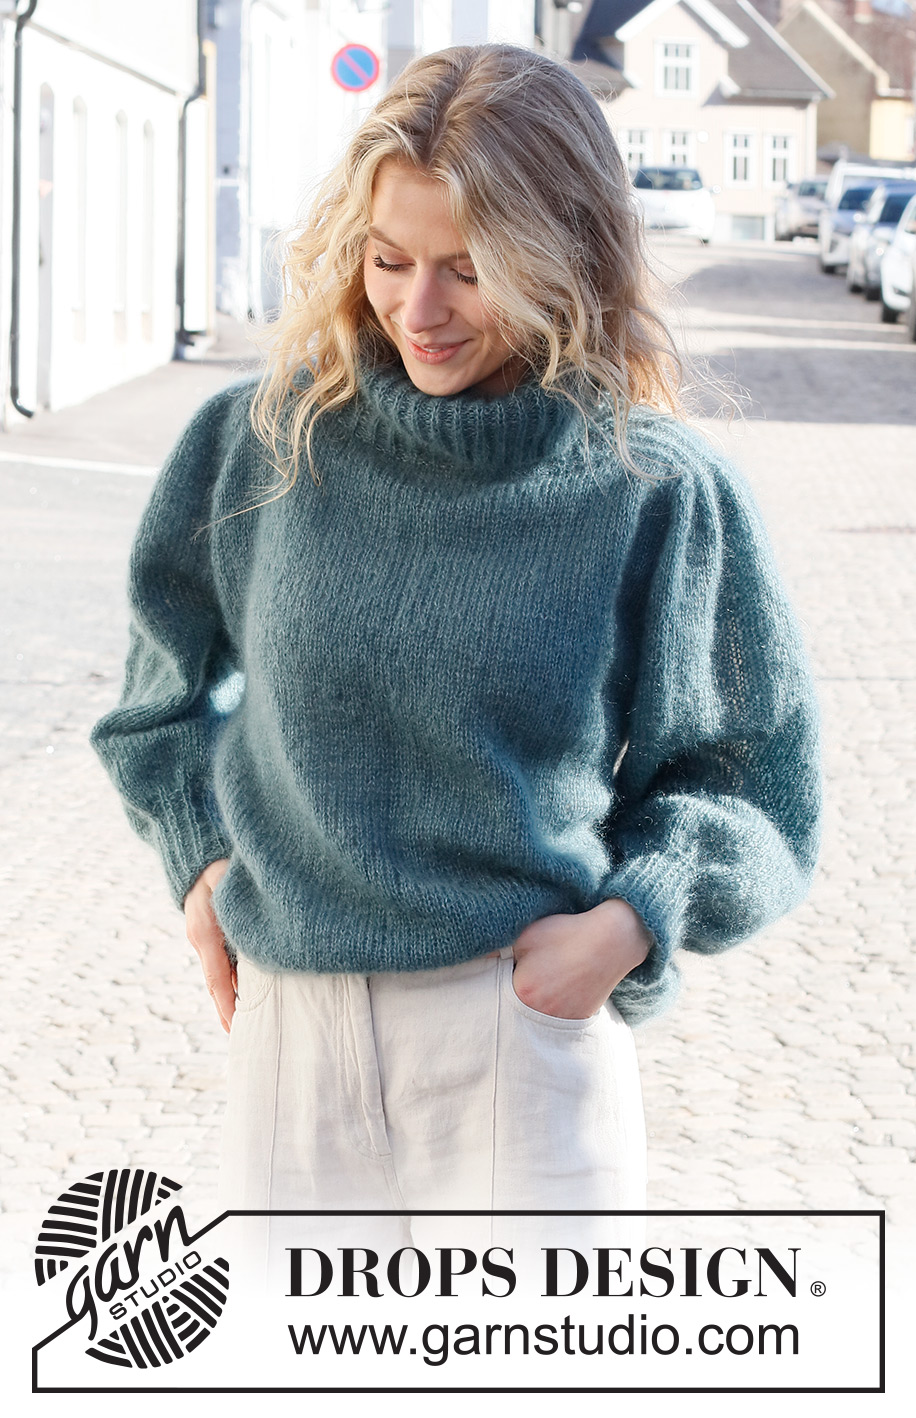
Falling Water Sweater#fallingwatersweater |
||||||||||
 |
 |
|||||||||
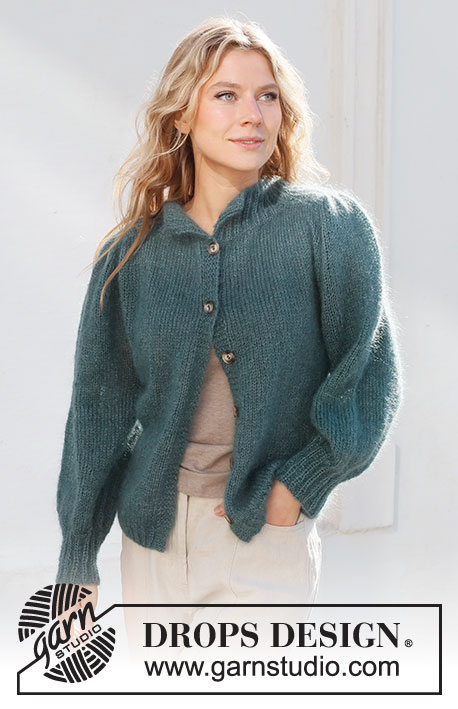
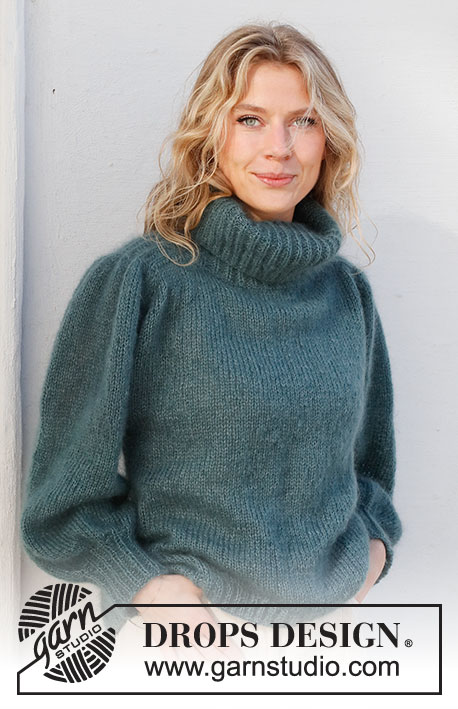
Knitted jumper in 2 strands DROPS Kid-Silk. The piece is worked top down, with saddle shoulders, puffed sleeves and high neck. Sizes S - XXXL.
DROPS 227-39 |
||||||||||
|
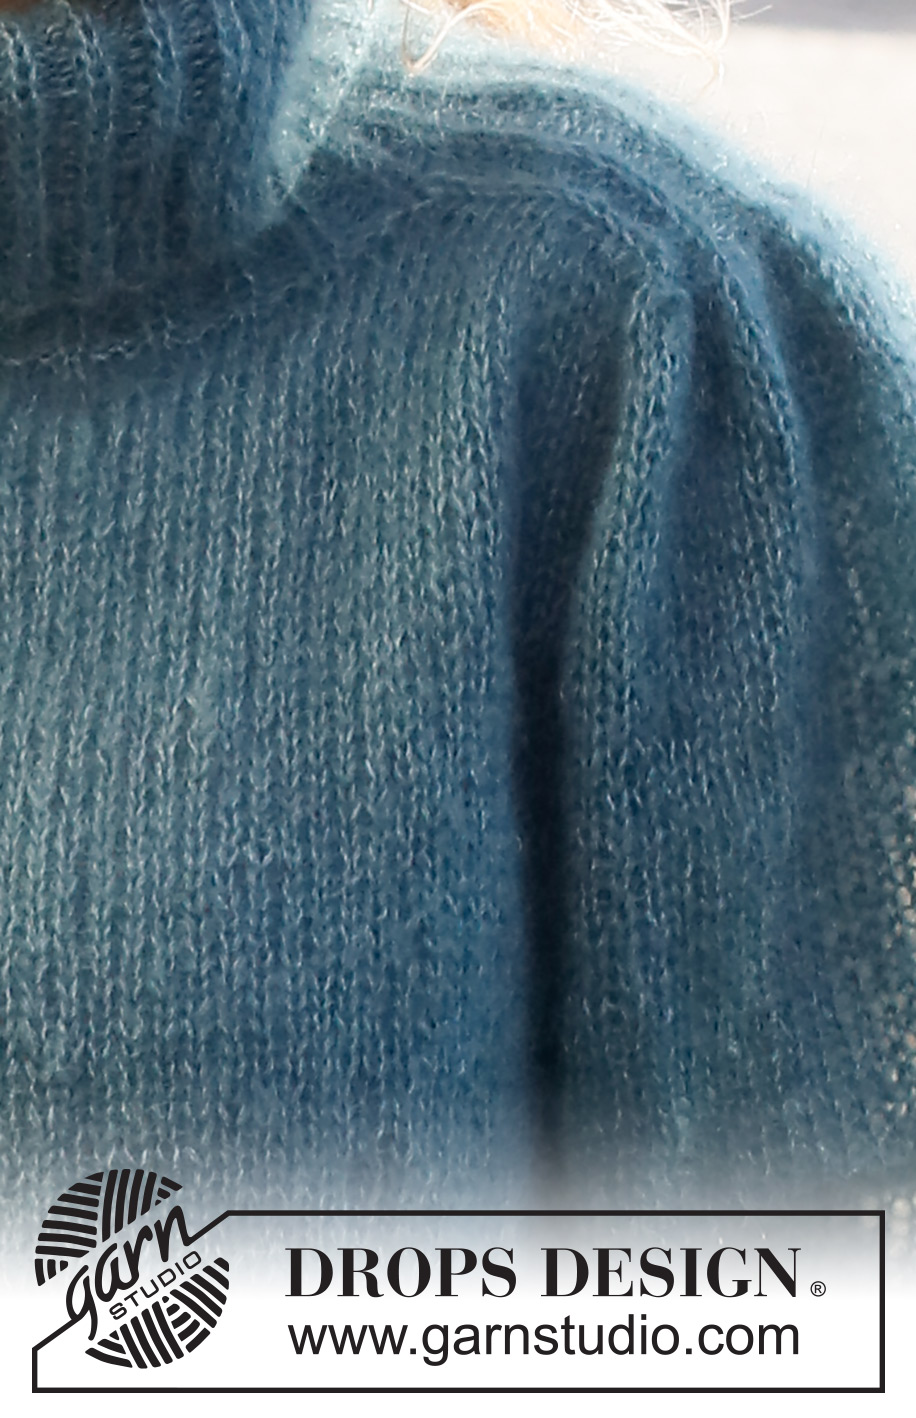
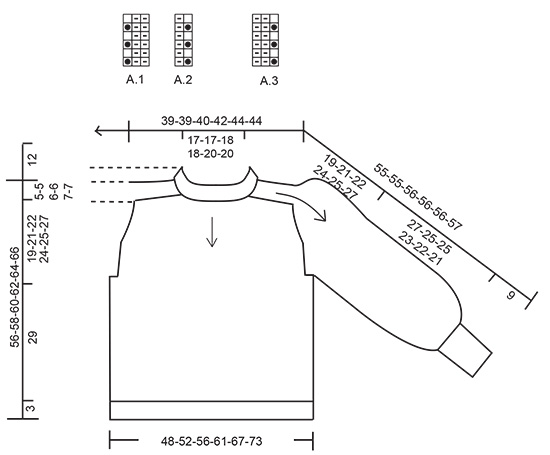
------------------------------------------------------- EXPLANATIONS FOR THE PATTERN: ------------------------------------------------------- RIDGE/GARTER STITCH (worked back and forth): Knit all rows. 1 ridge = knit 2 rows. PATTERN: See diagrams A.1 to A.3. The diagrams show all rows in the pattern from the right side. INCREASE/DECREASE TIP (evenly spaced): To work out how to increase/decrease evenly, count the number of stitches on to be increased/decreased over (e.g. 120 stitches) and divide by the number of increases/decreases to be made (e.g. 18 stitches) = 6.6. In this example, increase by making 1 yarn over after alternately each 6th and 7th stitch (approx.). On the next row work the yarn overs twisted to avoid holes. When decreasing, knit together alternately each 5th and 6th stitch and each 6th and 7th stitch. INCREASE TIP-1: All increases are worked from the right side! Increase 1 stitch by making 1 yarn over. On the next row (wrong side) knit the yarn over twisted to avoid a hole. INCREASE TIP-2: BEFORE MARKER-STITCH: The new stitch twists to the right. Use the left needle to pick up the strand between 2 stitches from the previous round, pick up the back strand and knit in the front loop. AFTER MARKER-STITCH: The new stitch twists to the left. Use the left needle to pick up the strand between 2 stitches from the previous round, pick up the front strand and knit in the back loop. DECREASE TIP (for sleeves): Decrease 1 stitch on either side of the marker thread as follows: Work until there are 3 stitches left before the marker thread, knit 2 together, knit 2 (marker thread sits between these 2 stitches), slip 1 stitch as if to knit, knit 1 and pass the slipped stitch over the knitted stitch (2 stitches decreased). CASTING-OFF TIP: To avoid the cast-off edge being tight you can cast off with a larger size needle. If the edge is still tight, make 1 yarn over after approx. each 4th stitch at the same time as casting off; the yarn overs are cast off as normal stitches. ------------------------------------------------------- START THE PIECE HERE: ------------------------------------------------------- JUMPER – SHORT OVERVIEW OF THE PIECE: The jumper is worked from top down, with 2 strands. The neck is worked in the round with circular needle. The piece is then divided for the front/back pieces and the saddle shoulders. The shoulders are worked separately, back and forth, after which the front and back pieces are worked together again; at the same time stitches are knitted up along the sides of the shoulders. The yoke is continued in the round from mid-back then divided for the body and sleeves. The body is continued in the round. The sleeves are worked in the round with short circular needle/double pointed needles. NECK: Cast on 120-120-132-132-150-150 stitches with circular needle size 5 mm and 2 strands DROPS Kid-Silk. Change to circular needle size 3 mm and work A.1 in the round for 16 cm. Knit 1 round where you decrease 18-18-20-20-22-22 stitches evenly spaced – read INCREASE/DECREASE TIP = 102-102-112-112-128-128 stitches. Now turn the piece so you work in the opposite direction (this means the previous right side will be on the outside when the neck is turned down later). Continue in rib as follows: Work A.3 over the first 18-18-21-21-24-24 stitches, insert a marker here, work A.2 over the next 12-12-14-14-16-16 stitches, work the first stitch in A.2, insert a marker here, work A.1 over the next 36-36-39-39-45-45 stitches, work the first 2 stitches in A.1, insert a marker here, work A.2 over the next 12-12-14-14-16-16 stitches, work the first stitch in A.2, insert a marker here, work A.1 over the next 18-18-18-18-21-21 stitches, work the first 2 stitches in A.1. Continue this pattern for 8 cm (the neck measures 24 cm) – adjust so the next row is an even row in the diagrams. Work the next row as follows: Knit 18-18-21-21-24-24 stitches and decrease 1-0-2-1-3-3 stitches evenly over these stitches (= half back piece), work pattern as before over the next 13-13-15-15-17-17 stitches (= shoulder), knit 38-38-41-41-47-47 stitches and decrease 4-2-3-1-5-5 evenly over these stitches (= front piece), work pattern as before over the next 13-13-15-15-17-17 stitches (= shoulder), knit 20-20-20-20-23-23 and decrease 3-2-1-0-2-2 stitches evenly over these stitches (= half back piece). There are 94-98-106-110-118-118 stitches (34-36-38-40-42-42 stitches on the front/back pieces and 13-13-15-15-17-17 stitches on each shoulder). Cut the strand. Now work the shoulders; leave the other stitches on the needle or place them on a thread. SADDLE SHOULDERS: Starting from the right side, work back and forth over the shoulder-stitches with circular needle size 3 mm and 2 strands DROPS Kid-Silk as follows: Cast on 1 stitch (= edge stitch), work the 13-13-15-15-17-17 stitches in pattern A.2 as before, at the same time as each purl-1 is increased to purl-2 – read INCREASE TIP-1 (= 6-6-7-7-8-8 stitches increased), cast on 1 stitch at the end of the row (= edge stitch) = 21-21-24-24-27-27 stitches. Work 1 row from the wrong side then work the next row from the right side as follows: 1 edge stitch in garter stitch, A.3 until there are 2 stitches left, work the first stitch in A.3 (so the pattern is symmetrical), 1 edge stitch in garter stitch. Continue this pattern back and forth until the piece measures 8-8-9-9-10-10 cm from the purl-increases – adjust so the last row is from the wrong side. Place these stitches on a thread and work the other shoulder in the same way. Now work the front and back pieces and the shoulders onto the same circular needle size 5 mm, at the same time as stitches are knitted up along the sides of the shoulders. Start the round from mid-back: HALF BACK PIECE: Work stocking stitch over the first 17-18-19-20-21-21 stitches, knit up 14-14-14-15-15-15 stitches inside the edge stitch along the side of the shoulder. SHOULDER: Knit 1, * knit 1 in both the front and back loops of the next stitch, make 1 yarn over *, work from *-* a total of 18-18-21-21-24-24 times, knit 1 in both the front and back loops of the next stitch, knit 1 (= 37-37-43-43-49-49 stitches increased and 58-58-67-67-76-76 stitches on the shoulder). FRONT PIECE: Knit up 14-14-14-15-15-15 stitches inside the edge stitch along the other side of the shoulder, knit the next 34-36-38-40-42-42 stitches on the front piece, knit up 14-14-14-15-15-15 stitches inside the edge stitch along the side of the other shoulder. SHOULDER: Knit 1, * knit 1 in both the front and back loops of the next stitch, make 1 yarn over *, work from *-* a total of 18-18-21-21-24-24 times, knit 1 in both the front and back loops of the next stitch, knit 1 (= 37-37-43-43-49-49 stitches increased and 58-58-67-67-76-76 stitches on the shoulder). HALF BACK PIECE: Knit up 14-14-14-15-15-15 stitches inside the edge stitch along the other side of the shoulder, knit the remaining 17-18-19-20-21-21 stitches on the back piece. There are 240-244-266-274-296-296 stitches on the needle. YOKE: Insert a marker thread at the beginning of the round (= mid-back). THE PIECE IS NOW MEASURED FROM HERE! Now insert 4 markers as follows: Marker 1: Work stocking stitch over the first 31-32-33-35-36-36 stitches, insert the marker in the next stitch (= half back piece). Marker 2: Work stocking stitch over the next 56-56-65-65-74-74 stitches, insert the marker in the next stitch (= right sleeve). Marker 3: Work stocking stitch over the next 62-64-66-70-72-72, stitches, insert the marker in the next stitch (= front piece). Marker 4: Work stocking stitch over the next 56-56-65-65-74-74 stitches, insert the marker in the next stitch (= left sleeve). Work stocking stitch over the last 31-32-33-35-36-36 stitches (= half back piece). Allow the 4 markers to follow your work onwards; they are used when increasing. Continue with stocking stitch in the round. AT THE SAME TIME, on the next round the increase for the sleeves and yoke will start. The increase are done at the same time, but in size L, XL, XXL and XXXL the increases continue on the yoke after the increases for the sleeves are finished. Increase as explained below. On the first round increase 4 stitches for the sleeves and 4 stitches for the yoke. Increase 1 stitch on each side of the 4 markers – read INCREASE TIP-2 ( = 8 increased on the round). SLEEVE INCREASES: Increase AFTER markers 1 and 3 and BEFORE markers 2 and 4. Increase like this every 2nd round a total of 7-9-6-9-6-8 times = 72-76-79-85-88-92 stitches on the sleeves (including the marker-stitches on each side) YOKE INCREASES: Increase BEFORE markers 1 and 3 and AFTER markers 2 and 4. Increase like this every 2nd round a total of 7-9-11-12-16-21 times = 76-82-88-94-104-114 stitches on the front and 76-82-88-94-104-114 on the back piece. When all the increases are finished there are 296-316-334-358-384-412 stitches. Continue with stocking stitch until the piece measures 19-21-22-24-25-27 cm from the marker thread after the neck. Now divide for the body and sleeves as follows: Work the first 38-41-44-47-52-57 stitches (= half back piece), place the next 72-76-79-85-88-92 stitches on a thread for the sleeve, cast on 6-6-8-10-10-10 stitches (= in side under sleeve), work the next 76-82-88-94-104-114 stitches (= front piece), place the next 72-76-79-85-88-92 stitches on a thread for the sleeve, cast on 6-6-8-10-10-10 stitches (= in side under sleeve), work the last 38-41-44-47-52-57 stitches (= half back piece). The body and sleeves are finished separately. THE PIECE IS NOW MEASURED FROM HERE. BODY: = 164-176-192-208-228-248 stitches. Continue with stocking stitch in the round for 29 cm. Try the jumper on and work to desired length (3 cm left to finished length). Increase 37-40-42-47-51-55 stitches evenly spaced = 201-216-234-255-279-303 stitches. Change to circular needle size 3 mm. Work A.1 for 3 cm. Cast off with knit over Fisherman’s rib and purl over purl – read CASTING-OFF TIP. The jumper measures approx. 56-58-60-62-64-66 cm from the shoulder down. SLEEVES: Place the 72-76-79-85-88-92 stitches from the thread on the one side of the piece on double pointed needles/short circular needle size 5 mm and knit up 1 stitch in each of the 6-6-8-10-10-10 stitches cast on under the sleeve = 78-82-87-95-98-102 stitches. Insert a marker thread in the middle of the new stitches under the sleeve. Start at the marker thread and work stocking stitch in the round for 4 cm. Now decrease 1 stitch on either side of the marker thread – read DECREASE TIP. The decreases in sizes S and M are finished (= a total of 1-1 time). In sizes L, XL, XXL and XXXL repeat the decrease every 8-2½-2-2 cm 1-3-4-4 more time(s) (= a total of 2-4-5-5 times). When all decreases are worked, there are 76-80-83-87-88-92 stitches on the round. Continue working until the sleeve measures 27-25-25-23-22-21 cm from the division. Try the jumper on and work to desired length (9 cm left to finished length). Knit 1 round where you decrease 34-38-38-42-40-41 stitches evenly spaced = 42-42-45-45-48-51 stitches. Change to double pointed needles size 3 mm and work A.1 for 9 cm. Cast off with knit over Fisherman’s rib and purl over purl – remember CASTING-OFF TIP. The sleeve measures approx. 36-34-34-32-31-30 cm from the division. Work the other sleeve in the same way. |
||||||||||
Diagram explanations |
||||||||||
|
||||||||||
 |
||||||||||
Have you finished this pattern?Tag your pictures with #dropspattern #fallingwatersweater or submit them to the #dropsfan gallery. Do you need help with this pattern?You'll find 33 tutorial videos, a Comments/Questions area and more by visiting the pattern on garnstudio.com. © 1982-2026 DROPS Design A/S. We reserve all rights. This document, including all its sub-sections, has copyrights. Read more about what you can do with our patterns at the bottom of each pattern on our site. |
||||||||||


With over 40 years in knitting and crochet design, DROPS Design offers one of the most extensive collections of free patterns on the internet - translated to 17 languages. As of today we count 324 catalogues and 12290 patterns translated into English (UK/cm). 12290
We work hard to bring you the best knitting and crochet have to offer, inspiration and advice as well as great quality yarns at incredible prices! Would you like to use our patterns for other than personal use? You can read what you are allowed to do in the Copyright text at the bottom of all our patterns. Happy crafting!
Post a comment to pattern DROPS 227-39
We would love to hear what you have to say about this pattern!
If you want to leave a question, please make sure you select the correct category in the form below, to speed up the answering process. Required fields are marked *.