
Popular categories
Looking for a yarn?


Comments / Questions (27)
![]() Eji wrote:
Eji wrote:
Could i ask for this pattern's headband if i am using crochet? Need your help
16.11.2020 - 05:30DROPS Design answered:
Dear Eji, we are unfortunately not able to adjust each our patterns to each individual request. You are welcome to contact your DROPS store for any individual assistance. Happy crocheting!
16.11.2020 - 09:25
![]() Monica wrote:
Monica wrote:
Grazie come sempre per la vostra disponibilità. In merito all'ultima domanda e risposta quindi a cose (2rov e 2 dr) devo lavorare 8 punti non 8 giri ... Scusate ma la spiegazione così com'è in italiano non è chiara perchè se lavoro 8 giri a coste si intendono tutti gli aumenti e non solo gli ultimi 8 punti. Comunque grazie per l'aiuto
22.10.2020 - 12:20DROPS Design answered:
Buongiorno Monica. Lavora a coste 8 m e sono le 8 m che aumenta negli ultimi 8 giri con aumenti. Man mano che aumenta 1 di queste maglie, la lavora a coste. Abbiamo modificato un po' il testo. Buon lavoro!
22.10.2020 - 14:02
![]() Monica wrote:
Monica wrote:
Grazie per le risposte. Ma allora questa spiegazione è sbagliata "Aumentare in questo modo su ogni giro 18-20-22 volte in totale. Lavorare gli aumenti dei primi 10-12-14 giri a maglia rasata, poi lavorare gli aumenti degli 8 giri successivi come segue: 2 maglie rovescio, 2 maglie diritto, 2 maglie rovescio, 2 maglie diritto." Non sono 8 giri ma 8 punti. Mi confermate? Grazie mille
22.10.2020 - 11:12DROPS Design answered:
Buongiorno Monica. P.es per la taglia S, aumenta le prime 10 volte e lavora questi aumenti a maglia rasata. L'aumento successivo (primo aumento degli ultimi 8), lavora la maglia aumentata a rovescio; l'aumento successivo, lavora la maglia aumentata a rov; l'aumento successivo, lavora la maglia aumentata a dir e così via. Terminati gli 8 aumenti, avrà le coste 2 m rov / 2 m dir. L'ultima foto a destra può esserle di aiuto. Buon lavoro!
22.10.2020 - 12:13
![]() Monica wrote:
Monica wrote:
Scusate ma come mai nella foto il davanti e il dietro hanno la maglia rasata nei bordi e invece seguendo le istruzioni mi trovo con la maglia a coste?
21.10.2020 - 22:08DROPS Design answered:
Buongiorno Monica. Le prime e le ultime 8 maglie del davanti / dietro sono lavorate a coste 2 maglie diritto / 2 maglie rovescio. Deve lavorare le coste in modo che le prime 2 e le ultime 2 maglie del ferro siano maglie lavorate a diritto. Buon lavoro!
22.10.2020 - 10:39
![]() Monica wrote:
Monica wrote:
Credo ci sia un errore. Quando si inizia il dietro si deve lavorare A2 e non A1. Corretto?
21.10.2020 - 21:31DROPS Design answered:
Buongiorno Monica. Abbiamo corretto il testo: si deve lavorare il diagramma A.2. La ringraziamo per la segnalazione. Buon lavoro!
22.10.2020 - 10:12
![]() Ghada Gamil wrote:
Ghada Gamil wrote:
My first question is i worked 10 round in stocking stitch then 8 round k2 p2 after that how shall i continue the pattern of increasd stitches ? My second question is the 72-76-80 stitches in back and front piece i will work them a1 or a2 or a3 ? Thank you
08.10.2020 - 12:15DROPS Design answered:
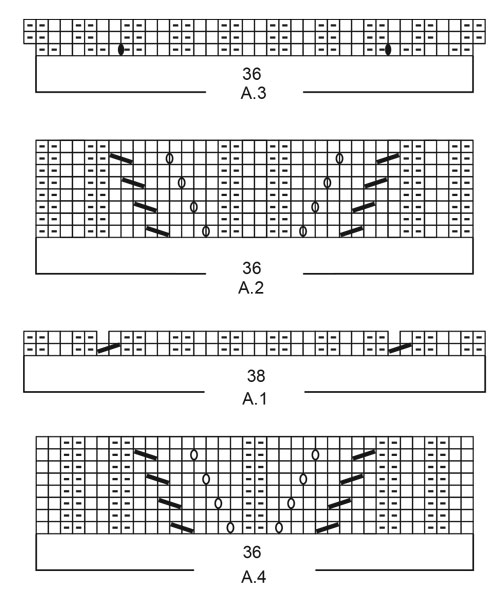
Dear Mrs Gamil, piece is worked top down, you start with 1 round in stocking stitch (not 10) then work 13 cm in rib K2/P2 (that's how the pattern is worked and shown). Then you add markers as explained for your size and you will incraese for the saddle shoulder = on front and back piece; the stitches of shoulders are worked in rib as before and front/back piece are worked with A.1. After A.1 is done, work A.2 over A.1 and continue repeating A.2. When dividing piece you will work A.1 over the middle stitches (= remaining sts on each side are worked K over K and P over P),then work A.2 and then work A.3 (see measurement in written pattern) before working ribbed edge. Happy knitting!
08.10.2020 - 16:14
![]() Davenport Michèle wrote:
Davenport Michèle wrote:
Très mignon
16.06.2020 - 11:45
|
|||||||||||||||||||
Leaf Diversion#leafdiversionset |
|||||||||||||||||||
 |
 |
||||||||||||||||||
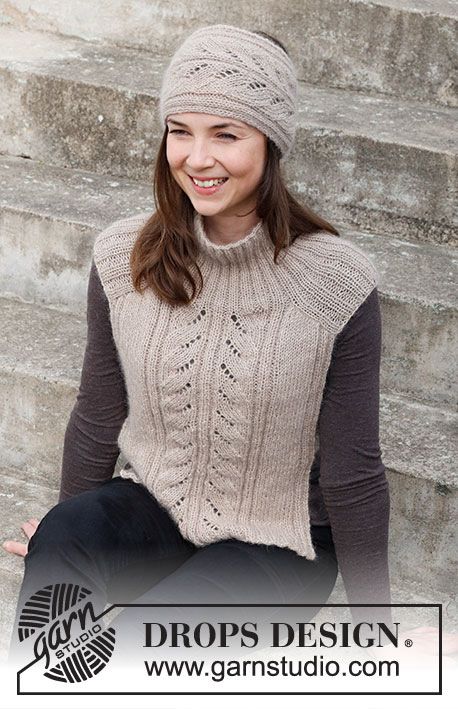
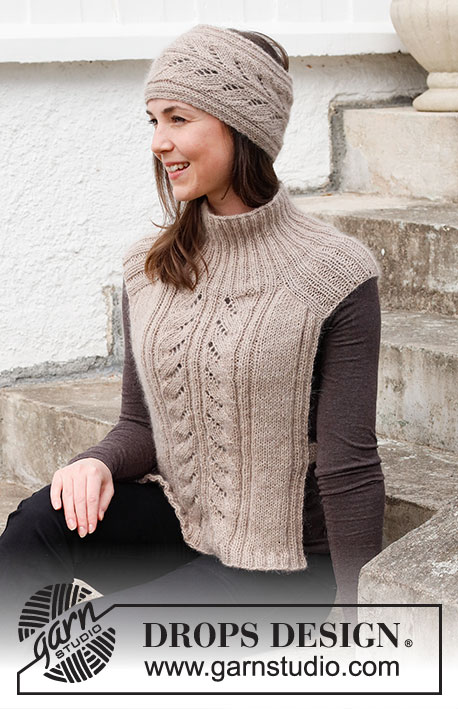
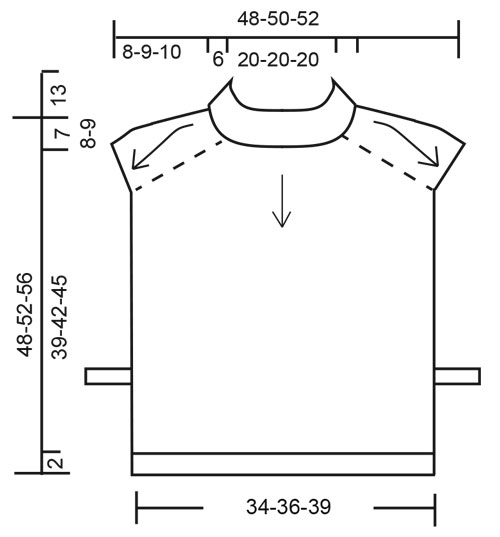
Knitted vest and head band in DROPS Nord and DROPS Kid-Silk. Piece is knitted top down with increase for saddle shoulder and lace pattern. Size: S - XXXL
DROPS 218-23 |
|||||||||||||||||||
|
------------------------------------------------------- EXPLANATION FOR THE PATTERN: ------------------------------------------------------- GARTER STITCH (back and forth): Knit all rows. 1 ridge vertically = knit 2 rows. PATTERN: Vest: See diagrams A.1 to A.3. Head band: See diagram A.4. Diagrams show all rows in pattern seen from the right side. INCREASE TIP-1 (applies to saddle shoulder increase): BEFORE MARKER: The new stitch will be twisted, leaning towards the right. Use left needle to pick up strand between 2 stitches from the round below, pick up strand from behind and knit stitch in front loop. AFTER MARKER: The new stitch will be twisted, leaning towards the left. Use left needle to pick up strand between 2 stitches from the round below, pick up strand from the front and knit stitch in back loop. INCREASE TIP-2 (evenly): To calculate how to increase evenly, count the stitches to be increased (e.g. 10 stitches) and divide this number by stitches of increases to be done (e.g. 4) = 2.5. In this example increase by making 1 yarn over after alternately every other and 3rd stitch. On next row work yarn overs twisted to avoid holes. ------------------------------------------------------- START THE PIECE HERE: ------------------------------------------------------- VEST - SHORT OVERVIEW OF THE PIECE: Piece is worked top down, and worked in the round until shoulder increases are done. Then work front and back piece back and forth separately. VEST: Cast on 128-136-144 stitches on circular needle size 4 mm with 1 strand Nord and 1 strand Kid-Silk (= 2 strands). Knit 1 round. Then work rib (= knit 2/purl 2) in the round for 13 cm. Switch to circular needle size 5 mm. Now work as follows: Insert 1st marker at beginning of round (= before 2 knit stitches), work rib as before over the first 26-30-34 stitches, insert 2nd marker here, work A.1 over the next 38-38-38 stitches (= 2 stitches decreased), insert 3rd marker here, work rib as before over the next 26-30-34 stitches, insert 4th marker here, work A.1 over the last 38-38-38 stitches (= 2 stitches decreased) = 124-132-140 stitches. REMEMBER THE KNITTING TENSION! SADDLE SHOULDER INCREASE: Now work last round in A.1 and work rib as before over the 26-30-34 stitches on each shoulder. AT THE SAME TIME on first round increase 4 stitches on round: Increase BEFORE 1st and 3rd marker, and AFTER 2nd and 4th marker – read INCREASE TIP-1. Increases are only on front piece and back piece and number of shoulder stitches remains the same. Increase like this every round 18-20-22 times in total. Work the increased stitches from the first 10-12-14 rounds in stocking stitch, then work the increased stitches from the next 8 rounds in pattern as follows: Purl 2, knit 2, purl 2, knit 2. When A.1 is finished vertically, work A.2 over A.1 and rib as before over the 26-30-34 stitches on each shoulder. When all increases are done, there are 196-212-228 stitches on round, continue with pattern as before. The next time the 1st, 3rd, 5th or 7th round in A.2 is worked; work as follows: Cast off with knit over knit and purl over purl over the first 26-30-34 stitches, work pattern as before over the next 72-76-80 stitches before slipping them on 1 stitch holder (= front piece), cast off with knit over knit and purl over purl over the next 26-30-34 stitches, work pattern as before over the last 72-76-80 stitches (= back piece). BACK PIECE: Continue back and forth with pattern as before over the 72-76-80 stitches. I.e. Work A.2 over the middle 36-36-36 stitches and work knit over knit and purl over purl over the remaining stitches. When piece measures 39-42-45 cm from transition between A.1 in the neck and A.2 – adjust to finish after a whole repetition vertically, work next row from right side as follows: Work as before over the first 8-8-8 stitches, knit the next 10-12-14 stitches while increasing 4-2-4 stitches evenly – read INCREASE TIP-2, work A.3 over A.2 (= 2 stitches increased), knit the next 10-12-14 stitches while increasing 4-2-4 stitches evenly, work the last 8-8-8 stitches as before = 82-82-90 stitches. Work 1 row in pattern (work yarn overs twisted to avoid holes). Switch to circular needle size 4 mm. Now work rib from right side as follows: Work (knit 2/purl 2) over the first 20-20-24 stitches, knit 2, continue with knit over knit and purl over purl over the next 38-38-38 stitches, work (knit 2/purl 2) over the next 20-20-24 stitches, knit 2. Continue back and forth like this until rib has been worked for 2 cm. Cast off stitches with knit over knit and purl over purl. FRONT PIECE: Work as on back piece. ASSEMBLY: Knit a band with buttonhole in each side as follows: Cast on 7 stitches on circular needle size 4 mm with 1 strand Nord and 1 strand Kid-Silk (= 2 strands). Work in garter stitch back and forth. When 4 ridges have been worked, decrease for buttonhole follows: Knit 2, knit 2 together (= 1 stitch decreased), make 1 yarn over, knit 3. On next row knit yarn over. continue back and forth in garter stitch until band measures approx. 16 to 28 cm – or desired length (ribbon can be worked longer after button is attached, to make it easier to work until correct length). Fasten button on right side of back piece, approx. 14 cm up from bottom edge and between 5th and 6th stitch from edge. Then try the vest on and adjust length of band by working to desired length. Fasten the other end of band on on the inside of front piece approx. 14 cm (i.e. in a row) with button. Repeat in the other side. ------------------------------------------------------- HEAD BAND: Work head band back and forth on circular needle. HEAD BAND: Cast on 36 stitches on circular needle size 4.5 mm with 1 strand Nord + 1 strand Kid-Silk (= 2 strands). Work pattern A.4 back and forth. Tighten the yarn a little at the beginning of every row to avoid a loose edge stitch. REMEMBER THE KNITTING TENSION! Work like this until piece measures 49 cm or desired length - adjust to finish after a whole repetition vertically. Cast off stitches with knit over knit and purl over purl. Cut the yarn but leave some yarn for assembly. Sew seam with grafting/kitchener stitches inside cast-on and cast-off edge. |
|||||||||||||||||||
Diagram explanations |
|||||||||||||||||||
|
|||||||||||||||||||
 |
|||||||||||||||||||
 |
|||||||||||||||||||
Have you finished this pattern?Tag your pictures with #dropspattern #leafdiversionset or submit them to the #dropsfan gallery. Do you need help with this pattern?You'll find 23 tutorial videos, a Comments/Questions area and more by visiting the pattern on garnstudio.com. © 1982-2026 DROPS Design A/S. We reserve all rights. This document, including all its sub-sections, has copyrights. Read more about what you can do with our patterns at the bottom of each pattern on our site. |
|||||||||||||||||||


With over 40 years in knitting and crochet design, DROPS Design offers one of the most extensive collections of free patterns on the internet - translated to 17 languages. As of today we count 324 catalogues and 12290 patterns translated into English (UK/cm). 12290
We work hard to bring you the best knitting and crochet have to offer, inspiration and advice as well as great quality yarns at incredible prices! Would you like to use our patterns for other than personal use? You can read what you are allowed to do in the Copyright text at the bottom of all our patterns. Happy crafting!
Post a comment to pattern DROPS 218-23
We would love to hear what you have to say about this pattern!
If you want to leave a question, please make sure you select the correct category in the form below, to speed up the answering process. Required fields are marked *.