Comments / Questions (6)
![]() Renata wrote:
Renata wrote:
Proszę o alternatywę włóczki która byłaby dostępna dla tego wzoru chciałabym właśnie uzyskać taki grubszy wzór z góry dziękuję pozdrawiam
01.09.2025 - 14:54DROPS Design answered:
Witaj Renato, próbka jaka jest w tym wzorze będzie osiągnięta przy zastosowaniu włóczek z grupy C (lub 2 nitek włóczek z grupy A). Wg mnie najlepszą alternatywą byłaby włóczka DROPS Alpaca Bouclé. Efekt nie będzie jednak taki jak we wzorze, ponieważ w tym momencie nie mamy w ofercie włóczek tego typu. Najpierw wykonaj próbkę i zobacz czy powstała dzianina spełni Twoje oczekiwania. Pozdrawiamy!
03.09.2025 - 09:17
![]() Candice Diacon wrote:
Candice Diacon wrote:
Greetings! I'm confused as to whether or not this is a pullover sweater jacket, the assembly directions call for sewing the packets over each other and then sewing on the fur hooks...? Is this a cardigan or pullover? Please advise? And thank you for providing such wonderful patterns and informative instructions on all the patterns!
01.02.2023 - 06:37DROPS Design answered:
Dear Mrs Diacon, this is a jacket but at the beginning of the back piece you worked 2 pieces joined later together, you should sew the 8 sts on the right side of back piece over the 8 sts on the left side of back piece and sew them together. Happy knitting!
01.02.2023 - 08:56
![]() Nicole Pelletier wrote:
Nicole Pelletier wrote:
Bonjour, Avec quelles laines puis-je remplacer drops pelliza pour avoir le même effet pour 2 fils ? Cordialement Nicole Pelletier
29.11.2020 - 22:24DROPS Design answered:
Bonjour Mme Pelletier, DROPS Pelliza était vraiment spéciale et rien ne peut vraiment la remplacer, vous pouvez regarder du côté de laines de 17 cm de tension, comme par exemple Alpaca Bouclé, n'hésitez pas à faire différents essais, et échantillons pour pouvoir vous décider en toute connaissance de cause. Votre magasin pourra vous conseiller en fonction des textures souhaitées. Bon tricot!
30.11.2020 - 10:54
![]() ESPEIT wrote:
ESPEIT wrote:
Bonjour Doit on uniquement monter les mailles avec 2 fils et continuer ensuite avec un seul fil OU BIEN tout tricoter avec 2 fils
19.06.2018 - 09:29DROPS Design answered:
Bonjour Mme Espeit, le manteau se tricote entièrement avec 2 fils sur la base de 17 m x 22 rangs = 10 x 10 cm. Bon tricot!
19.06.2018 - 11:13
![]() Drops Design France wrote:
Drops Design France wrote:
Bonjour Emmerechts, les 18 m de la bordure devant sont à tricoter en jersey et seront repliées ensuite et cousues sur l'envers pour les bordures devant de chaque côté. Bon tricot !
03.04.2009 - 09:37EMMERECHTS wrote:
Bonjour, Devant droit : ... Monter 18 m au milieu devant pour la bordure ... Pouvez-vous m'expliquer, je suis un petit peu perdue et dans quel point faut-il les tricoter? D'avance merci.Bien à vous, Lucienne
02.04.2009 - 15:41
DROPS 57-13 |
|
|
|
|
DROPS fake fur coat in Pelliza. Long or Short pattern
DROPS 57-13 |
|
|
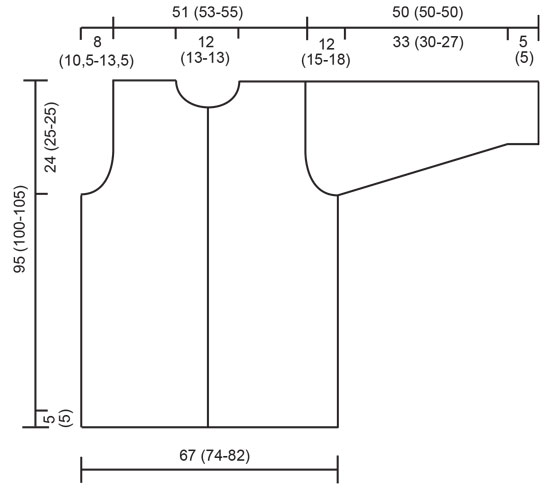
Knitting tension: 17 stitches x 22 rows with needle size 5 mm and stocking stitch = 10 x 10 cm. Remember needle size is only a guide! Ridge/Garter stitch (back and forth on needle):1 ridge = Knit 2 rows. Ridge/Garter stitch (in the round):1 ridge = 2 rounds. Knit 1 round and purl 1 round. Edge: Work 5 cm stocking stitch, purl 1 round (= folding edge - the piece is measured from here), 5 cm stocking stitch. Short pattern: If you would like the short pattern work as follows: Body: Measurements at armholes, neck and casting off edge are reduced by 15 (15-15) cm. Finished length = 80 (85-90) cm. Amount of yarn reduced by 100 (150-150) g. Right front piece: CARE! The garment will sag by about 10 % after use, remember this when working to desired length and when piece is measured. The coat is worked back and forth with circular needle and with double yarn. If you want the shorter pattern, see description above. Cast on 57 (63-70) stitches with needle size 4 mm and brown (double yarn) and work Edge. Change to needle size 5 mm and work stocking stitch at the same time as you increase 18 stitches towards mid front for band and band lining = 75 (81-88) stitches. Remember the knitting tension. When piece measures 71 (75-80) cm cast off for armholes every 2nd row: 4 stitches x 1 (1-1), 3 stitches x 1 (2-3), 2 stitches x 2 (3-4), 1 stitch x 3 (2-2) = 61 (63-65) stitches. When piece measures 89 (94-99) cm cast off towards neck every 2nd row: 22 (23-23) stitches x 1, 3 stitches x 1, 2 stitches x 1, 1 stitch x 1. Cast off when piece measures 95 (100-105) cm. Left front piece: Cast on and work as for right front piece but with increases and decreases in opposite side. Back piece: There is a split mid back, so you work back piece in 2 parts for the first 25 (26-28) cm. Cast on 57 (63-70) stitches with circular needle size 4 mm and 2 strands brown and work 5 cm stocking stitch, purl 1 row where you increase 8 stitches towards mid back for split band - these stitches are worked in garter stitch upwards-, work 5 cm stocking stitch (remember split band stitches are worked in garter stitch). Change to circular needle size 5 mm, work stocking stitch (remember garter stitch over band stitches). When piece measures 25 (26-28) cm cast off the 8 band stitches = 57 (63-70) stitches. Lay piece to one side and work an equivalent piece, but with increase in opposite side. Place both pieces on same needle with band stitches mid back = 114 (126-140) stitches, work stocking stitch. When piece measures 71 (75-80) cm cast off for armholes every 2nd row: 4 stitches x 1 (1-1), 3 stitches x 1 (2-3), 2 stitches x 2 (3-4), 1 stitch x 3 (2-2) = 86 (90-94) stitches. When piece measures 93 (98-103) cm cast off the middle 16 (18-18) stitches for neck. Then cast off 2 stitches in each side on next row towards neck. Cast off when piece measures 95 (100-105) cm. Sleeve: The sleeve is worked back and forth on circular needle as Pelliza can twist when worked in the round. Cast on 52 (54-54) stitches with circular needle size 4 mm and 2 strands brown and work Edge. Change to circular needle size 5 mm and work stocking stitch. At the same time increase in each side: 1 stitch x 15 (16-16) for S/M: every 4th row M/L+XL: alternately every 3rd and 4th row = 82 (86-86) stitches. When piece measures 38 (35-32) cm cast off for sleeve cap in each side every 2nd row: 2 stitches x 4, 1 stitch x 7 (10-13), 4 stitches x 2, cast off. Piece measures approx. 50 (50-50) cm. Assembly: Sew shoulder seams. Lay right split band at back over left and sew. Fold the outermost 12 stitches of the band on front piece towards wrong side and sew. Fold edge at bottom double towards wrong side and sew down. Sew on fur hooks. Sew on an decorative button at top of right band - over the button you can work a cover with hook size 3 mm as follows: Work 4 chain stitches and form them to a ring with 1 slip stitch in first chain stitch; Round 1: work 5 double crochets around the ring; Round 2: work 2 stitches in each stitch; Round 3: * work 2 stitches in next stitch, 1 double crochet *, repeat *-* to end of round. Now increase in this way every round, but add 1 double crochet between each time you work 2 double crochets in 1 double crochet. When cover is large enough for button, work 2 rounds without increasing, then 3 rounds where you decrease stitches equivalent to the increased stitches - decrease by skipping 1 double crochet. Collar: Knit up approx. 90-100 stitches around neck from wrong side (also over the bands) with needle size 4 mm and work 28 cm stocking stitch, cast off and fold collar double and sew. Sew in sleeves. |
|
 |
|
Have you finished this pattern?Tag your pictures with #dropspattern or submit them to the #dropsfan gallery. Do you need help with this pattern?You'll find 25 tutorial videos, a Comments/Questions area and more by visiting the pattern on garnstudio.com. © 1982-2026 DROPS Design A/S. We reserve all rights. This document, including all its sub-sections, has copyrights. Read more about what you can do with our patterns at the bottom of each pattern on our site. |


Post a comment to pattern DROPS 57-13
We would love to hear what you have to say about this pattern!
If you want to leave a question, please make sure you select the correct category in the form below, to speed up the answering process. Required fields are marked *.