
Popular categories
Looking for a yarn?


Comments / Questions (3)
![]() Federica wrote:
Federica wrote:
Salve, volevo chiedere se è possibile lavorare il modello in tondo con ferri circolari. Quali modifiche si dovrebbero apportare? Grazie. Il modello è bellissimo.
13.11.2022 - 18:49DROPS Design answered:
Buonasera Federica, per un'assistenza così personalizzata può rivolgersi al suo rivenditore DROPS di fiducia. Buon lavoro!
13.11.2022 - 20:13
![]() Elżbieta wrote:
Elżbieta wrote:
Też mi podoba się, bardzo oryginalny, czekam
06.06.2019 - 09:39
![]() Teresa Machała wrote:
Teresa Machała wrote:
Bardzo podoba mi się ten wzór oraz lubie kid silk, mam z niej kilka swetwrków i są moje ulubione. Czekam na ten wzór
05.06.2019 - 22:45
|
|||||||||||||
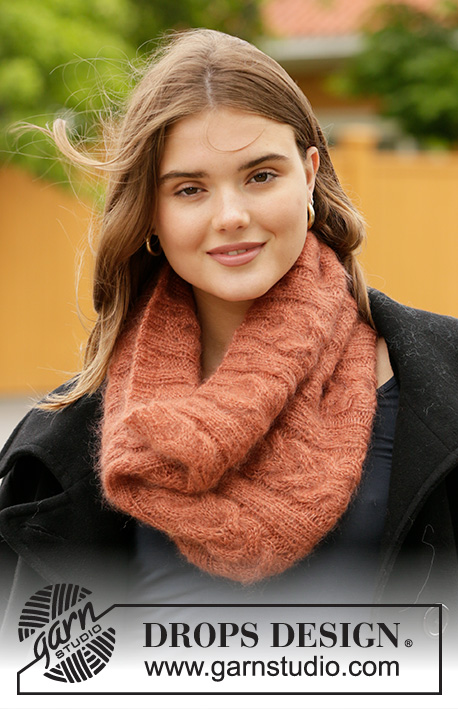
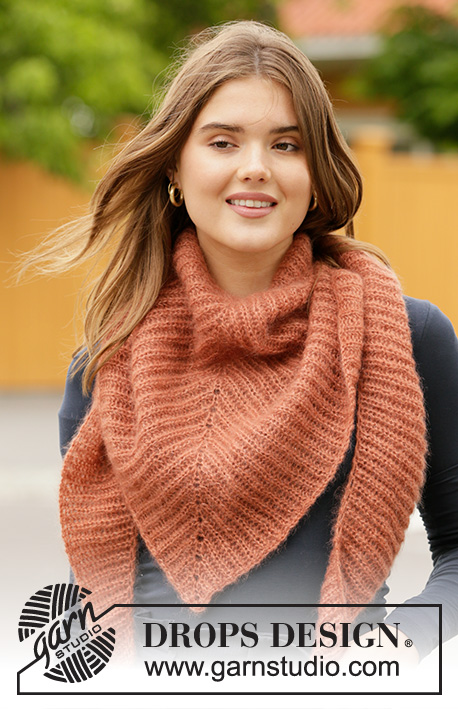
City Chic Set#citychicset |
|||||||||||||
 |
 |
||||||||||||
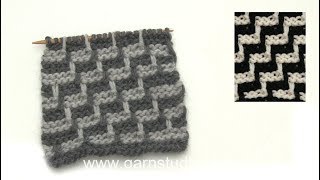
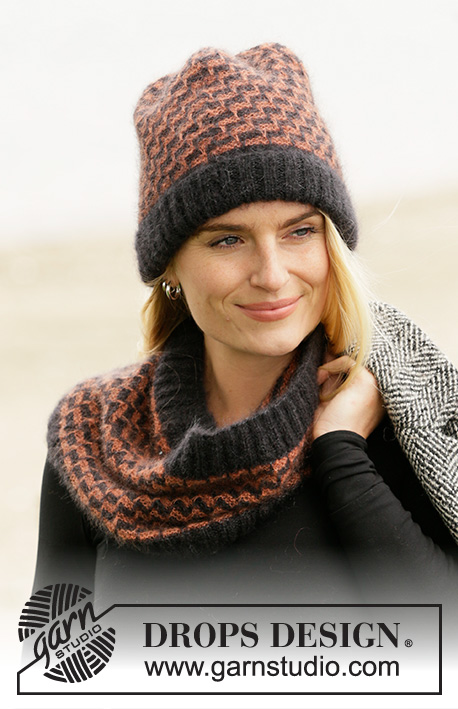
Knitted hat and neck warmer with pepita pattern in DROPS Kid-Silk. The piece is worked with garter stitch and square pattern with raised stitches.
DROPS 204-11 |
|||||||||||||
|
------------------------------------------------------- EXPLANATIONS FOR THE PATTERN: ------------------------------------------------------- PATTERN: See diagrams A.1, A.2 and A.3. The diagrams show all rows in the pattern seen from the right side. ------------------------------------------------------- START THE PIECE HERE: ------------------------------------------------------- NECK WARMER – SHORT OVERVIEW OF THE PIECE: The piece is worked back and forth with circular needle and is sewn together to finish. NECK WARMER: Cast on 180-192-204 stitches with circular needle size 3 mm and with 2 strands of black. Work rib (knit 2, purl 2) for 4 cm. Remove one of the strands and continue working with just 1 strand. Knit the next row, decreasing at the same time 8-10-12 stitches evenly spaced = 172-182-192 stitches. Knit 1 row from the wrong side. REMEMBER THE KNITTING TENSION! Then work according to diagrams A.1, A.2 and A.3; the first row is from the right side: Work diagram A.1 over 1 stitch, repeat A.2 until there is 1 stitch left on the row and work A.3 over 1 stitch. Continue working the diagrams like this; repeat A.x in height. Work until the piece measures approx. 23-25-27 cm from the cast-on edge – adjust so the next row is worked with black. Continue with black and knit 1 row from the right side where you increase 4-6-4 stitches evenly spaced = 176-188-196 stitches. Knit 1 row from the wrong side. Add 1 more strand of black, continuing with 2 strands of black, and work rib (knit 2 / purl 2) for 3 cm. Loosely cast off with knit over knit and purl over purl. ASSEMBLY: Using 1 strand of black, lay the sides together edge to edge and sew in the outermost loop of the outermost stitch. ------------------------------------------------------- HAT – SHORT OVERVIEW OF THE PIECE: The piece is worked back and forth with circular needle and sewn together to finish. HAT: Cast on 132-136-140 stitches with circular needle size 3 mm and 2 strands of black. Work rib (knit 2 / purl 2) for 10 cm (the rib will be folded in half when finished). Remove one of the strands and continue with just 1 strand. Knit the next row and at the same time decrease 5-4-3 stitches evenly spaced = 127-132-137 stitches. Knit 1 row from the wrong side. Then work according to diagrams A.1, A.2 and A.3 with the first row from the right side as follows: Work diagram A.1 over 1 stitch, repeat A.2 until there is 1 stitch left on the row and work A.3 over 1 stitch. REMEMBER THE KNITTING TENSION! Continue working the diagrams like this; repeat A.x in height. Work until the piece measures a total of 25-26-27 cm (there is approx. 3.5 - 4 cm left to finished length). Now decrease for the top of the hat; make sure the pattern fits. ROW 1 (= right side): Work pattern as before, but on every other repeat of A.2 decrease 1 stitch by knitting the last 2 stitches together. ROW 2 (= wrong side): Work pattern as before, but now there are 4 stitches in every other repeat. ROW 3 (= right side): Work pattern as before but decrease in the same way as row 1, in the repeats of A.2 which have 5 stitches. ROW 4 (= wrong side): Work pattern as before, but now there are 4 stitches in every repeat of A.2. There are 102-106-110 stitches on the needle. ROW 5 (= right side): Work pattern as before, but on every other repeat of A.2 decrease 1 stitch by knitting the last 2 stitches together. ROW 6 (= wrong side): Work pattern as before, but now there are 3 stitches in every other repeat of A.2. ROW 7 (= right side): Work pattern as before but decrease in the same way as row 5 in the repeats of A.2 which have 4 stitches. ROW 8 (= wrong side): Work pattern as before, but now there are 3 stitches in every repeat of A.2. There are 77-80-83 stitches on the needle. ROW 9 (= right side): Work pattern as before, but on every other repeat of A.2 decrease 1 stitch by knitting the last 2 stitches together. ROW 10 (= wrong side): Work pattern as before but now there are 2 stitches in every other repeat of A.2. ROW 11 (= right side): Work pattern as before but decrease in the same way as row 9 in the repeats of A.2 which have 3 stitches. ROW 12 (= wrong side): Work pattern as before, but now there are 2 stitches in every repeat of A.2. There are 52-54-56 stitches on the needle. ROW 13 (= right side): Work pattern as before, but on every other repeat of A.2 decrease 1 stitch by knitting the last 2 stitches together. ROW 14 (= wrong side): Work pattern as before, but now there is 1 stitch in every other repeat of A.2. ROW 15 (= right side): Work pattern as before but decrease in the same way as row 13 in the repeats of A.2 which have 2 stitches. ROW 16 (= wrong side): Work pattern as before, but now there is 1 stitch in every repeat of A.2. There are 27-28-29 stitches on the needle. Continue with black to finished length. ROW 17 (= right side): Knit 1-0-1, * knit 2 together *, work from *-* to end of row. There are 14-14-15 stitches on the needle. ROW 18 (= wrong side): Knit. ROW 19 (= right side): Knit 0-0-1, * knit 2 together *, work from *-* to end of row. There are 7-7-8 stitches on the needle. Cut the strand and pull it through the remaining stitches. Pull tight, tack the strand through the stitches a couple of times and fasten well. ASSEMBLY: Lay the piece so the sides meet and, using 1 strand of black, sew the sides together, sewing in the outermost loop of the outermost stitch. Fold the ribbed section in half and fasten down with a couple of small, neat stitches if you wish. |
|||||||||||||
Diagram explanations |
|||||||||||||
|
|||||||||||||
 |
|||||||||||||
Have you finished this pattern?Tag your pictures with #dropspattern #citychicset or submit them to the #dropsfan gallery. Do you need help with this pattern?You'll find 15 tutorial videos, a Comments/Questions area and more by visiting the pattern on garnstudio.com. © 1982-2026 DROPS Design A/S. We reserve all rights. This document, including all its sub-sections, has copyrights. Read more about what you can do with our patterns at the bottom of each pattern on our site. |
|||||||||||||


With over 40 years in knitting and crochet design, DROPS Design offers one of the most extensive collections of free patterns on the internet - translated to 17 languages. As of today we count 324 catalogues and 12290 patterns translated into English (UK/cm). 12290
We work hard to bring you the best knitting and crochet have to offer, inspiration and advice as well as great quality yarns at incredible prices! Would you like to use our patterns for other than personal use? You can read what you are allowed to do in the Copyright text at the bottom of all our patterns. Happy crafting!
Post a comment to pattern DROPS 204-11
We would love to hear what you have to say about this pattern!
If you want to leave a question, please make sure you select the correct category in the form below, to speed up the answering process. Required fields are marked *.