
Popular categories
Looking for a yarn?


Comments / Questions (5)
![]() Mara wrote:
Mara wrote:
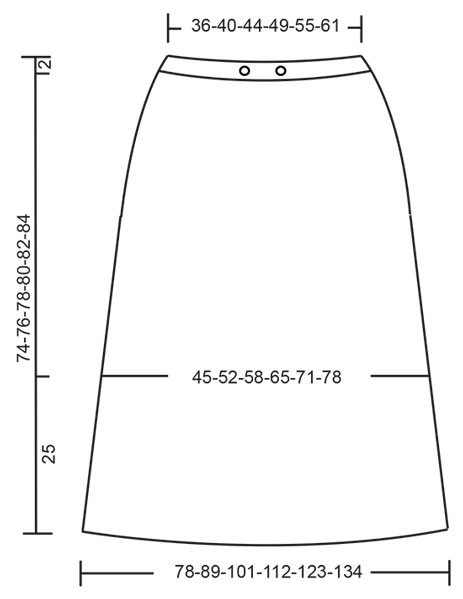
Guten Tag Wie muss ich stricken, wenn ich den Rock nur knielang möchte? Bei Grösse S. Wieviel Garn benötige ich? Vielen Dank Mara Senn
18.01.2024 - 15:06DROPS Design answered:
Liebe Mara, gerne können Sie sich von einem Rock mit der gewünschten Länge inspirieren (siehe hier für Garngruppe C, so können Sie kalkulieren, je nach der gewünschten Länge, wie Sie die Abnahmen arrangieren können, und wieviele Garn Sie dann brauchen. Damit kann Ihnen sicher Ihr DROPS Händler -auch per Telefon oder per E-Mail weiterhelfen. Viel Spaß beim stricken!
19.01.2024 - 08:24
![]() Helga wrote:
Helga wrote:
Vil strikke skjørtet i 3XL, men ønsker å strikke det ankellangt. Er dette mulig? Ev. tips på hvordan?
22.10.2023 - 01:38DROPS Design answered:
Hej Helga, hvis du kigger på måleskitsen, så skal du lægge de ekstra cm til lige efter hulmønsteret (efter de 25 cm) inden du begynder at tage ind ifølge opskriften :)
24.10.2023 - 09:12
![]() Raija Tervo wrote:
Raija Tervo wrote:
Mallineulekuvassa 5.rivi merkattu neulottavaksi nurjalla kaikki silm. Kuitenkin selityksissä ohjeistetaan neulomaan ensimm.langankierto OIKEIN ja ( toinen pudotetaan.).
09.10.2022 - 15:21
![]() Stitch Maker wrote:
Stitch Maker wrote:
In the lace chart after the first shift, the knitter should shift the round 1 stitch to the right on every other row (those with the yarn overs) else the first lace repeat will not line up correctly. Subsequent lace repeats take care of themselves, but the shift it's vital to get the first properly arranged.
22.11.2019 - 20:30
![]() Stitch Maker wrote:
Stitch Maker wrote:
There appear to be some errors in the lace chart compared to the photo. The k2tog in the third row from the top appears out of place. Also, the eyelets in the V lace pattern appear in the photo to be single yo (in contrast to those in the old shale pattern which appear to be 2yo.) Can you verify these issues?
15.11.2019 - 21:06DROPS Design answered:
Dear Stitch Marker, the yarn overs have been worked "doubled" to make larger holes, but you can make only 1 if you like to. On the last V lace pattern (arrow 2) you displace the beg of round of 1 st (= still working over 12 sts in width), then on 3rd row from the top, you need to decrease 1 stitch in each repeat, that's why you K2tog before 2nd yarn over. Happy knitting!
18.11.2019 - 08:31
|
||||||||||||||||||||||||||||
Love Story#lovestoryskirt |
||||||||||||||||||||||||||||
 |
 |
|||||||||||||||||||||||||||
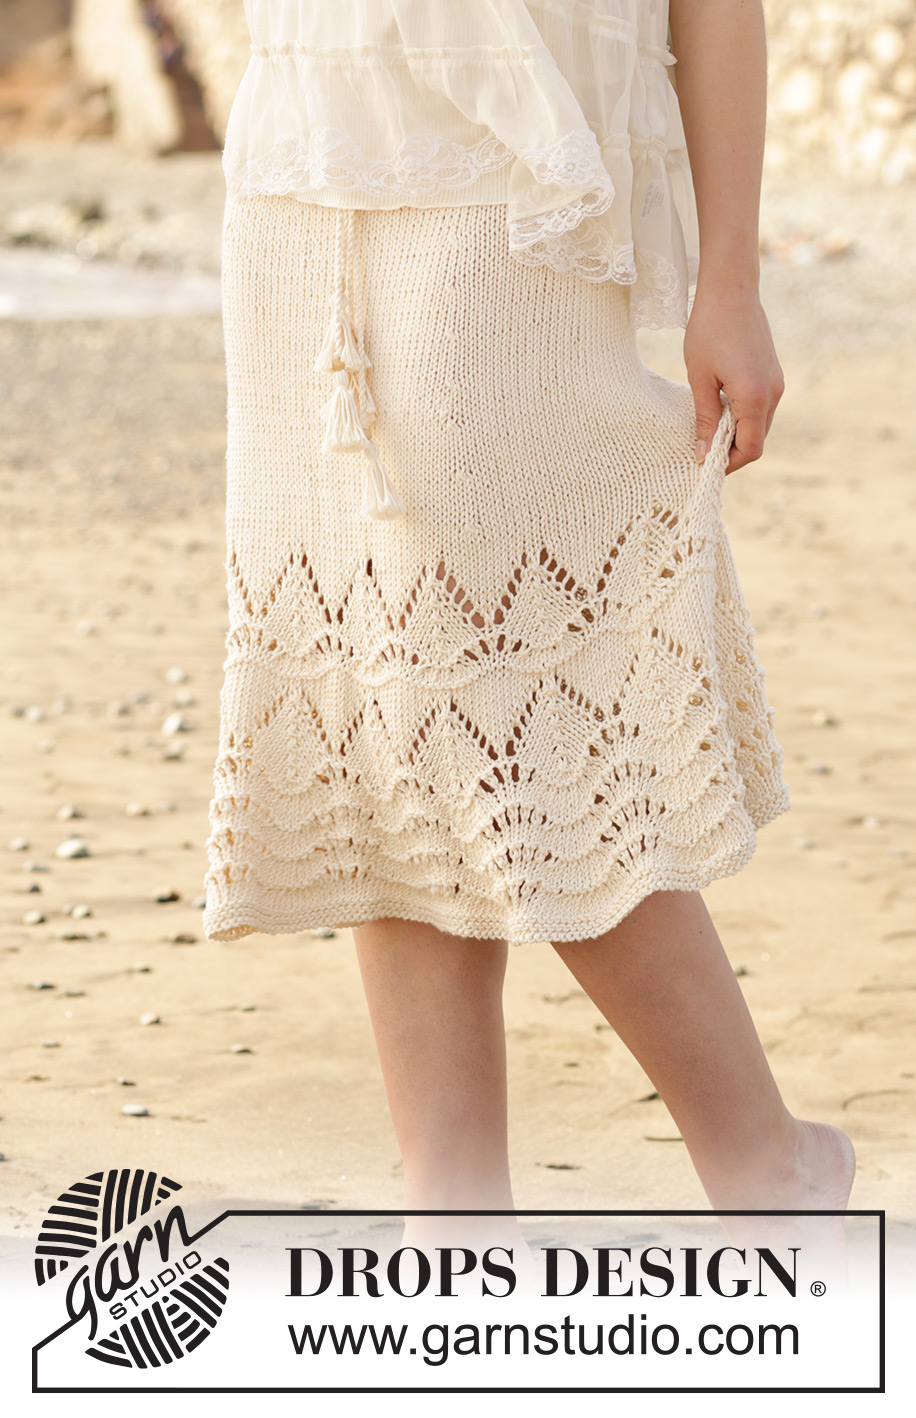
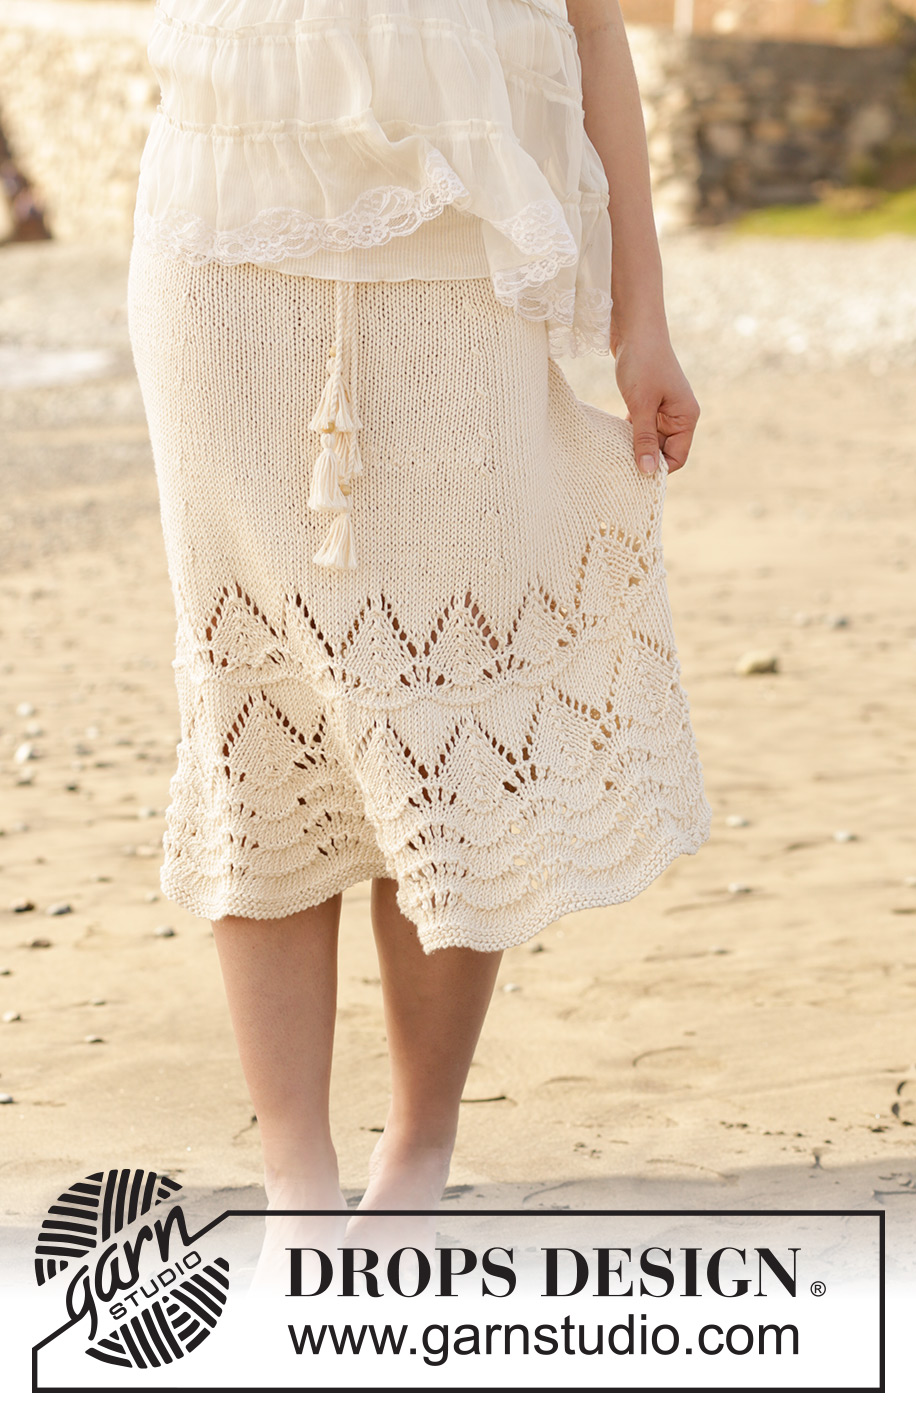
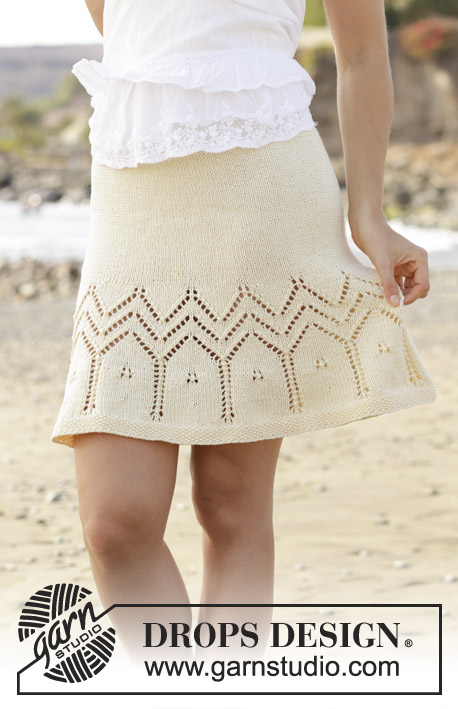
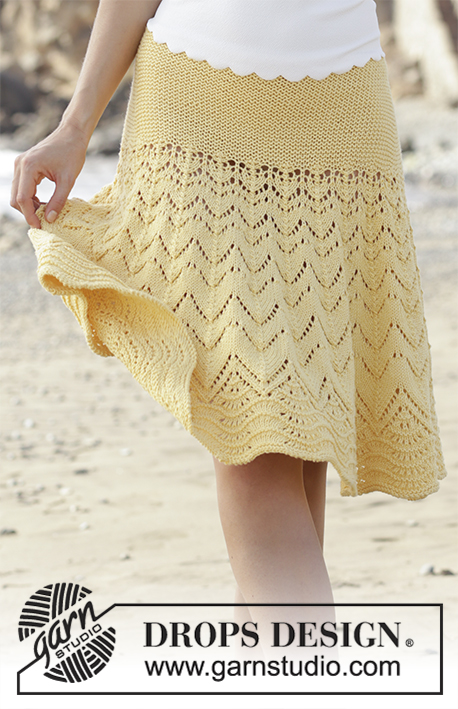
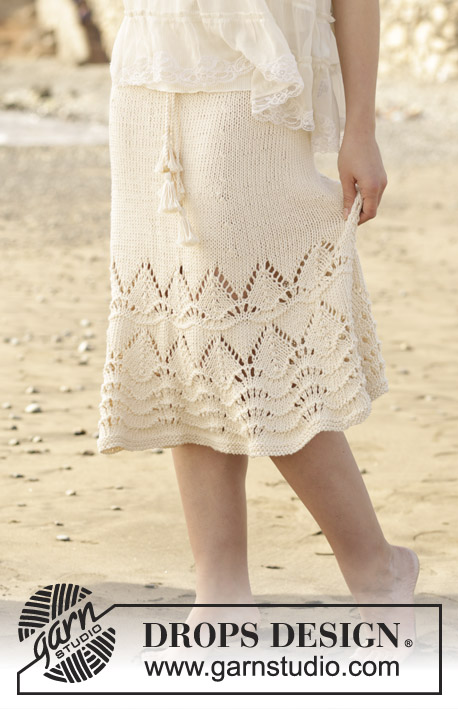
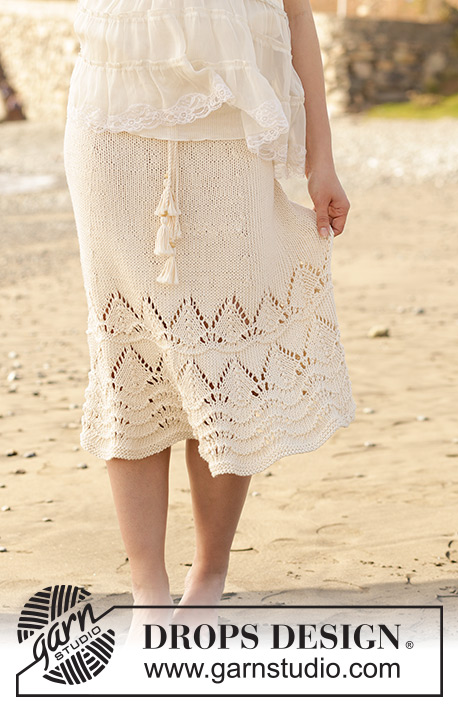
Knitted skirt with lace pattern and ties. Sizes S - XXXL. The piece is worked in DROPS Paris.
DROPS 190-32 |
||||||||||||||||||||||||||||
|
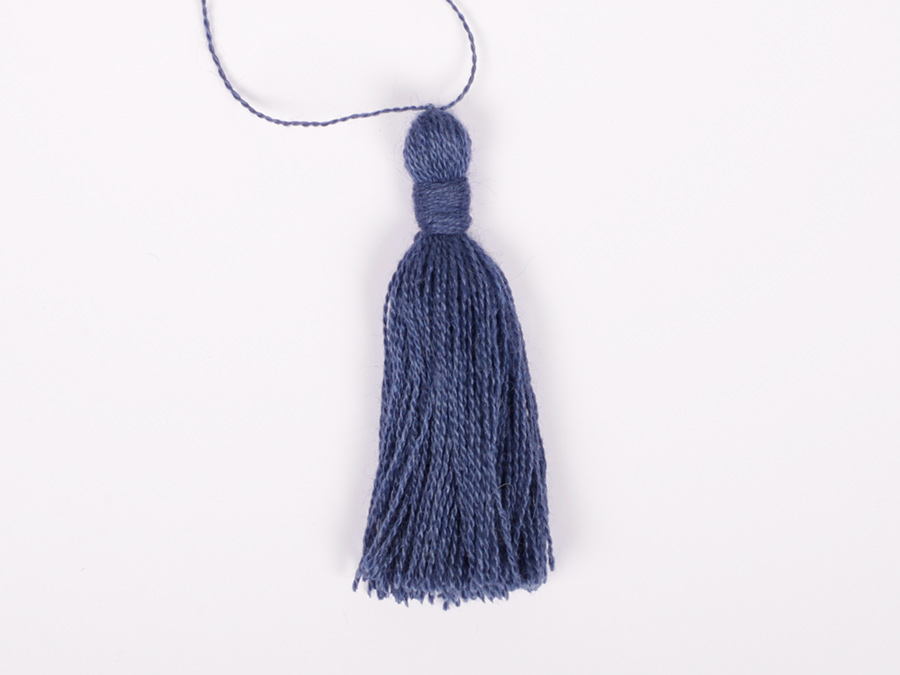
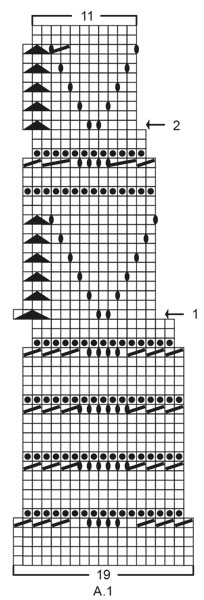
INFORMATION FOR THE PATTERN: RIDGE/GARTER STITCH (worked in the round): 1 ridge = 2 rounds. Knit 1 round and purl 1 round. PATTERN: See diagram A.1. MEASURING TIP: When working wave pattern, the bottom edge of the piece will curve. Take all measurements from where the curve is shortest. DECREASE TIP: Decrease as follows after the marker thread: Slip 1 stitch as if to knit, knit 1, pass the slipped stitch over the knitted stitch (= 1 stitch decreased). Decrease as follows before the marker thread: Start 2 stitches before the marker thread and knit 2 together (= 1 stitch decreased). ---------------------------------------------------------- SKIRT: The piece is worked in the round with circular needle, bottom up. Cast on a little loosely 266-304-342-380-418-456 stitches with circular needle size 5 mm and Paris. Work 2 RIDGES in the round – see description above. Then work A.1 in the round (= 14-16-18-20-22-24 repeats of 19 stitches). REMEMBER THE KNITTING TENSION! NOTE: On the round marked with arrow-1 in A.1, the start of the round is shifted 2 stitches to the left to allow the pattern to fit, i.e. pass the first 2 stitches over onto the right needle without working them and then work A.1 in the round. The 2 stitches moved to the right needle are worked in the last repetition of A.1. On next round knit all stitches. Then start the round as usual. On the round marked with arrow-2 in A.1 the start is shifted 1 stitch to the left in the same way. When A.1 has been completed, there are 154-176-198-220-242-264 stitches on the needle. Continue with stocking stitch. When the piece measures 28-28-28-28-30-30 cm – read MEASURING TIP, insert 4 marker threads in the piece as follows: Marker thread 1 is inserted after the first 18-21-24-27-30-35 stitches, marker thread 2 after the next 41-46-51-56-61-62 stitches, marker thread 3 after the next 36-42-48-54-60-70 stitches and marker thread 4 after the next 41-46-51-56-61-62 stitches. There are 18-21-24-27-30-35 stitches left on the round after the last marker thread. Allow the marker threads to follow your work upwards. On the next round decrease after marker threads 1 and 3 and before marker threads 2 and 4 – read DECREASE TIP (= 4 stitches decreased). Decrease like this every 6-5-4-4-3½-3½ cm a total of 8-10-12-13-14-14 times by each marker thread = 122-136-150-168-186-208 stitches. Continue working until the piece measures 72-74-76-78-80-82 cm. Now work a waistband with holes for the cord as described below. If you want elastic in the waist instead of ties, do not work the holes in the front (the waistband is otherwise worked in the same way). The next round is worked as follows: Knit 24-28-30-36-40-46 stitches, cast off 2 stitches for the cord in front, knit 9-8-9-8-9-8 stitches, cast off 2 stitches for the cord in front and knit to end of round. On the next round cast on 2 new stitches over the cast off stitches = 122-136-150-168-186-208 stitches. Continue working until the piece measures 74-76-78-80-82-84 cm. Purl 1 round (= folding edge), work stocking stitch for 2 cm as lining and loosely cast off. TWISTED CORD: If you do not want ties, then skip this section and go straight to assembly. Cut 2 strands of Paris of 4-4-4½-4½-5-5 metres. Twist them together until they begin to resist, fold the cord double and it will continue to twist. Tie a knot in both ends. Fasten a small wooden bead in each end of the cord. Make another cord in the same way. ASSEMBLY: Lay both cords on the wrong side of the skirt, along the top edge and pull the ends with the beads out through the holes on the front piece. Fold the lining over towards the wrong side so that the cords are hidden in the waist band. Sew down neatly with small stitches, but make sure you do not sew through the cords. NOTE: If you want elastic in the waistband, instead of ties, fold the lining over to the wrong side and sew down neatly, but leave a small opening to thread the elastic through. TASSELS FOR THE TIES: Make 4 tassels and sew one tassel in each end of the ties, under the beads. 1 tassel = cut 12 strands of Paris of 11 cm. Cut 1 strand of approx. 25 cm to use to sew on the tassel and lay this strand in the middle of the 12 strands. Fold the strands double and tie a new strand around the tassel (approx. 1 cm from the top), fasten well and sew the tassel to the cord as described above. Make the other tassels in the same way. |
||||||||||||||||||||||||||||
Diagram explanations |
||||||||||||||||||||||||||||
|
||||||||||||||||||||||||||||
 |
||||||||||||||||||||||||||||
 |
||||||||||||||||||||||||||||
Have you finished this pattern?Tag your pictures with #dropspattern #lovestoryskirt or submit them to the #dropsfan gallery. Do you need help with this pattern?You'll find 25 tutorial videos, a Comments/Questions area and more by visiting the pattern on garnstudio.com. © 1982-2026 DROPS Design A/S. We reserve all rights. This document, including all its sub-sections, has copyrights. Read more about what you can do with our patterns at the bottom of each pattern on our site. |
||||||||||||||||||||||||||||


With over 40 years in knitting and crochet design, DROPS Design offers one of the most extensive collections of free patterns on the internet - translated to 17 languages. As of today we count 324 catalogues and 12290 patterns translated into English (UK/cm). 12290
We work hard to bring you the best knitting and crochet have to offer, inspiration and advice as well as great quality yarns at incredible prices! Would you like to use our patterns for other than personal use? You can read what you are allowed to do in the Copyright text at the bottom of all our patterns. Happy crafting!
Post a comment to pattern DROPS 190-32
We would love to hear what you have to say about this pattern!
If you want to leave a question, please make sure you select the correct category in the form below, to speed up the answering process. Required fields are marked *.