
Popular categories
Looking for a yarn?


Comments / Questions (86)
![]() Gina wrote:
Gina wrote:
Gracias ,un patrón muy claro de entender,con un resultado perfecto.
04.02.2021 - 03:11
![]() Tarja Göthe wrote:
Tarja Göthe wrote:
Hur gör jag när jag ska börja sticka A1.( 13 ggr =78m) vad gör jag med den ökningen mitt bak?
10.01.2021 - 15:37DROPS Design answered:
Hei Tarja. Du har kun et merke midt bak, ingen økninger. Når du begynner med A.1 vil du få økninger i slutten av diagrammet der det er vist med en oval sirkel. mvh DROPS design
18.01.2021 - 13:27
![]() Karin Vetter wrote:
Karin Vetter wrote:
DROPS Design: Modell Nr. u-069-bn Garngruppe B FOREST DANCE Wie kann ich folgende Garne bestellen: 350 g Farbe Nr. 72 hell perlgrau 100 g Natur 0,1 und 100g Pink Nr. 13 ( das PINK auf ihrer Abbildung entspricht nicht der Farbe des Kleides. Ich möchte das Kleid in Größe 116 stricken mit den Stulpen dazu. Erbitte dringend HILFE. Vielen Dank
03.01.2021 - 16:48DROPS Design answered:
Liebe Karin. Du kannst die Wolle hier bestellen: <
![]() Elena wrote:
Elena wrote:
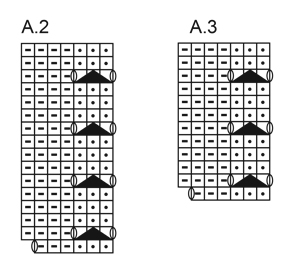
Buonasera. Cerco di spiegare meglio il problema. Le maniche le sto facendo con i ferri diritti ma il diagramma A 3 non mi viene. Ho provato a fare A 3 leggendo il diagramma sia per lavorare in tondo che per lavorare avanti e indietro ma non mi viene. Non capisco dove sbaglio. Grazie per l aiuto
15.11.2020 - 22:03DROPS Design answered:
Buonasera Elena, dovrebbe lavorare il diagramma A.3 leggendo da destra a sinistra e poi da sinistra a destra nel ferro di ritorno, modificando i punti per la lavorazione in piano. Qual è il punto in cui riscontra difficoltà nel diagramma? Buon lavoro!
16.11.2020 - 22:17
![]() Elena wrote:
Elena wrote:
Salve. Ho fatto l abito con i ferri circolari e adesso sto facendo le maniche ma sui ferri diritti ma il diagramma A 3 non mi viene. L ho fatto leggendolo nei 2 modi ma niente. Come mai? Grazie
15.11.2020 - 20:14DROPS Design answered:
Buonasera Elena, le maniche sono lavorate in tondo per cui il diagramma si legge sempre dal basso verso l'alto, da destra verso sinistra. Se ci spiega meglio qual è il suo problema con il diagramma A.3 potremo aiutarla in modo più preciso. Buon lavoro!
15.11.2020 - 20:46
![]() Elena wrote:
Elena wrote:
Buonasera. Devo lavorare il 6° ferro del diagramma A1, ma io mi trovo che il ferro inizia con 2m precedentemente lavorate in bianco e 1 rosa, quindi se inizio con 3 m rosa non mi trovo con il disegno. Sto lavorando con i ferri circolari sempre al diritto. Ho notato che se giro il lavoro, e quindi lavorerei al rovescio, le maglie coincidono con il diagramma. Ma se lavoro così si crea un buco all'inizio perchè i fili sono sulla sx. AIUTO cosa devo fare?
31.10.2020 - 18:06DROPS Design answered:
Buonasera Elena, ci indica la taglia che sta lavorando? Sta leggendo il diagramma in modo corretto dal basso verso l'alto e da destra verso sinistra per tutti i ferri dato che la lavorazione è in tondo? Buon lavoro!
21.11.2020 - 21:30
![]() Ulrike Alaze wrote:
Ulrike Alaze wrote:
Die Anleitung ist gut verständlich. Das Kleid sehr schön. Aber die vorgeschlagene Wolle Karisma ist für dieses Kleid zu dick und vor allem zu kratzig.
27.10.2020 - 17:49
![]() Elena wrote:
Elena wrote:
Buonasera. Quando scrivete " quando è stato lavorato A1, ci sono 208 m. sul ferro " dove sono stati fatti gli aumenti se si parte da 84 m che poi diventano 78 ? grazie
24.10.2020 - 19:50DROPS Design answered:
Buongiorno Elena. Nel diagramma A1 sono riportati gli aumenti (delle maglie gettate) che consentono di arrivare al numero di maglie indicato. Buon lavoro!
25.10.2020 - 08:44
![]() Maria wrote:
Maria wrote:
Witam. W opisie wzoru jest następujące sformułowanie . " Dalej przer. na krótkich drutach z żyłką nr 4 i przer. 1 okr. na prawo, W TYM SAMYM CZASIE dopasować liczbę o. do 78-84-90-98-105." Co to oznacza? Poproszę o wyjaśnienie. Dziękuję i pozdrawiam
13.07.2020 - 17:24DROPS Design answered:
Witaj Mario, to znaczy że jak zaczniesz przerabiać na drutach z żyłką nr 4 i będziesz wykonywała pierwsze okrążenie na prawo, to musisz w nim albo zamknąć, albo dodać oczka, aby uzyskać tyle oczek ile ma być w twoim rozmiarze. Miłej pracy!
14.07.2020 - 10:51
![]() Paola Barberis wrote:
Paola Barberis wrote:
Buongiorno, trovo stupendo questo modello , colori compresi, ma avrei bisogno di una taglia 2 anni. Potete aiutarmi? Grazie, Paola
09.06.2020 - 17:01DROPS Design answered:
Buongiorno Paola, per un aiuto così personalizzato può rivolgersi al suo rivenditore DROPS di fiducia. Buon lavoro!
12.06.2020 - 10:11
|
|||||||||||||||||||
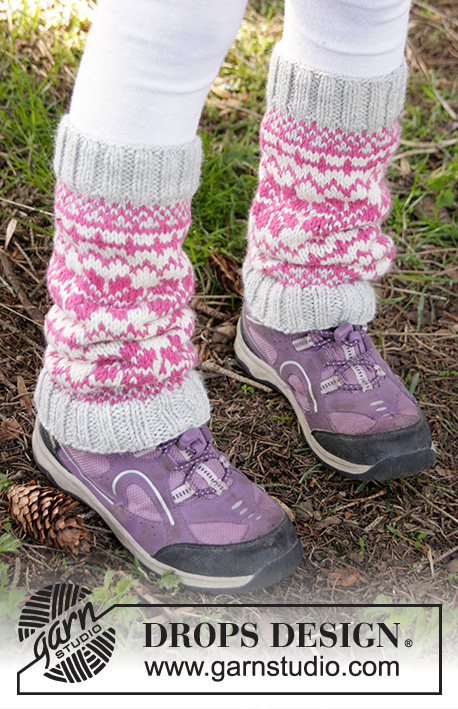
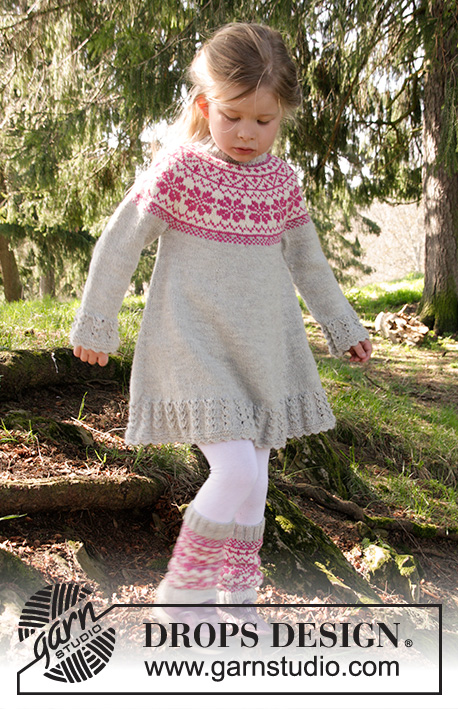
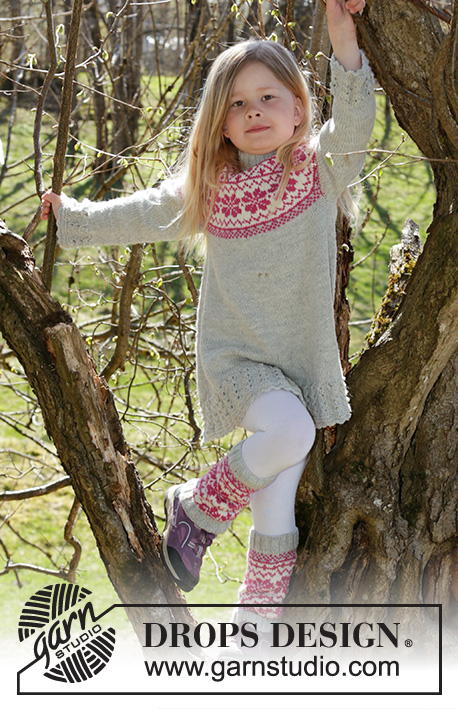
Forest Dance#forestdancedress |
|||||||||||||||||||
 |
 |
||||||||||||||||||
Knitted dress with Nordic pattern in DROPS Karisma. Size children 3 - 12 years.
DROPS Children 27-9 |
|||||||||||||||||||
|
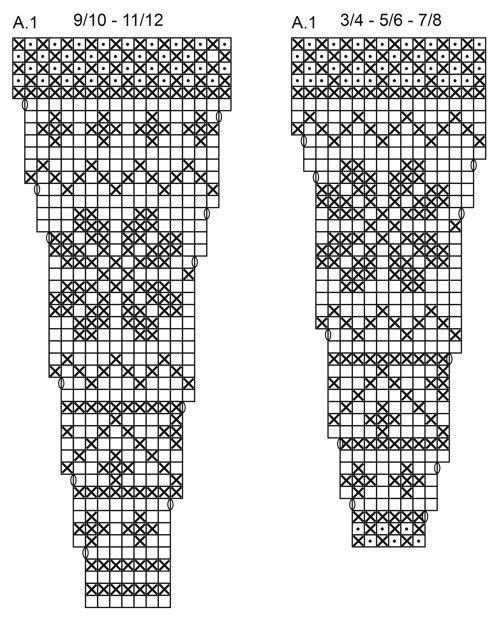
INCREASE TIP: Inc with YO, on next round K YO twisted to avoid holes. PATTERN: See diagrams A.1 to A.3. See diagram for size! KNITTING TIP: To avoid the knitting tension to tighten when working pattern, it is important not to tighten the strands on back side of piece. Switch to a higher needle no when working pattern if the pattern is somewhat tight. RIDGE: (worked in the round): 1 ridge = 2 rounds. K 1 round and P 1 round. ---------------------------------------------------------- DRESS: Worked in the round, top down. YOKE: Cast on 84-88-92-96-100 sts on a small circular needle size 3.5 mm with light pearl grey. Insert 1 marker at beg of round (= mid back). Work rib = K 2/P 2 for 3-3-4-4-5 cm (= neck edge). Switch to a short circular needle size 4 mm. K 1 round while at the same time adjusting no of sts to 78-84-90-98-105. Then work an elevation at the back in stocking st as follows: K 8 sts past marker, turn, tighten yarn and P 16 sts on return, turn, tighten yarn and K 24 sts, turn, continue by working 8 sts more on every turn until a total of 48-48-64-64-80 sts have been worked, turn and K 1 round until marker mid back again. Then work A.1 (= 13-14-15-14-15 repetitions in width) - see diagram for size. READ KNITTING TIP! REMEMBER THE KNITTING TENSION Switch to a longer circular needle when there are enough sts. When A.1 has been worked, there are 208-224-240-252-270 sts on needle. Work 0-0-1-0-1 cm with light pearl grey. Piece now measures approx. 15-15-16-17-18 cm mid front (measured without rib in the neck). Work with light pearl grey and in stocking st until finished measurements. First work 1 round while AT THE SAME TIME inc 4-4-4-12-10 sts evenly = 212-228-244-264-280 sts. Work next round as follows: Work 31-33-35-37-39 sts, slip the next 44-48-52-58-62 sts on 1 stitch holder for sleeve (without working them first), cast on 6 new sts, work 62-66-70-74-78 sts (= front piece), slip the next 44-48-52-58-62 sts on 1 stitch holder for sleeve (without working them first), cast on 6 new sts, work 31-33-35-37-39 sts. BODY: = 136-144-152-160-168 sts. NOW MEASURE PIECE FROM HERE! Now insert 6 markers in the piece as follows: Insert 1st marker at beg of round (= side), 2nd marker after 24-25-26-27-28 sts, 3rd marker after another 20-22-24-26-28 sts, 4th marker after another 24-25-26-27-28 sts (= side), 5th marker after another 24-25-26-27-28 sts, 6th marker after another 20-22-24-26-28 sts (24-25-26-27-28 sts remain on round after last marker). When piece measures 3 cm, inc as follows: Inc 1 st on each side of 1st and 4th marker, inc 1 st after 2nd and 5th marker and 1 st before 3rd and 6th marker – READ INCREASE TIP (= 8 sts inc). Inc every 2-2½-2½-3-3 cm 13-13-14-14-15 times in total = 240-248-264-272-288 sts. When piece measures 29-34-38-42-46 cm, dec 0-2-0-2-0 st evenly on round = 240-246-264-270-288 sts, then work according to A.2. When A.2 has been worked one time vertically, there are 280-287-308-315-336 sts on round. Work 2 RIDGES - see explanation above, and cast off. SLEEVE: Slip sts from one stitch holder on double pointed needles size 4 mm, cast in addition on 6 sts mid under sleeve (insert 1 marker in the middle of these sts) = 50-54-58-64-68 sts. NOW MEASURE PIECE FROM HERE! Work in stocking st in the round with light pearl grey. When sleeve measures 2 cm, dec 1 st on each side of marker. Repeat dec every 4½-3½-4-3-3½ cm 5-7-7-10-10 times in total = 40-40-44-44-48 sts. When piece measures 20-25-29-32-36 cm, adjust no of sts to = 42-42-48-48-48. Work A.3, when A.3 has been worked one time vertically, there are 49-49-56-56-56 sts on round. Work 2 ridges in garter st, cast off. Work the same way over the sts on the other stitch holder. ASSEMBLY: Sew the openings under the sleeves. CROCHET EDGE: Work a finishing edge around the bottom of dress on hook size 3.5 mm as follows with light pearl grey: 1 dc in first st, * 3 ch, 1 tr in 1st ch worked, skip 2 or 3 sts, 1 dc in next st *, repeat from *-* the entire round and finish with 1 sl st in 1st dc from beg of round. Fasten off. Crochet the same way around the sleeves. |
|||||||||||||||||||
Diagram explanations |
|||||||||||||||||||
|
|||||||||||||||||||
 |
|||||||||||||||||||
 |
|||||||||||||||||||
 |
|||||||||||||||||||
Have you finished this pattern?Tag your pictures with #dropspattern #forestdancedress or submit them to the #dropsfan gallery. Do you need help with this pattern?You'll find 29 tutorial videos, a Comments/Questions area and more by visiting the pattern on garnstudio.com. © 1982-2026 DROPS Design A/S. We reserve all rights. This document, including all its sub-sections, has copyrights. Read more about what you can do with our patterns at the bottom of each pattern on our site. |
|||||||||||||||||||


With over 40 years in knitting and crochet design, DROPS Design offers one of the most extensive collections of free patterns on the internet - translated to 17 languages. As of today we count 324 catalogues and 12290 patterns translated into English (UK/cm). 12290
We work hard to bring you the best knitting and crochet have to offer, inspiration and advice as well as great quality yarns at incredible prices! Would you like to use our patterns for other than personal use? You can read what you are allowed to do in the Copyright text at the bottom of all our patterns. Happy crafting!
Post a comment to pattern DROPS Children 27-9
We would love to hear what you have to say about this pattern!
If you want to leave a question, please make sure you select the correct category in the form below, to speed up the answering process. Required fields are marked *.