
Popular categories
Looking for a yarn?


Comments / Questions (16)
![]() Lynn wrote:
Lynn wrote:
Looks nice
20.03.2024 - 21:56
![]() Carole wrote:
Carole wrote:
Merci beaucoup pour la rapidité. Dernière question, la suite dit de faire une autre série de 16 rangs raccourcis. Est-ce avec les 6 côtes mousse comme la suite précédente et encore 15 fois? Merci.
26.08.2019 - 17:30DROPS Design answered:
Bonjour Carole, vous devez ensuite tricoter les 16 rangs des RANGS RACCOURCIS seulement (ceux expliqués au tout début des explications). Bon tricot!
27.08.2019 - 09:19
![]() Carole wrote:
Carole wrote:
Bonjour, j'ai terminé les augmentations et cela dit de continuer à faire les rangs raccourcis et les côtes mousse encore 14 fois. Est ce vraiment 14 fois ou 15 fois vu qu'ils disent "Encore"? De plus, par la suite, ça dit de faire une autre série de rang raccourcis. Est-ce avec les 6 côtes mousse comme la suite précédente et est-ce encore 14 ou 15 fois? Merci.
26.08.2019 - 15:46DROPS Design answered:
Bonjour Carole, on répète de *-* encore 14 fois, autrement dit, on va tricoter de *à* 15 fois au total. Bon tricot!
26.08.2019 - 16:22
![]() Carole wrote:
Carole wrote:
Merci beaucoup pour les explications, mais la chose que je ne comprend pas c’est que je me demande ce que vous voulez dire par 6 côtes mousse? Pour moi des côtes c’est comme faire une bordure de manche. 🙄
20.08.2019 - 02:12DROPS Design answered:
Bonjour Carole, pour former 1 côte mousse, on doit tricoter 2 rangs endroit - cf POINT MOUSSE au début des explications, ainsi, pour avoir 6 côtes mousse, on va tricoter 12 rangs endroit. Bon tricot!
20.08.2019 - 09:25
![]() Carole wrote:
Carole wrote:
Bonjour, Je fais le modèle 170-13, et je suis rendu aux rangs raccourcis. Cependant, je ne comprend ce que l’on veut dire par 6 côtes mousse? voir le texte copié ci-dessous. “ Après les rangs raccourcis, tricoter 6 côtes mousse en allers et retours sur toutes les mailles avec la bordure picot comme avant*, répéter de *-* encore 4 fois“
19.08.2019 - 00:38DROPS Design answered:
Bonjour Carole, la partie à répéter est la suivante: 16 rangs en rangs racourcis (4 augmentations) + 12 rangs (= 6 côtes mousse (= 3 augmentations)) soit 28 rangs au total que vous répétez 5 fois au total; Vous avez maintenant 70 mailles (= 35 m + 5 fois 7 augmentations). Bon tricot!
19.08.2019 - 11:22
![]() Zaza wrote:
Zaza wrote:
Merci, cordialement zaza
12.02.2018 - 15:43
![]() Zaza wrote:
Zaza wrote:
Bonjour, Merci pour votre réponse mais cela ne me dit pas si j'ai bien compris quand j'explique les points que je fais. Par contre, quand on regarde la photo du modele il y a à mon avis des trous je pense qu'ils représentent chaque transition des rangs raccourcis si on les évite à mon avis cela enlèvera le charme du modele merci de votre réponse zaza
12.02.2018 - 11:08DROPS Design answered:
Bonjour Zaza, en fonction de là où vous en êtes de la bordure picot, il m'est difficile de vous dire quel rang tricoter, mais suivez les rangs de la bordure picot comme avant aux rangs raccourcis. Pour les jours des rangs raccourcis, tricotez simplement comme expliqué: tricotez le nombre de mailles indiqué, tournez et tricotez les mailles indiqué et ainsi de suite. Bon tricot!
12.02.2018 - 14:18
![]() Zaza wrote:
Zaza wrote:
Bonjour, je suis arrivée aux rangs raccourcis. Rang 1 : 30 m end, 1 jeté, 1 m end, 4 m end (rg 1 bordure) Rang 2 : 4 m end, 21 m end, tourner Les Rangs 3, 5, 7, 9, 11, 13, 15 ne sont pas noté Je pense que le rang 3 se fait ainsi : 21 m end, 2 m ensemble a l'endroit, 1 jeté, tricoter 2 fois à l'endroit chacune des 2 dernières mailles Pourriez vous me dire si j'ai bien compris Merci pour votre aide zaza
10.02.2018 - 11:18DROPS Design answered:
Bonjour Zaza, sur l'endroit, tricotez à l'endroit jusqu'au marqueur et terminez par la bordure picot (à celui des 4 rans correspondansts) c'est-à-dire comme au 1er rang, en ajustant le rang de la bordure picot. Bon tricot!
12.02.2018 - 08:35
![]() Helle wrote:
Helle wrote:
Sorry, I didnt read it right, now I understand :o))
15.01.2017 - 12:34Helle wrote:
Hey garnstudio 😀 you have written, that we will repeat the pattern 14 times in the last time we knit the center, is it not 4 times like first time of the center of the sjal ?
11.01.2017 - 10:07
|
|
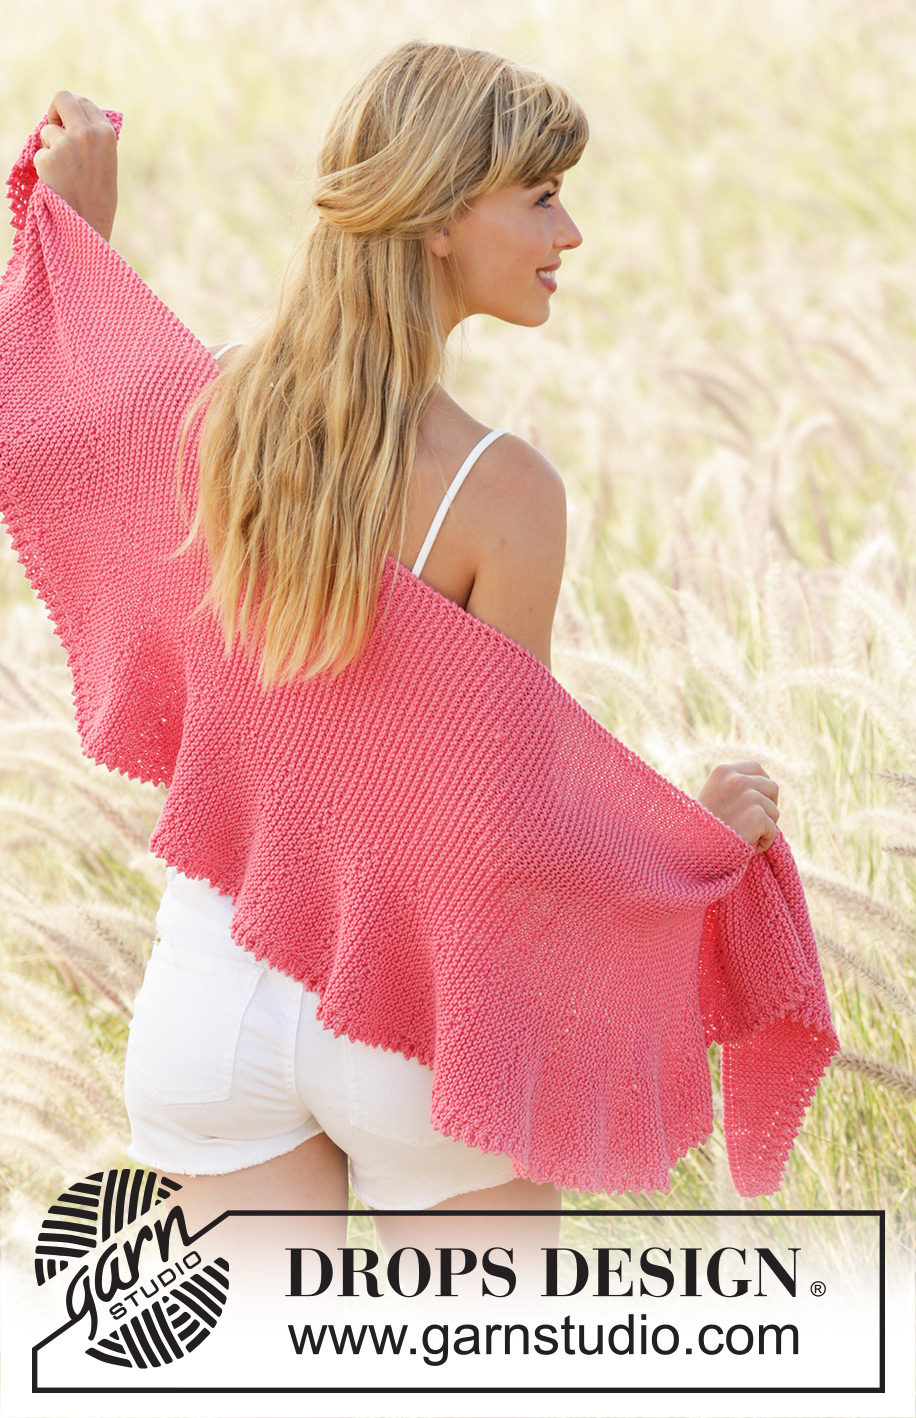
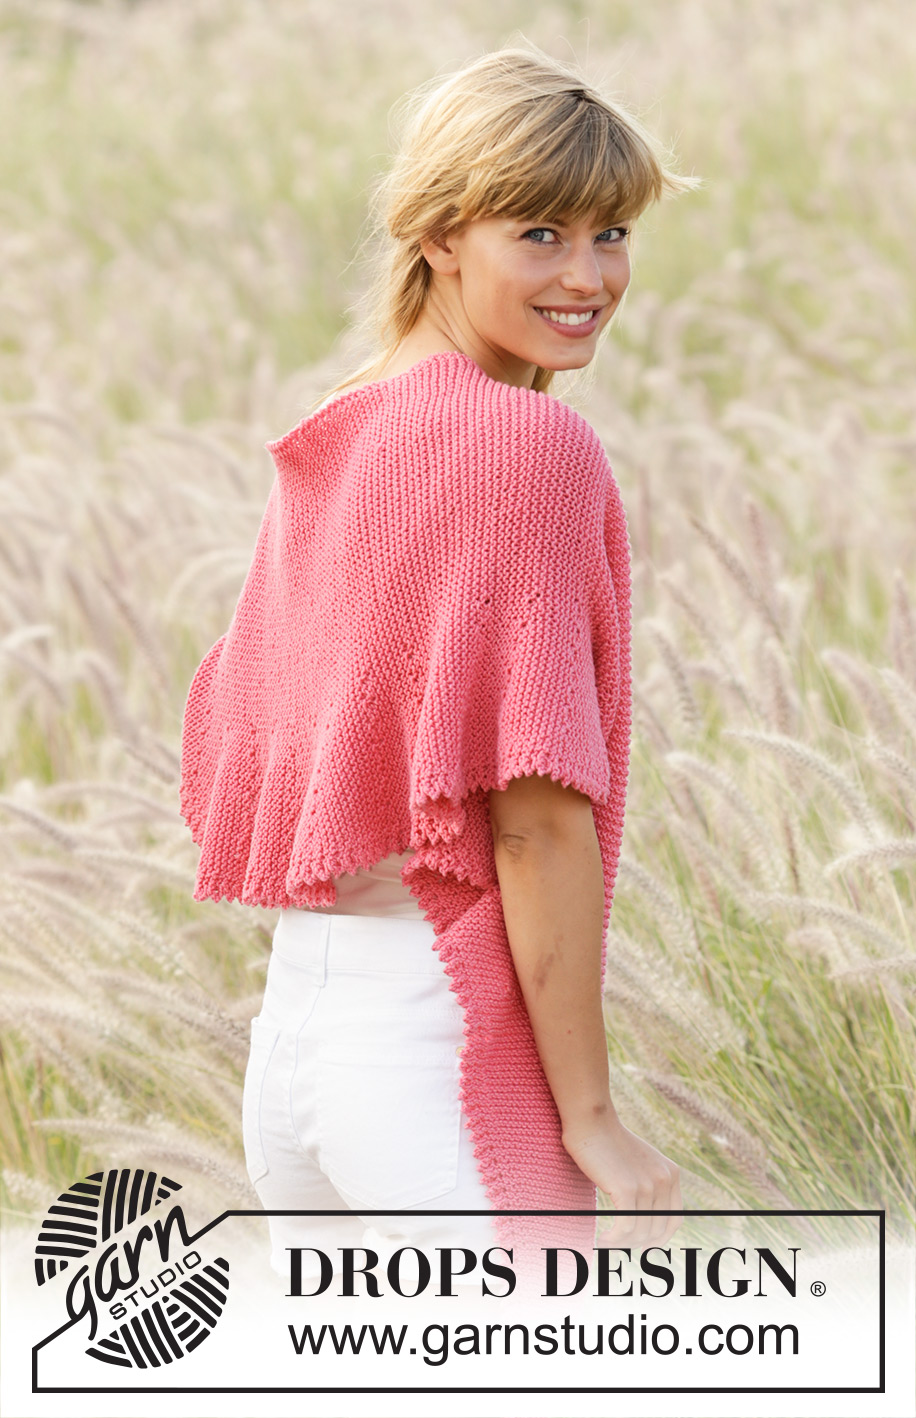
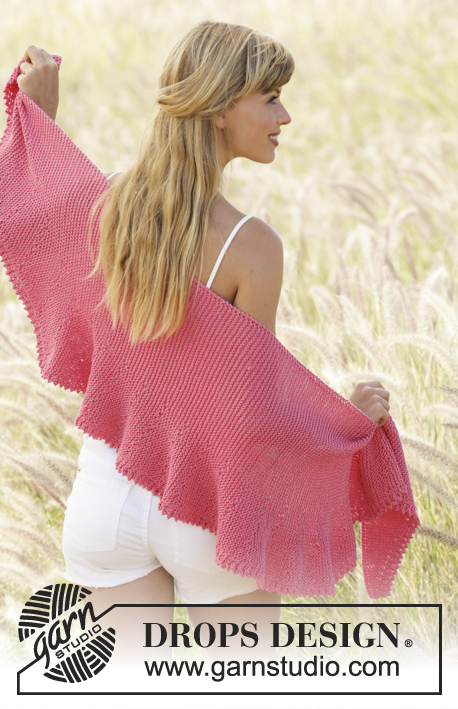
Pink Sorbet#pinksorbetscarf |
|
 |
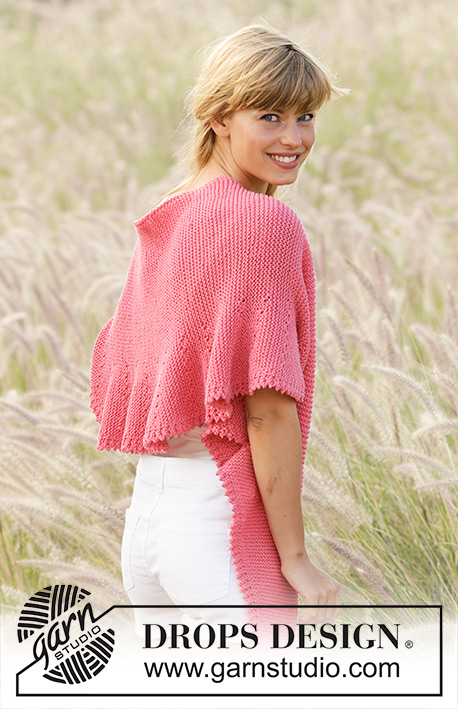 |
Knitted DROPS shawl in garter st with short rows and picot edge in “Cotton Merino”.
DROPS 170-13 |
|
|
GARTER ST (back and forth): K all rows. 1 ridge = 2 rows K. PICOT EDGE: Worked over the last 4 sts on row (seen from RS): Row 1 (= RS): K all sts. Row 2 (= WS): K all sts. Row 3 (= RS): K 2 tog, 1 YO, K 2 sts in each of the last 2 sts on row (= 2 sts inc and 6 sts in picot edge). Row 4 (= WS): Slip first st as if to K, K 1 and psso, K 1 and slip the last st on right needle over the foremost st (= dec 2 sts), K 3. Repeat rows 1 to 4. INCREASE TIP: All inc are done from RS. Inc 1 st by making 1 YO. On next row K YO twisted to avoid holes. DECREASE TIP: All dec are done from RS! Beg 2 sts before marker, K 2 tog. SHORT ROWS: Work short rows at the end of every row from RS and at beg of every row from WS, AT THE SAME TIME continue picot edge after marker (seen from RS). Row 1 (= RS) and every row from RS: K until marker, work picot edge. Row 2 (= WS): Work picot edge until marker, K 21, turn piece. Row 4: Work picot edge until marker, K 18, turn piece. Row 6: Work picot edge until marker, K 15, turn piece. Row 8: Work picot edge until marker, K 12, turn piece. Row 10: Work picot edge until marker, K 9, turn piece. Row 12: Work picot edge until marker, K 6, turn piece. Row 14: Work picot edge until marker, K 3, turn piece. Row 16: Work picot edge until marker, then K the rest of row - NOTE: To avoid holes in transitions between turns on fan, slip yarn between 2 sts in every turn twisted back on needle and K tog with the next st on left needle. ---------------------------------------------------------- SHAWL: Work entire shawl in GARTER ST - see explanation above, with picot edge along one side. Worked back and forth on circular needle from side to side. Cast on 6 sts on circular needle size 4 mm with Cotton Merino. K 1 row from WS. Insert 1 marker after the first 2 sts on row (seen from RS) = 4 sts after marker for picot edge. Then work as follows: Row 1 (= RS): K 1, inc 1 st – READ INCREASE TIP, K 1, marker, work PICOT EDGE – see explanation above. Row 2 (= WS): Work picot edge until marker, K the rest of row (K YO twisted). Row 3: K until marker, work picot edge. Row 4: Work picot edge until marker, K the rest of row. Row 5: K until 1 st remains before marker, inc 1 st, K 1, work picot edge. Row 6: Work picot edge until marker, K the rest of row (K YO twisted). Row 7: K until marker, work picot edge. Row 8: Work picot edge until marker, K the rest of row. Repeat 5th-8th row 27 more times = 35 sts on row. REMEMBER THE KNITTING TENSION READ ALL OF THE FOLLOWING SECTION BEFORE CONTINUING! * Work SHORT ROWS - see explanation above (= 16 rows in total - NOTE: Continue inc before picot edge as before every 4th row). After short rows work 6 ridges back and forth over all sts with picot edge as before *, repeat from *-* 4 more times. There are now 70 sts on row and piece measures approx. 45 cm (measures at beg of row seen from RS). Insert a marker at beg of row (seen from RS). Inc are now done. Continue as follows from RS: * Work short rows (= 16 rows in total), work 6 ridges back and forth over all sts with picot edge as before *, repeat from *-* 14 more times, then work 1 repetition more with short rows (= 16 rows). Piece measures 50 cm from marker and approx. 95 cm cast-on edge. READ ALL OF THE FOLLOWING SECTION BEFORE CONTINUING! Now dec beg. Work as follows: * Work 6 ridges back and forth over all sts with picot edge as before but now dec 1 st every 4th row (i.e. every other row from RS) – READ DECREASE TIP. After the 6 ridges work short rows (continue dec before picot edge as before every 4th row) *, repeat from *-* 4 more times = 35 sts remain on needle and piece measures approx. 112 cm from cast-on edge. Then work as follows: Row 1 (= RS): K until 2 st remains before marker, dec 1 st, work picot edge. Row 2 (= WS): Work picot edge until marker, K the rest of row. Row 3: K until marker, work picot edge. Row 4: Work picot edge until marker, K the rest of row. Repeat 1st-4th row 28 more times = 6 sts remain on row. K 1 row from RS and cast off with K from WS. |
|
Have you finished this pattern?Tag your pictures with #dropspattern #pinksorbetscarf or submit them to the #dropsfan gallery. Do you need help with this pattern?You'll find 12 tutorial videos, a Comments/Questions area and more by visiting the pattern on garnstudio.com. © 1982-2026 DROPS Design A/S. We reserve all rights. This document, including all its sub-sections, has copyrights. Read more about what you can do with our patterns at the bottom of each pattern on our site. |
|


With over 40 years in knitting and crochet design, DROPS Design offers one of the most extensive collections of free patterns on the internet - translated to 17 languages. As of today we count 324 catalogues and 12290 patterns translated into English (UK/cm). 12290
We work hard to bring you the best knitting and crochet have to offer, inspiration and advice as well as great quality yarns at incredible prices! Would you like to use our patterns for other than personal use? You can read what you are allowed to do in the Copyright text at the bottom of all our patterns. Happy crafting!
Post a comment to pattern DROPS 170-13
We would love to hear what you have to say about this pattern!
If you want to leave a question, please make sure you select the correct category in the form below, to speed up the answering process. Required fields are marked *.