
Popular categories
Looking for a yarn?


Comments / Questions (52)
![]() Lise-Gro Henriksen wrote:
Lise-Gro Henriksen wrote:
Hei. Maskeantallet stemmer ikke når jeg setter merketrå for raglanfelling. Er sikker på at jeg har fulgt maskeantallet i mønsteret . Forslag til hva jeg skal gjøre videre?
27.11.2018 - 13:14DROPS Design answered:
Hei Lise-Gro. Så etter å ha økt masker jevnt fordelt har du nå (86) 86-102-102-118 (134-134) masker på pinnen. Hvilken størrelse strikker du? vi kan enklere forklare deg akkurat hva du skal gjøre om vi vet hvilken størrelse du strikker nemlig. Hilsen Drops
29.11.2018 - 14:25Dhanam wrote:
Hi, me again - I counted the total stitches in 1/3 month size - starting with 86 after the increase in the yoke section. In the following pattern - the stitches totoalled to 96 !
03.02.2018 - 18:37DROPS Design answered:
Hi Dhanam, You have a total of 12 band stitches in garter stitch, + 2 x A.1 (4 stitches), + K2, P2 x 17 (68 stitches) + P2, which is a total of 86 stitches. Hope this helps and happy knitting!
04.02.2018 - 06:53Salomé wrote:
I am already done with the yoke and the neck elevation, there is no indication whether you start the diagram on the row where you make a stitch or whether you start at the bottom which is just plain knitting. Normally the diagrams are numbered, but yours is not.
31.12.2017 - 19:07DROPS Design answered:
Dear Salomé, start reading diagram on the bottom corner on the right side, from the right towards the left from RS (and every round), and from the left towards the right from WS when working back and forth. Happy knitting!
02.01.2018 - 11:20Salomé wrote:
Hi there, I have an uncertainty about where to start with the diagram, normally it is numbered starting from the bottom. I am to start on the pattern after the increase but am not sure whether to start from the bottom of the diagram which is a make one row or do I start at the top which is just plain knit?
29.12.2017 - 19:40DROPS Design answered:
Dear Salomé, after you finish knitting the yoke (including the elevation of the back) you start the patterned stitches with the first row of the diagram. Happy Knitting!
30.12.2017 - 15:54
![]() Cathrine wrote:
Cathrine wrote:
Hei Strikker denne i størrelse 0/1. Frem til bærestykket er det ok, og det står at man skal ha 86 m på pinnen. På neste omgang gjør man klart til raglan og oppskriften er delt etter størrelse. Det som står på størrelse 0/1 stemmer ikke med det maskeantallet man har. Derimot stemmer det som står på prematurstørrelsen, og man har jo samme maskeantall som prematurstørrelsen avslutter med i avsnittet over.
06.10.2017 - 13:27
![]() Lisa wrote:
Lisa wrote:
Stemmer det verkeleg at pinnestr. 3,5 gjev strikkefasthet 24 m x 32 p glattstrikk på 10 x 10 cm? Ser på andre oppskrifter med akkurat same garn at det står at pinnestr. 3 gjev strikkefasthet 24 m x 32 p glattstrikk på 10 x 10 cm, og skjønar ikkje heilt korleis det på akkurat denne oppskrifta (og tilsvarande i Simply Sweet Singlet) er slik at ein må ha større pinnar for same strikkefasthet..
26.07.2017 - 18:28DROPS Design answered:
Hei Lisa. På denne bodyen er det den strikkefastheten som er oppgitt, men om du får samme strikkefasthet med å bruke pinne nr 3.0, kan du fint bruke det. Det som er viktig er å få strikkefastheten som er oppgitt for å få de målene som er i oppskriften. God Fornøyelse!
07.08.2017 - 12:39Ni wrote:
Hi, I am just knitting this pattern but am stuck in the middle of the "all sizes" section where it says: for the rs " place pieces together (...). Work 1 round in the round (...), work the rest of the round, cut the yarn and beg next round mid back". I understand the knitting tog the 6 band stitches, but why don't I just continue in the round from there. Why do I just continue for one round, then cut the yarn and Beginn mid back? Somehow stick here... thank you
29.05.2017 - 17:32DROPS Design answered:
Dear Ni, you have then to finish this round, but at the end of this round (when reaching the previous beg of rows), cut the yarn. You continue now in the round but from mid back: join the yarn on mid back and continue in the round from mid back. Happy knitting!
29.05.2017 - 18:17
![]() Birthe Isaksen wrote:
Birthe Isaksen wrote:
Hej, jeg er ved at strikke denne sag, men er i tvivl om raglan indtagninger,Under emnet alle str,1/3 mdr, gentag udt, 7 gange til total 8 gange, men skal der tages ud endnu 8 gange, da jeg ikke kan få raglan målene til at passe på 8 cm, hvis ikke der skal tages mere ud. Strikke fastheden passer. Håber det er forståeligt, som jeg ser skal raglan målene være 10 cm. Kh Birthe
03.11.2016 - 13:31DROPS Design answered:
Hej Birthe. Du tager ud i hver anden pind 8 gange i alt = 16 pinde strikket. Du har 32 p paa 10 cm, saa det er 5 cm til raglan. Du har allerede strikket kant/förhöjning bag. Dit aermegab (maalt lige ned - altsaa ikke maalt i "raglanlinien") skal vaere ca. 6 cm i str 1/3 mdr.
03.11.2016 - 15:50
![]() Elisabeth Jensen wrote:
Elisabeth Jensen wrote:
Jeg forstår ikke raglandøknignen. Fordi det står at jeg øke ved "1 kast på hver side av de 2 m rett i hver raglanlinje (sett fra retten). " Men etter første pinne med A1 og så en pinne vrang tilbake (stemmer det) så har jeg 1maske, 1 kast som nå er strikket til en mase og en maske. For å øke skal jeg da ta et kast strikke de 3 maskene og så et kast til?
13.07.2016 - 22:30DROPS Design answered:
Hej Elisabeth, du skal altid øge på hver side af de 2 rett i raglanlinjen, det vil sige at du kun skal have de 2 masker imellem kasten. Når du strikker kasten på næste pind, så skal de strikkes ind i mønsteret. God fornøjelse!
29.03.2017 - 08:46
![]() Tonje wrote:
Tonje wrote:
Hei, jeg oppdaget at jeg har begynt på mønsteret i feil retning, dvs jeg har begynt med to rette uten kast, så tre masker med felling osv.. Gjør det noe at jeg har strikket mønsteret omvendt, eller kan jeg bare fortsette sånn?
15.05.2016 - 17:07DROPS Design answered:
Hej Tonje. Nej, det tror jeg ikke gör noget. Men se hvordan det gaar.
17.05.2016 - 13:36
|
||||||||||
Simply Sweet#simplysweetonesie |
||||||||||
|
|
||||||||||
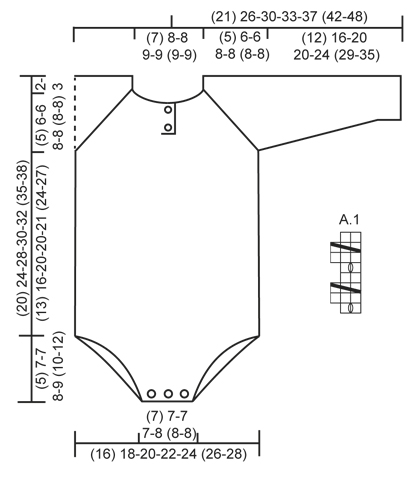
Knitted baby body in rib, worked top down in DROPS BabyMerino. Size premature – 4 years.
DROPS Baby 25-30 |
||||||||||
|
GARTER ST (back and forth on needle): K all rows. 1 ridge = 2 rows K. PATTERN: See diagram A.1. The diagram shows all rows in pattern seen from RS. RAGLAN: All inc are done from RS. Inc 1 st on each side of the 4 raglan lines by making 1 YO on each side of the 2 sts K in each raglan line (seen from RS). Work YOs into rib, i.e. P the first 2 sts from WS, K the next 2 sts from WS etc. – NOTE: Do not work YOs twisted (i.e. there should be holes on each side of the 2 K sts in raglan line). BUTTONHOLES: Dec for buttonholes on right band. 1 buttonhole = K tog third and fourth st from edge and make 1 YO (dec for buttonholes from WS). Dec for buttonholes when piece measures: SIZE (premature): 1 and 3 cm. SIZE 0/1 month + 1/3 months: 1 and 4 cm. SIZE 6/9 months + 1218 months: 1 and 4½ cm. SIZE (2 years + 3/4 years): 1 and 5 cm. DECREASE TIP 1 (applies to leg opening): Dec inside 3 edge sts in garter st. FROM RS: Dec after 3 sts in garter st as follows: P 2 twisted tog. Dec as follows before 3 sts in garter st (beg when 5 sts remain on row): P 2 tog. FROM WS: Dec after 3 sts in garter st as follows: K 2 twisted tog. Dec as follows before 3 sts in garter st (beg when 5 sts remain on row): K 2 tog. DECREASE TIP 2 (applies to sleeves): Work until 3 sts remain before marker, work 2 sts tog (in rib), work 2 sts (marker is between these 2 sts) and then work 2 sts twisted tog (in rib). ---------------------------------------------------------- BODY: The piece is worked top down. Work back and forth on circular needle to after neck vent, then work piece in the round on double pointed needles/circular needles before dividing for legs. Work sleeves in the round on double pointed needles. YOKE: Cast on (54) 60-60-64-74 (74-74) sts (incl 6 band sts in each side towards mid front) on circular needle size 3.5 mm with off white Baby Merino. Work 2 RIDGES in garter st - see explanation above (1st row = RS). Then work an elevation in the back of neck as follows (1st row = RS): K until (6) 8-8-8-10 (10-10) sts remain, turn, tighten yarn and work until (6) 8-8-8-10 (10-10) sts remain in the other side. Turn piece, tighten yarn and work until (12) 16-16-16-20 (20-20) sts remain, turn piece, tighten yarn and work back until (12) 16-16-16-20 (20-20) sts remain. Turn piece, tighten yarn and work until (18) 24-24-24-30 (30-30) sts remain, turn, tighten yarn and work until (18) 24-24-24-30 (30-30) sts remain in the other side. Turn piece, tighten yarn and work the rest of the row. Work next row as follows from WS: K 6 band sts, P the next (42) 48-48-52-62 (62-62) sts AT THE SAME TIME inc (32) 26-42-38-44 (60-60) sts evenly over these sts and finish with K 6 band sts (remember BUTTONHOLES on band – see explanation above) = (86) 86-102-102-118 (134-134) sts on needle. WORK NEXT ROW AS FOLLOWS FROM RS: SIZE (premature) + 0/1 month: 6 band sts in GARTER ST – see explanation above, K 2, P 2, A.1 (= 2 sts), P 2, K 2 (insert 1 marker in the middle of these 2 sts = raglan line), * P 2, K 2 *, repeat from *-* 3 times in total, P 2, K 2 (insert 1 marker in the middle of these 2 sts = raglan line), * P 2, K 2 *, repeat from *-* 5 times in total, P 2, K 2 (insert 1 marker in the middle of these 2 sts = raglan line), * P 2, K 2 *, repeat from *-* 3 times in total, P 2, K 2 (insert 1 marker in the middle of these 2 sts = raglan line), P 2, A.1 (= 2 sts), P 2, K 2 and 6 band sts in GARTER ST. SIZE 1/3 months + 6/9 months + 12/18 months: 6 band sts in GARTER ST – see explanation above, K 2, P 2, A.1 (= 2 sts), P 2, K 2, P 2, K 2 (insert 1 marker in the middle of these 2 sts = raglan line), * P 2, K 2 *, repeat from *-* 3-3-5 times in total, P 2, K 2 (insert 1 marker in the middle of these 2 sts = raglan line), * P 2, K 2 *, repeat from *-* 7 times in total, P 2, K 2 (insert 1 marker in the middle of these 2 sts = raglan line), * P 2, K 2 *, repeat from *-* 3-3-5 times in total, P 2, K 2 (insert 1 marker in the middle of these 2 sts = raglan line), P 2, K 2, P 2, A.1 (= 2 sts), P 2, K 2 and 6 band sts in GARTER ST. SIZE (2 years + 3/4 years): 6 band sts in GARTER ST – see explanation above, ** K 2, P 2, A.1 (= 2 sts), P 2 **, repeat from **-** 2 times in total, K 2 (insert 1 marker in the middle of these 2 sts = raglan line), * P 2, K 2 *, repeat from *-* 5 times in total, P 2, K 2 (insert 1 marker in the middle of these 2 sts = raglan line), * P 2, K 2 *, repeat from *-* 9 times in total, P 2, K 2 (insert 1 marker in the middle of these 2 sts = raglan line), * P 2, K 2 *, repeat from *-* 5 times in total, P 2, K 2 (insert 1 marker in the middle of these 2 sts = raglan line), ** P 2, A.1 (= 2 sts), P 2, K 2 **, repeat from **-** 2 times in total and finish with 6 band sts in GARTER ST. ALL SIZES: Continue pattern like this back and forth. AT THE SAME TIME on next row from RS inc for RAGLAN – see explanation above (= 8 sts inc). Repeat inc every other row/round (i.e. every row from RS) (7) 7-7-11-11 (11-11) more times (= (8) 8-8-12-12 (12-12) inc in total on each side of every raglan line). AT THE SAME TIME when piece measures (4) 5-5-6-6 (7-7) cm, band ends and piece is worked in the round on needle as follows (adjust so that next row is worked from RS): Place piece tog with sts from right band at the top (so that bands are on top of each other and buttonholes are at the edge). Work 1 round in the round AT THE SAME TIME K tog the 6 sts from right and left band 2 by 2, work the rest of round, cut the yarn and beg next round mid back. Continue rib and pattern in the round AT THE SAME TIME continue inc for raglan as before but work the 6 sts mid front as follows: P 2, A.1 (= 2 sts) and P 2. After last inc for raglan there are (144) 144-160-192-208 (224-224) sts on needle. Work (0) 2-2-2-2 (2-2) more rounds as before, piece measures approx. (7) 8-8-10-11 (11-11) cm from shoulder. On next round slip the (32) 32-32-40-48 (48-48) sts between each marker over sleeve on stitch holders (work sts before slipping them on stitch holder) = (40) 40-48-56-56 (64-64) sts remain on front and back piece. BODY: = (80) 80-96-112-112 (128-128) sts. On next round cast on (8) 16-12-12-16 (16-20) LOOSE sts under each sleeve = (96) 112-120-136-144 (160-168) sts on body – NOW MEASURES PIECE FROM HERE. Place a marker each side. Continue rib in the round as before (= K 2/P 2) with A.1 at the front as before. When piece measures (13) 16-20-20-21 (24-27) cm from armhole, divide at the markers in each side and finish front and back piece separately. BACK PIECE: = (48) 56-60-68-72 (80-84) sts. Work rib back and forth as before but work the outermost 3 sts in each side in garter st. AT THE SAME TIME dec 1 st inside the 3 edge sts in each side – READ DECREASE TIP 1 (= 2 sts dec). Repeat dec on every row (i.e. from both RS and WS) (6) 10-12-16-14 (18-14) more times (= (7) 11-13-17-15 (19-15) times in total) and then every other row (i.e. every row from RS) (5) 5-5-5-7 (7-11) times in total = (24) 24-24-24-28 (28-32) sts remain on needle. K 1 row from RS while AT THE SAME TIME dec (8) 8-8-8-10 (10-12) sts evenly = (16) 16-16-16-18 (18-20) sts remain on needle. K 10 rows (= 5 ridges) and loosely cast off with K from WS. FRONT PIECE: = (48) 56-60-68-72 (80-84) sts. Work rib back and forth as before but work the outermost 3 sts in each side in garter st. AT THE SAME TIME dec 1 st inside the 3 edge sts in each side – READ DECREASE TIP 1 (= 2 sts dec). Repeat dec on every row (i.e. from both RS and WS) (11) 13-17-21-19 (23-17) more times (= (12) 14-18-22-20 (24-18) times in total) and then every other row (i.e. every row from RS) (0) 2-0-0-2 (2-8) times in total = (24) 24-24-24-28 (28-32) sts remain on needle. K 1 row from RS while AT THE SAME TIME dec (8) 8-8-8-10 (10-12) sts evenly = (16) 16-16-16-18 (18-20) sts on needle. K 1 row from WS. On next row (= RS), dec for 3 buttonholes as follows: K (3) 3-3-3-3 (3-4), * 1 YO, K 2 tog, K (2) 2-2-2-3 (3-3) *, repeat from *-* 1 more time, K 2 tog, 1 YO and K (3) 3-3-3-3 (3-4). K 4 rows (= 2 ridges) and loosely cast off with K from WS. SLEEVE: = (32) 32-32-40-48 (48-48) sts. Cast on (8) 16-12-12-16 (16-20) LOOSE sts under sleeve = (40) 48-44-52-64 (64-68) sts on needle (work in the round on double pointed needles). Insert 1 marker at beg of round (= mid under sleeve) - NOW MEASURE PIECE FROM HERE. Continue rib in the round as before (= K 2/P 2). AT THE SAME TIME when sleeve measures 1 cm, dec 1 st on each side of marker - READ DECREASE TIP 2. Repeat dec every (4) 4-6-6-6 (8-8) rows (3) 7-3-7-7 (7-7) more times (= (4) 8-4-8-8 (8-8) times in total) = (32) 32-36-36-48 (48-52) sts remain on needle. When sleeve measures (12) 16-20-20-24 (29-35) cm, loosely cast off with K over K and P over P. Work the other sleeve the same way. ASSEMBLY: Sew the openings under the sleeves. Sew 2 buttons on to left button band in the neck and 3 buttons at the bottom of body. |
||||||||||
Diagram explanations |
||||||||||
|
||||||||||
 |
||||||||||
Have you finished this pattern?Tag your pictures with #dropspattern #simplysweetonesie or submit them to the #dropsfan gallery. Do you need help with this pattern?You'll find 27 tutorial videos, a Comments/Questions area and more by visiting the pattern on garnstudio.com. © 1982-2026 DROPS Design A/S. We reserve all rights. This document, including all its sub-sections, has copyrights. Read more about what you can do with our patterns at the bottom of each pattern on our site. |
||||||||||


With over 40 years in knitting and crochet design, DROPS Design offers one of the most extensive collections of free patterns on the internet - translated to 17 languages. As of today we count 324 catalogues and 12290 patterns translated into English (UK/cm). 12290
We work hard to bring you the best knitting and crochet have to offer, inspiration and advice as well as great quality yarns at incredible prices! Would you like to use our patterns for other than personal use? You can read what you are allowed to do in the Copyright text at the bottom of all our patterns. Happy crafting!
Post a comment to pattern DROPS Baby 25-30
We would love to hear what you have to say about this pattern!
If you want to leave a question, please make sure you select the correct category in the form below, to speed up the answering process. Required fields are marked *.