Comments / Questions (111)
Brenda Labelle wrote:
Hello I am from Canada and have been doing crochet for 40 years but never took the time to actually learn to work with drawn patterns. I want to know if there is a complete written pattern about this particular pattern? Nostalgia is so lovely but I just cannot seem to get the hang of the drawings at all. I have tried a total of 6 times but it is not working out for me at all. Thank you for any info. :)
14.07.2015 - 05:47DROPS Design answered:
Dear Mrs Labelle, there is only diagram to this pattern, each symbol represents 1 st/1 group of st as stated under diagram text. Start diagram at the bottom corner on the right side towards the left from RS and from the left towards the right from WS. Remember you can get further individual assistance to this pattern with your DROPS store. Happy crocheting!
27.07.2015 - 11:26Elena wrote:
Hola saludos desde Ecuador,tengo una pregunta sombre este model con respecto a las indicaciones done existence does iguales Pero el diagrama es diferente es el 3 p de cadena --- y el Otro es ovalado negro' pueden poor favor explicarme en un video gracias por responderme.
30.06.2015 - 22:24DROPS Design answered:
Hola Elena, los 2 símbolos indican 3 p.de cad. Pero en cada caso se trabajan en diferente dirección. Simplemente están diferenciados para facilitar la vista del patrón.
03.07.2015 - 08:50
![]() Martina wrote:
Martina wrote:
Hallo, ich komme beim linken Vordert.nicht weiter. Wenn ich nach den 2 Stäbchenr. an der Ärmelseite mit A6 anfange und passend zum re. Vordert.hinlege so habe ich eine Rückr. (rechtes Vorderteil = Hinr.)Wenn ich am Halsausschnitt mit A5 anfange, dann sind meine Wendelm. bei A5 nicht von Reihe 3 zu 4 wie auf dem Diagramm sondern in R4 zu 5. So kann der Halsausschnitt nicht genau gegengleich sein.In welcher Reihenfolge muss ich die Muster beim linken Vorderl. nach der 2.R.häkeln?
07.06.2015 - 16:06
![]() Tiziana wrote:
Tiziana wrote:
Buongiorno sono arrivata alla 3'riga del dietro ma non capisco se devo fare 1 giro a maglia alta nella spalla dx e nel mezzo agg le 46 maglie per poi attaccare l'altra spalla dx ed avere in tt le 175 m. O se è in un altro modo! Grazie per la vs gentilissima e paziente risposta!
26.04.2015 - 15:01DROPS Design answered:
Buongiorno Tiziana. Alla terza riga del dietro, lavora come segue: 1 m.a in ogni m della spalla sinistra, avvia le 46 cat e poi lavora 1 m.a in ogni m della spalla destra, spalla che ha iniziato a lavorare prima e poi lasciato in sospeso. Buon lavoro!
26.04.2015 - 16:46
![]() . Veenema wrote:
. Veenema wrote:
Dwz dat er 3 symbolen zijn voor "losse", die waar je mee opzet(nr 1) de streepjes (nr 6) en het hele zwarte symbool (nr 5)??
18.04.2015 - 11:07DROPS Design answered:
Hoi Veenema. Ja en nee. Nummer 1 - donkere stip is 1 losse. De dikke zwarte "streep" is 3 lossen en ook de 3 dunne stipjes zijn gelijk aan 3 lossen. In de teltekening is er duidelijk verschil tussen deze verschillende symbolen en waar je ze gebruikt.
20.04.2015 - 13:15S. Veenema wrote:
Graag wil ik weten wat voor steek het geheel zwarte schuin liggende pictogram is. ik vind het is een moeilijk patroon, je moet de schema's steeds naast elkaar leggen om het te kunnen volgen, en de tekst loopt maar door en is onoverzichtelijk.
16.04.2015 - 15:22DROPS Design answered:
Hoi. Dat is het 5e symbool: 3 lossen
16.04.2015 - 15:48
![]() Roxane wrote:
Roxane wrote:
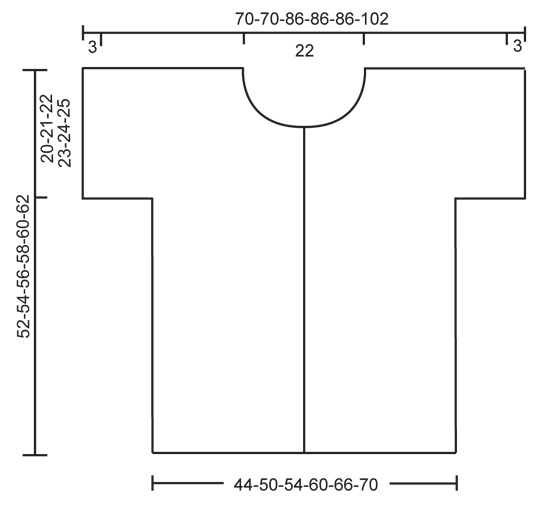
Sehr geehrte Damen und Herren, wie kann ich feststellen welche Größe ich häkeln muss? Sind die Nummern an dem Schnittmuster Reihen und Maschen oder cm Angaben? Beste Grüße Roxane
01.04.2015 - 19:37DROPS Design answered:
Es sind alles cm-Angaben, in der Reigenfolge, in der oben im Kopf die Größen angegeben sind. Sie können also Maß an sich nehmen und die für Sie passende Größe auswählen (das Brustmaß ist dabei das Wichtigste).
02.04.2015 - 09:52
![]() Tiziana wrote:
Tiziana wrote:
Sto eseguendo il davanti dx e sono arrivata ai 21 cm. di altezza totale. Ora continuo con i diagrammi come prima ma dopo solo una ripetizione di A.2 (invece di 2 e poi A.1), si dice di fare degli archetti fino a fine riga. Non capisco come fare. I miei complimenti per i modelli splendidi e per le spiegazioni. Grazie
21.03.2015 - 22:44DROPS Design answered:
Buongiorno Tiziana. Quando il lavoro misura 21 cm, non deve più lavorare sulle m della manica. Conti quante m ci sono in un cm. Lavora poi la riga successiva come segue (sul rovescio): diagrammi A.6, A.4 e A.2 (1 volta), 1 m.b nella m successiva, * 3 cat, salta le m che formano un cm e nella m successiva lavora 1 m.b *; ripete le indicazioni tra gli asterischi altre 2 volte, in modo da avere tre archi di cat. Giri il lavoro e prosegua lavorando la riga 3 del diagramma A6 negli archi di cat e le rimanti m come prima. Buon lavoro!
23.03.2015 - 14:47
![]() Susanne wrote:
Susanne wrote:
... (letzter Teil ;-) 4. Wird bei A.6 zum Wenden das jeweils erste Stb durch 3 Lm ersetzt (also 3 Lm + 2Stb - 2 Lm - 3Stb) oder werden die 3 WendeLm wie im Häkeltipp 2 in allen R extra gehäkelt (also 3Lm - 3Stb - 2Lm - 3Stb) oder gar keine WendeLM? ... Ich habe alle drei Varianten ausprobiert, aber es wird nie so eine schöne Kante mit runden Bögen, wie auf dem Photo :-( Danke schon mal für die Hilfe!
07.03.2015 - 00:24DROPS Design answered:
Die 3 Lm werden bei A.6 am Anfang jeder R zusätzlich als Wende-Lm gehäkelt und ergeben an sich diesen Bogenrand wie auf dem Foto.
08.03.2015 - 14:13
![]() Susanne wrote:
Susanne wrote:
... 3. werden die Stb. bzw. fM jeweils in den Bogen (also um die Lm herum) oder exakt in die Lm eingestochen, z. B. R.4 die Stb Nr. 2,3 und 4 bzw. 5,6,7 und 8 (z.B. in A.4); oder die fM in R.7 (in allen Mustern); oder die Stb. in A.6? ...
07.03.2015 - 00:23DROPS Design answered:
Reihe 4 A.1: Das 2. und 3. Stb häkeln Sie in die Lm, das 4. Stb in die 1. Lm der 3 Lm. Das 5. - 8. Stb der R wird um die einzelne Lm, die zwischen den beiden Stb der 3. R liegt, gehäkelt. Die fM können Sie im die Lm häkeln, die Stb in A.6 häkeln Sie ebenfalls um die Lm.
08.03.2015 - 14:07
Nostalgia#nostalgiacardigan |
||||||||||||||||||||||
|
|
||||||||||||||||||||||
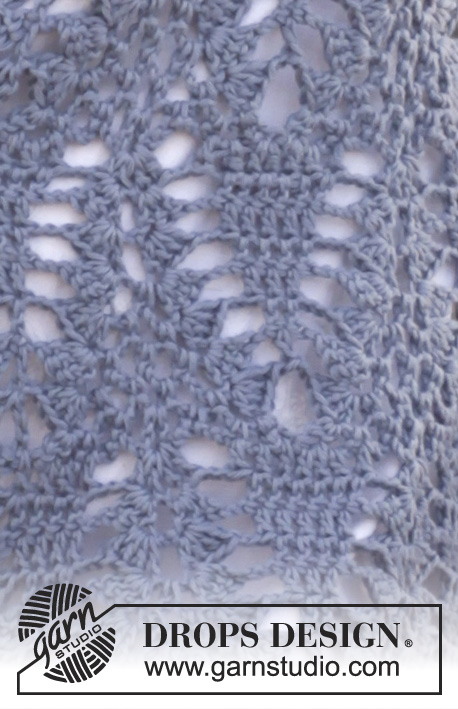
Crochet DROPS jacket with lace pattern in ”Safran”. Size: S - XXXL.
DROPS 152-3 |
||||||||||||||||||||||
|
CROCHET INFO: Replace first tr at beg of every tr row with 3 ch. CROCHET TIP 1: When one whole repetition of pattern vertically in diagrams A.1-A.4 have been worked, continue with pattern but now work A.X. CROCHET TIP 2: Work 3RD ROW of A.6 as follows over 6 tr: Work 3 ch (to turn with), 3 tr in 3rd tr from hook, 2 ch, 3 tr in next tr. On each row starting with A.6 (i.e rows with tr-groups) ch 3 to turn with before working A.6. Repeat pattern in chart from 4th row. CROCHET TIP 3: When working A.6 on front band work 1st row as follows: Work 3 ch (to turn with), 3 tr in 6th ch from hook, ch 2, 3 tr in next tr. On each row starting with A.6 (i.e rows with tr-groups) ch 3 to turn with before working A.6. Repeat pattern in chart from 4th row. PATTERN: See diagrams A.1 to A.6. The diagrams show all rows in pattern seen from RS. BUTTONHOLES: Measure from neck edge at the front and sew buttons on left band: SIZE S: 2, 8, 14, 20 and 26 cm SIZE M: 2, 8, 14, 20 and 26 cm SIZE L: 2, 9, 16, 23 and 30 cm SIZE XL: 2, 9, 16, 23 and 30 cm SIZE XXL: 2, 10, 18, 26 and 34 cm SIZE XXXL: 2, 10, 18, 26 and 34 cm ---------------------------------------------------------- JACKET: The piece is worked top down. RIGHT FRONT PIECE: Work 62-62-82-82-82-102 ch on hook size 4 mm with Safran. Work 1ST ROW (= RS)(= 1ST ROW in diagram A.1, A.2, A.3 and A.6) as follows: 1 tr in 4th ch from hook, 1 tr in next ch, * skip 1 ch, 1 tr in each of the next 4 ch *, repeat from *-* 11-11-15-15-15-19 times in total, skip 1 ch, 1 tr in last ch = 48-48-64-64-64-80 tr – READ CROCHET INFO. ROW 2: Work 1 tr in each of the 48-48-64-64-64-80 tr. ROW 3 (= RS): Then work PATTERN according to diagram A.6 over 6 tr 1 time - READ CROCHET TIP 2! Continue with A.1 over 18 tr, A.2 over 16-16-32-32-32-48 tr, and A.3 over 8 tr. Continue like this back and forth with pattern the same way, AT THE SAME TIME inc sts for neck in diagram A.3. When 1 whole repetition vertically of A.3 has been worked, work 23 new ch towards mid front for A.4 and A.6 (= band) – READ CROCHET TIP 1 and CROCHET TIP 3! Then work as follows with pattern from WS: A.6, A.4 over 17 ch, A.2 2-2-3-3-3-4 times, A.1 1 time, and A.6 1 time. Continue like this back and forth until piece measures 20-21-22-23-24-25 cm in total = right sleeve. On next row from WS continue as before with A.6, A.4 and A.2 until 1-1-2-2-2-3 repetitions of A.2 have been worked in width. Then work ch-spaces as follows: Work 1 dc in next st, * 3 ch, skip approx. 1 cm, 1 dc *, repeat 1-2-0-1-2-0 more times (= 2-3-1-2-3-1 ch-space in total). Turn and work as follows from RS: Beg on 3rd row in A.6 and work 1 repetition in the next 2-3-1-2-3-1 ch-space, continue with A.2, A.4 and A.6 as before until piece measures 52-54-56-58-60-62 cm in total, - or adjust after one whole repetition vertically. LEFT FRONT PIECE: Work 61-61-81-81-81-101 ch on hook size 4 mm with Safran. Work 1ST ROW (= RS)(= 1ST ROW in diagram A.2, A.4, A.5 and A.6) as follows: 1 tr in 4th ch from hook, * skip 1 ch, 1 tr in each of the next 4 ch *, repeat from *-* 11-11-15-15-15-19 times in total, skip 1 ch, 1 tr in last ch = 47-47-63-63-63-79 tr. ROW 2: Work 1 tr in each of the 47-47-63-63-63-79 tr. Then work as right front piece but reversed and work according to diagram A.5 instead of A.3, A.4 instead of A.1, and A.1 instead of A.4. BACK PIECE: Work right shoulder as follows: Work 62-62-82-82-82-102 ch on hook size 4 mm with Safran. Work 1ST ROW as follows: 1 tr in 4th ch from hook, 1 tr in next ch, * skip 1 ch, 1 tr in each of the next 4 ch *, repeat from *-* 11-11-15-15-15-19 times in total, skip 1 ch, 1 tr in last ch = 48-48-64-64-64-80 tr. ROW 2 (= 1ST ROW in diagram A.2, A.4 and A.6): Work 1 tr in each of the first 47-47-63-63-63-79 tr on row, work 2 tr in last tr on row = 49-49-65-65-65-81 tr. Cut the yarn and put piece aside. Work left shoulder as follows: Work 61-61-81-81-81-101 ch on hook size 4 mm with Safran. Work 1ST ROW as follows from RS: 1 tr in 4th ch from hook, * skip 1 ch, 1 tr in each of the next 4 ch *, repeat from *-* 11-11-15-15-15-19 times in total, skip 1 ch, 1 tr in last ch = 47-47-63-63-63-79 tr. ROW 2 (= 1ST ROW in diagram A.1, A.2 and A.6): Work 2 tr in the first tr on row, then work 1 tr in each of the remaining 46-46-62-62-62-78 tr on row = 48-48-64-64-64-80 tr. ROW 3: Work 1 tr in each of the next tr on left shoulder, work 46 LOOSE ch for neck, 1 tr in every tr on right shoulder = 143-143-175-175-175-207 tr. ROW 4: 1 repetition A.6 over 6 tr, A.4 over 17 tr, A.2 over 96-96-128-128-128-160 tr, A.1 over 18 tr, and finally A.6 over 6 tr - read CROCHET TIP 2. Continue this pattern back and forth until piece measures 20-21-22-23-24-25 cm in total (adjust according to front piece). Fasten off. Then work ch-spaces along one sleeve as on front piece – adjust to beg the same distance from edge on sleeve as on front piece and work ch-spaces as follows: * 1 dc, 3 ch, skip approx. 1 cm, 1 dc *, repeat 1-2-0-1-2-0 more times (= 2-3-1-2-3-1 ch-space in total). Continue over back piece with pattern as before, and finish with ch-spaces the same way in the other side. Continue as on front piece with A.6 in each side and pattern as before until piece measures 52-54-56-58-60-62 cm in total. ASSEMBLY: Sew the shoulder seams. Place front piece on top of back piece and work the sides and underarm seams tog in one as follows: Work 1 dc in front piece, 3 ch, 1 dc in back piece, * 3 ch, 1 dc in front piece approx. 1 cm higher up, 3 ch, 1 dc in back piece approx. 1 cm higher up *, repeat from *-*, finish with 1 sl st. Fasten off. Repeat in the other side. Sew buttons on to the left band and button through right band - see explanation above. NECK EDGE: When piece is assembled, work a neck edge as follows: Beg from RS, mid front on right band, fasten yarn with 1 sl st, * 3 ch, skip approx. 1 cm, 1 dc *, repeat from *-* around the entire neck. Fasten off. |
||||||||||||||||||||||
Diagram explanations |
||||||||||||||||||||||
|
||||||||||||||||||||||
 |
||||||||||||||||||||||
 |
||||||||||||||||||||||
 |
||||||||||||||||||||||
 |
||||||||||||||||||||||
Have you finished this pattern?Tag your pictures with #dropspattern #nostalgiacardigan or submit them to the #dropsfan gallery. Do you need help with this pattern?You'll find 8 tutorial videos, a Comments/Questions area and more by visiting the pattern on garnstudio.com. © 1982-2025 DROPS Design A/S. We reserve all rights. This document, including all its sub-sections, has copyrights. Read more about what you can do with our patterns at the bottom of each pattern on our site. |
||||||||||||||||||||||


Post a comment to pattern DROPS 152-3
We would love to hear what you have to say about this pattern!
If you want to leave a question, please make sure you select the correct category in the form below, to speed up the answering process. Required fields are marked *.