
Popular categories
Looking for a yarn?


Comments / Questions (74)
Ana Q wrote:
I think the diagram is wrong- if we work as it instructs we won't obtain a similar pattern to the image.
18.06.2016 - 19:50DROPS Design answered:
Dear Ana, diagrams are correct, remember to start reading diagrams from the bottom corner on the right side towards the left from RS and from the left towards the right from WS - read more here. Happy knitting!
20.06.2016 - 09:13
![]() Minni wrote:
Minni wrote:
Osaatteko sanoa mitä kokoa mallin päällä oleva neule on, S vai M?
15.07.2015 - 00:20DROPS Design answered:
Useimmiten mallien päällä olevat neuleet ovat kokoa S. Tarkista aina mitat mittapiirroksesta, ennen kuin aloitat neuletyön!
16.07.2015 - 14:09
![]() Lena wrote:
Lena wrote:
Varför går det inte att översätta frågor och svar till svenska??? Lena
11.07.2015 - 21:27
![]() Dorthe wrote:
Dorthe wrote:
Skal der strikkes vrang på vrangsiden, forstår ikke hvad man skal når der står strik 4 p
18.03.2015 - 20:59DROPS Design answered:
Hej Dorthe. Hvis du strikker retstrik skal du strikke ret paa vrangen og glatstrik vrang paa vrangen. Strikker du mönster (Som A.2) fölger du diagrammet og vr paa retten er r paa vrangen. Du skal strikke 4 pinde som beskrevet (RETSTRIK – se forkl over - over de første 5-7-9-13-17-23 m, 2 vr, 4 m glatstrik, A.2 (= 21 m), 4 m glatstrik, 2 vr, afslut med 2 r, 2 vr, 2 r (= forkant))
19.03.2015 - 13:39
![]() Borello wrote:
Borello wrote:
J'ai resolu le probleme des 5 m à la fois avec un crochet n°2.5 glisser les 5 m dessus , 1 jete passer a travers les 5 m et replacer la m obtenue sur l'aig, ne pas oublier la jetée avant les 5 dernieres m et bien glisser le crochet dans le meme sens que si tricoté... simple!
15.03.2015 - 20:45
![]() Carry Hagemann-Monasso wrote:
Carry Hagemann-Monasso wrote:
Het lukt me niet om 5 steken in eens samen te breien De stekenverhouding klopt wel. Ben erg benieuwd hoe dat moet ,al van alles geprobeerd Ciao Carry
14.01.2015 - 11:52DROPS Design answered:
Hoi Carry. Je kan eventueel proberen om eerst de 3 samenbreien en dan de volgende 2 samen breien. Haal vervolgens de eerste st (van de 3 samengebreide st) over de tweede (van de 2 samengebreide st).
14.01.2015 - 14:25
![]() Donna wrote:
Donna wrote:
I am having a problem with this pattern, as there are no instrutions for the back and neck. As I have already followed the patter for the left front and back piece, and something is missing I would appreciate having the rest of the pattern. Your reply would be greatly appreciated
13.11.2014 - 22:06DROPS Design answered:
Dear Donna, if you have worked left front piece/back piece, you have worked the left part of the jacket. The chart at the end of the pattern shows the knitting direction (so from bottom left front piece towards mid back) and the star mark the mid back, this part will be then sew tog with the sts from right front piece/back piece when assembly. Happy knitting!
14.11.2014 - 15:15
![]() Jenny wrote:
Jenny wrote:
Hallo, in der Anleitung wird sehr ausführlich beschrieben wie ich die Hin-R. stricke aber über die Rück-R. wird kein Wort verloren. Soll ich die Maschen auf der Rück-R. so stricken wie sie auf der Nadel erscheinen? Vielen Danke im vorraus
13.11.2014 - 21:20DROPS Design answered:
Sie stricken die Rück-R in der Musterfolge, die Sie in der Hin-R etabliert haben, und müssen dabei auf die Diagramme achten, dort sind die Rück-R ja eingezeichnet (die Diagramme zeigen in unseren Anleitungen immer alle R, soweit nicht anders angegeben).
15.11.2014 - 17:53
![]() Jenny wrote:
Jenny wrote:
Någon som kanske kan förklara denna beskrivning lite bättre? Väldig rörig beskrivning så helt ärligt så förstår jag inte ett smack. uppskattar en bättre förklaring
19.10.2014 - 20:14DROPS Design answered:
Hej Jenny, Vi kan inte skriva om beskrivningen! Men hur långt har du kommit? Vad är det du inte förstår, så skall vi försöka förklara i detalj!
20.10.2014 - 14:38
![]() Sabatier wrote:
Sabatier wrote:
Oui le diagramme A1 est fait sur 6 mailles. Mais 21 n'est pas divisible par 6 !! donc quand vous avez fait 3 fois le diagramme A1 , il vous reste 3 mailles (18x3 = 21) il faut en faire quoi de ces 3 mailles ?
30.06.2014 - 11:00DROPS Design answered:
Bonjour Mme Sabatier, Je ne suis pas sûre de comprendre, je suis désolée. À quel niveau souhaitez-vous tricoter 3 fois le diagramme A.1 ? Merci de m'en dire un peu plus pour pouvoir vous aider. Bon tricot!
30.06.2014 - 17:08
|
|||||||||||||||||||||||||
Audry#audrycardigan |
|||||||||||||||||||||||||
 |
 |
||||||||||||||||||||||||
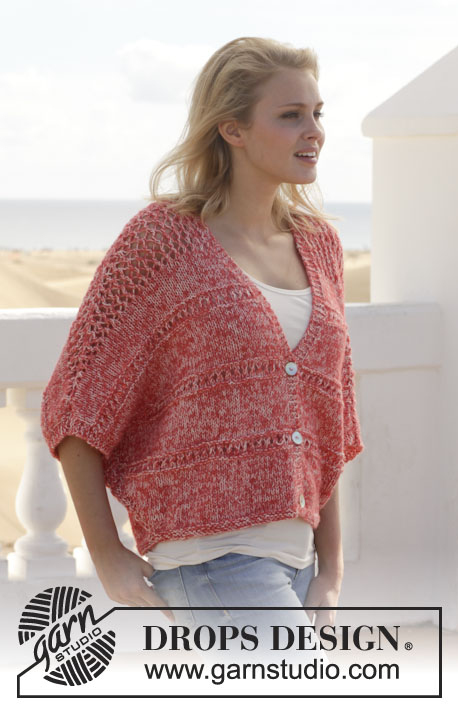
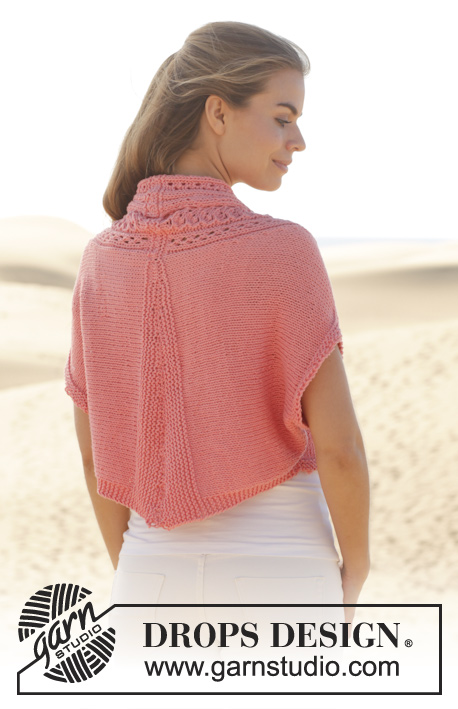
Knitted DROPS jacket with lace pattern and shawl collar in ”Paris”. Size: S - XXXL.
DROPS 154-20 |
|||||||||||||||||||||||||
|
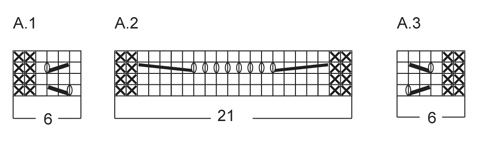
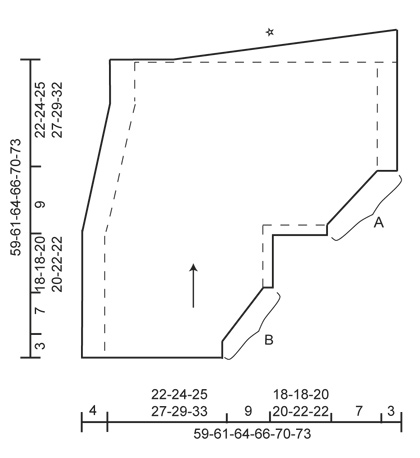
GARTER ST (back and forth on needle): K all rows. 1 ridge = 2 rows K. PATTERN: See diagrams A.1-A.3. The diagrams show all rows in pattern seen from RS. BUTTONHOLES: Dec for buttonholes on right band. 1 buttonhole = K tog 5th and 6th st from mid front. On next row cast on 1 new st over the dec st. Dec for buttonholes when piece measures: SIZE S: 6, 12 and 18 cm SIZE M: 6, 12 and 18 cm SIZE L: 6, 13 and 20 cm SIZE XL: 6, 13 and 20 cm SIZE XXL: 7, 14 and 21 cm SIZE XXXL: 7, 14 and 21 cm ---------------------------------------------------------- JACKET: Work back and forth in two parts from bottom edge on front piece to mid back. Sew the two parts tog when finished. LEFT FRONT PIECE/BACK PIECE: Worked back and forth on circular needle to make room for all the sts. Cast on 44-46-48-52-56-62 sts (incl 6 band sts towards mid front) on circular needle size 5 mm with Paris. Work as follows from RS: Work in GARTER ST – see explanation above - over the first 5-7-9-13-17-23 sts, P 2, 4 sts in stocking st, A.2 (= 21 sts), 4 sts in stocking st, P 2, finish with K 2, P 2, K 2 (= band). NOTE! Work band like this until finished measurements. Work 4 rows like this, then work as follows from RS: Work in garter st over the first 5-7-9-13-17-23 sts, A.3 (= 6 sts), A.2 (= 21 sts), A.1 (= 6 sts), finish with K 2, P 2, K 2 (= band). Continue until piece measures 3 cm. Then work in stocking st over the first 5-7-9-13-17-23 sts, A.3/A.2/A.1 and band sts (= K 2, P 2, K 2) as before AT THE SAME TIME on next row from WS beg inc towards the side and cast on new sts at the end of every row from WS as follows: Cast on 1 st 5 times in total and 2 sts 3 times in total. Work the new sts in stocking st. Then on next row from WS, cast on 5 new sts 1 time in total = 60-62-64-68-72-78 sts. Work the 5 new sts in garter st for sleeve edge. When piece measures 28-28-30-30-32-32 cm, LOOSELY cast on 30-30-34-34-38-38 new sts for sleeve at the end of next row from WS = 90-92-98-102-110-116 sts. Work the 30-30-34-34-38-38 new sts in garter st. Work 3 ridges in garter st over the new sts. Work the rest of sts as before. Then work in stocking st over all sts in garter st (work sts in stocking st until finished measurements). Now dec for neck as follows: Work in stocking st until 2 sts remain before A.3, slip 1 st as if to K, K 1, psso, repeat dec every 4th row 10 times in total. AT THE SAME TIME on next row from WS beg inc towards the side and cast on new sts at end of every row from WS as follows: Cast on 2 sts 5 times in total and 1 st 2 times in total. NOTE! Work the 12 new sts in stocking st. On next row from WS, cast on 5 new sts 1 time in total (work the 5 new sts in garter st until finished measurements). When neck dec is done, there are 97-99-105-109-117-123 sts on needle. Work as before until piece measures 58-60-63-65-69-72 cm. Adjust so that next row is from RS. Work 1 ridge over all sts AT THE SAME TIME on last row (= WS) cast off the first 39 sts. Then work in garter st AT THE SAME TIME cast off as follows: K all sts (= from RS), turn and * cast off the first 5-5-5-6-5-6 sts (= WS) and work remaining sts on row, turn and work back *, repeat from *-* 11-11-12-12-14-14 times in total. Cast off the remaining sts. RIGHT FRONT PIECE/BACK PIECE: Work as left front piece/back piece but reversed. I.e. dec and inc in left side of piece (i.e. at the end of every row from RS). Dec for neck after A.3 (from RS) by K 2 tog. Dec for BUTTONHOLES - see explanation above. ASSEMBLY: Sew the two parts tog mid back in front loop of outermost sts. Sew tog A against B - see chart – sew in outer loops of edge sts. Sew the buttons on to left front piece. |
|||||||||||||||||||||||||
Diagram explanations |
|||||||||||||||||||||||||
|
|||||||||||||||||||||||||
 |
|||||||||||||||||||||||||
 |
|||||||||||||||||||||||||
Have you finished this pattern?Tag your pictures with #dropspattern #audrycardigan or submit them to the #dropsfan gallery. Do you need help with this pattern?You'll find 17 tutorial videos, a Comments/Questions area and more by visiting the pattern on garnstudio.com. © 1982-2026 DROPS Design A/S. We reserve all rights. This document, including all its sub-sections, has copyrights. Read more about what you can do with our patterns at the bottom of each pattern on our site. |
|||||||||||||||||||||||||


With over 40 years in knitting and crochet design, DROPS Design offers one of the most extensive collections of free patterns on the internet - translated to 17 languages. As of today we count 324 catalogues and 12290 patterns translated into English (UK/cm). 12290
We work hard to bring you the best knitting and crochet have to offer, inspiration and advice as well as great quality yarns at incredible prices! Would you like to use our patterns for other than personal use? You can read what you are allowed to do in the Copyright text at the bottom of all our patterns. Happy crafting!
Post a comment to pattern DROPS 154-20
We would love to hear what you have to say about this pattern!
If you want to leave a question, please make sure you select the correct category in the form below, to speed up the answering process. Required fields are marked *.