
Popular categories
Looking for a yarn?


Comments / Questions (85)
![]() Heidi wrote:
Heidi wrote:
Jo men jeg fik vist ikke forklaret ordentligt. Jeg er netop nået til første række i diagrammet. Og det er her jeg møder stjernen jeg ikke kan finde forklaringen på. Og A1,A2A3 ser for mig ud til alle er være stangmasker men i de 3 yderste i begge sider må være anderledes end dem i midten siden de er tegnet sådan?
22.08.2024 - 14:30DROPS Design answered:
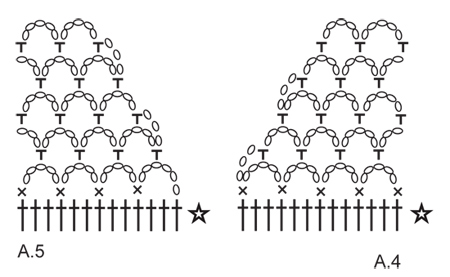
Hej Heidi, jo du finder forklaringen til stjernen i diagramforklaringen lige ovenfor diagrammerne - det står - * = denne række er forkl i opskriften - Det er altså kun første række i A.1-2-3 og A.4 og A.5
22.08.2024 - 15:03
![]() Heidi wrote:
Heidi wrote:
Jeg har stirret mig blind. Jeg kan ikke finde beskrivelsen af den stjerne som der står findes andet sted i opskriften. Jeg har læst og læst. For mig at se er første række i diagrammet det samme men det er de ikke i beskrivelsen. Hvad er det mon jeg overser?
22.08.2024 - 13:43DROPS Design answered:
Hej Heidi, jo første række i diagrammerne består af stangmasker og det er dem som er beskrevet således under RYGSTK: .....Videre hækles der 5-5-5-4-5-5 rækker til med 1 st i hver st (= totalt 6-6-6-5-6-6 rækker med st) – læs HÆKLEINFO! Fortsæt med MØNSTER således .... OG nu kommer du til diagrammerne :)
22.08.2024 - 14:26
![]() Karine Beauvoir wrote:
Karine Beauvoir wrote:
Bonjour il y a eu une correction sur se modèle,mais je ne trouve pas où cest
01.10.2023 - 21:33DROPS Design answered:
Bonjour Mme Beauvoir, cliquez sur la phrase soulignée en rouge pour la trouver - mais cette correction ne s'applique que si vous avez imprimé les explications avant cette date, sinon, la correction est déjà faite. Bon crochet!
02.10.2023 - 10:37
![]() Christine Gundlach wrote:
Christine Gundlach wrote:
Hallo, wie viel Luftmaschen werden für die Ärmel angeschlagen? Viele Grüße von C.Gundlach
06.07.2021 - 22:31DROPS Design answered:
Liebe Frau Gundlach, die Ärmel sind von oben rum die Armlöcher nach unten gehäkelt, dh beginnen Sie bei einer der Markierung am Armloch (Vorderteil für die linke Ärmel, Rückenteil für die rechte Ärmel) und häkeln Sie 20 bis 26 Luftmaschenbogen (siehe Größe). Viel Spaß beim häkeln!
07.07.2021 - 07:34
![]() Jessica wrote:
Jessica wrote:
Bonjour, Je réalise actuellement le dos en taille S. Les 49cm de hauteur doivent ils correspondre à la fin du schéma A.x ? Si oui, les 51cm de hauteur totale tomberont ils après 1 rang de 21 brides +1 rang de brides avec la diminution ? (Soit un total de 3 rangs de brides après les arceaux ) Merci beaucoup de votre réponse et pour ce modèle très sympathique
06.06.2021 - 18:29DROPS Design answered:
Bonjour Jessica, les 2 derniers cm du dos doivent être crochetés en brides, ajustez la hauteur nécessaire si besoin, mais rappelez-vous que l'encolure devant doit être dans les arceaux. Bon crochet!
07.06.2021 - 07:50
![]() Jutta Krause Morsing wrote:
Jutta Krause Morsing wrote:
Hvordan kan det være, at der skal være så mange masker til en start på rygstykket, 100 lm i str. L? Selv efter indtagningerne på første omgang er mit stykke hele 66 cm lang, altså bredden på rygstykket, det er da for stort?
25.02.2021 - 11:16DROPS Design answered:
Hej Jutta, Det er for at kanten skal blive elastisk. Når du har hæklet første række har du 85 masker = 52 cm (ifølge måleskitsen nederst i opskriften) God fornøjelse!
25.02.2021 - 14:10
![]() Susan Williamson wrote:
Susan Williamson wrote:
I am a great fan of your patterns and find them generally easy to understand but I've made several now and they always come up way bigger than the chart sizes suggest. I always go down one crochet hook size but even then on this one it is still almost 7 cm wider than the chart (size M). But the height is fine. Could you check the chart width is correct? Thank you.
22.05.2020 - 11:16DROPS Design answered:
Dear Mrs Williamson, in size M you should have 76 sts and following the tension (16 sts = 10 cm in width), you would then have ca 48 cm. Make sure you get the correct tension to get same measurements as in the chart. Happy crocheting!
22.05.2020 - 12:33
![]() Mc wrote:
Mc wrote:
Merci beaucoup, finalement je vais le faire avec un crochet N°3 Le crochet 4,5 me donne les dimensions d'un pull XXL. Et je désire le faire en L
09.04.2020 - 15:20DROPS Design answered:
Bonjour Mc, nous crochetons toutes de façon différente, raison pour laquelle on doit se référer à l'échantillon pour obtenir les bonnes mesures finales, vous avez donc tout à fait raison d'opter pour un crochet plus petit s'il vous permet d'obtenir le bon échantillon à la fois en largeur et en hauteur pour obtenir les mesures du schéma dans la taille souhaitée. Bon crochet!
14.04.2020 - 15:07
![]() Mc wrote:
Mc wrote:
Bonjour, Je veux réaliser ce modèle , cependant j'ai un souci sur l'échantillon. En utilisant le crochet n°4 j'ai un échantillon trop large pour 16 brides sur 8 rangs. Lorsque j'utilise le crochet n°3,5, j'ai bien 10 cm sur 16 brides mais en hauteur j'ai 9 rangs et non 8 pour 10 cm. Quelle taille dois je choisir sachant que je pensais prendre une taille L Merci
04.04.2020 - 17:08DROPS Design answered:
Bonjour Mc, essayez de recommencer votre échantillon en tirant un peu moins vos brides en hauteur pour conserver la bonne largeur indispensable aux mesures finales en préservant la hauteur pour conserver le bon aspect. plus d'infos sur l'échantillon ici. Bon crochet!
09.04.2020 - 13:20
![]() D Vels wrote:
D Vels wrote:
Waarom is het patroon bij AX totaal anders dan A2A3A1 Je eindigt in de eerste toer met 6 lossen en waar zet je die vast voordat je het stokje van de 2 toer haakt
26.09.2019 - 14:28DROPS Design answered:
Dag D Vels,
In A.X begin je de toeren met stokjes steeds met 3 lossen en je eindigt de toer met 1 stokje. Dan keer je het werk en begin je weer met 3 lossen.
27.09.2019 - 15:16
|
||||||||||||||||||||||
Amber#ambersweater |
||||||||||||||||||||||
|
|
||||||||||||||||||||||
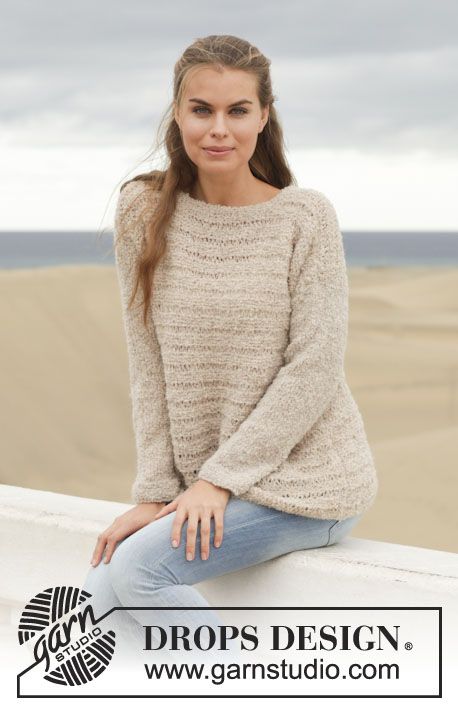
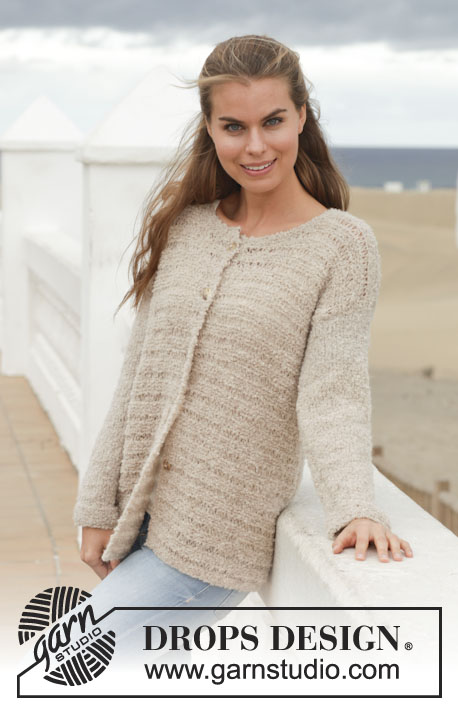
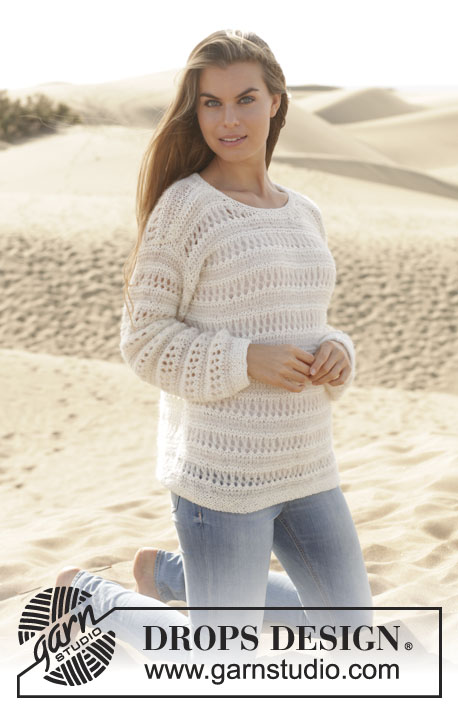
Crochet DROPS jumper with lace pattern and trebles in ”Cotton Light”. Size: S - XXXL.
DROPS 152-17 |
||||||||||||||||||||||
|
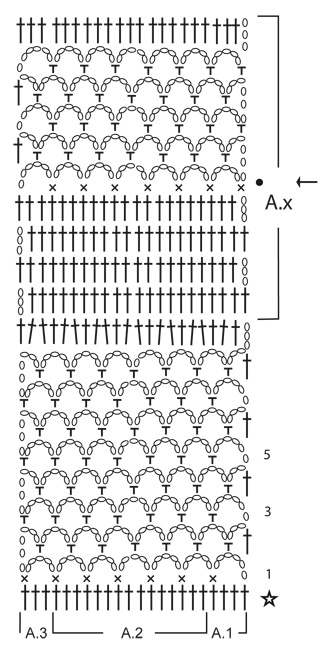
CROCHET INFO: At beg of a new row replace 1 tr with 3 ch. PATTERN: See diagrams A.1-A.5. CROCHET TIP: Beg and end at arrow in the middle of diagram A.x DECREASE TIP: Dec 1 tr by working 2 tr tog as follows: Work 1 tr but wait with last pull through (= 2 sts on hook), then work next tr but on last pull through, pull yarn through all 3 sts on hook. ---------------------------------------------------------- BACK PIECE: Worked back and forth. Work 83-90-100-107-121-132 loose ch on hook size 4.5 mm with Cotton Light. ROW 1: Work 1 tr in 4th ch from hook (= 2 tr), then work 1 tr in each of the next 2-2-5-5-5-2 ch, * skip 1 ch, work 1 tr in each of the next 6 ch *, repeat from *-* 10-11-12-13-15-17 more times = 70-76-85-91-103-112 tr. Then work 5-5-5-4-5-5 more rows with 1 tr in every tr (= 6-6-6-5-6-6 rows in total with tr) – READ CROCHET INFO. Continue with PATTERN as follows: Work A.1 over 4 tr, A.2 until 3 tr remain, A.3 over the remaining 3 tr from previous row. Continue with diagrams A.1 – A.3 back and forth for 8 rows, there are now 8 holes diagonally in height (= first stripe with lace pattern), and 1 row with tr's. REMEMBER THE CROCHET TENSION! Then continue with stripes in tr and lace pattern the same way but work according to diagram A.x, AT THE SAME TIME when piece measures 32-32-32-40-41-41 cm and when working a section with tr, insert a marker in each side for armholes. Continue with pattern as before. When piece measures 49-50-51-60-62-63 cm, beg neck dec and finish each shoulder separately as follows from RS: Work 1 row with tr over the first 21-24-27-30-36-39 tr, turn piece and dec 1 tr – READ DECREASE TIP. Work the rest of row. When piece measures 51-52-53-62-64-65 cm, back piece is finished. Fasten off. Work the other shoulder the same way but reversed. FRONT PIECE: Work as back piece. When piece measures 43-43-43-53-54-54 cm, beg neck dec and work each shoulder separately. Work left shoulder as follows from RS: Work ch-spaces as before (with 2 tr between every dc on first row with ch-spaces) over the first 27-30-33-36-42-45 tr, AT THE SAME TIME dec for neck by dec 1 ch-space in lace pattern according to pattern A.4. Continue like this back and forth until A.4 has been worked 1 time vertically. On next row work 4 tr in first ch-space, 3 tr in each of the next ch-spaces until 1 ch-space remains, and 4 tr in last ch-space on row = 20-23-26-29-35-38 tr remain for shoulder. Then continue with 1 tr in every tr. When piece measures 51-52-53-62-64-65 cm in total, front piece is finished. Fasten off. Work the other shoulder the same way but reversed and use diagram A.5 instead of A.4. Sew the shoulder seams. SLEEVE: The sleeves are worked from armhole and outwards. ROW 1: Beg at the bottom at one of the markers for armhole, and work ch-spaces over the armhole as follows: 1 dc, * 5 ch, 1 dc *, repeat from *-* until there are 20-21-23-23-25-26 ch-spaces (every ch-space is over 1½-2 cm). Continue back and forth with pattern A.x until 3 repetitions in total vertically have been worked - READ CROCHET TIP - AT THE SAME TIME dec in every section with tr as follows: 1st and 2nd time A.x is worked dec 1 tr in each side of piece on the 1st, 3rd and 5th row with tr in A.x = 6 tr dec in each side. 48-51-57-57-63-66 tr remain. 3rd time A.x is worked dec as follows: Dec 1 tr in each side of piece on the first 4-5-5-5-5-5 rows with tr = 40-41-47-47-53-56 tr remain. Continue with 4-3-2-2-1-0 rows with tr. Now sleeve measures approx. 36-35-34-34-33-32 cm. Fasten off. NECK EDGE: Work an edge around the neck as follows from mid on top of shoulder: 1 dc, * 3 ch, skip approx. 1 cm, 1 dc *, repeat from *-* around the entire neck and finish with 1 sl st in 1st dc on round. Fasten off. ASSEMBLY: Sew side seams and underarm seams in one in edge sts on rows. |
||||||||||||||||||||||
Diagram explanations |
||||||||||||||||||||||
|
||||||||||||||||||||||
 |
||||||||||||||||||||||
 |
||||||||||||||||||||||
 |
||||||||||||||||||||||
Have you finished this pattern?Tag your pictures with #dropspattern #ambersweater or submit them to the #dropsfan gallery. Do you need help with this pattern?You'll find 4 tutorial videos, a Comments/Questions area and more by visiting the pattern on garnstudio.com. © 1982-2026 DROPS Design A/S. We reserve all rights. This document, including all its sub-sections, has copyrights. Read more about what you can do with our patterns at the bottom of each pattern on our site. |
||||||||||||||||||||||


With over 40 years in knitting and crochet design, DROPS Design offers one of the most extensive collections of free patterns on the internet - translated to 17 languages. As of today we count 324 catalogues and 12290 patterns translated into English (UK/cm). 12290
We work hard to bring you the best knitting and crochet have to offer, inspiration and advice as well as great quality yarns at incredible prices! Would you like to use our patterns for other than personal use? You can read what you are allowed to do in the Copyright text at the bottom of all our patterns. Happy crafting!
Post a comment to pattern DROPS 152-17
We would love to hear what you have to say about this pattern!
If you want to leave a question, please make sure you select the correct category in the form below, to speed up the answering process. Required fields are marked *.