The yarn cost is calculated from the pattern’s smallest size and the yarn’s cheapest product type. Looking for an even better price? You might find it on the DROPS Deals!
-------------------------------------------------------
Alternative Yarn – See how to change yarns here
Yarn Groups A to F – Use the same pattern and change the yarn here
Yarn usage using an alternative yarn – Use our yarn converter here
-------------------------------------------------------
The yarn cost is calculated from the pattern’s smallest size and the yarn’s cheapest product type. Looking for an even better price? You might find it on the DROPS Deals!
= ch | |
= dc | |
= tr | |
= 1st round |
Each of our patterns has specific tutorial videos to help you.
These step-by-step tutorials might also help you:
Why is the knitting/crochet tension so important?
Knitting tension is what determines the final measurements of your work, and is usually measured per 10 x 10 cm. It is provided like so: number of stitches in width x number of rows in height - eg: 19 stitches x 26 rows = 10 x 10 cm.
The knitting tension is very individual; some people knit/crochet loosely while others work tightly. You adjust the knitting tension with the needle size, which is why the suggested needle size is only meant as a guide! You need to adjust this (up or down) to ensure that YOUR knitting tension matches the knitting tension provided in the pattern. If you work with a different knitting tension than provided you will have a different yarn consumption, and your work will have different measurements than what the pattern suggests.
The knitting tension also determines which yarns can replace each other. As long as you achieve the same knitting tension you can replace one yarn with another.
See DROPS lesson: How to measure your tension/gauge
See DROPS video: How to make a gauge tension swatch
How do I know how many balls of yarn I need?
The required amount of yarn is provided in grams, eg: 450 g. To calculate how many balls you’ll need you first need to know how many grams are in 1 ball (25g, 50g or 100g). This information is available if you click on the individual yarn quality on our pages. Divide the amount required with the amount of each ball. For example, if each ball is 50g (the most common amount), the calculation will be as follows: 450 / 50 = 9 balls.
Can I use a different yarn than what the pattern suggests?
The important thing when changing from one yarn to another is that the knitting/crochet tension remains the same. This is so that the measurements of the finished piece will be the same as on the sketch provided. It is easier to achieve the same knitting tension using yarns from the same yarn group. It is also possible to work with multiple strands of a thinner yarn to achieve the knitting tension of a thicker one. Please try our yarn converter. We recommend you to always work a test swatch.
Please NOTE: when changing yarn the garment might have a different look and feel to the garment in the photo, due to individual properties and qualities of each yarn.
See DROPS lesson: Can I use a different yarn than the one mentioned in the pattern?
What are the yarn groups?
All our yarns are categorised into yarn groups (from A to F) according to thickness and knitting tension – group A contains the thinnest yarns and group F the thickest. This makes it easier for you to find alternative yarns to our patterns, should you wish to switch yarn. All yarns within the same group have a similar knitting tension and can easily replace each other. However, different yarn qualities have different structures and properties which will give the finished work a unique look and feel.
How do I use the yarn calculator?
At the top of all our patterns you’ll find a link to our yarn calculator, which is a helpful tool should you wish to use a different yarn than suggested. By filling in the yarn quality you wish to replace, the amount (in your size) and number of strands, the calculator will present good alternative yarns with the same knitting tension. Additionally it will tell you how much you’ll require in the new qualities and whether you’ll need to work with multiple strands. Most skeins are 50g (some are 25g or 100g).
If the pattern is worked with multiple colours, every colour will have to be calculated separately. Similarly, if the pattern is worked with several strands of different yarns (for example 1 strand Alpaca and 1 strand Kid-Silk) you will have to find alternatives for each, individually.
Why do you show discontinued yarns in the patterns?
Since different yarns have different qualities and textures we have chosen to keep the original yarn in our patterns. However, you can easily find options among our available qualities by using our yarn calculator, or simply pick a yarn from the same yarn group.
It is possible that some retailers still have discontinued yarns in stock, or that someone has a few skeins at home that they would like to find patterns for.
The yarn calculator will provide both alternative yarn as well as required amount in the new quality.
What size should I knit?
If you think it's hard to decide what size to make, it can be a good idea to measure a garment you own already and like the size of. Then you can pick the size by comparing those measures with the ones available in the pattern's size chart.
You'll find the size chart at the bottom of the pattern.
See DROPS lesson: How to read size chart
Why do I get the wrong knitting tension with the suggested needle size?
The needle size provided in the pattern serves only as a guide, the important thing is to follow the knitting tension. And since knitting tension is very individual, you will have to adjust the needle size to ensure that YOUR tension is the same as in the pattern – maybe you’ll have to adjust 1, or even 2 needle sizes, up or down to achieve the correct tension. For this, we recommend that you work test swatches.
Should you work with a different knitting tension than the one provided, the measurements of the finished garment might deviate from the measurement sketch.
See DROPS lesson: How to measure your tension/gauge
See DROPS video: How to make a tension/gauge swatch
Why is the pattern worked top-down?
Working a garment top-down provides more flexibility and room for personal adjustment. For example it is easier to try the garment on while working, as well as making adjustments to length of yoke and shoulder caps.
The instructions are carefully explaining every step, in the correct order. Diagrams are adjusted to the knitting direction and are worked as usual.
How do I work according to a knitting diagram?
The diagram depicts all rows/rounds, and every stitch seen from the right side. It is read from bottom to top, from right to left. 1 square = 1 stitch.
When working back and forth, every other row is worked from the right side and every other row is worked from the wrong side. When working from the wrong side, the diagram will have to be worked reversed: from left to right, knit stitches are purled, purl stitches are knit etc.
When working in the round every round is worked from the right side and the diagram are worked from right to left on all rounds.
See DROPS lesson: How to read knitting diagrams
How do I work according to a crochet diagram?
The diagram depicts all rows/rounds, and every stitch seen from the right side. It is worked from bottom to top, from right to left.
When working back and forth every other row is worked from the right side: from right to left and every other row is worked from the wrong side: from left to right.
When working in the round, every row in the diagram are worked from the right side, from right to left.
When working a circular diagram you start in the middle and work your way outwards, counter clockwise, row by row.
The rows usually start with a given number of chain stitches (equivalent to the height of the following stitch), this will either be depicted in the diagram or explained in the pattern.
See DROPS lesson: How to read crochet diagrams
How do I work several diagrams simultaneously on the same row/round?
Instructions for working several diagrams after each other on the same row/round, will often be written like so: “work A.1, A.2, A.3 a total of 0-0-2-3-4 times". This means you work A.1 once, then A.2 is worked once, and A.3 is repeated (in width) the number of times provided for your size – in this case like so: S = 0 times, M = 0 times, L=2 times, XL= 3 times and XXL = 4 times.
The diagrams are worked as usual: begin with the first row in A.1, then work the first row in A.2 etc.
See DROPS lesson: How to read knitting diagrams
See DROPS lesson: How to read crochet diagrams
Why are the sleeves shorter in larger sizes?
The total width of the garment (from wrist-to-wrist) will be larger in the larger sizes, despite the actual sleeves being shorter. The larger sizes have longer sleeve caps and wider shoulders, so there will be a good fit in all sizes.
Where on the garment is the length measured?
The measurement sketch/schematic drawing provides information regarding the full length of the garment. If it’s a jumper or a jacket the length is measured from the highest point on the shoulder closest to the neckline, and straight down to the bottom of the garment. It is NOT measured from the tip of shoulder. Similarly, the length of yoke is measured from the highest point on the shoulder and down to where yoke is split into body and sleeves.
On a jacket measures are never taken along bands, unless specifically stated. Always measure inside band stitches when measuring the length.
See DROPS lesson: How to read a schematic drawing
What is a repeat?
Diagrams are often repeated on the round or in height. 1 repeat is the diagram the way it appears in the pattern. If it says to work 5 repeats of A.1 in the round, then you work A.1 a total of 5 times after/next to each other in the round. If it says to work 2 repeats of A.1 vertically/in height you work the entire diagram once, then begin again at the start and work the entire diagram one more time.
Why does the piece start with more chain stitches than it’s worked with?
Chain stitches are slightly narrower than other stitches and to avoid working the cast-on edge too tight, we simply chain more stitches to begin with. The stitch count will be adjusted on the following row to fit the pattern and measurement sketch.
Why increase before the rib edge when the piece is worked top-down?
The rib edge is more elastic and will contract slightly compared to, for example, stocking stitch. By increasing before the rib edge, you avoid a visible difference in width between the rib edge and the rest of the body.
Why increase in the cast-off edge?
It’s very easy to cast off too tightly, and by making yarn overs while casting off (and simultaneously casting these off) you avoid a too tight cast off edge.
See DROPS video: How to bind off with yarn overs (yo)
How do I increase/decrease on every 3rd and 4th row/round alternately?
To achieve an even increase (or decrease) you can increase on, for example: every 3rd and 4th row alternately, like so: work 2 rows and increase on the 3rd row, work 3 rows and increase on the 4th. Repeat this until the increase is complete.
See DROPS lesson: Increase or decrease 1 st on every 3rd and 4th row alternately
How can I work a jacket in the round instead of back and forth?
Should you prefer to work in the round instead of back and forth, you may of course adjust the pattern. You’ll need to add steeks mid-front (usually 5 stitches), and follow the instructions. When you would normally turn and work from the wrong side, simply work across the steek and continue in the round. At the end you’ll cut the piece open, pick up stitches to work bands, and cover the cut edges.
See DROPS video: How to knit steeks and cut open
Can I work a jumper back and forth instead of in the round?
Should you prefer to work back and forth instead of in the round, you may of course adjust the pattern so you work the pieces separately and then assemble them at the end. Divide the stitches for the body in 2, add 1 edge stitch in each side (for sewing) and work the front and back pieces separately.
See DROPS lesson: Can I adapt a pattern for circular needles into straight needles?
Why is the pattern slightly different than what I see in the photo?
Pattern repeats can vary slightly in the different sizes, in order to get the correct proportions. If you’re not working the exact same size as the garment in the photo, yours might deviate slightly. This has been carefully developed and adjusted so that the complete impression of the garment is the same in all sizes.
Make sure to follow instructions and diagrams for your size!
How do I make a women’s size garment into a men’s size one?
If you have found a pattern you like which is available in women’s size it’s not very difficult to convert it to men’s size. The biggest difference will be the length of sleeves and body. Start working on the women size that you think would fit across the chest. The additional length will be worked right before you cast off for the armhole/sleeve cap. If the pattern is worked top-down you can add the length right after the armhole or before the first decrease on sleeve.
Regarding additional yarn amount, this will depend on how much length you add, but it is better with a skein too many than too few.
How do I prevent a hairy garment from shedding?
All yarns will have excess fibres (from production) that might come off as lint or shedding. Brushed yarns (ie hairier yarns) have more of these loose, excess fibres, causing more shedding.
Shedding also depends on what is worn under or over the garment, and whether this pulls at the yarn fibres. It’s therefore not possible to guarantee that there will be no shedding
Below are some tips on how to get the best result when working with hairier yarns:
1. When the garment is finished (before you wash it) shake it vigorously so the looser hairs come off. NOTE: do NOT use a lint roller, brush or any method that pulls at the yarn.
2. Place the garment in a plastic bag and put it in your freezer - the temperature will cause the fibres to become less attached to each other, and excess fibres will come off easier.
3. Leave in the freezer for a few hours before taking it out and shaking it again.
4. Wash the garment according to the instructions on the yarn label.
Why does my garment pill?
Pilling is a natural process that happens to even the most exclusive of fibers. It's a natural sign of wear and tear that is hard to avoid, and that is most visible in high friction areas of your garment like a sweater's arms and cuffs.
You can make your garment look as new by removing the pilling, using a fabric comb or a pill/lint remover.
Victoriana |
|||||||||||||
|
|
||||||||||||
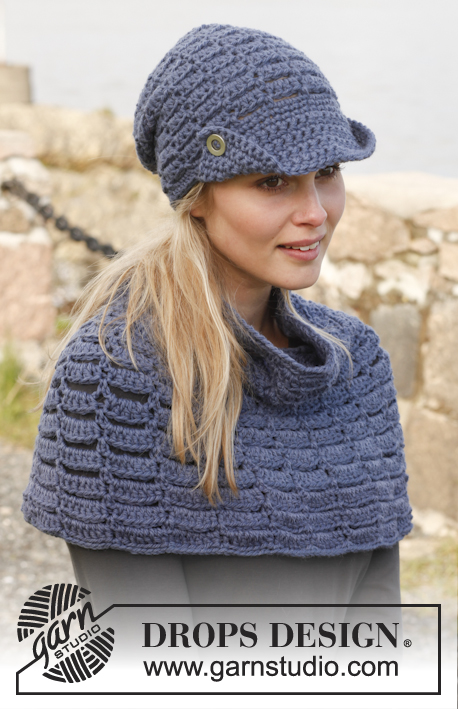
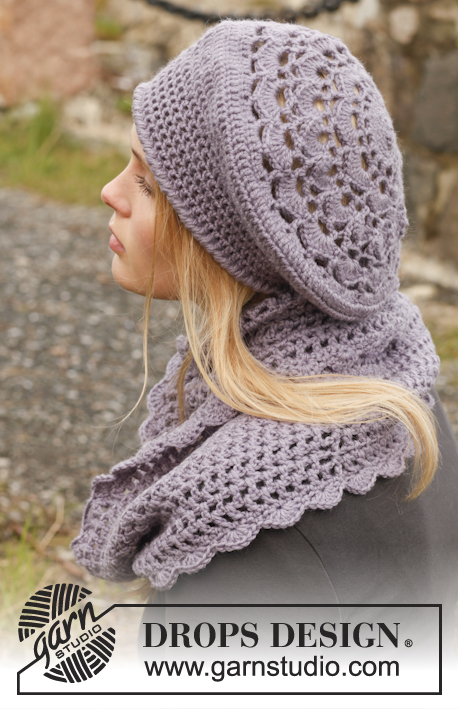
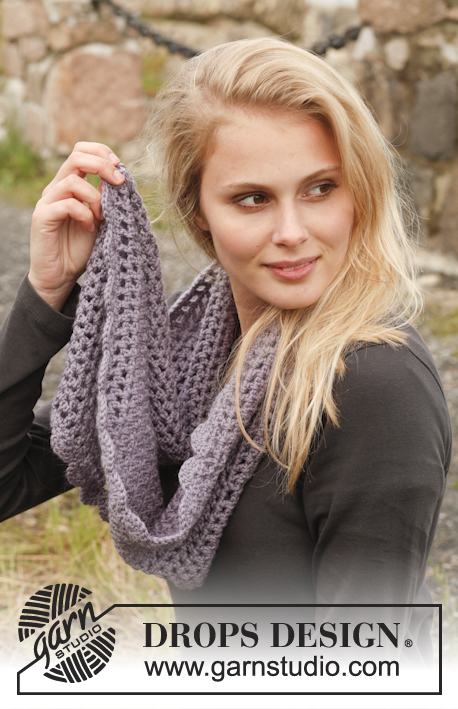
Set consists of: Crochet DROPS beret and neck warmer in ”Karisma”.
DROPS 149-8 |
|||||||||||||
CROCHET INFO: Replace first dc on round with 1 ch. Finish with 1 sl st in ch from beg of round. Replace first tr on a tr round with 3 ch. Finish with 1 sl st in 3rd ch. PATTERN: See diagram A.1. REVERS CROCHET: Work as dc but backwards. I.e. crochet around from left to right ROUNDS WITH TR AND CH: Work every round with tr and ch as follows: Turn piece so that WS is towards you, work 4 ch (= 1st tr + 1st ch), skip 1st ch-space (= last ch from previous round), * 1 tr in next ch-space, 1 ch *. Repeat from *-*, finish round with 1 tr in last ch-space (= ch-space with 4 ch from previous round), 1 sl st in ch-space with 4 ch from beg of round - i.e. work alternately from RS and WS to get a nice finish/beg on round. ---------------------------------------------------------- BERET: The piece is worked top down. ROUND 1: Work 4 ch on hook size 4 mm with Karisma and form a ring with 1 sl st in first ch, work 8 dc in ch-ring - READ CROCHET INFO. ROUND 2: Work 2 dc in every dc the entire round = 16 dc. REMEMBER THE CROCHET TENSION! ROUND 3: * 1 dc in first dc, 2 dc in next dc *, repeat from *-* = 24 dc. ROUND 4: * 1 dc in each of the next 2 dc, 2 dc in next dc *, repeat from *-* = 32 dc. Then work according to A.1 (= 4 repetitions on round). When A.1 has been worked 1 time vertically, there are 32 ch-spaces on round. Continue to work as follows: ROUND 1: Work 4 tr in every ch-space = 128 tr. ROUND 2: Work 1 tr in every tr AT THE SAME TIME dec 2 tr evenly = 126 tr. ROUND 3: Work 1 tr in every tr but work every 13th and 14th tr tog = 117 tr. ROUND 4: Work 1 tr in every tr but work every 12th and 13th tr tog = 108 tr. ROUND 5: Work 1 tr in every tr but work every 11th and 12th tr tog = 99 tr. ROUND 6: Work 1 tr in every tr AT THE SAME TIME dec 11 tr evenly = 88 tr. ROUND 7-10: Work 1 tr in every tr the entire round. ROUND 11: Work with a double thread. Work a round with REVERSE CROCHET - see explanation above. --------------------------------------------------------- NECK WARMER: Work in the round with Karisma on hook size 4 mm, work 1 loose ch-row with 228 ch, finish with 1 sl st in 1st ch. Work 4 ch (= 1st tr + 1st ch), * skip 1 ch, 1 tr in next ch, 1 ch *, repeat from *-* the entire round and finish with 1 sl st in ch-space with 4 ch from beg of round = 114 tr + ch. Then work ROUNDS WITH TR AND CH – see explanation above. Continue like this until piece measures 18 cm vertically. Then work a fan edge as follows: ROUND 1: Work 1 ch in 1st dc, 1 dc in every tr and 1 dc in every ch the entire round and finish with 1 sl st in first ch = 228 dc. ROUND 2: Work 1 ch in 1st dc, * skip 2 dc, 6 tr in next dc, skip 2 dc, 1 dc in next dc *, repeat from *-* the entire round and finish with 1 sl st in first ch = 38 fans. Work the same way in the other side. Fasten off. |
|||||||||||||
Diagram explanations |
|||||||||||||
|
|||||||||||||
Have you made this or any other of our designs? Tag your pictures in social media with #dropsdesign so we can see them! Do you need help with this pattern?You'll find tutorial videos, a Comments/Questions area and more by visiting the pattern on garnstudio.com. © 1982-2024 DROPS Design A/S. We reserve all rights. This document, including all its sub-sections, has copyrights. Read more about what you can do with our patterns at the bottom of each pattern on our site. |
With over 40 years in knitting and crochet design, DROPS Design offers one of the most extensive collections of free patterns on the internet - translated to 17 languages. As of today we count 309 catalogues and 11534 patterns translated into English (UK/cm). 11534
We work hard to bring you the best knitting and crochet have to offer, inspiration and advice as well as great quality yarns at incredible prices! Would you like to use our patterns for other than personal use? You can read what you are allowed to do in the Copyright text at the bottom of all our patterns. Happy crafting!
Comments / Questions (94)
BarbaraZ72 wrote:
Il berretto non resta fermo sulla fronte e scende perché è troppo largo . A partire dal settimo giro posso diminuire Finché non raggiungo la circonferenza corretta?
02.04.2020 - 17:52DROPS Design answered:
Buonasera Barbara, ha verificato che il suo campione corrispondesse a quello indicato prima di iniziare a lavorare? In ogni caso può effettuare tutte le modifiche che desidera. Buon lavoro!
02.04.2020 - 20:39Kushla Haenen wrote:
I am looking at the Beret instructions here. Where it says to continue to diagram A 1, where do I find this? The diagram is not showing up on this page, nor on the printable instructions page. No images of the project are loading either. Do I assume that the diagram is one of the images that is failing to load on this page?
12.02.2020 - 00:20DROPS Design answered:
Hi Kushla, our website is now working OK. Please try to open the pattern again.
12.02.2020 - 07:13Elizabeth wrote:
Hello, I would have loved to make this hat but, this is a horrible pattern! Rounds 1-4, and then follow A.1???!!! What is that... And then the rounds start over at round 1 again... ?? WHAAT.... I give up. I'm an experienced crocheting and pattern reader, but this one's awful to try and follow. Just write out the pattern! I'm going too try something else! This is not worth the time when there are so many other options too use.
02.12.2019 - 05:40DROPS Design answered:
Dear Elizabeth, The DROPS patterns are knitted and crocheted by thousands and thousands of people around the world. We understand however that in certain countries, with different knitting/crochet traditions than Scandinavia, our patterns might be written in a way that differs from what some are used to. But of course we want everyone to understand our patterns, so that’s why we have created an extensive library of tutorial videos as well as step by step lessons that explain how to follow the techniques we use and how to read the diagrams in our patterns. Give them a try!
02.12.2019 - 10:26Niki wrote:
I am lost on this part. When A.1 has been worked 1 time vertically, there are 32 ch-spaces on round. Once the diagram is worked through, I have many more chain spaces than 32. Could you clarify this for me please?
19.10.2019 - 03:18Niki answered:
I figured it out! Lovely pattern!
19.10.2019 - 20:56Margherita De Luca wrote:
Hello, Can this pattern be made with a fingering yarn? Would you start with 12 sc instead of 8 so it sits flat?
16.04.2019 - 06:26DROPS Design answered:
Dear Margherita, the original yarn, DROPS Karisma is a light DK weight yarn, not much thicker than the fingering weight you ask for. Unfortunately, we cannot recalculate every pattern for each individual request, but I would suggest to make a small trial piece and make the necessary modifications, recalculations accordingly. Happy Crafting!
16.04.2019 - 15:38Heidi Liebeton wrote:
Bij de patroon staat dat het patroon is gecorrigeerd en dat de toeren 1 tm 4 vasten moeten worden inplaats van stokjes. Maar om welke 4 toeren gaat dit is dat van het telpatroon A1 of van de andere 4 toeren
05.01.2019 - 16:40DROPS Design answered:
Dag Heidi,
Waar vasten hadden moeten staan, stonden eerst stokjes in het patroon, maar je kunt gewoon het online patroon gebruiken, want de correcties zijn hierin al doorgevoerd.
05.01.2019 - 20:29Sandrine wrote:
Mme Gromelle Pour moi le pb de taille se ressoud en prenant un crochet un peu plus gros (4,5 ou 5) et de prėvoir un rab de laine. J'adore ce modèle. J'ai dėja fait ce modèle et je recommence pour ma fille ! Bon crochet
04.12.2018 - 08:10Gromelle wrote:
Bonjour, ce modèle de bonnet est trop petit. Est-il possible de le faire plus grand ? avec peut-être une laine différente et un crochet plus gros ? Il me faudrait une taille L - tour de tête 59cm. Merci pour votre retour d'information. Cordialement.
20.10.2018 - 19:54DROPS Design answered:
Bonjour Mme Gromelle, nous ne sommes malheureusement pas en mesure de pouvoir adapter chacun de nos modèles à chaque demande. N'hésitez pas à contacter - même par mail ou téléphone - le magasin où vous avez acheté votre laine pour toute assistance. Bon crochet!
22.10.2018 - 08:21Caroline wrote:
Bonjour j’ai fini A1 mais je ne comprends pas les tour 4 et 5. Pourriez vous m’expliquer s’il vous plaît
12.10.2018 - 20:41DROPS Design answered:
Bonjour Caroline, aux tours 4 et 5 après A.1 on va diminuer ainsi: Tour 4: *1 bride dans chacune des 11 brides suivantes, écoulez les 2 brides suivantes ensemble*, répétez de *-* tout le tour. Tour 5: *1 bride dans chacune des 10 brides suivantes, écoulez les 2 brides suivantes ensemble*, répétez de *-* tout le tour. Bon crochet!
15.10.2018 - 08:07Zila Doucette wrote:
Hi - I am relatively new at crochet and I absolutely LOVE this set and want to make a couple. Do you consider it to be easy enough for a beginner? Also, is the size of the yarn 100g the weight? Thanks, Zila
11.10.2018 - 17:33DROPS Design answered:
Dear Zila, you'll find some videos explaining the different techniques used in that pattern, follow diagram as explained in the written pattern starting from the bottom corner on the right side towards the left on every round. You'll find here all informations about the yarn, feel free to contact your DROPS store - even per mail or telephone - for any individual assistance. Happy crocheting!
12.10.2018 - 07:33