
Popular categories
Looking for a yarn?


Comments / Questions (133)
![]() Giorgia wrote:
Giorgia wrote:
Buongiorno, purtroppo non capisco come non far venire il segno tra le coste a legaccio tra la fine di un ferro e l'inizio di un altro. I punti ai lati dei quali si fanno gli aumenti infatti risultano al centro dei 4 ferri e, anche nel video, si incomincia il giro all'inizio del primo ferro. Non so se sono stata chiara. Grazie!!!
30.04.2018 - 09:20DROPS Design answered:
Buongiorno Giorgia. Purtroppo il passaggio da un ferro e l'altro nel legaccio risulta sempre un po' visibile. Buon lavoro!
30.04.2018 - 16:23
![]() Manni wrote:
Manni wrote:
Hallo, ich habe eine Frage zum Abketten am Halsausschnitt. Müssen die Maschen sowohl am Anfang als auch am Ende der Reihe abgekettet werden (also auf beiden Seiten des Halsausschnittes)? Und verstehe ich die Anleitung richtig, dass insgesamt in 4 Reihen abgekettet wird ( in der 2.Reihe 2 Maschen, in der 4.Reihe 2 Maschen, in der 6.Reihe 1 Masche und in der 8. Reihe nochmals 1 Masche)? Vielen Dank für die Antwort! Mit freundlichen Grüßen
10.03.2018 - 22:31DROPS Design answered:
Liebe Manni, Runde beginnt mit 1. Markierung, Faden abschneiden, die mittleren 16-18 M zwischen 1. und 2. Markierung stilllegen und weiter nach den stillgelegten Maschen (Hinreihe) bis die stillgelegten Maschen stricken, dann am Anfang jeder Reihe (Hin- sowie Rückreihe) für den Halsabketten (insgesamt 6 M auf beiden Seiten abketten). Viel Spaß beim stricken!
12.03.2018 - 09:01
![]() Makaraviez wrote:
Makaraviez wrote:
Bonjour, j’ai du mal à comprendre comment on rabat les mailles de chaque côté de l’encolure... il faut rabattre les 6 mailles à chaque rang? De chaque côté ? À la suite? Un diagramme serait bien utile...
31.10.2017 - 11:52DROPS Design answered:
Bonjour Mme Makaraviez, une fois que vous avez mis en attente les mailles de l'encolure, continuez en allers et retours et rabattez au début de chaque rang côté encolure (= sur l'endroit et sur l'envers): 2 x 2 m et 2x 1 m = on aura 6 m rabattues de chaque des mailles en attente. Bon tricot!
31.10.2017 - 11:58MARIA ELENA ALASSIA wrote:
Hola, les he hecho una consulta y no me respondieron aún, tengo que epezar este modelo, nunca trabajé con agujas de doble punta, asi que me arriesgo. Necesisto saber en que momento del trabajo se empieza a usar las agujas circulares?
03.04.2017 - 23:30DROPS Design answered:
Hola Maria. Cuando trabajamos en redondo y comenzamos la labor con pocos puntos, es recomendable primero trabajar con agujas de doble punta y después, cuando hayan suficientes puntos, pasar a las agujas circulares.
14.04.2017 - 11:34MARIA ELENA ALASSIA wrote:
Hola, me resulta un poco confuso las indicaciones de este modelo,sin contar las mangas, cuantas partes son? se va aumentando utilizando las agujas de dos puntas? y cuando se empieza a usar las agujas circulares? Tengo que hacerlo y me resulta un poco dificil. Les agradezco una ayudita. Saludos
02.04.2017 - 21:28DROPS Design answered:
Hola Maria Elena. Este modelo se trabaja en 3 partes separadas: el delantero, la espalda, las mangas y, al terminar, se cosen. Cuando trabajamos en redondo y comenzamos la labor con pocos puntos, es recomendable primero trabajar con agujas de doble punta y después, cuando hayan suficientes puntos, pasar a las agujas circulares.
14.04.2017 - 11:41
![]() Nathalie wrote:
Nathalie wrote:
Bonjour, Je souhaiterai réaliser ce modèle avec la DROPS Alpaca, que j'adore. A quel fil devrais-je l'associer pour obtenir l'équivalent d'un fil du groupe C ? Merci beaucoup ! Nathalie
05.03.2017 - 15:27DROPS Design answered:
Bonjour Nathalie, vous trouverez ici les alternatives possibles et comment calculer la quantité choisie. Bon tricot!
06.03.2017 - 09:50
![]() Elizabeth wrote:
Elizabeth wrote:
Hi, I have a question about binding off the front. When I bind off do I bind off the stitches on each side of the neck stitch holder? Does the 2 stitches 2 times mean two stitches on each side of the neck stitch holder? Then after a row with no binding off, do I bind off 1 stitch on each side of the neck stitch holder on the next row of knitting? A close up photo of the neck edge or diagram would be really helpful. Thanks so much!
02.03.2017 - 01:27DROPS Design answered:
Dear Elizabeth, after you have put the middle sts on a thread for neck, continue back and forth from neck (sts on st holder) on one side towards neck on the other side (sts on st holder), at the same time cast off at the beg of every row from neck (both from RS and from WS): 2 sts 2 times and 1 st 2 times = 6 sts cast off on each side of the middle st on thread. Happy knitting!
02.03.2017 - 08:45
![]() Hublet wrote:
Hublet wrote:
A qu'elle moment dois-je prendre les aiguilles circulaires ? Ça ne va pas faire un tube? Merci d'avance
01.11.2016 - 10:50DROPS Design answered:
Bonjour Mme Hublet, vous pourrez continuer avec l'aiguille circulaire quand il y aura trop de mailles pour les aiguilles doubles pointes. Vous augmentez régulièrement tous les 2 tours, et obtenez ainsi un carré, comme dans la vidéo. Bon tricot!
01.11.2016 - 12:35
![]() Grethe Lund wrote:
Grethe Lund wrote:
Denne flotte bluse er jeg ved at lave, men ser nu at jeg mangler den halve opskrift af ryg,og opskrift af ærmer, samt halskant og montering. Kan jeg måske hjælpes? Venlig hilsen Grethe
26.10.2016 - 11:45DROPS Design answered:
Hej Grethe. Opskriften er komplet naar jeg kigger paa siden. Har du mon ikke faaet skrevet det hele ud.
26.10.2016 - 12:27
![]() Patty wrote:
Patty wrote:
I'm working on the front, size S, with 240st ready to slip off for the neckline. I've finished the purl row and I'm at marker M1 (beg of row). Do I continue knitting stitches (22 st) to get to the middle 16st between M1 and M2? Then I slip off middle 16st to stitch holder. Then I'd turn work, and continue working back and forth. My M1 (beg of row) is now in the middle of this section... Should I change knits to purls at this marker to keep the garter stitch? Thank you!
14.09.2016 - 20:12DROPS Design answered:
Dear Patty, after the P row, slip first the middle 16 on a st holder for neckline and start next row after these 16 sts from RS (= left side of piece to get the right side of neckline when worn) and continue to the end of row ie before the 16 sts left unworked for neckline. Happy knitting!
15.09.2016 - 08:31
|
|
Hugs and kisses#hugsandkissessweater |
|
 |
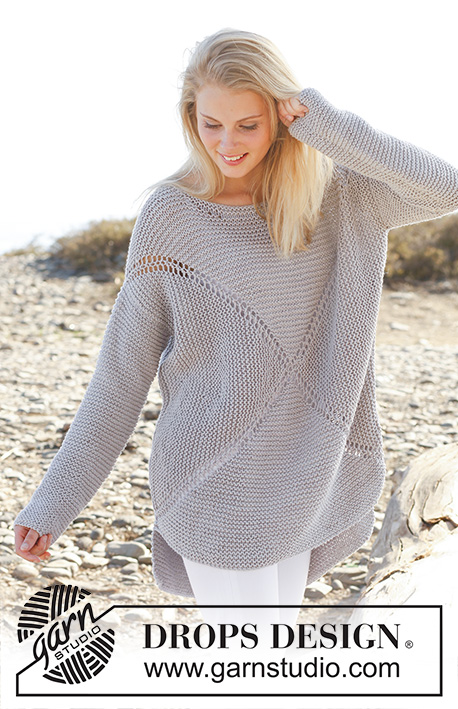 |
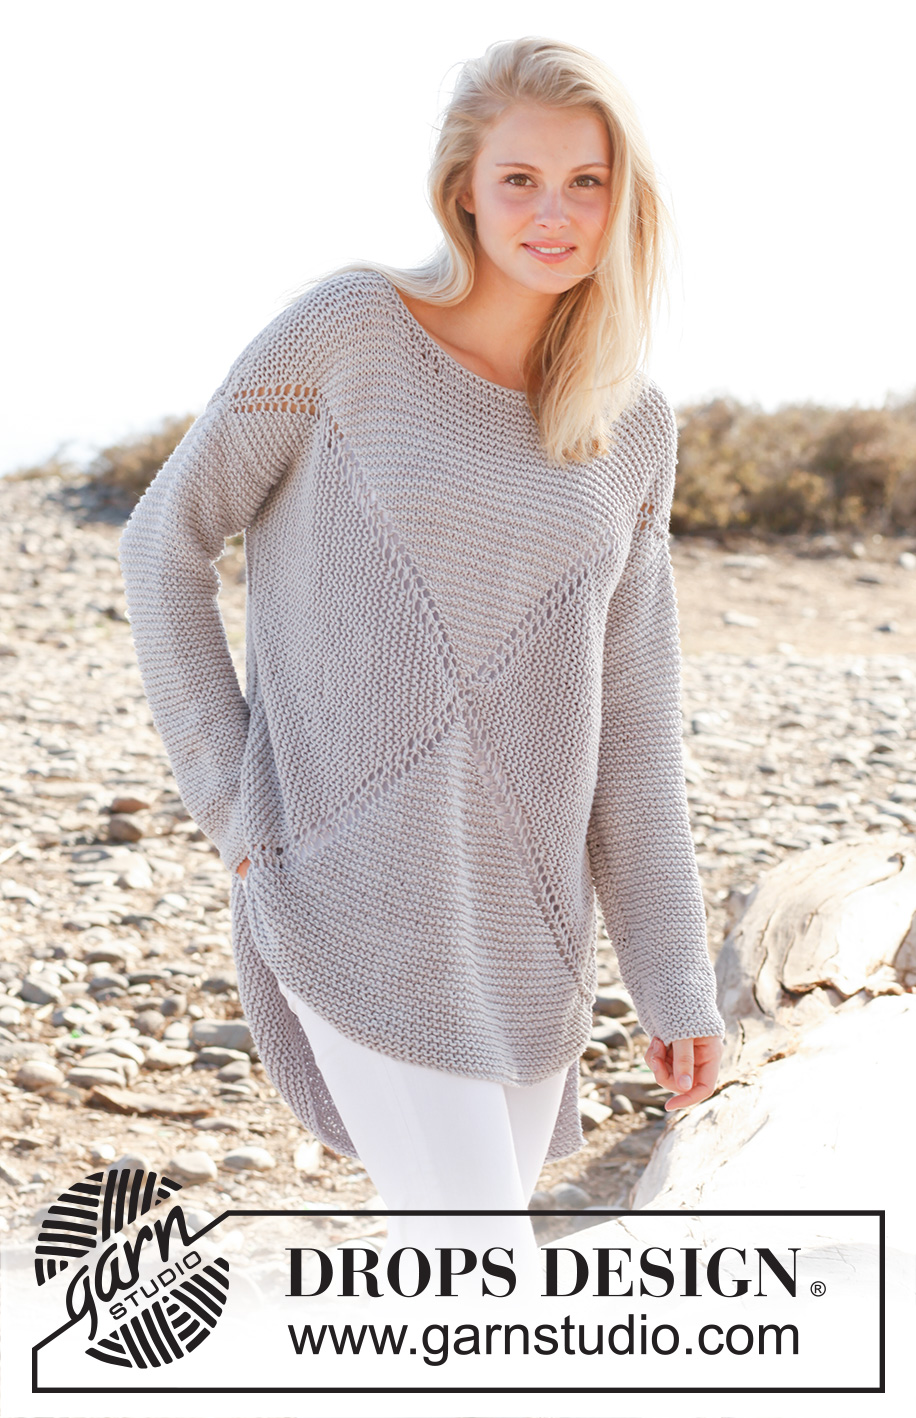
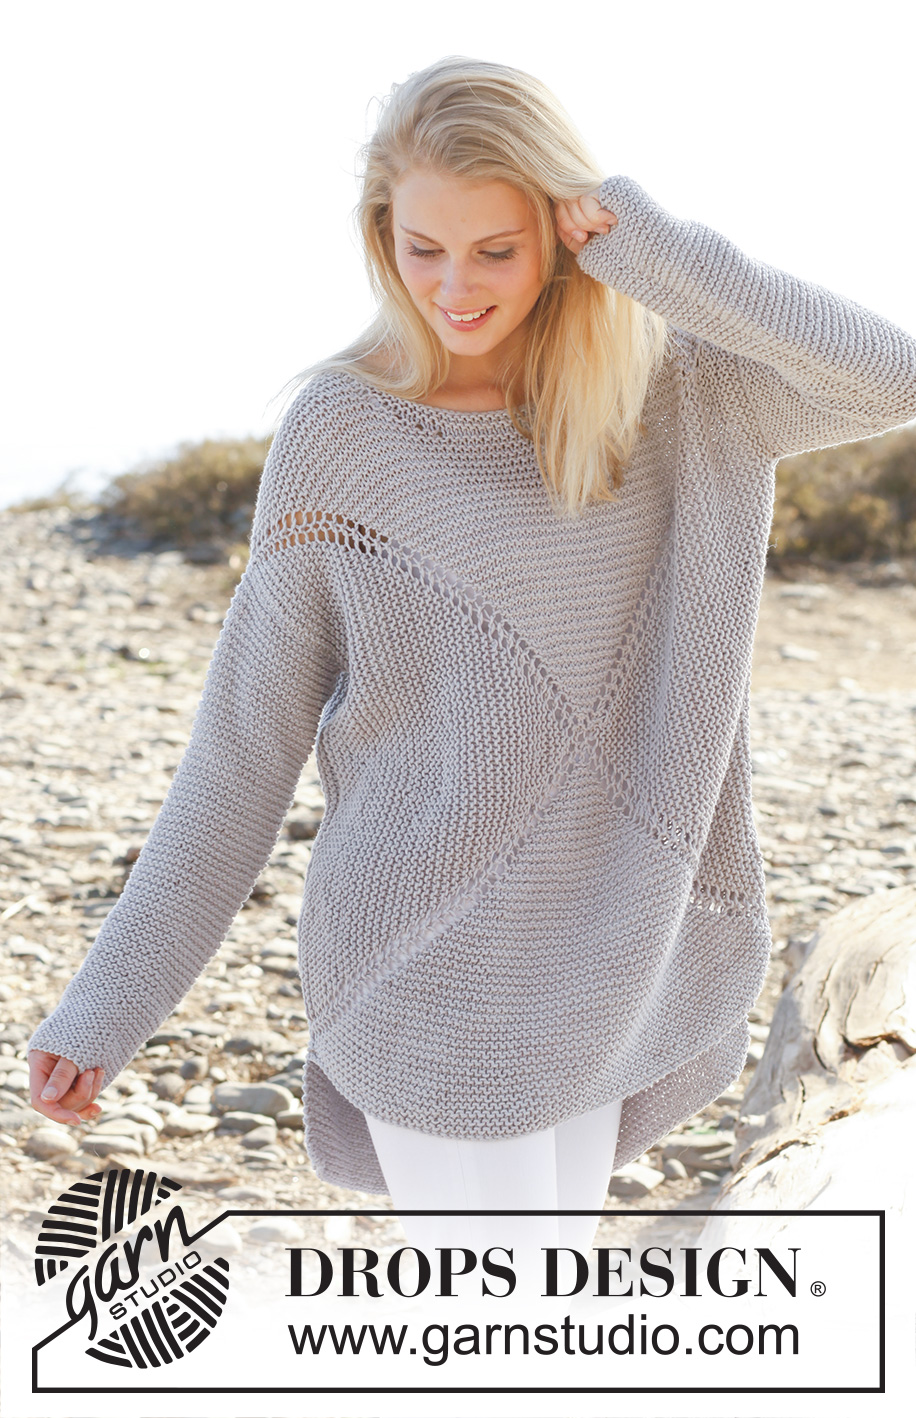
Knitted DROPS jumper worked in a square in garter st in ”Paris”. Size: S - XXXL.
DROPS 146-2 |
|
|
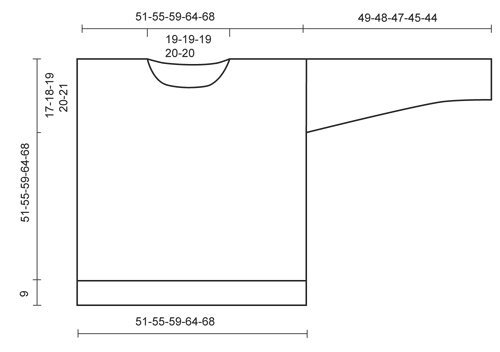
GARTER ST (in the round on circular needle): 1 ridge = 2 rounds. * K 1 round and P 1 round *, repeat from *-*. GARTER ST (back and forth on needle): K all rows. 1 ridge = 2 rows K. MEASURING TIP: Hold the piece up when measuring. Because of the garter st and the weight of the yarn the sleeve will be somewhat longer. If a lighter sleeve is wanted, work 4 ridges at the bottom of sleeve, then work in reversed stocking st. ---------------------------------------------------------- JUMPER: Worked in 2 parts from mid front/mid back in a square. Cast on and work on double pointed needles, switch to circular needle when needed. Finish by working the sleeves. FRONT PIECE: Cast on 8 sts with Paris and divide them on 4 double pointed needles size 6 mm (= 2 sts on every needle). Insert a marker in the first, third, fifth and seventh st (= 4 markers). Then work in the round and in GARTER ST over all sts - see explanation above. AT THE SAME TIME on every other round make 1 YO on each side of every marker (= 8 inc on every other round), on next round K YOs to make holes. Continue like this until there are 240-264-288-320-344 sts on needle (= 29-32-35-39-42 inc and 60-66-72-80-86 sts on each of the 4 sides). Stop with 1 P round. Now slip the middle 16-16-18-18-18 sts between 1st and 2nd marker on a stitch holder for neck, then work piece back and forth. Continue in garter st and continue inc at markers - AT THE SAME TIME cast off towards the neck on every other row as follows: 2 sts 2 times and 1 st 2 times. Continue inc until there are 284-308-330-362-386 sts on needle (= 38-41-44-48-51 inc, 78-84-90-98-104 sts between markers, 25-28-30-34-37 sts on each side of neck). Keep sts between 3rd and 4th marker on needle, cast off the other sts = 78-84-90-98-104 sts on needle. Work 2 ridges back and forth over these sts. Cast off. Insert a marker in each side, 17-18-19-20-21 cm down from the shoulder. This shows where the sleeve is sewn in. BACK PIECE: Cast on 8 sts with Paris and divide them on 4 double pointed needles size 6 mm (= 2 sts on every needle). Insert a marker in the first, third, fifth and seventh st (= 4 markers). Then work in the round and in garter st over all sts, AT THE SAME TIME on every other round make 1 YO on each side of every marker (= 8 inc on every other round), on next round K YOs to make holes. Continue like this until there are 288-312-336-368-392 sts on needle (= 35-38-41-45-48 inc and 72-78-84-92-98 sts between markers). Now cast off the middle 28-28-30-30-30 sts between 1st and 2nd marker for neck, then work piece back and forth = 260-284-306-338-362 sts. Continue inc until there are 284-308-330-362-386 sts on needle (= 38-41-44-48-51 inc, 78-84-90-98-104 sts between markers, 25-28-30-34-37 sts on each side of neck). Keep sts between 3rd and 4th marker on needle, cast off the other sts = 78-84-90-98-104 sts on needle. Work 15 ridges back and forth over these sts. Cast off. Insert a marker in each side, 17-18-19-20-21 cm down from the shoulder. This shows where the sleeve is sewn in. SLEEVE: Worked back and forth on circular needle. READ MEASURING TIP! Cast on 37-38-41-44-45 sts (incl 1 edge st in each side) on circular needle size 6 mm with Paris. Work in garter st. When piece measures 8 cm, inc 1 st in each side. Repeat inc every 5-4½-4½-4-3½ cm 7-8-8-8-9 more times (= 8-9-9-9-10 inc in total) = 53-56-59-62-65 sts. Cast off when piece measures 49-48-47-45-44 cm (shorter measurements in the larger sizes because of broader shoulder width). ASSEMBLY: Sew the shoulder seams. Sew in sleeves down to markers on front/back piece. Sew underarm and side seams in one inside 1 edge st, leave the bottom 10 cm = vent. NECK EDGE: Knit up approx. 66 to 74 sts (incl sts on stitch holder) on a short circular needle (40 cm) around the neck. Work 2 ridges. Cast off. |
|
 |
|
Have you finished this pattern?Tag your pictures with #dropspattern #hugsandkissessweater or submit them to the #dropsfan gallery. Do you need help with this pattern?You'll find 17 tutorial videos, a Comments/Questions area and more by visiting the pattern on garnstudio.com. © 1982-2026 DROPS Design A/S. We reserve all rights. This document, including all its sub-sections, has copyrights. Read more about what you can do with our patterns at the bottom of each pattern on our site. |
|


With over 40 years in knitting and crochet design, DROPS Design offers one of the most extensive collections of free patterns on the internet - translated to 17 languages. As of today we count 324 catalogues and 12290 patterns translated into English (UK/cm). 12290
We work hard to bring you the best knitting and crochet have to offer, inspiration and advice as well as great quality yarns at incredible prices! Would you like to use our patterns for other than personal use? You can read what you are allowed to do in the Copyright text at the bottom of all our patterns. Happy crafting!
Post a comment to pattern DROPS 146-2
We would love to hear what you have to say about this pattern!
If you want to leave a question, please make sure you select the correct category in the form below, to speed up the answering process. Required fields are marked *.