
Popular categories
Looking for a yarn?


Comments / Questions (45)
![]() Anthonis wrote:
Anthonis wrote:
Waar kam ik een haak boek kopen
29.04.2024 - 09:09
![]() Rita GERUM wrote:
Rita GERUM wrote:
Bonjour, concernant le modèle 147-38, pourriez vous me dire comment assembler les manches dos devant, je n'y arrive pas
11.03.2024 - 16:38DROPS Design answered:
Bonjour Mme Gerum, cette vidéo montre comment assembler 2 pièces crochetées, elle pourra fort probablement vous aider. Bon assemblage!
12.03.2024 - 07:15
![]() Rsoleil wrote:
Rsoleil wrote:
Bonjour, je viens de terminer le modèle DROPS 147-38 veste, j\'ai adoré faire ce modèle, juste un gros problème pour l\'assemblage des manches dos devant, je ne sais pas comment faire, j\'ai essayé toutes sortes d astuces mais n\'y suis pas arrivée, pourriez vous me dire comment ? Merci
11.03.2024 - 16:35
![]() Kia wrote:
Kia wrote:
Jeg hækler I str medium. Og forstår ikke hvordan jeg skal læse denne del af opskriften. FØRSTE FORSTK: Hækl st frem og tilbage over de første 50-53-57-62-68-75 st på rækken. Samtidig lukkes der af mod ærmegabet på hver RÆKKE: 2 st 0-0-1-2-3-5 gange og 1 st 1-2-2-3-5-6 gange – SE LUKKETIPS = 49-51-53-55-57-59 st tilbage. Kan I uddybe hvordan jeg skal lukke af?
08.02.2022 - 19:33DROPS Design answered:
FØRSTE FORSTK: Hækl st frem og tilbage over de første 53 st på rækken. Samtidig lukkes der af mod ærmegabet på hver RÆKKE: 2 st 0 gange og 1 st 2 gange – SE LUKKETIPS =51 st tilbage. Det vil sige at du hækler 1 km over først m på rækken (mod ærmegabet) hækler pinden ud, vender og hækler til du har 1 maske tilbage, vend arbejdet (nu har du lukket 2 masker af) God fornøjelse!
09.02.2022 - 12:22
![]() Kristina McKinney wrote:
Kristina McKinney wrote:
I can’t figure out how to attach the sleeves and attach the front and back. Do you have a video or pictorial of attaching everything together?
17.02.2021 - 22:55DROPS Design answered:
Dear Mrs McKinney, you can first pin the sleeve around the armhole, then sew the outermost loop/the front loop of the stitches on last row together with the outermost loop of stitches along armhole. Happy assembly!
18.02.2021 - 09:25
![]() Kristina McKinney wrote:
Kristina McKinney wrote:
I’m working on the front piece. I’m starting the neck decrease and I’ve done the 15 decrease 1 time but I don’t know what to do next. 3dc 1 time, 2dc 2 times ect.
16.09.2020 - 03:12DROPS Design answered:
Dear Mrs McKinney, this video shows how to decrease stitches at the beginning of a row/at the end of the row. At the end of a row you will turn when 3 dc / 2 dc remains, at the beg of a row you will work slip stitches over the first 3 dc/2 dc (depending on which front piece you are now working on). These decreases should be worked on every row, either at the end or at the beg of the row. Happy crocheting!
16.09.2020 - 08:59
![]() Kristina McKinney wrote:
Kristina McKinney wrote:
I am starting the 1st front piece. I don’t understand when the decrease starts . And why 2 dc 3 times and 1 dc 5 times.
10.09.2020 - 00:48DROPS Design answered:
Dear McKinney, this video shows how to decrease at the beginning or at the end of a row, you have here to decrease for armhole at the beg of a RS row + at the end of a WS row (= left front piece) or at the end of a WS row + at the beg of a RS row (= right front piece). Happy crocheting!
10.09.2020 - 09:47
![]() Audrey wrote:
Audrey wrote:
Bonjour, si je comprends bien, après le 1er rang de ms l'ouvrage devrait mesurer 86CM (2x43) pour une taille S, est-ce exact? Mon échantillon mesure bien 10X10 pour le nmbre de B et de rang indiqué pourtant après mon rang de ms il est bcp plus long, il mesure 170cm au lieu des 134 prévus pour la plus grande taille, comment cela se fait-il? il n'ai quand me pas possible que ma tension soit aussi relachée entre l'échantillon et l'ouvrage !?
02.05.2019 - 16:14DROPS Design answered:
Bonjour Audrey, avez-vous bien vos 317 ms? (on monte davantage de mailles en l'air que de mailles serrées pour éviter que le 1er rang ne soit trop serré), si l'échantillon est juste avec 317 ms vous devez avoir environ 138 cm (y compris les bordures des devants non comprises dans les 134 cm) - et 39 fois A.1 (=3.5 cm) = 136.5 + les mailles des bords. Bon crochet!
03.05.2019 - 08:34Asma wrote:
Hi ... i am not speaking english well but i will try to write to you what i want . i cant find the suitable words , i want the pattron for this chaket like a picture not writing if that is possible . iam so greatful for you . thanks .
01.06.2016 - 11:55DROPS Design answered:
Dear Asma, this pattern is only available with a written pattern, for any further personnal assistance, you can contact your DROPS Store (choose your country in the list). Happy crocheting!
01.06.2016 - 12:12
![]() Anneke Nijhof wrote:
Anneke Nijhof wrote:
Kunnen jullie aangeven hoe groot/klein x, xl, xxl of xxxl is? Ik kan wel met een bepaalde maat beginnen, maar dan zul je zien dat die net niet goed is. Voorts vind ik het jammer dat de breipatronen meestal met een rondbreinaald moet worden gebreid. Ik kan daar absoluut niet mee over weg. Is het niet mogelijk ook de mogelijkheid te bieden om voor- achter- en/of mouwen gewoon met twee naalden te breien? Met vriendelijke groet, Anneke
16.01.2016 - 19:26DROPS Design answered:
Hoi Anneke. Kijk onderaan het patroon, hier vind je alle afmetingen in cm. Kijk hier voor meer informatie over het aanpassen van een breipatroon van rondbreinaalden naar rechte naalden
19.01.2016 - 15:12
|
||||||||||
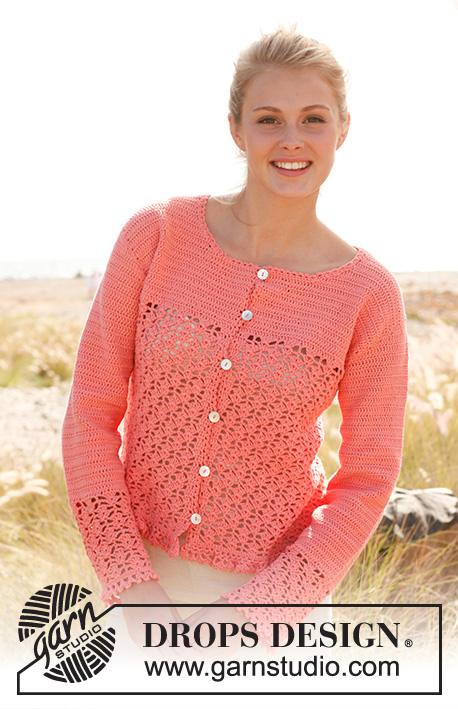
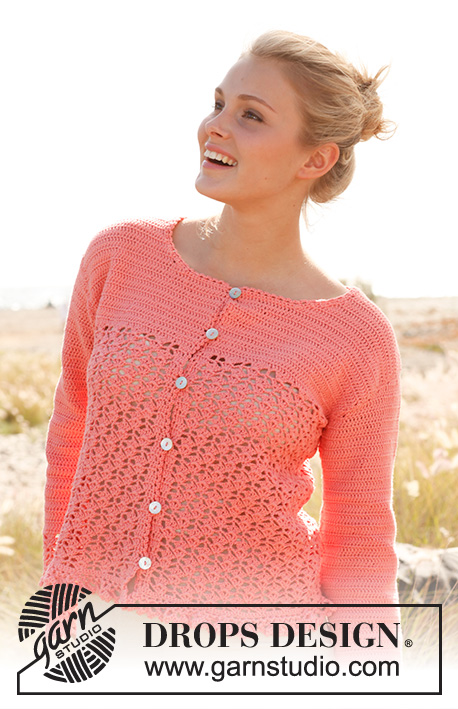
Peach blossom#peachblossomcardigan |
||||||||||
 |
 |
|||||||||
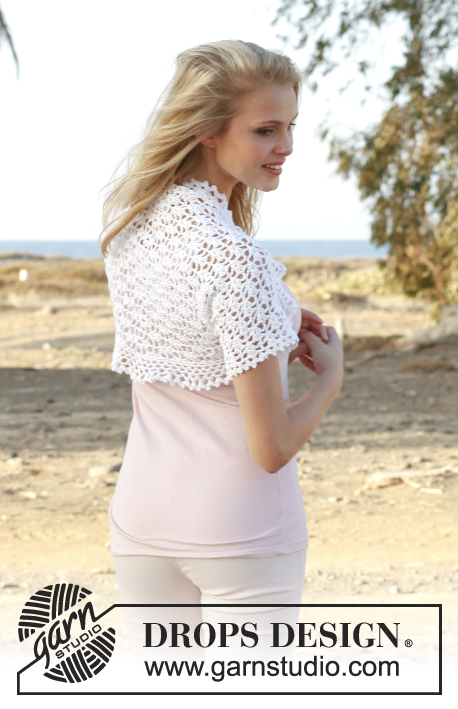
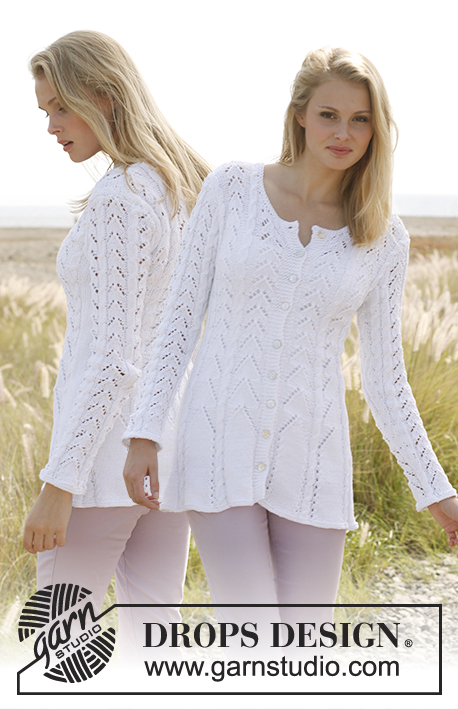
Crochet DROPS jacket with lace pattern and flounce at the bottom in ”Safran”. Size S - XXXL
DROPS 147-38 |
||||||||||
|
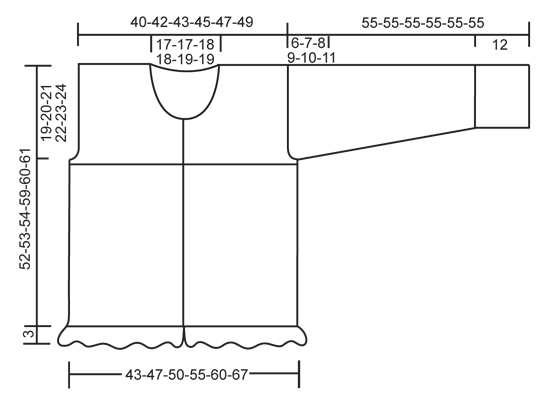
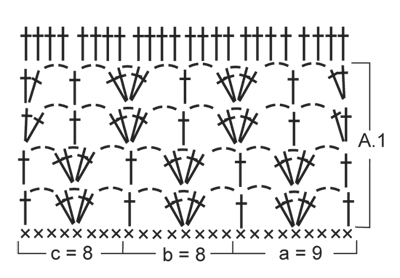
CROCHET INFO: Replace first tr on every row with 3 ch. PATTERN: See diagram A.1. DECREASE TIP: Dec at beg of row as follows: Work sl sts over no of tr to be dec. Dec at end of row as follows: When no of tr to be dec remains, turn. -------------------------------------------------------- JACKET: Worked bottom up, back and forth from mid front. READ CROCHET INFO! Work 246-265-284-313-342-380 ch on hook size 3 mm with Safran. Continue with 1 dc in 2nd ch from hook, then 1 dc in each of the next 4-5-6-5-4-6 ch, * skip 1 ch, 1 dc in each of the next 5 ch *, repeat from *-* the entire row = 205-221-237-261-285-317 dc. Continue diagram A.1 as follows: 3 ch up from first dc, 1 tr in next dc, diagram a over the first 9 dc, diagram b until 10 dc remain, diagram c over the first 8 dc, then 1 tr in each of the last 2 dc (= 25-27-29-32-35-39 repetitions on row). Repeat the 4 rows in A.1 upwards until piece measures approx. 32-32-32-36-36-36 cm – finish after 4th row in diagram. REMEMBER THE CROCHET TENSION! On next row work tr as shown in 5th row in diagram, i.e. as follows: 1 tr in each of the first 4 tr, * 2 tr in ch-loop, 2 tr in next ch-loop, 1 tr in each of the next 4 tr *, repeat from *-*, finish with 2 tr in each of the last 2 ch-loops and 1 tr in each of the last 4 tr = 204-220-236-260-284-316 tr. Then finish front and back piece separately. FIRST FRONT PIECE: Work tr back and forth over the first 50-53-57-62-68-75 tr on row. At the same time dec towards the armhole on every row: 2 tr 0-0-1-2-3-5 times and 1 tr 1-2-2-3-5-6 times – SEE DECREASE TIP = 49-51-53-55-57-59 tr remain. When piece measures 42-43-44-47-48-49 cm, beg neck dec as follows: Dec 13-13-14-14-15-15 tr 1 time, 3 tr 1 time, 2 tr 2 times and 1 tr 3 times = 26-28-29-31-32-34 tr remain on row. Cut the thread when piece measures approx. 52-53-54-59-60-61 cm. OTHER FRONT PIECE: Work as first front piece but reversed. BACK PIECE: Work tr back and forth over the middle 94-100-108-118-130-144 tr (do not work over the 5-7-7-9-9-11 sts in each side = armhole). AT THE SAME TIME dec towards armhole in each side as on front piece = 92-96-100-104-108-112 tr. When piece measures 50-51-52-57-58-59 cm, work 1 row only over the outermost 28-30-31-33-34-36 tr in one side for shoulder, then work 1 more row while at the same time dec 2 tr towards the neck, work the rest of row = 26-28-29-31-32-34 tr on shoulder, cut the thread. Piece measures approx. 52-53-54-59-60-61 cm. Work the same way on the other shoulder. FLOUNCE AT THE BOTTOM OF BODY: Work in the dc row at the bottom of body as follows - beg from WS: ROW 1: 1 dc in first dc, * 3 ch, skip 1 dc, 1 dc in next dc *, repeat from *-* the entire row. ROW 2: Turn with 5 ch, 1 dc in first ch-loop, * 4 ch, 1 dc in next ch-loop *, repeat from *-* the entire row. ROW 3: Turn with 6 ch, 1 dc in first ch-loop, * 6 ch, 1 dc in next ch-loop *, repeat from *-* the entire row. ROW 4: Work as follows in every ch-loop: 2 dc + 1 picot (= 3 ch, 1 dc in first ch) + 2 dc. Cut and fasten the thread. SLEEVE: Worked back and forth and sewn tog at the end. Work 68-68-78-78-78-87 ch on hook size 3 mm with Safran. Turn and work 1 dc in 2nd ch from hook, then work 1 dc in each of the next 6-6-4-4-4-7 ch, * skip 1 ch, 1 dc in each of the next 5 ch *, repeat from *-* the entire row = 57-57-65-65-65-73 dc. Continue to work diagram A.1 as follows: Diagram a over the first 9 dc, diagram b until 8 dc remain, then diagram c (= 7-7-8-8-8-9 repetitions on row). Continue like this until the 4 rows in diagram A.1 have been worked a total of 3 times vertically. Piece measures approx. 12 cm. On next row work tr as shown in 5th row in diagram, i.e. as follows: 1 tr in each of the first 2 tr, * 2 tr in ch-loop, 2 tr in next ch-loop, 1 tr in each of the next 4 tr *, repeat from *-*, finish with 2 tr in each of the last 2 ch-loops and 1 tr in each of the last 2 tr = 56-56-64-64-64-72 tr. Continue with 1 tr in every tr – AT THE SAME TIME when piece measures 16 cm, inc 1 tr in each side by working 2 tr in next to last tr in each side. Repeat inc 9-12-11-13-16-15 more times: SIZE S: Every 4th row, SIZE M + L: Every 3rd row, SIZE XL: Alternately every other and 3rd row, SIZE XXL + XXXL: Every other row = 76-82-88-92-98-104 tr. When piece measures 49-48-47-46-45-44 cm (shorter measurements in the larger sizes because of longer sleeve cap and broader shoulder width), dec for sleeve cap on every row in each side as follows: 3 tr 1 time, 2 tr 5-6-8-9-10-11 times and 3 tr 1 time. Piece now measures approx. 55 cm for all sizes, cut the thread. EDGE AT THE BOTTOM OF SLEEVE: Work in the dc row at the bottom of sleeve as follows - beg from WS: ROW 1: 1 dc in first dc, * 5 ch, skip 2 dc, 1 dc in next dc *, repeat from *-* the entire row - NOTE: For the no of sts to add up skip only 1 dc the last time in sizes S and M. In sizes L and XL skip 3 dc the last time. Turn piece. ROW 2: Work as follows in every ch-loop: 2 dc + 1 picot (= 3 ch, 1 dc in first ch) + 2 dc. Cut and fasten the thread. ASSEMBLY: Sew shoulder seams and sleeve seams edge to edge to avoid a chunky seam and sew sleeves in body. Work up along right band, around the neck and down along left band as follows: 1 dc in first st, * 3 ch, skip approx. 1 cm, 1 dc in next st *, repeat from *-*. Sew buttons on left band – top button should be approx. 1 cm from the top, then evenly spaced downwards. Button in ch-loops on right band. |
||||||||||
Diagram explanations |
||||||||||
|
||||||||||
 |
||||||||||
 |
||||||||||
Have you finished this pattern?Tag your pictures with #dropspattern #peachblossomcardigan or submit them to the #dropsfan gallery. Do you need help with this pattern?You'll find 6 tutorial videos, a Comments/Questions area and more by visiting the pattern on garnstudio.com. © 1982-2026 DROPS Design A/S. We reserve all rights. This document, including all its sub-sections, has copyrights. Read more about what you can do with our patterns at the bottom of each pattern on our site. |
||||||||||


With over 40 years in knitting and crochet design, DROPS Design offers one of the most extensive collections of free patterns on the internet - translated to 17 languages. As of today we count 324 catalogues and 12290 patterns translated into English (UK/cm). 12290
We work hard to bring you the best knitting and crochet have to offer, inspiration and advice as well as great quality yarns at incredible prices! Would you like to use our patterns for other than personal use? You can read what you are allowed to do in the Copyright text at the bottom of all our patterns. Happy crafting!
Post a comment to pattern DROPS 147-38
We would love to hear what you have to say about this pattern!
If you want to leave a question, please make sure you select the correct category in the form below, to speed up the answering process. Required fields are marked *.