
Popular categories
Looking for a yarn?


Comments / Questions (108)
![]() SEIGNOLLES Sophie wrote:
SEIGNOLLES Sophie wrote:
Mais où se trouve le diagramme svp ??
21.04.2026 - 18:53DROPS Design answered:
Bonjour Mme Seignolles, il n'y a pas de diagrammes pour ce modèle, les explications des carrés et de l'assemblage sont toutes écrites. Bon crochet!
22.04.2026 - 07:53
![]() Jacomien Schoolderman wrote:
Jacomien Schoolderman wrote:
Ik heb een vraag over de vierkantjes aan elkaar haken. Twee aan elkaar haken staat in de video, maar hoe je de volgende vierkantjes er ook aanhaakt, begrijp ik niet. Ook op internet kan ik hier niet iets over vinden. Kunt u het mij uitleggen. Vooral de hoeken lukken helemaal niet. Alvast hartelijk bedankt Met vriendelijke groet, Jacomien
18.04.2026 - 20:07
![]() Debbie wrote:
Debbie wrote:
Me again. I made the poncho 4 x 7 squares and it’s too big in the neck. Can I reduce the squares to 4 x 6? Will that make the neck opening smaller?
02.10.2025 - 03:46
![]() Debbie wrote:
Debbie wrote:
I’m confused how to assemble this poncho. Do I make strips of 4 squares wide and 8 long? How big is second part? Help!
03.09.2025 - 15:38DROPS Design answered:
Dear Debbie, part 1 and part 2 are exactly the same. Depending on the size worked, the strip will be: 4 squares wide x 7 squares high (S/M), 4 squares wide x 8 squares high (L/XL) or 5 squares wide x 8 squares high (XXL/XXXL). You join the short side (width) of Part 1 to the long side (height) of Part 2, specifically to the right lower edge (so the 4 squares from part 1 join the 4 lower squares of Part 2). Later on, you join the short edge of Part 2 to the long side of Part 1. Happy knitting!
15.09.2025 - 00:24
![]() Marie wrote:
Marie wrote:
Hej! Varför kan ni inte skriva hur många rutor som ska virkas ihop på längden och höjden för varje storlek? Del 1: hur många rutor ska det vara det vara på höjden och längden? Tre eller fyra? Del 2: hur många rutor ska det vara på höjden och längden?
19.08.2025 - 19:48
![]() Mika Frost wrote:
Mika Frost wrote:
Hej! Ang montering. Om jag lägger en rad med 4 rutor och så 8 rutor på höjden x 2 blir den jättesmal och jag får 10 rutor över. Var ska de in? Förstår att jag missar något, men jag har läst och läst :) Tacksam för svar! Mvh Mika
02.05.2025 - 19:02DROPS Design answered:
Hej Mika, den bliver 36 cm + frynser. Se måleskitsen nederst i opskriften, så ser du formen på den :)
08.05.2025 - 09:56
![]() Paola wrote:
Paola wrote:
Ho difficoltà ad unire i quadrati quando mi trovo i 4 angoli per fare più file.Grazie
12.06.2023 - 13:15DROPS Design answered:
Buonasera Paola, che difficoltà incontra nell'unione dei quadrati? Buon lavoro!
20.06.2023 - 17:04
![]() Amanda Holman wrote:
Amanda Holman wrote:
Hej! Jag vill göra ”Lady of the valley ” medium fast med tjockare garn än A. Funderar på Puna som är B. Skulle jag kunna följa mönstret för small/ medium tror ni?
13.09.2022 - 14:52DROPS Design answered:
Hej Amanda ja det går säkert, om du får rutan att bli 8,5 som det står i mönstret, så får du också samma mått som i måttskissen :)
15.09.2022 - 15:35
![]() Eva wrote:
Eva wrote:
Hej! Jag ställde en fråga om Varför en inte ska virka ihop varv 1 med en smygmaska innan en börjar med lm-bågarna. Blev hänvisad till att titta på videon. Jag har läst mönstret och tittat på videon, och det är därför jag vänligen undrar Varför en inte ska ta ihop första varvet. Jag tycker det blir snyggare att virka ihop med en sm, men kanske det är nåt som påverkas senare som jag inte insett. Tack för svar!
22.04.2022 - 18:22DROPS Design answered:
Hei Eva. Her har nok design avd vurdert at det blir penest med å ikke avslutte med en kjedemaske. Men om du syns det blir penest med en kjedemasken, kan du fint gjøre det. Evnt hekle 2 ruter (en slik du ønsker og en rute slik det ståri oppskriften) og ta en vurdering. mvh DROPS Design
25.04.2022 - 10:22
![]() Eva wrote:
Eva wrote:
Hej! Jag undrar varför en inte ska virka ihop varv 1 med en smygmaska innan en börjar med lm-bågarna. Mvh Eva
13.04.2022 - 15:11DROPS Design answered:
Hej Eva, har du set videoen nederst i mønsteret, her viser vi de første varv :)
22.04.2022 - 12:03
|
|
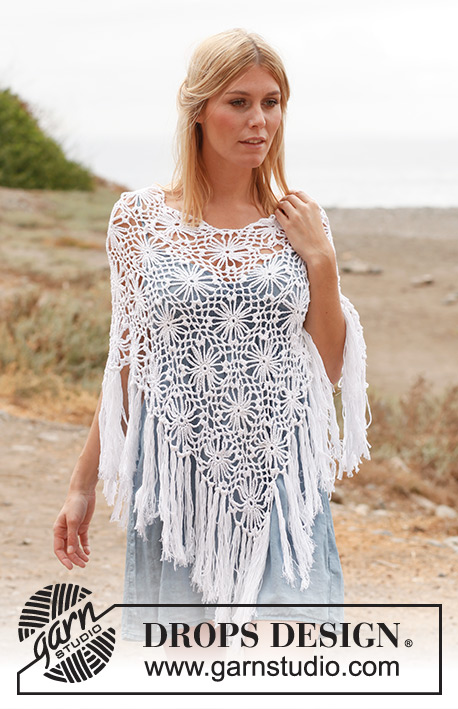
Lily of the Valley#lilyofthevalleyponcho |
|
 |
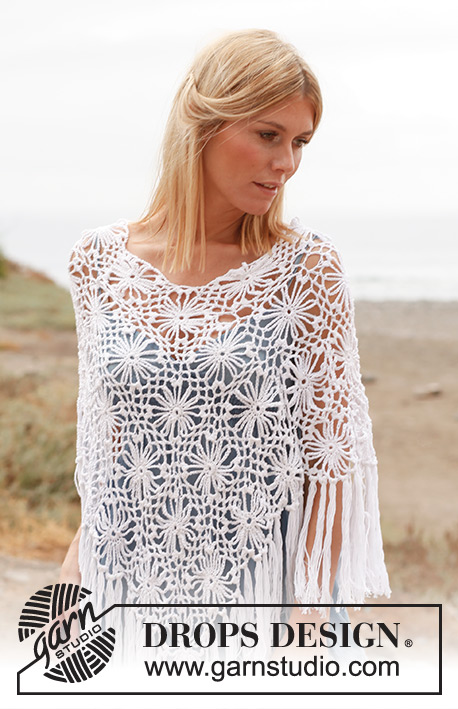 |
Crochet DROPS poncho with squares in ”Safran”. Size: S - XXXL.
DROPS 137-16 |
|
|
BOBBLE START: Work 3 ch, work 1 tr – but wait with last pull through (= 2 sts on hook), work 1 tr the same way in the same st, pull thread through all 3 sts on hook = 1st bobble on round. BOBBLE: Work 1 tr – but wait with last pull through (= 2 sts on hook), work 2 tr the same way in the same st, pull thread through all 4 sts on hook. ---------------------------------------------------------- PONCHO: The poncho is worked in two parts and sew tog when finished. SQUARE: Crochet 5 ch on hook size 4 mm with Safran and form a ring with 1 sl st in first ch. ROUND 1: 1 ch, 12 dc in ch-ring. ROUND 2: * 15 ch, 1 sl st in next dc *, repeat from *-* the entire round, finish with 10 ch and 1 dtr in 1st dc from beg of 1ST ROUND, turn = 12 ch-loops. ROUND 3: Sl st until the middle of 1st ch-loop, in the same loop work [1 BOBBLE START - Read explanation above, 4 ch, 1 BOBBLE - Read explanation above] = 1st corner, * work [4 ch, 1 dc in next ch-loop] 2 times, 4 ch, in next ch-loop work [1 bobble, 4 ch, 1 bobble] = corner *. Repeat from *-* the entire round. When repeating from *-* the last time do not work [1 bobble, 4 ch, 1 bobble] but finish with 1 sl st in 1st bobble. Cut and fasten the thread. PART 1: Work 28-32-40 squares in total. Sew squares tog alongside and then across. Place the squares with 4-4-5 squares in breadth and 7-8-8 squares in height. Place 2 and 2 squares on top of each other and crochet them tog as follows: Work 1 dc in ch-loop in the corner on 1st square, 2 ch, 1 dc in ch-loop in the corner on 2nd square, * 2 ch, 1 dc in next ch-loop on 1st square, 2 ch, 1 dc in next ch-loop on 2nd square *, repeat from *-*, finish with 2 ch, 1 dc in ch-loop in the corner on 1st square, 2 ch, 1 dc in ch-loop in the corner on 2nd square. NOTE: Make sure that the transitions between every square are pretty when the squares are worked tog alongside. Piece measures approx. 36-36-45 cm in breadth and 63-72-72 cm vertically. PART 2: Work the same way as on PART 1. ASSEMBLY: Crochet the parts tog as follows: Place the short side on part 1 against right long side on part 2 (36-36-45 cm up on the bottom edge). Work the 2 parts tog the same way as before (1 dc in the corner, 2 ch and 1 dc in next ch-loop etc.). Then work the short side on part 2 against part 1 the same way but against the left long side on part 1. FRINGES: 1 fringe = 6 threads of approx. 40 cm. Fold the threads double, thread the loop through 1 ch-loop and pull the thread ends through the loop (so that 12 threads hang down in every fringe). Insert fringes on the diagonal sides on the poncho as follows: Insert 1 fringe in the 3 ch-loops between the corners on every square and 1 fringe in the ch-loop between the squares. |
|
 |
|
Have you finished this pattern?Tag your pictures with #dropspattern #lilyofthevalleyponcho or submit them to the #dropsfan gallery. Do you need help with this pattern?You'll find 7 tutorial videos, a Comments/Questions area and more by visiting the pattern on garnstudio.com. © 1982-2026 DROPS Design A/S. We reserve all rights. This document, including all its sub-sections, has copyrights. Read more about what you can do with our patterns at the bottom of each pattern on our site. |
|


With over 40 years in knitting and crochet design, DROPS Design offers one of the most extensive collections of free patterns on the internet - translated to 17 languages. As of today we count 324 catalogues and 12290 patterns translated into English (UK/cm). 12290
We work hard to bring you the best knitting and crochet have to offer, inspiration and advice as well as great quality yarns at incredible prices! Would you like to use our patterns for other than personal use? You can read what you are allowed to do in the Copyright text at the bottom of all our patterns. Happy crafting!
Post a comment to pattern DROPS 137-16
We would love to hear what you have to say about this pattern!
If you want to leave a question, please make sure you select the correct category in the form below, to speed up the answering process. Required fields are marked *.