
Popular categories
Looking for a yarn?


Comments / Questions (10)
![]() LYDIA HÉNIN wrote:
LYDIA HÉNIN wrote:
Quel serait le nombre de mailles nécessaires pour réaliser ce modèle pour un adulte s'il vous plaît ? Merci.
28.01.2026 - 18:25DROPS Design answered:
Bonjour Mme Hénin, nous ne sommes malheureusement pas en mesure de pouvoir adapter chacun de nos modèles à chaque demande, toutefois, vous devriez pouvoir vous inspirer d'un modèle de tour de cou pour femme, en côtes. Bon tricot!
29.01.2026 - 08:53
![]() Trine wrote:
Trine wrote:
Når jeg skal øke får jeg 2 vrange på neste omgang. Noen som kan hjelpe?
24.12.2025 - 23:55DROPS Design answered:
Hei Trine. Du vil få 2 vrangmasker etter hverandre når du øker i vrangbord, bare husk å strikke kastene vridd, slik at det ikke blir hull og at rett maskene kommer over hverandre (sett fra retten). mvh DROPS Design
05.01.2026 - 09:47
![]() Majsan Henrysson wrote:
Majsan Henrysson wrote:
Tack för fina mönster. Stickade mössan och den blev så fin. Håller nu på med halsduken. Varvet efter ökningen får jag inte till. Stickar omateg avigt, men sedan enligt resårstickningen blir det avig maska igen, alltså 2 aviga efter varandra. Vad gör jag för fel?
13.11.2024 - 19:06DROPS Design answered:
Hej Majsan, jo du vil få 2 vrang efter hinanden når du øker i resåren, se till at retmaskerne er over hinanden fra retsiden :)
19.11.2024 - 10:21
![]() Kim wrote:
Kim wrote:
When it says to knit until Piece is 2 3/4 inches, does that mean the entire piece or just that section? Also, at the end when it says knit until piece is 4 inches, does that mean the entire piece is 4 inches total in width? I tried to find the finished measurements for each size, but it is not listed.
29.10.2020 - 18:07DROPS Design answered:
Dear Kim, measurements are given in height from the cast on row, this means in both larger sizes, the 2 3/4 inches are measured from cast on row - piece measures 4" in total when its finished. Happy knitting!
30.10.2020 - 07:20
![]() Renouard wrote:
Renouard wrote:
Bonsoir \\r\\nJ\\\'ai relevé une erreur dans les explications après les augmentations...ne faut il pas faire un rang endroit sur l envers? Comme vu sur la photo,il me semble que cela est plus pratique pour reprendre les côtes ..merci de me dire si je me trompe.\\r\\nEt encore merci pour tout vos modèles .\\r\\nVeronique
21.11.2018 - 20:44DROPS Design answered:
Bonjour Mme Renouard, on n'a que 2 côtes mousse, la 1ère = le rang endroit sur l'envers après les premières augmentations, la 2ème: 2 rangs end après les 2èmes augmentations. Quand on augmente à 6-7-8 cm, on continue à tricoter les mailles comme elles se présentent (les m end à l'endroit et les m env à l'env). Bon tricot!
22.11.2018 - 09:26
![]() Raquel wrote:
Raquel wrote:
Cuando hago los aumentos, en mi caso de 95 a 116, como tengo que seguir calcetando en la siguiente vuelta para que me coincida el resorte?, no me coincide 1x1 y como aún soy un poco novata... GRACIAS
16.08.2016 - 10:27DROPS Design answered:
Hola Raquel. Como puedes apreciar en la foto, no todos los pts coinciden derecho sobre derecho y revés sobre revés. Es normal, trabajando los aumentos siempre tenemos un pequeño desplazamiento.
29.08.2016 - 22:54Fran wrote:
Salve, Salve, ho notato una discrepanza nelle misure per 1-3 tra le istruzioni italiane e inglesi: nel pattern italiano per la taglia 1-3 sono indicati 50-56 cm, mentre in quello inglese (ma anche tedesco, spagnolo), per la taglia 1-3 sono indicati 56-62cm. Qual è quella corretta? Ringrazio anticipitamente, Fran
12.02.2016 - 00:02DROPS Design answered:
Buonasera Fran. Abbiamo corretto le misure nel testo. La ringraziamo per la segnalazione. Buon lavoro!
12.02.2016 - 22:20
![]() Sigrunn Braatlund wrote:
Sigrunn Braatlund wrote:
Hei! Jeg mener formuleringen om hvor den andre rilleraden skal plasseres må være feil. Skjerfet har en tredeling der en rille lager et skille der jeg skal felle og der jeg skal øke. Dette gjør at det ikke blir så synlig at det ikke synes så godt at vrangbordens rette og vrange ikke kommer rett over hverandre der man har felt eller økt. Men jeg oppfatter at jeg skal strikke rillerad nummer to og så strikke 1 cm FØR jeg øker som beskrevet.
23.02.2015 - 12:05
![]() Ev wrote:
Ev wrote:
When I reach the increase row (p1, k1, p1, k1, inc 1), then continue in ribbing in the next row, isn't the k1, p1 rib put off by the extra stitches? Should those extra stitches be worked as presented (knit the knit stiches, purl the purl stitches, knit the increase stitches)? I'm an experienced knitter but that row confuses me (could be the fact that I have a bad head cold).
03.12.2014 - 16:26DROPS Design answered:
Dear Ev, inc 1 st on this row by making 1 yo, on next row, P YO twisted and then work K over K and P over P (see Increase tip at beg of the pattern). Happy knitting!
04.12.2014 - 10:43
![]() Sarah wrote:
Sarah wrote:
Hallo! Ich glaube bei der deutschen Version gibt es ein paar Schreib- und Übersetzungsfehler, z.B. soll bei der englischen Version nach 5cm eine Reihe RS und eine WS gestrickt werden, bei der deutschen nur eine Reihe. LG
07.09.2014 - 23:40DROPS Design answered:
Liebe Sarah, vielen Dank für den Hinweis, wir haben den fehlenden Teil nun ergänzt.
09.09.2014 - 19:38
|
|
Henrik VIII#henrikviiibib |
|
 |
 |
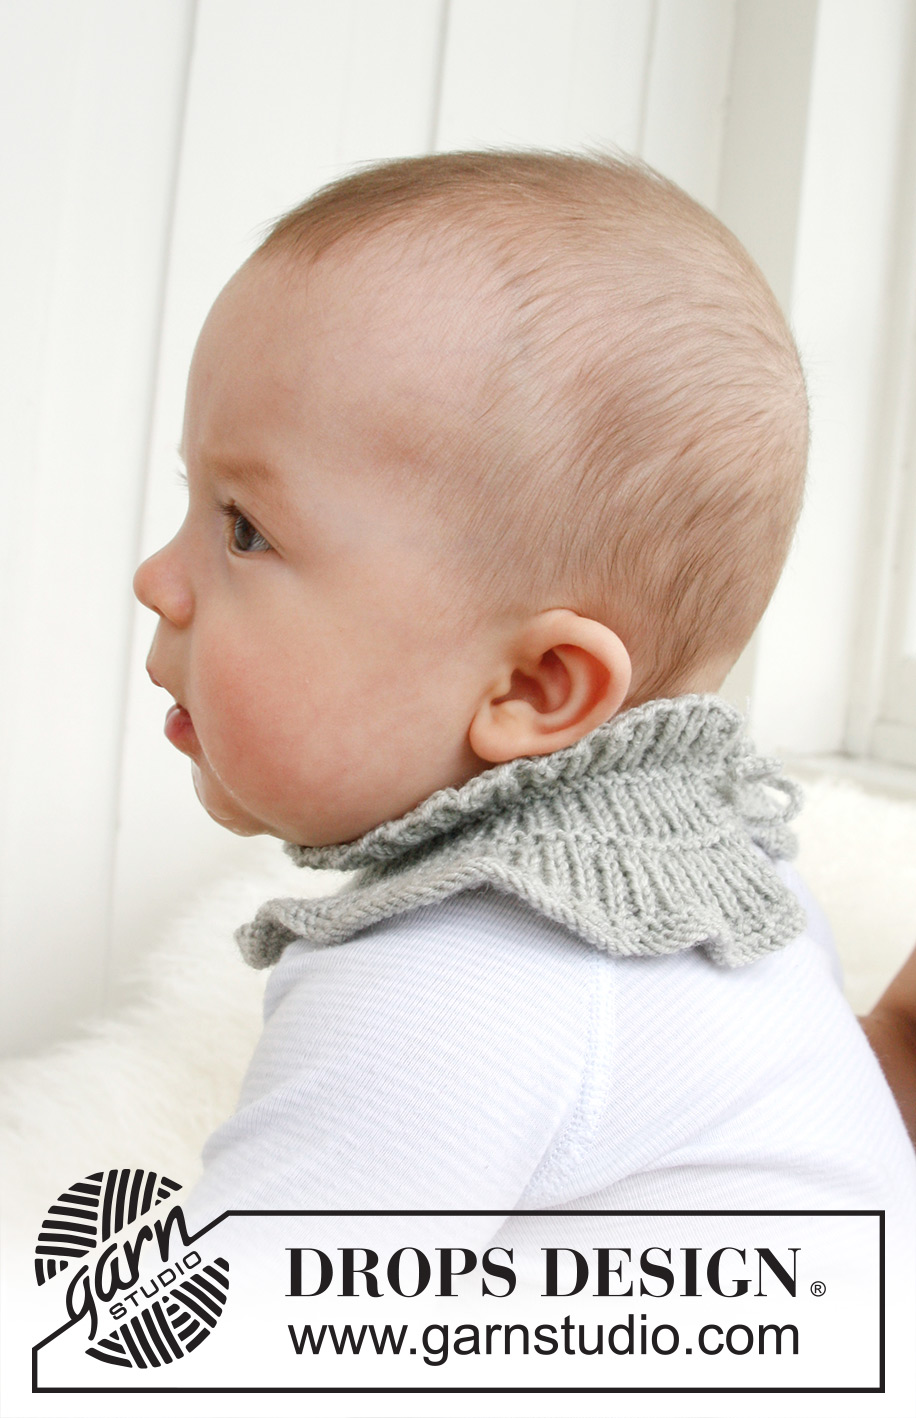
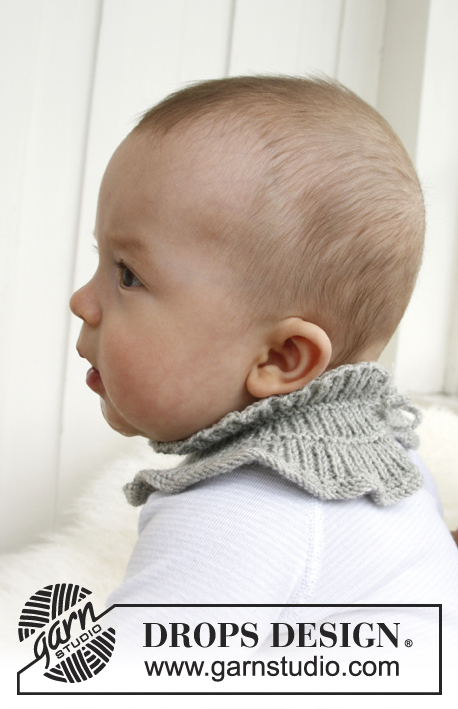
Knitted neck warmer or bib for baby and child in DROPS BabyMerino
DROPS Baby 21-9 |
|
|
GARTER ST (back and forth on needle): K all rows. DECREASE TIP: Dec 1 st by K 2 sts tog. INCREASE TIP: Inc 1 st by making 1 YO, on next row P YO twisted (i.e. work in back loop of st instead front) to avoid holes. ---------------------------------------------------------- SCARF: Worked back and forth on needle. Cast on 115-121-127 (133-139) sts with Baby Merino on needle size 2.5 mm. Work 4 rows in garter st - see explanation above (1st row = RS). Work next row as follows from RS: 4 sts in garter st (= band), * K 1, P 1 *, repeat from *-* until 5 sts remain, finish with K 1 and 4 sts in garter st (= band). Continue with rib like this with 4 sts in garter st in each side until piece measures 2½-2½-3 (4-4) cm. Then work next row as follows from RS: 4 sts in garter st, * K 2 tog, K 1 *, repeat from *-* until 6 sts remain, K 2 tog and 4 sts in garter st = 79-83-87 (91-95) sts. K 1 row from WS. Then work next row as follows from RS: 4 sts in garter st, * K 1, P 1 *, repeat from *-* until 5 sts remain, finish with K 1 and 4 sts in garter st. Continue with rib like this with 4 sts in garter st in each side until piece measures 5-5-6 (7-7) cm. K 1 row from RS and K 1 row from WS. Continue with rib as before with 4 sts in garter st in each side until piece measures 6-6-7 (8-8) cm. Work next row as follows from WS: 4 sts in garter st, * P 1, K 1, P 1, K 1, inc 1 st - Read INCREASE TIP above *, repeat from *-* until 7 sts remain and finish with P 1, K 1, P 1 and 4 sts in garter st = 96-101-106 (111-116) sts. Continue with rib with 4 sts in garter st in each side until piece measures 8-8-9 (10-10) cm. Cast off sts with K over K and P over P. TIES: Start in the one short side of the scarf and crochet 1 dc in outermost st in garter st in the upper ridge (1 ridge = 2 rows in garter st) on the scarf on hook size 2.5 mm. Crochet ch for approx. 16-17-18 (20-22) cm, turn and crochet 1 sl st in every ch back (beg in 2nd ch from hook). Cut and fasten the threads. Crochet another tie in the other short side of the scarf. |
|
Have you finished this pattern?Tag your pictures with #dropspattern #henrikviiibib or submit them to the #dropsfan gallery. Do you need help with this pattern?You'll find 11 tutorial videos, a Comments/Questions area and more by visiting the pattern on garnstudio.com. © 1982-2026 DROPS Design A/S. We reserve all rights. This document, including all its sub-sections, has copyrights. Read more about what you can do with our patterns at the bottom of each pattern on our site. |
|


With over 40 years in knitting and crochet design, DROPS Design offers one of the most extensive collections of free patterns on the internet - translated to 17 languages. As of today we count 324 catalogues and 12290 patterns translated into English (UK/cm). 12290
We work hard to bring you the best knitting and crochet have to offer, inspiration and advice as well as great quality yarns at incredible prices! Would you like to use our patterns for other than personal use? You can read what you are allowed to do in the Copyright text at the bottom of all our patterns. Happy crafting!
Post a comment to pattern DROPS Baby 21-9
We would love to hear what you have to say about this pattern!
If you want to leave a question, please make sure you select the correct category in the form below, to speed up the answering process. Required fields are marked *.