
Popular categories
Looking for a yarn?


Comments / Questions (21)
![]() Elaine Miller wrote:
Elaine Miller wrote:
According to the pattern we have to do the decrease for the raglan on right side 22 times (for the small size). We completed 12 times and began the neck bind offs with holders. Then we started the 1 st bind offs at neck edges and realized we would run out of stitches on the neck sides before we could finish all 22 raglan decreases. We have been careful about following the instructions. Is it possible there are less than 22 decrease rows for the raglan or are you counting it differently?
13.02.2024 - 03:02DROPS Design answered:
Dear Mrs Miller, in size S you won't have any stitches left after all decreases for raglan and neck are done, then just pick up 120 sts along whole neck to work neck edge. Happy knitting!
13.02.2024 - 08:49
![]() Eva Gaspar wrote:
Eva Gaspar wrote:
Hi, could the neckline be worked in moss stitch, too? with the same number of st and needle? Thank you :)
07.02.2024 - 08:51DROPS Design answered:
Dear Mrs Gaspar, you can probably work the neckline in moss stitch, the number of stitches and needle size would remain the same. Adjust the length to the desired one. Happy knitting!
08.02.2024 - 08:06
![]() Silvia wrote:
Silvia wrote:
Quando si iniziano le diminuzione nel raglan bisogna continuare a m legaccio le 2 m prima delle nuove maglie? Una delle due farà parte della diminuzione e quindi mi chiedo se bisogna aggiungerle quando si fanno le diminuzioni. Grazie
29.03.2020 - 23:40DROPS Design answered:
Buongiorno Silvia. Dal ferro precedente a quello in cui si inizia a diminuire per il raglan, le maglie ai lati delle maglie aumentate vengono lavorate a maglia rasata. Buon lavoro!
30.03.2020 - 12:49
![]() Yen wrote:
Yen wrote:
Hi, Would you be able to give me some explanation regarding the formation of the sleeves ? I'm at the "yoke" and I am having a really bad time trying to cast on 50 new stitches over the 8 stitches of the armhole .... it seems to be way too tight and I can't maneuver the needle ! please help me, I'm going crazy here ! Do I need to cast on a different set of needle or something ?
01.07.2017 - 13:37DROPS Design answered:
Dear Yen, the extra 50 stitch you are casting on, forms the sleeve. It is only thight and not the easiest to handle the needles in the first couple of rows, then it gradually gets easier. It might help, if you use a longer circular needle, and pull the cable out a little bit, just before and after the sleeve stitches (much like with the magic loop method). I hope this helps. Happy Knitting!
03.07.2017 - 00:54
![]() Zabeth wrote:
Zabeth wrote:
Voilà, je viens de le finir. J'ai mis quelques photos sur mon blog zazaetczaiguilles.eklablog.com si cela peut aider les autres tricoteuses! Il y a juste un petit hic, je pense que la boutonnière est réalisée trop tôt, du coup elle se retrouve un peu loin du haut de la bordure d'encolure.
27.02.2017 - 16:41
![]() Zabeth wrote:
Zabeth wrote:
Oui, merci, c'est ce que j'avais fait de toute façon. Après avoir mis les 14 m en attente de l'encolure, puis faire les 2x3 diminutions, puis rabattre 1 m au début à ch. rg, cela veut dire qu'il n'y aura plus de m pour le raglan de ch. côté!
14.02.2017 - 15:52DROPS Design answered:
Bonjour Zabeth, tout à fait, comme il est indiqué, je cite: "(rabattre après les diminutions du raglan des devants de chaque côté), c'est-à-dire que vous continuez ces diminutions pour l'encolure même si elles empiètent sur le raglan. Bon tricot!
14.02.2017 - 16:59
![]() Zabeth wrote:
Zabeth wrote:
J'ai l'impression qu'il y a une erreur, je cite : "tricoter au point mousse sur 1.... suivant sur l'envers" si on commence le rang des 12 m point mousse sur l'endroit, ce qui est spécifié ci-dessous et que l'on tricote 6 rangs ainsi, on se retrouve forcément sur l'endroit, donc il n'est pas possible de rabattre les 8m centrales de ces 12 m sur un rang envers!! Comment fait-on alors?
11.02.2017 - 12:48DROPS Design answered:
Bonjour Zabeth, on tricote 6 rangs avec 12 m au point mousse aux marqueurs en commençant sur l'endroit (= 3 côtes mousse aux marqueurs), au rang suivant sur l'endroit, tricotez toutes les mailles à l'endroit, et au rang suivant sur l'envers, rabattez les 12 m à l'end sur l'envers. Bon tricot!
13.02.2017 - 09:56
![]() Erna Van Cleef wrote:
Erna Van Cleef wrote:
Het is mij niet duidelijk hoeveel steken er nog op de naald moeten overblijven vooraleer aan de halsboord te beginnen. Tusen de 70 en 120 is wel erg vaag. Ik brei maat L, heb de vereiste 36 cm schouderhoogte bereikt en heb nog steeds meer steken op mijn naald over dan ik moet opnemen voor de halsboord. Nochtans klopt de stekenverhouding.
24.04.2016 - 22:46DROPS Design answered:
Hoi Erna. Je moet tussen de 70 en 120 st over hebben - zoals er staat in het patroon. Voor L zou ik inschatten zo rond de 95 st over (zo een beetje in het midden). Het beste is om het vestje even aan te doen en zien hoe het bevalt.
25.04.2016 - 12:39
![]() Marga wrote:
Marga wrote:
Ik snap de raglan niet, moet je nu eerst minderen en dan averechts voor de mindering ribbels breien zodat de mindering op het pand zit? Op de foto zie je zo'n mooie dikke ribbel maar dat lukt niet.
26.06.2015 - 19:01DROPS Design answered:
Hoi Magda. Je mindert aan beide zijkanten van de ribbelsteken (die markeren elk overgang tussen de panden/mouwen = raglan) zoals beschreven onder TIP MINDEREN
03.07.2015 - 14:09
![]() Drops Design France wrote:
Drops Design France wrote:
Si vous avez besoin d'aide, nous vous demandons de bien vouloir vous adresser au magasin où vous avez acheté votre laine. Lorsque vous achetez le fil original Garnstudio, soyez assurée d'avoir acheté votre laine auprès d'un magasin qui vous donnera toute l'aide requise, également par téléphone ou par mail. Vous pouvez également vous adresser au forum DROPS.
01.09.2011 - 11:47
|
|
It's June#itsjunecardigan |
|
 |
 |
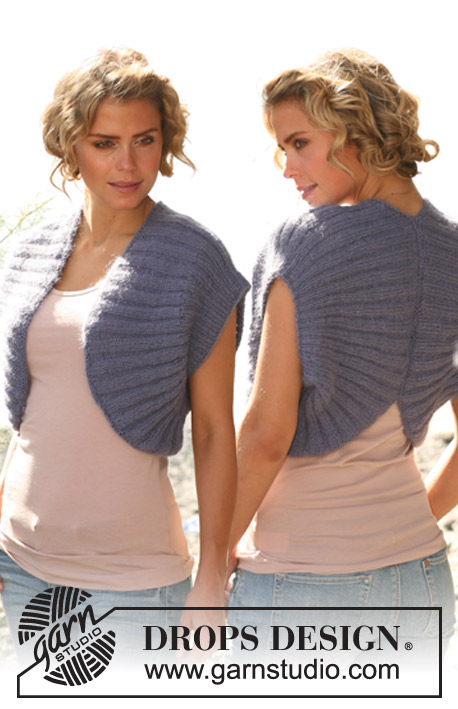
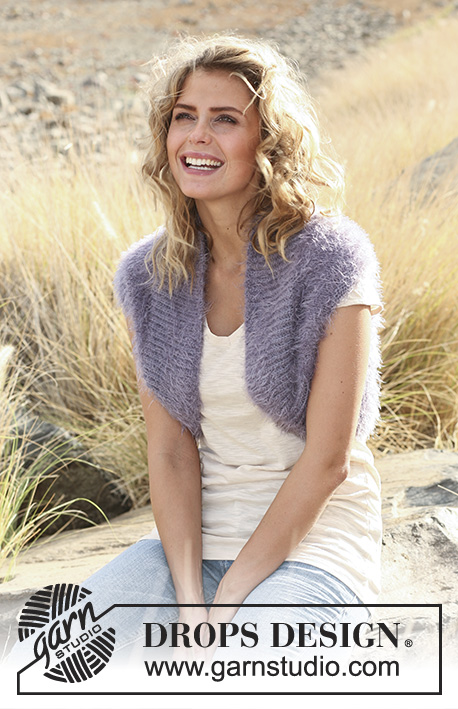
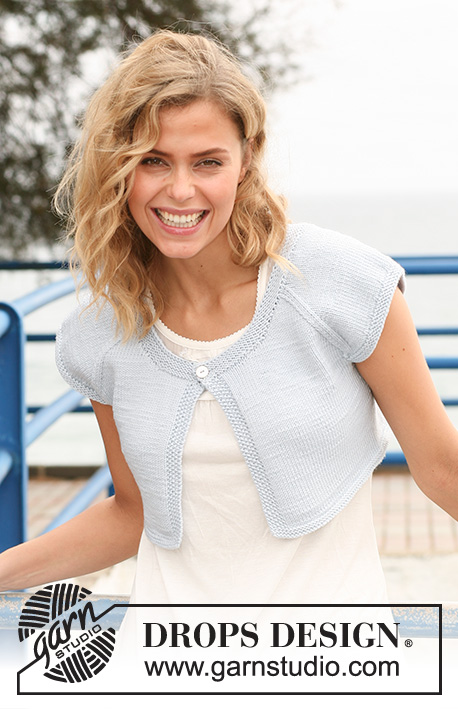
Knitted DROPS short sweater with raglan sleeves in "Merino Extra Fine". Size: S - XXXL.
DROPS 128-34 |
|
|
GARTER ST (back and forth on needle): K all rows. MOSS ST: 1st row: * K1, P1 *, repeat from *-*. 2nd row: K over P and P over K. Repeat 2nd row. INCREASE TIP: Inc from RS by knitting 2 sts into 1 st. BUTTON HOLE: Cast off for button hole on right front band. 1 button hole = K 3rd and 4th st from mid front tog, make 1 YO. DECREASE TIP (applies to raglan): Dec as follows from RS: Beg 2 sts before st with marker: K 2 tog, K 1 (marker is in this st), slip 1 st as if to K, K1, psso. KNITTING TIP: If knitting tension is incorrect in height and the knitting is too tight, the raglan sleeve will be too short and the armholes too small. This can be adjusted by working 1 extra row without dec evenly spaced between dec. -------------------------------------------------------- JACKET: Worked back and forth on circular needle from mid front. Cast on 168-188-204-224-252-280 sts (incl 5 band sts in each side) on circular needle size 3 mm. Work 4 rows in GARTER ST - see explanation above! Change to circular needle size 3.5 mm. Continue working next row from RS as follows: Work MOSS ST - see explanation above - over the first 5 sts, stocking st until 5 sts remain, finish with 5 sts in moss st. The 5 sts in moss st each side = bands. Work bands in moss st until finished measurements. Continue with stocking st over the remaining sts. REMEMBER THE KNITTING TENSION! When piece measures 4 cm, insert 2 markers in the piece after 42-47-51-56-63-70 sts from each side (back piece = 84-94-102-112-126-140 sts). On next row from RS inc 1 st on each side of marker in each side - READ INCREASE TIP! Repeat inc every 2-2-2-2-3-3 cm a total of 4 times = 184-204-220-240-268-296 sts. When piece measures 13-14-14-15-17-17 cm, work in garter st over 12 sts in each side with beg from RS (= 6 sts on each side of marker in each side), work the remaining sts as before. When 6 rows in garter st have been worked over the 12 sts in each side, cast off the middle 8 sts for armholes on next row from WS (cast off with K from WS) = 168-188-204-224-252-280 sts. The piece measures approx. 14-15-15-16-18-18 cm. YOKE: Work 1st row from RS as follows: Work over right front piece as before (continue the 2 sts in each side of armhole in garter st), cast on 50-54-58-62-66-70 new sts over armhole, work in stocking st over back piece, cast on 50-54-58-62-66-70 new sts over the other armhole, work over left front piece as before = 268-296-320-348-384-420 sts. READ ALL OF THE FOLLOWING SECTION BEFORE CONTINUING! Work next row from WS as follows: 5 band sts in moss sts, stocking st as before over left front piece, garter st over the new sts + 2 sts in garter st each side of the new sts as before, stocking st over back piece, garter st over the new sts + 2 sts in garter st each side of the new sts as before, stocking st until 5 sts remain, finish with 5 band sts in moss st. Continue like this. When a total 6 rows in garter st over the new sts for sleeve have been worked, K 1 row from RS as before while AT THE SAME TIME inc 14-14-14-12-12-12 sts evenly over the new sts - READ INCREASE TIP! (= 64-68-72-74-78-82 sts on each sleeve. Insert a marker in first and last st of the new sts for sleeve so that there are 62-66-70-72-76-80 sts between markers on each sleeve (= 4 markers)) = 296-324-348-372-408-444 sts. P 1 row from WS with 5 band sts in moss st towards mid front in each side as before (the 2 sts in garter st in each of the new sts are worked in stocking st from here). On next row from RS dec for raglan in each of the 4 transitions between body and sleeves (i.e. 8 dec per dec-row) - READ DECREASE TIP AND KNITTING TIP! Repeat dec every row from RS a total of 22-24-26-26-27-29 times. AT THE SAME TIME when piece measures 23-24-25-25-26-27 cm, slip the outermost 14-16-16-20-22-24 sts at beg of the next 2 rows on a stitch holder for neck after they have been worked. Continue to cast off for neckline at beg of every row in each side as follows: 3 sts 2 times. Continue to cast off 1 st at beg of every row until piece measures 32-34-36-38-40-42 cm from shoulder down (cast off past the raglan dec on front piece in each side). Then piece measures approx. 28-30-32-33-35-37 cm measured from mid back of neck and down. After all dec for raglan and neck, approx. 70-120 sts remain on needle. NECKLINE: Knit up approx. 120-132-136-156-168-180 sts from RS on circular needle size 3 mm (incl sts on stitch holders). K 1 row from WS. K next row from RS while AT THE SAME TIME dec 10-12-14-16-18-20 sts evenly and casting off for 1 BUTTON HOLE on same row - see explanation above. Continue in garter st. Cast off when a total of 5 ridges (10 rows in garter st) have been worked vertically. Sew button on to neckline at top of left front band. |
|
 |
|
Have you finished this pattern?Tag your pictures with #dropspattern #itsjunecardigan or submit them to the #dropsfan gallery. Do you need help with this pattern?You'll find 19 tutorial videos, a Comments/Questions area and more by visiting the pattern on garnstudio.com. © 1982-2026 DROPS Design A/S. We reserve all rights. This document, including all its sub-sections, has copyrights. Read more about what you can do with our patterns at the bottom of each pattern on our site. |
|


With over 40 years in knitting and crochet design, DROPS Design offers one of the most extensive collections of free patterns on the internet - translated to 17 languages. As of today we count 324 catalogues and 12290 patterns translated into English (UK/cm). 12290
We work hard to bring you the best knitting and crochet have to offer, inspiration and advice as well as great quality yarns at incredible prices! Would you like to use our patterns for other than personal use? You can read what you are allowed to do in the Copyright text at the bottom of all our patterns. Happy crafting!
Post a comment to pattern DROPS 128-34
We would love to hear what you have to say about this pattern!
If you want to leave a question, please make sure you select the correct category in the form below, to speed up the answering process. Required fields are marked *.