
Popular categories
Looking for a yarn?


Comments / Questions (9)
![]() Tuff wrote:
Tuff wrote:
On the back piece, after knitting 13 cm in rib, how many rows do you increase? 1, 2? 14? I understand the sleeve will later attach, but how far down is that? It might be American snobbery, but this pattern is written in fits and stops, and could really be better explained.
12.09.2018 - 13:22DROPS Design answered:
Dear Tuff, You will increase at every 3-3-2.5-2.5-2-2 cm (if you did a swatch and your gauge is the same as the one given, you can always count on many rows you have on the 10 x 10 cm swatch. As to the total number of incresaes, depending on the size you are knitting, you will increase 12-12-14-14-14-14 times. Happy Knitting!
12.09.2018 - 14:35
![]() Andrea Blümel wrote:
Andrea Blümel wrote:
Liebes DROPS Team! Ich stehe mit dem Patentmuster auf Kriegsfuss, kann ich auch ein normales Bündchen oder das falsche Patentmuster stricken? Vielen Dank im Voraus
03.09.2015 - 18:36DROPS Design answered:
Das normale Rippenbündchen und auch das falsche Patentmuster ziehen sich mehr zusammen, das Vollpatent ist durch den höheren Garnverbrauch elastischer, was bei dieser Jacke nicht unwichtig ist. Wagen Sie sich einfach dran, so schwierig ist es nicht - schauen Sie sich mal das Video zum Patentmuster an, im Kopf neben dem Foto, vielleicht hilft Ihnen das weiter.
07.09.2015 - 18:41
![]() Sara wrote:
Sara wrote:
Buonasera vorrei fare questo modello nella taglia xl con il filato brushed alpaca silk quanti gomitoli sono necessari? grazie
24.05.2015 - 22:18DROPS Design answered:
Buongiorno Sara. Per sostituire il filato indicato con uno dello stesso gruppo di filati, deve calcolare i metri complessivi necessari con il filato indicato e dividerlo per i metri di un singolo gomitolo del filato scelto. In questo caso: 280 m (1 gomitolo di Vivaldi) x 6 gomitoli necessari = 1680 metri : 140 (metri in un gomitolo di Brushed Alpaca Silk) = 12 gomitoli necessari. Trova ulteriori informazioni su come sostituire i filati al punto 5 della seguente pagina . Buon lavoro!
25.05.2015 - 08:31
![]() Cati wrote:
Cati wrote:
Habe kleinen Tippfehler entdeckt: Bei der Anleitung des Patent steht bei der Beschreibung der 2. Reihe als Abkürzung "2.P:" richtig wäre aber "2. R.:"
23.07.2014 - 13:59DROPS Design answered:
Vielen Dank für den Hinweis, das wird gleich korrigiert! Viel Spaß beim Stricken!
23.07.2014 - 14:36Bouya wrote:
S'il vous plait je voudrais avoir l'explication de se model qui me rend folle...mais comme en Algerie les aiguilles circulaire et surtout les numéros sont inexistant, pourriez vous me transmettre les explications avec aiguille normale? Merci d'avance
27.05.2014 - 12:44DROPS Design answered:
Bonjour Mme Bouya, ce modèle se tricote en allers et retours sur aiguille circulaire pour avoir suffisamment de place pour y loger toutes les mailles. Vous pouvez ainsi le tricoter sur aiguilles droites, pensez à bien conserver la bonne tension. Pour toute aide complémentaire, vous pouvez contacter votre magasin Drops ou le forum Drops. Bon tricot!
27.05.2014 - 13:28
![]() Aud wrote:
Aud wrote:
Fin jakke
21.06.2010 - 19:29
![]() Karin wrote:
Karin wrote:
Tolle Jacke, sieht richtig kuschelig aus.
14.06.2010 - 22:13
![]() Jana wrote:
Jana wrote:
Hezký, jednoduchý, slušivý svetřík.
14.06.2010 - 11:58
![]() Sylvia wrote:
Sylvia wrote:
Wunderschöne, vmtl. auch für Anfänger geeignete Jacke :-)
13.06.2010 - 15:15
|
|
DROPS 125-30 |
|
|
|
|
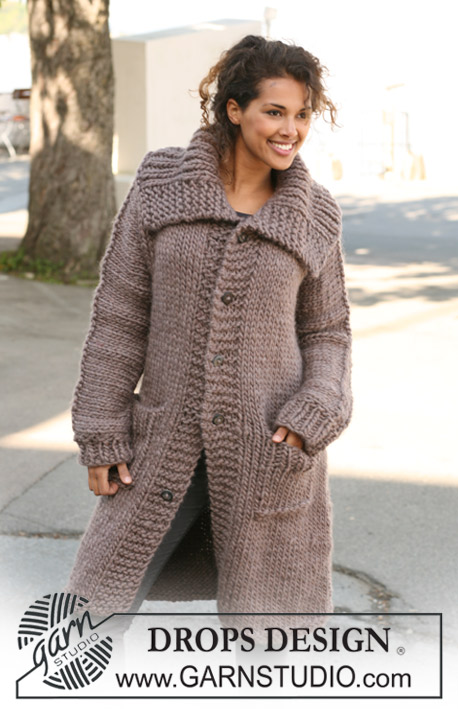
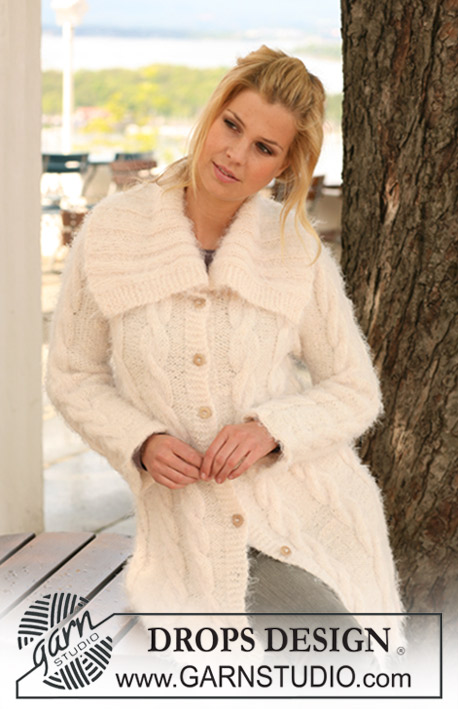
Jacket knitted from side to side with wide front band in English rib in DROPS Vivaldi or DROPS Brushed Alpaca Silk. Size S to XXXL.
DROPS 125-30 |
|
|
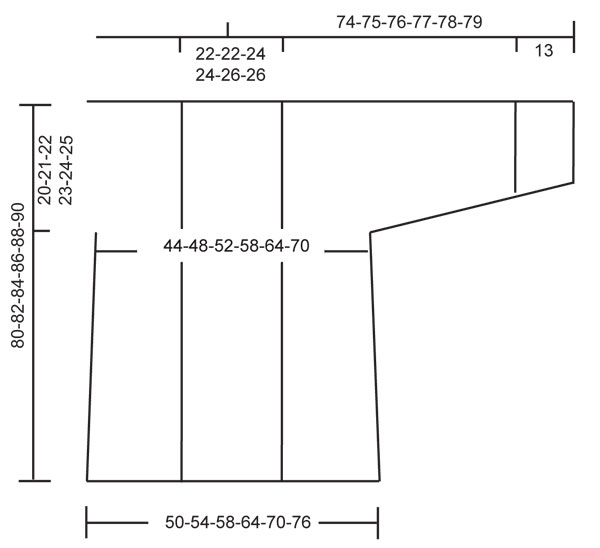
ENGLISH RIB (back and forth on needle): Row 1: * K1, 1 YO, slip 1 st as if to P *, repeat from *-* finish with K1. Row 2: * 1 YO, slip 1 st as if to P, K tog YO and slipped st *, repeat from *-* until 1 st remain, finish with 1 YO, slip 1 st as if to P. Row 3: * K tog YO and slipped st, 1 YO, slip 1 st as if to P *, repeat from *-* until 2 sts remain, K tog YO and slipped st. Repeat row 2 and 3. GARTER ST (back and forth on needle): K all rows. -------------------------------------------------------- JACKET: Worked from side to side in 3 parts which are sewn tog afterwards. BACK PIECE: Worked back and forth on circular needle from sleeve to sleeve. Cast on 21-23-23-25-25-27 sts on circular needle size 5 mm with Vivaldi or Brushed Alpaca Silk. Work ENGLISH RIB – see above, with 1 edge st in GARTER ST each side – see above. When piece measures 13 cm change to circular needle size 5.5 mm and continue in stocking st (on first row in stocking st K tog YO and 1 st to make the no of sts tally). AT THE SAME TIME when piece measures 13 cm inc 1 st at the end of row from RS, repeat the inc on every 3-3-2.5-2.5-2-2 cm a total of 12-12-14-14-14-14 times = 33-35-37-39-39-41 sts. When piece measures approx 52-51-50-48-46-44 cm (less for the larger sizes because of wider shoulders) slip sts on a stitch holder – last row is from WS. Cast on 32-32-33-33-34-34 sts on circular needle size 5.5 mm with Vivaldi or Brushed Alpaca Silk. K 1 row from RS and P 1 row from WS – work the last 2 sts on needle (as seen from RS) in garter st until finished measurements (= bottom edge) - at the end of row from WS cast on 32-33-33-33-34-35 new sts. Work 1 row from RS and 1 row from WS, at the end of row from WS cast on 32-33-34-34-34-35 new sts = 96-98-100-100-102-104 sts. Cut thread. Slip sts from sleeve back on the same needle, work from RS, first sts from sleeve, then the new 96-98-100-100-102-104 sts = 129-133-137-139-141-145 sts. Place a marker. NOW MEASURE PIECE FROM HERE! Work stocking st, but continue to work the 2 bottom sts in garter st. When piece measures 11-13-14-17-19-22 cm cast off 3 sts at beg of next row from RS for neck = 126-130-134-136-138-142 sts. Continue as before until piece measures 33-35-38-41-45-48 cm, cast on 3 new sts at the end of next row from WS = 129-133-137-139-141-145 sts (neck = 22-22-24-24-26-26 cm). When piece measures 44-48-52-58-64-70 cm slip the first 33-35-37-39-39-41 sts from RS on a stitch holder (sleeve) and continue on the remaining 96-98-100-100-102-104 sts. Work as follows – from RS: Cast off the first 32-33-34-34-34-35 sts on needle, work remaining sts on row, P 1 row. Cast off the first 32-33-33-33-34-35 sts on needle, work remaining sts on row, P 1 row. Work the last 32-32-33-33-34-34 sts and cast off on next row. Cut the thread. Slip sts on stitch holder back on circular needle size 5.5 mm and continue (= sleeve) = 33-35-37-39-39-41 sts. NOW MEASURE PIECE FROM HERE! Work stocking st, when piece measures 6-5-4.5-2.5-7-5 cm dec 1 st at the beg of row from WS and repeat the dec on every 3-3-2.5-2.5-2-2 cm a total of 12-12-14-14-14-14 times = 21-23-23-25-25-27 sts. When piece measures 39-38-37-35-33-31 cm change to circular needle size 5 mm. Work English rib with 1 edge st in garter st each side. Cast off when piece measures 52-51-50-48-46-44 cm, piece measures a total of 148-150-152-154-156-158 cm (from cast on row to cast off row). LEFT FRONT PIECE: Cast on and work like back piece until piece measures a total of 63-64-64-65-65-66 cm (11-13-14-17-19-22 cm) after the first marker), just before sts were cast off for neckline = 129-133-137-139-141-145 sts on needle. Slip sts on a stitch holder. RIGHT FRONT PIECE: Cast on and work like left front piece, but mirrored. ASSEMBLY: Sew shoulder/over arm seams. Sew under arm seams and side seam inside 1 edge st. FRONT BAND: Slip sts from right front piece back on circular needle size 5 mm, pick up 34-34-38-38-42-42 sts round neckline on back piece and slip sts from left front piece back on needle = 292-300-312-316-324-332 sts. K 1 row from WS, AT THE SAME TIME dec 37-37-39-39-41-41 sts evenly = 255-263-273-277-283-291 sts. Continue as follows from RS: English rib with 2 garter sts each side. Insert 3 markers in piece, 1 mid back and 1 on each shoulder. Insert markers in st which is worked YO + slipped st tog from RS. Continue in English rib, AT THE SAME TIME inc on approx every 3 cm as follows: Row 1 (from RS): 1 YO each side of st with marker (st with marker worked as follows: K tog YO and slipped st). Row 2 (from WS): 1 YO, K the new YO from previous row into back of loop, st with marker (= 1 YO, slip 1 st as if to P), K the new YO from previous row into back of loop, 1 YO. Row 3 (from RS): K the new YO from previous row into back of loop, 1 YO, slip next st as if to P, st with marker (= K tog YO and slipped st), 1 YO, slip next st as if to P, K the new YO from previous row into back of loop. There are now 2 inc sts each side of st with marker, continue in English rib on all sts. AT THE SAME TIME when front band measures 4-4-5-5-6-6 cm make buttonholes. Try on jacket to place the buttonholes correctly. Make 3 buttonholes with approx 8 cm between each, the bottom one approx 35-36-37-38-39-40 cm from bottom edge. 1 buttonhole: Cast off 2 sts (YO + slipped st count as 1 st - 1 YO, slip 1 st as if to P count as 1 st) for each buttonhole, on next row cast on 2 new sts. Repeat when front band measures approx 14-14-16-16-18-18 cm. Cast off when front band measures 18-18-20-20-22-22 cm. Sew buttons on left front band. |
|
 |
|
Have you finished this pattern?Tag your pictures with #dropspattern or submit them to the #dropsfan gallery. Do you need help with this pattern?You'll find 21 tutorial videos, a Comments/Questions area and more by visiting the pattern on garnstudio.com. © 1982-2026 DROPS Design A/S. We reserve all rights. This document, including all its sub-sections, has copyrights. Read more about what you can do with our patterns at the bottom of each pattern on our site. |


With over 40 years in knitting and crochet design, DROPS Design offers one of the most extensive collections of free patterns on the internet - translated to 17 languages. As of today we count 324 catalogues and 12290 patterns translated into English (UK/cm). 12290
We work hard to bring you the best knitting and crochet have to offer, inspiration and advice as well as great quality yarns at incredible prices! Would you like to use our patterns for other than personal use? You can read what you are allowed to do in the Copyright text at the bottom of all our patterns. Happy crafting!
Post a comment to pattern DROPS 125-30
We would love to hear what you have to say about this pattern!
If you want to leave a question, please make sure you select the correct category in the form below, to speed up the answering process. Required fields are marked *.