
Popular categories
Looking for a yarn?


Comments / Questions (131)
![]() Nicky wrote:
Nicky wrote:
Ik bedoelde Ik heb aan het einde van de eerste toer van M1 7 stokjes op een rij... Klopt dat? aan de rechterkant heb ik 5 stokjes en dan 2 stokjes in 1 stokje...
03.09.2015 - 15:46DROPS Design answered:
Hoi Nicky. Welke maat maak je? Dan kan ik het natellen.
03.09.2015 - 16:39
![]() Nicky wrote:
Nicky wrote:
Ik eindig bij M1 en dan bij de 1e rij aan de linkerkant na de 2 stokjes in 1 stokje met 2 stokjes en dan heb ik 5 stokjes over de boord, dus totaal heb ik dan 2 stokjes op een rij. Klopt dat? Moet ik de teruggaande toer, dus van links naar rechts als de 2e toer zien? Dank!
03.09.2015 - 11:31DROPS Design answered:
Hoi Nicky. Ja, je haakt de eerste toer van M.1 van rechts naar links en je hebt 5 stk aan beide zijkanten voor de voorbies. Je hebt na de eerste toer 4 stk per herhaling van M.1 ipv 3 en toer 2 haak je van links naar rechts en hier meerder je van 4 naar 5 stk. Kijk ook hier hoe je onze telpatronen moet lezen.
03.09.2015 - 12:22
![]() Marjolein wrote:
Marjolein wrote:
In het begin moet je 10 toeren M1 haken dat komt met 91 steken uit maar je moet ook nog beginnen en eindigen met 5 stk en dan kom ik niet uit. Hoe moet ik dit doen? Want 91 - 10 is 81 en dat is dus niet deelbaar door de 7 steken in het patroon
06.07.2015 - 22:14DROPS Design answered:
Hoi Marjolein. Je hebt 5 stk aan iedere kant = voorbies, dus je haakt M.1 over de overige 81 st. Eerste toer is 3 stk per herhaling (3 worden 4) = 27 herhalingen.
30.07.2015 - 14:01
![]() Eva wrote:
Eva wrote:
Jag läser virkinfo i början på mönstret. Förstår ej följande: Varje v avslutas med 1 sm i den 3e lm i början av v eller i början av föregående v. Ska jag inte göra en st som sista m i arbetet? Om jag bara gör sm så verkar kanten dra ihop sig väldigt mycket!
16.05.2015 - 13:28DROPS Design answered:
Hej Eva, Jag förstår din fråga, det är mera relevant med sm om du virkar runt. Lycka till!
18.05.2015 - 10:58
![]() Aida wrote:
Aida wrote:
Ola nao consigo entender a passagem 5 pa para a orla da frente, 1-0-2-1-0-2 pa, repetir M.2 nos pontos seguintes até restarem 6-5-7-6-5-7 pa, Desde ja agradeco
11.05.2015 - 08:44
![]() Cathy wrote:
Cathy wrote:
Q1. I am doing size XXL. Before doing M2 I had 226 stitches. How many stitches should I have after completing Row 3 of M2 as i seem to have far more than I expected before doing the shaping in my Q2 below? Q2. When I do the row where you do 8 ch for the underarm do I also do 5 tr at the beginning and end for the front bands PLUS the 36 tr for the front pieces (41 tr in total) or do the 36 tr INCLUDE the 5 tr for the front bands? Thanks
21.04.2015 - 12:19DROPS Design answered:
Dear Cathy, Q1: you should have same number of sts before/after M2, ie 226 sts in size XXL. M2 is worked over 6 sts and you still got 6 sts in each repeat on last row in M2. Q2: When crocheting the row with 8 ch for armhole, crochet from beg of row the 36 tr for front piece (= including the front bands). Happy crocheting!
21.04.2015 - 13:39
![]() Cathy wrote:
Cathy wrote:
I'm a left -handed crocheter and haven't used charts before. I know I need to reverse the direction following the M1 and M2 charts so that I would work Row 1 from left to right, but do I also have to mirror-image the symbols so that I start Row 1 (after the 5 tr for the band) with the 2 treble in one chain increase first as right handers will do? Thanks for your help.
14.04.2015 - 11:38DROPS Design answered:
Dear Cathy, M2 is worked with 5 tr front band sts each side + 1-0-2-1-0-2 tr, so that you will get 6-5-7-6-5-7 tr at the beg and end of row and M2 inbetween. Happy crocheting!
14.04.2015 - 13:31
![]() France Blanchette wrote:
France Blanchette wrote:
Bonjour, j'aimerais savoir dans le modèle, sur la ligne "crocheter 10 rangs en suivant M.1 entre parenthèses 5 brides de chaque côté , je voudrais que vous me décriviez la ligne au complet car je ne comprend la ligne. Merci
14.04.2015 - 05:00DROPS Design answered:
Bonjour Mme Blanchette, vous crochetez 5 B (= bordure devant), répétez ensuite M.1 sur les mailles suivantes jusqu'à ce qu'il reste 5 m, et terminez par 5 B (= bordure devant). Bon crochet!
14.04.2015 - 10:05
![]() Helen wrote:
Helen wrote:
Thanks for your help. I was getting the sizes muddled up. Now that you have pointed out I should end up with 114 and not 102 it makes sense.
23.03.2015 - 21:31
![]() Helen wrote:
Helen wrote:
Help! I have done m2 and have 178 stiches - so far so good. But I can't understand the next row. Tr 24 is ok but not sure about Chain 8. Do I do a chain of 8 coming out from stitch 25? But if I do that I will have 16 spare stitches. So do I do 8 slip stitches? I can see that 24 8 38 38 8 38 24 = 178. Pattern is 121-33 thanks.
22.03.2015 - 09:59DROPS Design answered:
Dear Helen, the ch 8 you crochet are for under arm and skip the next 38 tr from previous row (= these 38 tr will be worked for sleeve afterwards), you will have a hole (the skipped 38 sts) that will be the sleeve, and the new 8 ch you have crocheted over the skipped 38 sts are for sleeve. You have now 114 sts. Happy crocheting!
23.03.2015 - 09:59
|
|||||||||||||
A Kiss For Midwinter#akissformidwintercardigan |
|||||||||||||
 |
 |
||||||||||||
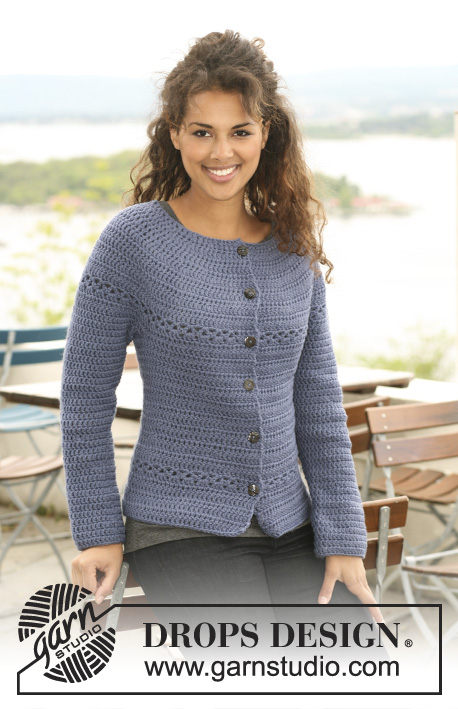
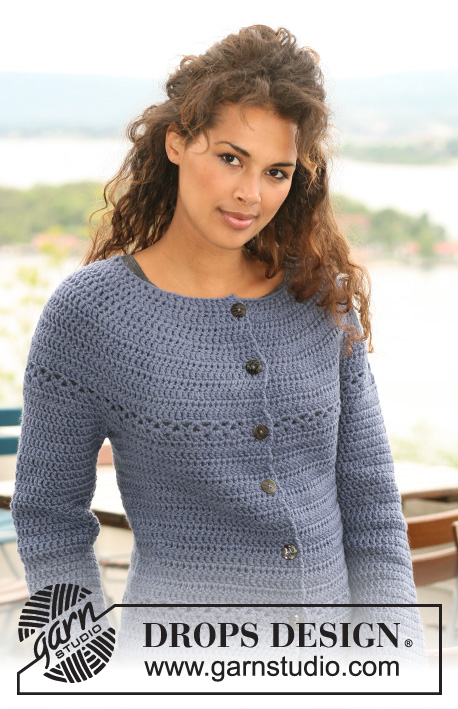
Crochet DROPS jacket in ”Nepal”. Size XS to XXXL.
DROPS 121-33 |
|||||||||||||
|
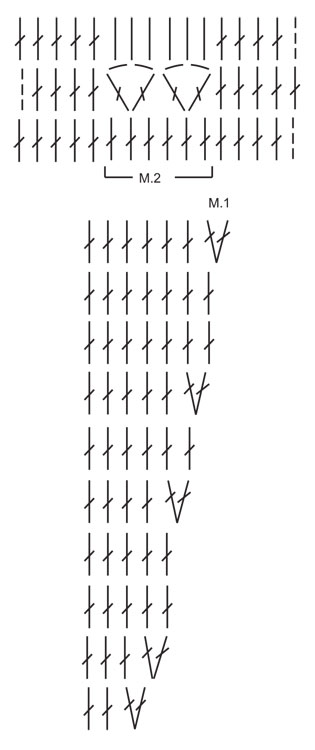
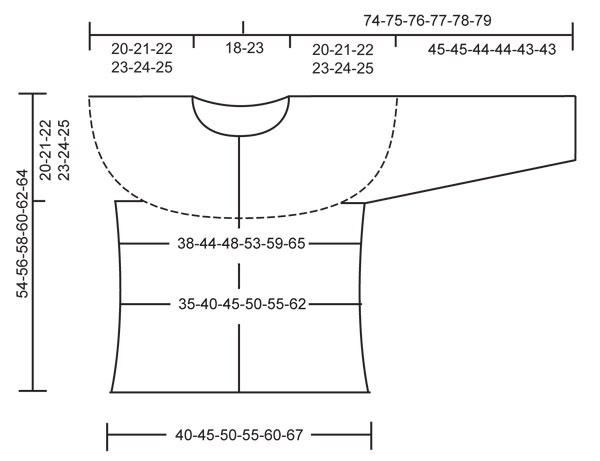
CROCHET INFO: Replace first tr on each round/row with 3 ch. Finish each round with 1 sl st in 3rd ch from beg of round/beg of previous row. PATTERN: See diagram M.1 and M.2. Diagram shows the pattern from RS. DECREASING TIP: Work 1 tr, but wait with last pull-through (= 2 sts on hook), work next tr, but when doing the last pull-through pull thread through all sts on hook – 1 dec tr. ---------------------------------------------------------- BODY PIECE: Worked from top down, back and forth from mid front. Work 91-99-107-115-123-131 ch (includes 3 ch to turn with) with crochet hook size 4.5 mm and Nepal. Work next row as follows: 1 tr in 4th ch, * skip 1 ch, 1 tr in each of the next 3 ch *, repeat from *-*, skip 1 ch and finish with 1 tr in the last 2 ch = 67-73-79-85-91-97 tr – see CROCHET INFO. Now work 10 rows acc to M.1 (5 tr each side = front band, work 1 tr in each tr – not included in diagram). After M.1 there are 162-178-194-210-226-242 tr on row. Continue with 1 tr in each tr. When piece measures 16-17-18-19-20-21 cm continue as follows: 5 tr on front band, 1-0-2-1-0-2 tr, repeat M.2 until 6-5-7-6-5-7 tr remain, finish with 1-0-2-1-0-2 tr and 5 tr on front band. Continue with 1 tr in each tr until piece measures 20-21-22-23-24-25 cm. Work next row as follows: 24-27-30-33-36-40 tr (front piece), 8 ch (under sleeve/armhole), skip 38-40-42-44-46-46 tr from previous round (to be used later for sleeve), 38-44-50-56-62-70 tr (back piece), 8 ch (under sleeve/armhole), skip 38-40-42-44-46-46 tr from previous row (to be used later for sleeve) and 24-27-30-33-36-40 tr (front piece). Continue with 1 tr in each tr/ch = 102-114-126-138-150-166 tr. Insert a marker in the middle of the 8 ch under sleeve each side (back piece = 46-52-58-64-70-78 tr, front piece = 28-31-34-37-40-44 tr). Continue with 1 tr in each tr. When piece measures 34-36-38-40-42-44 cm dec 8 sts evenly (do not dec on front band) - see DECREASING TIP = 94-106-118-130-142-158 tr. When piece measures 40-42-44-46-48-50 cm inc 12-12-12-12-12-14 tr evenly (do not inc on front band) = 106-118-130-142-154-172 tr. When piece measures 43-45-47-49-51-53 cm continue as follows: 5 tr on front band, repeat M.2, finish with 5 tr on front band. Continue with 1 tr in each tr until piece measures 54-56-58-60-62-64 cm, cut and fasten thread. SLEEVE: Worked from top down. Beg mid under sleeve as follows: 1 dc in the 5th of the 8 ch under sleeve/on armhole. Work 3 ch (= 1 tr) and continue with 1 tr in each ch. NOTE: Before continuing over armhole work 1 tr in transition (to avoid a hole). Continue with 1 tr in each tr over armhole, work 1 tr in transition and work 1 tr in each of the remaining ch under sleeve = 48-50-52-54-56-56 tr. Insert a marker mid under sleeve. NOW MEASURE PIECE FROM HERE. Work 1 tr in each tr. When piece measures 4 cm dec 1 tr each side of marker, see DECREASING TIP, and repeat the dec on every 4.5-4.5-4-4-4-4 cm, a total of 8-8-9-9-9-9 times = 32-34-34-36-38-38 tr. Cut and fasten thread when sleeve measures 45-45-44-44-43-43 cm – NOTE – less for the larger sizes because of wider neck and shoulder. ASSEMBLY: Sew buttons on left front piece – place the top one 1 cm from neckline, then the remaining with approx 8 cm between each. Use gap between 2 tr on front band as buttonhole. |
|||||||||||||
Diagram explanations |
|||||||||||||
|
|||||||||||||
 |
|||||||||||||
 |
|||||||||||||
Have you finished this pattern?Tag your pictures with #dropspattern #akissformidwintercardigan or submit them to the #dropsfan gallery. Do you need help with this pattern?You'll find 7 tutorial videos, a Comments/Questions area and more by visiting the pattern on garnstudio.com. © 1982-2026 DROPS Design A/S. We reserve all rights. This document, including all its sub-sections, has copyrights. Read more about what you can do with our patterns at the bottom of each pattern on our site. |
|||||||||||||


With over 40 years in knitting and crochet design, DROPS Design offers one of the most extensive collections of free patterns on the internet - translated to 17 languages. As of today we count 324 catalogues and 12290 patterns translated into English (UK/cm). 12290
We work hard to bring you the best knitting and crochet have to offer, inspiration and advice as well as great quality yarns at incredible prices! Would you like to use our patterns for other than personal use? You can read what you are allowed to do in the Copyright text at the bottom of all our patterns. Happy crafting!
Post a comment to pattern DROPS 121-33
We would love to hear what you have to say about this pattern!
If you want to leave a question, please make sure you select the correct category in the form below, to speed up the answering process. Required fields are marked *.