
Popular categories
Looking for a yarn?


Comments / Questions (62)
![]() Anna wrote:
Anna wrote:
Mitgezählt - ist vielleicht klarer ausgedrückt. ;-)
15.03.2018 - 15:53
![]() Anna wrote:
Anna wrote:
In der Blende soll jede 4. Reihe ein Umschlag gemacht werden, um den Kragenschal zu entwickeln. Sollen dabei die verkürzten Reihen auch berücksichtigt werden?
15.03.2018 - 15:11DROPS Design answered:
Liebe Anna, die Zunahmen für den Kragenschal werden nach den 2 und vor den 2 letzten Maschen der Reihe (innerhalb 2 Maschen) in alle 4. Reihe gestrickt, die verkürzte Reihen für den Blenden wie zuvor in jedem 4. cm wiederholen. Viel Spaß beim stricken!
15.03.2018 - 15:43
![]() MJ wrote:
MJ wrote:
On Size: XL Finished Bust: 43 3/8” Full length: 23 5/8”, shouldn't the shoulder bind-off be 32 stitches, not 42? I have struggled to get the numbers right, and finally resorted to charting the whole pattern. What am I missing? Is there errata? Thank you for your help.
09.03.2018 - 22:20DROPS Design answered:
Dear MJ, there are 32 sts remaining on shoulder for back piece, and you bind off these sts when piece measures 60 cm, ie 23.62 inches (see measurement chart)>. Happy knitting!
12.03.2018 - 08:24
![]() Irene Hendriks wrote:
Irene Hendriks wrote:
Zie vorige vraag: ik heb dan na 7 nld nog 80-6-16-4=54 st. Van 48 tot 55 cm (maat s) = 7 cm = 22 nld. Dan moet ik nog 15 nld breien om tot 55 cm te komen. Maar met in elke volgende nld 4 st minderen zijn na 13 nld nog maar 3 st op de nld en kom ik dus niet uit. Wat doe ik verkeerd?
07.03.2018 - 22:32DROPS Design answered:
Hallo Irene, Klopt je stekenverhouding in de hoogte? Als je meer naalden in de hoogte hebt op 10 cm dan staat aangegeven bij de stekenverhouding, moet je de minderingen voor de mouwkop over meer naalden verdelen, zodat je wel uitkomt met het aantal steken op de naald.
21.03.2018 - 21:18
![]() Irene Hendriks wrote:
Irene Hendriks wrote:
Over het minderen bij de mouwkop: "aan het begin van iedere naald aan iedere kant" 4x...2 steken, bedoelt u dan dus 4 steken pet naald (twee aan elke kant?. En later...dan 2 steken aan iedere kant tot het werk 55 cm meet > bedoelt u dan aan elke kant dus 4 st per naald? Dan zijn mijn steken op vóór ik 55 cm heb (maat s). Wat doe ik verkeerd?
02.03.2018 - 19:09DROPS Design answered:
Hoi Irene, Nee, er wordt bedoeld dat je aan elke kant 2 steken mindert en dat doe je 4 keer (dus 8 aan elke kant = 16 in totaal) daarna minder je 2 x 1 steek aan elke kant (dat zijn dus 4 in totaal op de naald) en dan steeds 2 steken aan elke kant tot de gewenste lengte.
04.03.2018 - 17:12
![]() Irene Hendriks wrote:
Irene Hendriks wrote:
Voor maat S moet ik 200 steken opzetten. Als 24 steken 10 cm is, betekent dat dat 200 steken 83 cm is. Dat is veel te breed. (want moet 2x 37 = 74 cm zijn). Wat doe ik fout?
21.11.2017 - 22:44DROPS Design answered:
Hoi Irene, Het voor en achterpand wordt in één keer gebreid. Je zet dus steken op voor zowel de voor en achterpanden. Pas bij de opening voor de mouw brei je het voor en achterpand apart verder. Dus het aantal steken is het totaal van het achterpand en de beide voorpanden met de overslag voor de sluiting midden voor.
22.11.2017 - 19:29
![]() Luiza wrote:
Luiza wrote:
Moim zdaniem w opisie jest błąd w miejscu: W TYM SAMYM CZASIE na wys. 15-26-27-28-29-30 cm od dołu robótki, dodać 1 o. na kołnierz wykonując 1 narzut w odl. 2 o. od brzegu z każdej strony. Sądzę, że powinno być : na wys.25-26-27 itd. Czy mam rację?
06.11.2017 - 21:27DROPS Design answered:
Dziękuję Luizo, jest tak jak piszesz. Już poprawiamy. Pozdrawiam
07.11.2017 - 09:18
![]() S.matray wrote:
S.matray wrote:
Ik heb de mouw volgens patroon maat m gebreid, net als het vest.Helaas is deze erg aangesloten en heeft een (te)kleine mouwkop. Daardoor zit het armsgat erg strak en niet comfortabel. De rest van het vestIis prima op maat. Wat is jullie suggestie mbt de mouw? Wellicht een maat l breien van de mouw?
18.02.2016 - 16:42DROPS Design answered:
Hoi. Ten eerste controleren dat je stekenverhouding klopt en de afmetingen ook. Als deze fout is kan het ook invloed hebben op afmetingen en pasvorm.
24.02.2016 - 17:03Birgitta Roos wrote:
Koftan är färdig men nedre kanten i rätstickning viker upp sig. Vad skall jag göra?
14.12.2015 - 13:58DROPS Design answered:
Hej Birgitta, Du kan ånga försiktigt med ett strykjärn: Täck med en fuktig handduk, och försiktigt ånga med ett strykjärn. Låt torka
17.12.2015 - 09:24
![]() Elly wrote:
Elly wrote:
Dank je wel! Ik ben erg blij met jullie patronen, materialen en service.
06.10.2014 - 18:28
|
|||||||||||||
Musical Night |
|||||||||||||
|
|
|||||||||||||
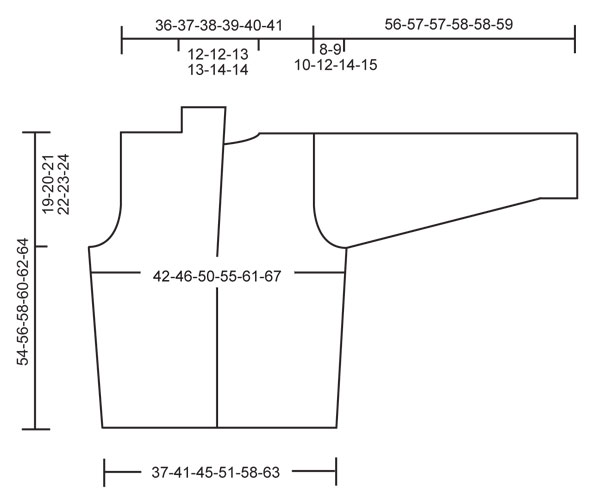
Fitted DROPS jacket in stocking st with cables in ”Alpaca”. Size S-XXXL.
DROPS 123-6 |
|||||||||||||
|
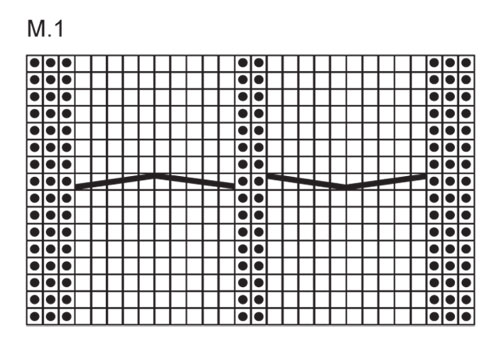
GARTER ST (back and forth on needle): K all rows. GARTER ST (in the round): K 1 round, P 1 round PATTERN: See diagram M.1 (= 28 sts). Diagram shows the pattern from RS. SHORTENED ROWS: Work shortened rows on front bands each side to make them more elastic. * K 2 rows back and forth on the 12 front band sts on one side only (or the no of sts on front band after inc), work 1 row on all sts, K 2 rows back and forth on front band sts the other side only *. NOTE! When turning mid piece tighten thread and continue as before. DECREASING TIP 1: Dec for neck from RS as follows: Right front piece (= after M.1): slip 1 st as if to K, K1, psso. Left front piece (= 2 sts before M.1): K2 tog. DECREASING TIP 2: Dec sts evenly over M.1 on cast off row by K2 tog before casting the st off. -------------------------------------------------------- JACKET: Worked back and forth on circular needle. Cast on 200-220-240-268-300-328 sts with Alpaca on circular needle size 3 mm. K 5 rows and work next row as follows from WS: K 12, 1 YO, * P2, 1 YO *, repeat from *-* a total of 9 times, K sts on row until 30 sts remain, 1 YO, repeat from *-* a total of 9 times, finish with K 12 = 220-240-260-288-320-348 sts. Work next row from RS as follows: 12 GARTER STS – see above, M.1 – see above, stocking st until 40 sts remain, finish with M.1 and 12 garter sts. Continue in pattern, stocking st and garter st like this with front bands (12 garter sts each side) in garter st until finished measurements. Insert 2 markers in piece, 66-71-76-83-91-98 sts in from each side (back piece = 88-98-108-122-138-152 sts). REMEMBER THE KNITTING TENSION! When piece measures 4 cm work SHORTENED ROWS on front bands each side – see above! Repeat the shortened rows on every 4 cm until finished measurements. AT THE SAME TIME when piece measures 8 cm inc 1 st each side of both markers. Repeat the inc on every 4.5-5-5.5-6.5-9-9.5 cm a total of 6-6-6-5-4-4 times. AT THE SAME TIME when piece measures 24-25-26-27-28-29 cm dec 1 st for neck inside M.1 on each front piece – See DECREASING TIP 1! Repeat the dec on every 1.5 cm a total of 14-14-15-15-17-17 times. AT THE SAME TIME when piece measures 25-26-27-28-29-30 cm inc 1 st for collar with 1 YO inside 2 sts each side towards front edge. On next row K YO into back of loop. Repeat the inc on every 4th row (i.e. every cm) a total of 16-17-18-19-20-21 times, work inc sts in garter st. When piece measures 35-36-37-38-39-40 cm cast off 6 sts mid under sleeve each side (= 3 sts each side of marker). Now complete each piece separately. BACK PIECE: = 94-104-114-126-140-154 sts. Cast of for armhole at beg of row each side as follows: 2 sts 1-3-4-6-8-10 times and 1 st 2-2-3-4-6-8 times = 86-88-92-94-96-98 sts. Continue in stocking st. When piece measures 52-54-56-58-60-62 cm cast off the middle 26-26-28-28-32-32 sts for neck and complete each shoulder separately. Cast off 1 st on neckline on next row = 29-30-31-32-31-32 sts left on shoulder. Cast off when piece measures 54-56-58-60-62-64 cm. LEFT FRONT PIECE: Cast off for armhole at the side as described for back piece. Continue to dec for neck and inc for collar. When all dec and inc are complete there are 67-69-71-73-73-75 sts on needle. When piece measures 54-56-58-60-62-64 cm cast off 39-40-41-42-41-42 sts for shoulder, AT THE SAME TIME dec 10 sts evenly on M.1 – See DECREASING TIP 2 = 28-29-30-31-32-33 sts left on collar. Work remaining sts on row. Continue with shortened rows on collar as follows (beg from WS): * back and forth on the 14-14-15-15-16-16 sts towards front edge only, back and forth on all sts *, repeat from *-* until collar measures 9-9-9.5-9.5-10-10 cm where shortest (measured from shoulder). Cast off. RIGHT FRONT PIECE: Like left front piece, but mirrored. SLEEVE: Worked in the round. Cast on 52-56-58-60-62-64 sts on double pointed needles size 3 mm with Alpaca. Work GARTER ST - see above! When piece measures 8 cm continue in stocking st. Insert a marker at beg of round. When piece measures 10 cm inc 1 st each side of marker. Repeat the inc on every 2.5-2.5-2-2-1.5-1.5 cm a total of 14-15-17-18-20-23 times = 80-86-92-96-102-110 sts. When piece measures 48-48-47-46-44-44 cm - NOTE! Less for the larger sizes because of longer sleeve cap and wider shoulder- cast off 6 sts mid under sleeve (= 3 sts each side of marker) and complete piece back and forth on needle, AT THE SAME TIME cast off for sleeve cap at the beg of every row each side: 2 sts 4-5-5-4-4-4 times, 1 st 2-2-4-9-12-14 times, then 2 sts each side until piece measures 55-56-56-57-57-58 cm, cast off 3 sts 1 time each side and cast off remaining sts. ASSEMBLY: Sew shoulder seams. Set in sleeves. Sew collar tog mid back and sew to back piece. Crochet buttonhole loops on right front band with crochet hook size 2.5 mm and Alpaca as follows: 1 dc, 5 ch, skip 1 cm, 1 dc. Make the loops after 4 cm, 10 cm, 16 cm and 22 cm, measured from bottom edge of jacket. |
|||||||||||||
Diagram explanations |
|||||||||||||
|
|||||||||||||
 |
|||||||||||||
 |
|||||||||||||
Have you finished this pattern?Tag your pictures with #dropspattern or submit them to the #dropsfan gallery. Do you need help with this pattern?You'll find 23 tutorial videos, a Comments/Questions area and more by visiting the pattern on garnstudio.com. © 1982-2026 DROPS Design A/S. We reserve all rights. This document, including all its sub-sections, has copyrights. Read more about what you can do with our patterns at the bottom of each pattern on our site. |
|||||||||||||


With over 40 years in knitting and crochet design, DROPS Design offers one of the most extensive collections of free patterns on the internet - translated to 17 languages. As of today we count 324 catalogues and 12290 patterns translated into English (UK/cm). 12290
We work hard to bring you the best knitting and crochet have to offer, inspiration and advice as well as great quality yarns at incredible prices! Would you like to use our patterns for other than personal use? You can read what you are allowed to do in the Copyright text at the bottom of all our patterns. Happy crafting!
Post a comment to pattern DROPS 123-6
We would love to hear what you have to say about this pattern!
If you want to leave a question, please make sure you select the correct category in the form below, to speed up the answering process. Required fields are marked *.