
Popular categories
Looking for a yarn?


Comments / Questions (45)
![]() Miriam wrote:
Miriam wrote:
Schönes Modell. Der untere Rand in Krausrippe allerdings rollt sich zusammen. Ich habe es mit kleinerer Nadelstärke und weniger Maschen versucht. Wie kann ich das verhindern?
16.01.2020 - 07:26DROPS Design answered:
Liebe Miriam, Sie können das Kleid (den Rock) mit Stecknadeln auf einer geeigneten Unterlage spannen, anfeuchten (z.B. mit einer Sprühflasche für Blumen) und trocknen lassen, danach entfernen Sie die Stecknadeln, dann sollte sich der Rand nicht mehr rollen.
16.01.2020 - 09:21
![]() Mary wrote:
Mary wrote:
Hi, I discovered a mistake. I am making this design in size S. The no of stiches in the row where the pleats are made is not adding up. There are 6 extra stiches so that instead of 8 stiches on each side there should be 12. Otherwise I'm loving the design and am thinking of knitting a light and lacy short-sleeved version of the same dress. Regards
21.08.2013 - 12:20DROPS Design answered:
Dear Mary, both diagrams M.1 and M.2 are worked on 11 sts : M.1 starts with a pleat on 10 sts + K1, and M.2 starts with K1 + a pleat on 10 sts. Happy knitting!
21.08.2013 - 16:02
![]() DROPS Design wrote:
DROPS Design wrote:
Hej, början på varvet är där du började lägga upp. Sätt en märktråd i varje sida; en i början och en efter 65 m, så har du en i varje sida:-)
20.02.2008 - 08:43
![]() Johanna wrote:
Johanna wrote:
Hej! Jag stickar i stl M. När jag har gjort varvet med M1:or och M2:or, så hamnar jag inte där jag började på varvet, dvs 6 maskor innan första M1. Så jag hänger inte med var "början på varvet " är, där jag förväntas sätta första märktråden? Jag har ju inte kommit tillbaka till min början ännu? (jag hamnar alltså 16 maskor från min "början") Vad har jag gjort för fel? Mvh// Johanna P
16.02.2008 - 00:46
![]() Therese wrote:
Therese wrote:
Jätte snygg modell! Vill ha!!
29.11.2007 - 22:32
![]() Eowyn wrote:
Eowyn wrote:
Sehr schönes Modell, mein Kopliment - What a nice dress - I like it really, it´s so sweet...
26.11.2007 - 10:45Nathalie wrote:
Man, dans les explications, il est indiqué de suivre les diagrammes M1 et M2 ce qui va former les plis de la taille.
01.11.2007 - 16:20
![]() Man wrote:
Man wrote:
Super ! comment faire le pliser ? afin que la robe se gondole au niveau de la taille ! merci
31.10.2007 - 22:13
![]() Nina wrote:
Nina wrote:
Den här var ju ändå snyggare. Älskar kläningar. Äger inget annat än klännignar i min garderob. Den här ska ingå i min garderob.
05.08.2007 - 20:33
![]() Gitte wrote:
Gitte wrote:
Underbar! Kul modell!
02.08.2007 - 14:00
|
||||||||||
Marimar#marimar |
||||||||||
 |
 |
|||||||||
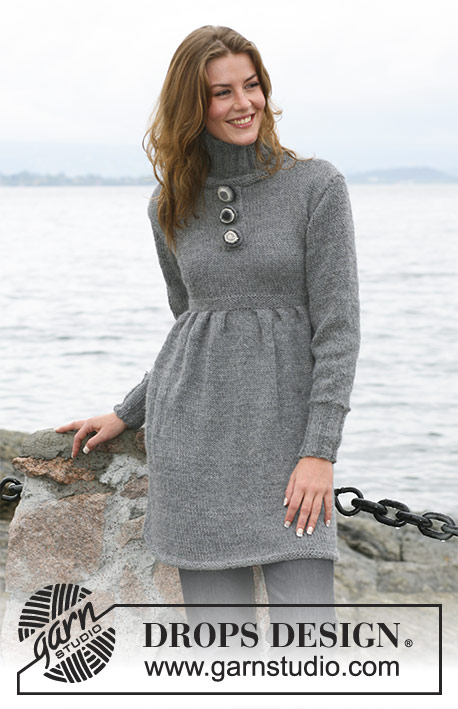
DROPS tunic with pleats and closed front edge in 2 threads “Alpaca”. Sizes: S - XXXL
DROPS 104-7 |
||||||||||
|
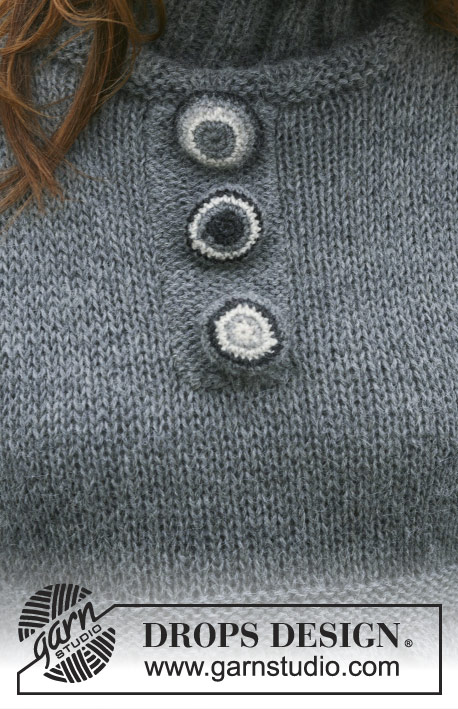
Knitting tension: 17 sts x 22 rows stocking sts = 10x10 cm with 2 threads Garter sts (on circular needles as follows): K1 round, P1 round and so on. Pleat: See diagram M.1 and M.2. Diagrams are seen from RS. Rib: * K3, P3 *, repeat from *-*. Tunic: Remember knitting tension! Knit piece in the round. Cast on 174-210-222-258-302-322 sts on circular needles size 5 mm with Alpaca. Knit 4 rounds garter sts – see explanation above. Continue in stocking sts. When piece measures 47-48-49-50-51-52 cm knit next row as follows: K 8-6-9-7-7-12, M.1 3-4-4-5-6-6 times in total (= 33-44-44-55-66-66 sts), K5, M.2 3-4-4-5-6-6 times in total, K16-12-18-14-14-24, M.1 3-4-4-5-6-6 times in total, K5, M.2 3-4-4-5-6-6 times in total, K 8-6-9-7-7-12 = 114-130-142-158-182-202 sts. Insert 2 marking threads or stitch markers into piece, 1 in beg of round and 1 after 57-65-71-79-91-101 sts. Change to circular needles size 4 mm and knit 10 rounds garter sts. Continue in stocking ts on circular needle size 5 mm. At the same time inc 1 sts on each side of marking thread or stitch marker (= 4 inc per round) on every 2nd-2nd-2nd-2nd-3rd-3rd rounds 7 times on total = 142-158-170-186-210-230 sts. When piece measures 57-59-61-63-65-67 cm cast off 3 sts on each side of each marking thread or stitch marker and complete each part separately. Back piece: = 65-73-79-87-99-109 sts. Cast off for armhole on each side on every other row as follows: 2 sts 0-0-1-2-4-6 times and 1 sts 1-3-3-4-5-5 times = 63-67-69-71-73-75 sts. When piece measures 75-78-81-84-87-90 cm cast off middle 21-23-23-25-27-27 sts for neckline. Continuing cast off 1 sts on next row at neckline = 20-21-22-22-22-23 sts left on each shoulder. Cast off when piece measures 77-80-83-86-89-92 cm. Front piece: = 65-73-79-87-99-109 sts. Cast off for armhole like back piece = 63-67-69-71-73-75 sts. At the same time when piece measures 58-61-62-64-65-68 cm purl seen from RS over middle 9-9-11-11-13-13 sts until completed measurement. When piece measures 71-74-77-79-82-85 cm slip middle 9-11-11-13-15-15 sts onto 1 thread or stitch holder. Then cast of to shape neckline on every other row as follows: 2 sts 2 times and 1 st 3 times = 20-21-22-22-22-23 sts left on shoulder. Cast off when piece measures 77-80-83-86-89-92 cm. Sleeve: Knit piece in round on circular needles. Cast on 42-42-48-48-54-54 sts on double pointed needles size 4.5 mm with 2 threads Alpaca. Knit Rib – see explanation above. When piece measures 12 cm knit 2 rounds garter sts – at the same time on last round dec evenly to 38-40-42-44-46-48 sts. Change to double pointed needles size 5 mm and continue in stocking sts – at the same time when piece measures 13 cm inc 2 sts mid under arm on every 3-3-2.5-2.5-2-2 cm 12-12-13-14-15-16 times in total = 62-64-68-72-76-80 sts. When piece measures 49-48-48-47-47-45 cm cast off 6 sts mid under arm and complete piece knitting back and forth on needle. Then cast off to shape sleeve top on each side on every other row: 2 sts 3 times and 1 sts 0-1-2-3-4-5 times, then cast off 2 sts on each side until piece measures 55-55-56-56-57-57 cm, cast off 3 sts 1 time on each side and cast of remaining sts. Sleeve measures approx 56-56-57-57-58-58 cm Assembly: Sew shoulder seams. Sew in sleeves. Pick up approx 72-84 sts incl sts on thread or stitch holder (dividable by 6) on circular needle size 4.5 mm around neck and knit 4 rounds garter sts. Knit Rib – see explanation above. Cast off K over K and P over P when piece measures 14-14-15-15-16-16 cm. Button cover: Crochet 3 button covers on crochet hook size 3 mm with 1 thread Alpaca. Crochet each button cover in stripes of 4 different colours. Change colour as follows: Button 1: Off white, light grey, off white, dark grey, finish with middle grey until button is completed. Button 2: Dark grey, dark grey, middle grey, off white, dark grey, finish with middle grey until button is completed. Button 3: Middle grey, middle grey, off white, light grey, middle grey, finish with dark grey until button is completed. Crochet button cover as follows: Crochet 2 ch, then crochet 7 dc in the first of the 2 ch, finish off with 1 sl st in first dc (=1st round). 2nd round: 1 ch, crochet 2 dc in each dc and finish off with 1 sl st in first dc in beginning of round (= 14 dc). 3rd round: 1 ch, * 1 dc in first dc, 2 dc in next dc* repeat from *-* = 21 dc. 4th round: *1 dc in each of 2 first dc, 2 dc in next dc* repeat from *-* = 28 dc. 5th – 8th round: Crochet 1 dc in each dc = 28 dc. 9th – 10th round: Crochet all dc tog 2 by 2. Crochet 2 dc tog as follows: Crochet 1 dc, but wait pulling through last sts (= 2 sts on crochet hook), crochet next dc but when last pull through is made, pull yarn through all sts on crochet hook. After 2 rounds = 7 dc left. Slip button inside cover, sew around opening and pull tog. Sew buttons on front edge. |
||||||||||
Diagram explanations |
||||||||||
|
||||||||||
 |
||||||||||
Have you finished this pattern?Tag your pictures with #dropspattern #marimar or submit them to the #dropsfan gallery. Do you need help with this pattern?You'll find 27 tutorial videos, a Comments/Questions area and more by visiting the pattern on garnstudio.com. © 1982-2026 DROPS Design A/S. We reserve all rights. This document, including all its sub-sections, has copyrights. Read more about what you can do with our patterns at the bottom of each pattern on our site. |
||||||||||


With over 40 years in knitting and crochet design, DROPS Design offers one of the most extensive collections of free patterns on the internet - translated to 17 languages. As of today we count 324 catalogues and 12290 patterns translated into English (UK/cm). 12290
We work hard to bring you the best knitting and crochet have to offer, inspiration and advice as well as great quality yarns at incredible prices! Would you like to use our patterns for other than personal use? You can read what you are allowed to do in the Copyright text at the bottom of all our patterns. Happy crafting!
Post a comment to pattern DROPS 104-7
We would love to hear what you have to say about this pattern!
If you want to leave a question, please make sure you select the correct category in the form below, to speed up the answering process. Required fields are marked *.