
Popular categories
Looking for a yarn?


Comments / Questions (89)
![]() Anne Ruythooren wrote:
Anne Ruythooren wrote:
Moet het rugpand ook gebreid worden met motiefpatroon M2, M3 en M4?
14.03.2026 - 15:13DROPS Design answered:
Dag Anne,
Ja, het rugpand is ook met het motief.
15.03.2026 - 09:42
![]() Anne Ruythooren wrote:
Anne Ruythooren wrote:
Bedankt voor de opheldering!
19.02.2026 - 09:07
![]() Anne Ruythooren wrote:
Anne Ruythooren wrote:
Ik brei het patroon in maat L. Hoe kom je van 77 steken op de naald na afkanting voor de armsgaten naar 61 steken om te starten met M3? Kan je eens de volledige Naalden 1 en 3 van M3 uitschrijven.Gelieve niet te verwijzen naar vorige antwoorden want die zijn niet echt duidelijk.Alvast bedankt voor uw ,hopelijk,snelle antwoord want ik zou graag voortbreien.
18.02.2026 - 10:13DROPS Design answered:
Dag Anne,
M.2 bestaat uit 11 steken en dit herhaal je 7 keer, dus kom je op 77 steken. Als je M.2 in de hoogte breit, minder je per herhaling in de breedte van M.2 2 steken, dus in totaal minder je 14 steken. Hierdoor kom je op (77-14=) 63 steken. Vermoedelijk staat er een foutje in deze maat. Ik zal het doorgeven aan de ontwerpafdeling om na te kijken en eventueel aan te passen. De andere maten lijken wel te kloppen. Als je vervolgens doorgaat met M.4 boven M.3 kloppen de 49 steken wel weer.
18.02.2026 - 18:48
![]() Marianne wrote:
Marianne wrote:
Hi I’m going to knit the XL size I want to make it longer do I knit more than 10 cos before I start increasing or do I knit more than 32cms before I cast off for the arm holes?
11.02.2026 - 04:30DROPS Design answered:
Hi Marianne, To keep the shape of the top, it is best to work more cms before you start increasing. Regards, Drops Team.
11.02.2026 - 06:30
![]() Marianne wrote:
Marianne wrote:
Please can you tell me how to make this pattern longer?
04.02.2026 - 02:59
![]() Marianne wrote:
Marianne wrote:
Hi I would like to make this pattern longer can you please tell me how I could do that?
28.01.2026 - 01:49DROPS Design answered:
Dear Marianne, we unfortunately are not able to adjust every pattern to each request, thanks in advance for your comprehension. You can take help from similar pattern with the requested measurements. Happy knitting!
27.02.2026 - 17:04
![]() Nadine wrote:
Nadine wrote:
J ai tricoté 1 fois M2 M3 et M4. Je fais la taille L.Donc après M4 je me retrouve avec 63 mailles. A 10cm de hauteur totale il faut augmenter4 fois tous les5 cm soit 8 mailles au total. Ce qui me donne 63+8=71 mailles alors que vous indiquez 99 mailles. Est ce que je dois augmenter des mailles après M4? Comment je dois continuer après M4 et sur quelles nombres de mailles? Je suis bloquée
20.07.2025 - 19:59DROPS Design answered:
Bonjour Nadine, la taille L - 91 mailles au debut. Vous tricotez M2 jusqu'a 29-30-31-32-33 cm de hauteur totale. Augmentations sur les cotes: 4x2 mailles=8. 91+8=99. A partir des emmanchures vous suivez M3. Bon tricot!
21.07.2025 - 11:13
![]() NADINE wrote:
NADINE wrote:
Bonjour Après les 4 rangs de M2 j ai bien 91 mailles. Comment dois je faire le 1er rang de M3 et combien de mailles je dois avoir à la fin de ce rang? Je n y comprends rien Merci de votre réponse
20.07.2025 - 17:05DROPS Design answered:
Bonjour Nadine, j'ai deja explique cela dans ma reponse precedente. Bon tricot!
21.07.2025 - 11:14
![]() Anna wrote:
Anna wrote:
Czy schemat A2 powtarzać tylko raz i zaraz po nim A3 i A4 czy cały czas robić A1 ? Trochę niejasno jest wytłumaczone.
16.07.2025 - 21:08DROPS Design answered:
Witaj Anno, schemat M.1 dotyczy kolorów. Jednocześnie przerabiasz ścieg fantazyjny, czyli najpierw M2, później M3 i 6 rzędów schematu M4, a następnie powtarzasz tylko 4 ostatnie rzędy schematu M4 (nie ma już zamykania oczek). Pozdrawiamy!
16.07.2025 - 22:36
![]() LISBETH SYNØVE TEIEN wrote:
LISBETH SYNØVE TEIEN wrote:
Skal starte med M3 og etter det jeg forstår skal jeg felle en maske i begynnelsen og 1 maske midt på. Skal jeg strikke 3 masker sammen ved "fellingen" for å få rett antall masker å fortsette med? Syntes dette er vanskelig å forstå. Tilsvarende blir det vel i fortsettelsen og der står det vel at det syrikkes 3 masker sammen i stedet for 2, det er vel på pinne 3 og tilsvarende i M4 eller?? Håper på bistand/svar
25.05.2025 - 16:41DROPS Design answered:
Hej Lisbeth, når du starter med M.3 efter ærmegabet, kan du se at i første del af rapporten, strikker du 2 masker sammen 4 gange, men har kun 2 omslag på første pind, her får du automatisk 2 masker mindre for hver gang du strikker hele rapporten i bredden. Når du kommer op til 3.pind strikker du 3 ret sammen som vi beskriver nederst i opskriften :)
27.05.2025 - 14:05
|
|||||||||||||||||||||||||||||||
Cool Vibes |
|||||||||||||||||||||||||||||||
|
|
|||||||||||||||||||||||||||||||
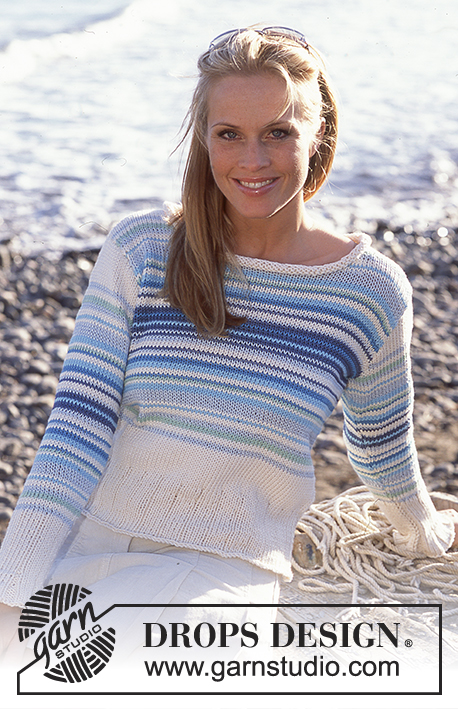
DROPS Top with a striped wave pattern.
DROPS 81-9 |
|||||||||||||||||||||||||||||||
|
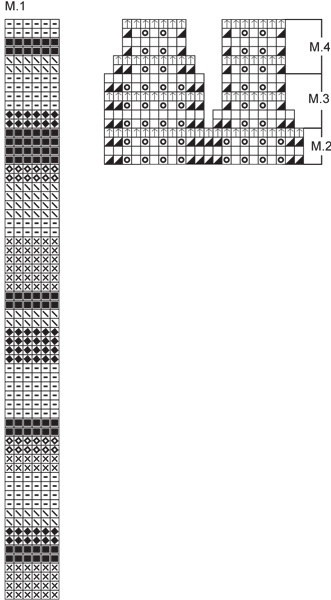
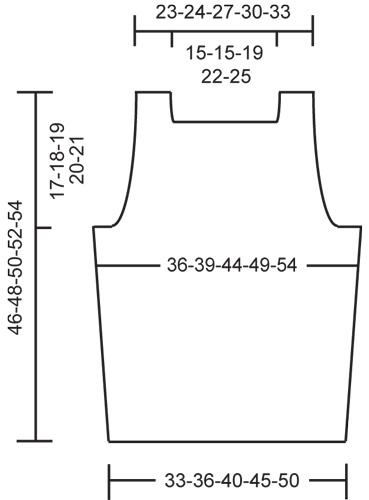
Tension: 22 sts x 34 rows in pattern = 10 x 10 cm. Stripe pattern: See chart. This chart is for COLOR only and follows the chart for Patterns 2, 3 and 4 for STITCH PATTERN. Wave pattern: See chart for Patterns M.2, M.3 and M4. This chart is for STITCH PATTERN only and follows the chart for Pattern M.1 for COLOR. Additional explanation to pattern diagram: On the 3rd row of the 1st part pf M.3 and on the 3rd row of the 2nd part of M.4, K3 tog (instead of K2 tog). Now repeat the 4 rows of M.3 and M.4 as shown in diagram and as explained in pattern. FRONT Loosely cast on 74-80-91-100-111 sts with beige and knit 2 rows garter st. Knit stripes following Pattern M.1 and wave pattern following Pattern M.2 – but keep 4-7-7-6-6 sts at each side in garter st. When the piece measures 10 cm inc 1 st at each side every 5-5-5-4-4 cm a total of 4-4-4-5-5 times – knit the increased sts in garter st = 82-88-99-110-121 sts. When the piece measures 29-30-31-32-33 cm cast off 4-6-6-6-6 sts at each side for armhole, then put the next 4-5-5-5-5 sts in garter st at each side on a st holder (these sts will be knit and joined with front later) = 66-66-77-88-99 sts. Measure the piece from here. Continue in pattern. After 3 cm (adjust to end after 4 rows of Pattern M.2) knit Pattern M.3 = 54-54-61-72-79 sts, then repeat the 4 last rows of Pattern M.3 (the rows without decs). When the piece measures 6 cm from where it was cast off for armholes, knit Pattern M.4 = 42-42-49-56-63 sts on needles, then repeat the 4 last rows of Pattern M.4 (the rows without decs). When the piece measures approx. 8 cm from where it was cast off for armholes, knit 2 rows garter st with natural over all sts and then cast off the center 34-34-41-48-55 sts = 4 sts remain at each side, put these sts on st holders. Put the 4-5-5-5-5 sts from st holders at one side of armhole edge back on needles. Knit garter st with natural for approx. 8 cm or to match top edge of front. Put in the 4 sts from st holder on the same needles = 8-9-9-9-9 sts. Knit garter st for approx. 12-13-14-15-16 cm, cast off – the strap is sewn to back later. Repeat on the other side. BACK Knit the same as the front. Cast off for armhole as on front. When the piece measures 14-15-16-17-18 cm from armhole bind-off knit 2 rows garter st with natural, then cast off all sts. Put sts from st holders at each side back on needles and knit garter st for approx. 14-15-16-17-18 cm, cast off. ASSEMBLY Sew the garter st edges along armhole on front and back and sew straps to back. Sew side seams using edge sts as seam allowance. |
|||||||||||||||||||||||||||||||
Diagram explanations |
|||||||||||||||||||||||||||||||
|
|||||||||||||||||||||||||||||||
 |
|||||||||||||||||||||||||||||||
 |
|||||||||||||||||||||||||||||||
Have you finished this pattern?Tag your pictures with #dropspattern or submit them to the #dropsfan gallery. Do you need help with this pattern?You'll find 13 tutorial videos, a Comments/Questions area and more by visiting the pattern on garnstudio.com. © 1982-2026 DROPS Design A/S. We reserve all rights. This document, including all its sub-sections, has copyrights. Read more about what you can do with our patterns at the bottom of each pattern on our site. |
|||||||||||||||||||||||||||||||


With over 40 years in knitting and crochet design, DROPS Design offers one of the most extensive collections of free patterns on the internet - translated to 17 languages. As of today we count 324 catalogues and 12290 patterns translated into English (UK/cm). 12290
We work hard to bring you the best knitting and crochet have to offer, inspiration and advice as well as great quality yarns at incredible prices! Would you like to use our patterns for other than personal use? You can read what you are allowed to do in the Copyright text at the bottom of all our patterns. Happy crafting!
Post a comment to pattern DROPS 81-9
We would love to hear what you have to say about this pattern!
If you want to leave a question, please make sure you select the correct category in the form below, to speed up the answering process. Required fields are marked *.