
Popular categories
Looking for a yarn?


|
|||||||||||||||||||||||||||||||
Cool Vibes |
|||||||||||||||||||||||||||||||
|
|
|||||||||||||||||||||||||||||||
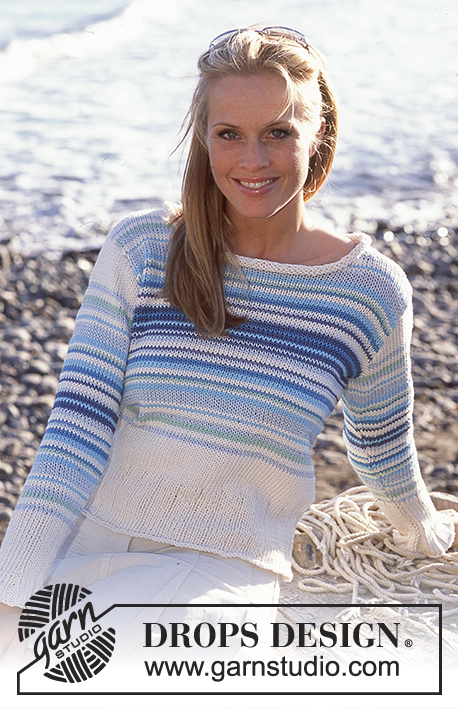
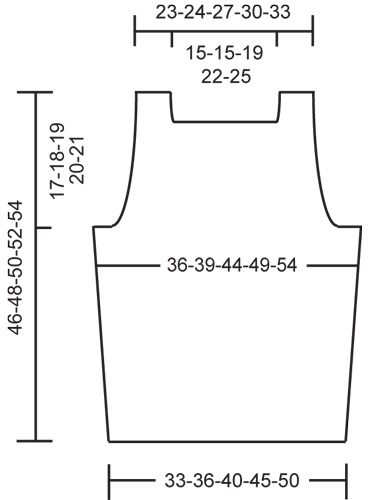
DROPS Top with a striped wave pattern.
DROPS 81-9 |
|||||||||||||||||||||||||||||||
|
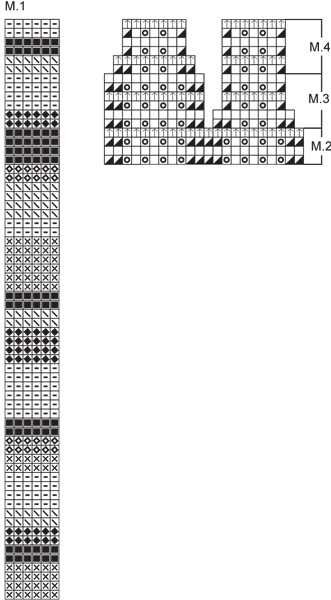
Tension: 22 sts x 34 rows in pattern = 10 x 10 cm. Stripe pattern: See chart. This chart is for COLOR only and follows the chart for Patterns 2, 3 and 4 for STITCH PATTERN. Wave pattern: See chart for Patterns M.2, M.3 and M4. This chart is for STITCH PATTERN only and follows the chart for Pattern M.1 for COLOR. Additional explanation to pattern diagram: On the 3rd row of the 1st part pf M.3 and on the 3rd row of the 2nd part of M.4, K3 tog (instead of K2 tog). Now repeat the 4 rows of M.3 and M.4 as shown in diagram and as explained in pattern. FRONT Loosely cast on 74-80-91-100-111 sts with beige and knit 2 rows garter st. Knit stripes following Pattern M.1 and wave pattern following Pattern M.2 – but keep 4-7-7-6-6 sts at each side in garter st. When the piece measures 10 cm inc 1 st at each side every 5-5-5-4-4 cm a total of 4-4-4-5-5 times – knit the increased sts in garter st = 82-88-99-110-121 sts. When the piece measures 29-30-31-32-33 cm cast off 4-6-6-6-6 sts at each side for armhole, then put the next 4-5-5-5-5 sts in garter st at each side on a st holder (these sts will be knit and joined with front later) = 66-66-77-88-99 sts. Measure the piece from here. Continue in pattern. After 3 cm (adjust to end after 4 rows of Pattern M.2) knit Pattern M.3 = 54-54-61-72-79 sts, then repeat the 4 last rows of Pattern M.3 (the rows without decs). When the piece measures 6 cm from where it was cast off for armholes, knit Pattern M.4 = 42-42-49-56-63 sts on needles, then repeat the 4 last rows of Pattern M.4 (the rows without decs). When the piece measures approx. 8 cm from where it was cast off for armholes, knit 2 rows garter st with natural over all sts and then cast off the center 34-34-41-48-55 sts = 4 sts remain at each side, put these sts on st holders. Put the 4-5-5-5-5 sts from st holders at one side of armhole edge back on needles. Knit garter st with natural for approx. 8 cm or to match top edge of front. Put in the 4 sts from st holder on the same needles = 8-9-9-9-9 sts. Knit garter st for approx. 12-13-14-15-16 cm, cast off – the strap is sewn to back later. Repeat on the other side. BACK Knit the same as the front. Cast off for armhole as on front. When the piece measures 14-15-16-17-18 cm from armhole bind-off knit 2 rows garter st with natural, then cast off all sts. Put sts from st holders at each side back on needles and knit garter st for approx. 14-15-16-17-18 cm, cast off. ASSEMBLY Sew the garter st edges along armhole on front and back and sew straps to back. Sew side seams using edge sts as seam allowance. |
|||||||||||||||||||||||||||||||
Diagram explanations |
|||||||||||||||||||||||||||||||
|
|||||||||||||||||||||||||||||||
|
|||||||||||||||||||||||||||||||
|
|||||||||||||||||||||||||||||||
|
Have you made this or any other of our designs? Tag your pictures in social media with #dropsdesign so we can see them! Do you need help with this pattern?You'll find tutorial videos, a Comments/Questions area and more by visiting the pattern on garnstudio.com. © 1982-2024 DROPS Design A/S. We reserve all rights. This document, including all its sub-sections, has copyrights. Read more about what you can do with our patterns at the bottom of each pattern on our site. |
|||||||||||||||||||||||||||||||


With over 40 years in knitting and crochet design, DROPS Design offers one of the most extensive collections of free patterns on the internet - translated to 17 languages. As of today we count 304 catalogues and 11422 patterns - 11422 of which are translated into English (UK/cm).
We work hard to bring you the best knitting and crochet have to offer, inspiration and advice as well as great quality yarns at incredible prices! Would you like to use our patterns for other than personal use? You can read what you are allowed to do in the Copyright text at the bottom of all our patterns. Happy crafting!
Comments / Questions (50)
Hej Hvor meget garn skal der bruges hvis jeg gerne vil lave toppen ensfarvet? Hilsen Anne
10.02.2024 - 20:45DROPS Design answered:
Hej Anne, da skal du nok regne med ca 4 nøgler i de mindste størrelser :)
12.02.2024 - 13:00I diagrammets M3 og M4 er der nogle mellemrum, som ikke er udfyldt med strikkeanvisninger, hvordan skal jeg forstå det? Hvordan skal jeg strikke disse mellemrum? Hvor begynder og hvor slutter pinden?
23.05.2023 - 12:13DROPS Design answered:
Hej Hanne, mellemrummene skal ikke strikkes, det er de masker som forsvinder efterhånden som du tager ind ifølge diagrammet - det vil sige du hopper bare over til næste side af diagrammet :)
23.05.2023 - 12:21Salve, devo iniziare a lavorare la prima parte di m3. Lavoro 2m insieme per due volte poi, faccio un diritto e un gettato per 5 volte e di nuovo 2 m insieme per 2 volte...poi come proseguo? devo continuare con 2m insieme, 1 get e 1 dir per sette volte? Nella seconda parte di m3 all'inizio calo 3m insieme? poi proseguo con 1 dir e 1 gett per 5 volte e dopo lavoro 2m insieme per 3 volte e proseguo con 1 get e 1 dir per 7 volte?
15.05.2023 - 10:21DROPS Design answered:
Buonasera Natascia, la 1° riga di M.3 si lavora in questo modo: 2 maglie insieme a diritto per 2 volte, 1 maglia diritto, 1 gettato per 2 volte, 1 maglia diritto, 2 maglie insieme a diritto per 4 volte, 1 gettato, 1 maglia diritto per 3 volte, 1 gettato, 2 maglie insieme a diritto per 2 volte. Buon lavoro!
15.05.2023 - 21:51Leuke zonnetop van mooie kwaliteit! Ik heb er m’n eigen twist aan gegeven door 6 kleuren te kiezen en daarmee steeds 4 naalden te breien. Het resultaat is prachtig!
01.03.2023 - 18:25Warum haben ihre Videos kein Ton? Liebe Grüße Susanne Burbach
09.07.2022 - 07:19DROPS Design answered:
Liebe Frau Burbach, Unsere Videos haben keinen Ton. Wir sind ein weltweites Unternehmen und die Videos werden von Leuten der verschiedensten Muttersprachen angeschaut, von denen viele nicht Englisch sprechen. Wir haben daher schriftliche Erklärungen, die die Videos begleiten und Sie werden beim Anschauen des Videos nicht durch Geräusche gestört. Viel Spass beim stricken!
11.07.2022 - 08:49Förstår inte diagrammet. 1:a varv M3, ska det alltid stickas 7 räta i början och slutet? Vad betyder mellanrummet i raden? Ska jag göra omslag 2 ggr varannan gång och 4 st varannan gång. Får inte ihop mönstret. Har låst fast helt... kommer ingen vart....??
19.03.2022 - 19:30DROPS Design answered:
Hei Eva-Britt. Det strikkes 7 masker i riller i hver side (rett på hver pinne). Om du ser på 1. rad på M.3 . så minskes det med 2 masker, derav mellomrommet i diagrammet (det er ingen masken på neste rad). mvh DROPS Design
21.03.2022 - 14:02Hej. Hvordan hæfter jeg alle enderne så det bliver mindst synligt?
18.07.2021 - 13:16DROPS Design answered:
Hej Anni, Her ser du hvordan du hæfter ender. Vælg den teknik som passer dig bedst: Hæft ender
04.08.2021 - 10:18Selon le diagramme, les diminutions sur m3 se font seulement aux debuts des rangs 1 et 3 , et seulement sur côté droit?? Et m3 a 6 rangs? Et m4 a 6 rangs et diminutions le 1 rang à gauche seulement?? Comment on arrive à avoir 12 dimunitions sur m3 et 12 dimunitions sur m4 si on fait si on fait 4 dimunitions au total sur m3 cote droit seulement et 6 du cote gauche sur m4??? Les emmenchures ne seront pas égales et manqueras des diminutions? Explications plus claires s.v.p.
13.05.2021 - 20:58DROPS Design answered:
Bonjour Mme Besner, vous diminuez au 1er et au 3ème rang de M.3 (=cf POINT FANTAISIE dans 1 motif du point de vagues sur 2 (en commençant par le 1er), il reste 18 mailles dans chaque M.3 - puis vous diminuez au 1er et au 3ème rang de M.4, dans 1 motif du point de vagues sur 2 (en commençant cette fois par le 2ème). Vous aviez auparavant 11 m dans chaque motif, vous en avez maintenant 7 (= après 4 diminutions). Bon tricot!
17.05.2021 - 08:06Ben er ondertussen achter gekomen dat je het telpatroon van rechts naar links breit, maar als je start in M3 moet ik dan al beginnen met de 1e 3 rechts samen te breien? En wat met de openingen tussen die 4 x 2steken rechts ? En zo verder dan. Kan er nie goed aan uit. Moet nu starten met M3 maar het is me totaal nie duidelijk. Grts
27.08.2020 - 14:58DROPS Design answered:
Dag Sabine,
M.3 begin je met 2 recht samen, dan nog een keer 2 recht samen, 1 recht, 1 omslag, 1 recht, 1 omslag, 1 recht, 2 recht samen, 2 recht samen. Dit herhaal je nog een keer. In totaal zijn er 2 steken minder dan op de vorige naald. Je hoeft dus niet steken over te slaan o.i.d.; je breit gewoon door van rechts naar links.
31.08.2020 - 09:09Beste ,moet het telpatroon van links naar rechts geteld worden ? Die openingen op het telpatroon zijn dan steken die samengebreid worden , in het M3 telpatroon? Mvgrt
27.08.2020 - 14:30