
Popular categories
Looking for a yarn?


Comments / Questions (65)
![]() Vicki wrote:
Vicki wrote:
Can you please advise where pattern 2 begins on both fronts? Any help greatly appreciated!
24.05.2025 - 15:13DROPS Design answered:
Dear Vicki, Pattern 2 in the front pieces is worked as indicated in Assembly for the Right and Left collar. Happy knitting!
25.05.2025 - 13:40
![]() Pinteau wrote:
Pinteau wrote:
Bonjour, pouvez-vous m'indiquer à quel moment et comment on assemble les 12cm en motif M2 terminé des devants avec la partie inférieure des devants correspondants en M1. Merci
18.03.2025 - 11:46DROPS Design answered:
Bonjour Mme Pinteau, vous allez relever 58 mailles le long de l'encolure du côté droit / gauche et tricoter environ 12 cm du point fantaisie- 2 - cf paragraphe Assemblage. Bon tricot!
18.03.2025 - 16:21
![]() Patricia McDonald wrote:
Patricia McDonald wrote:
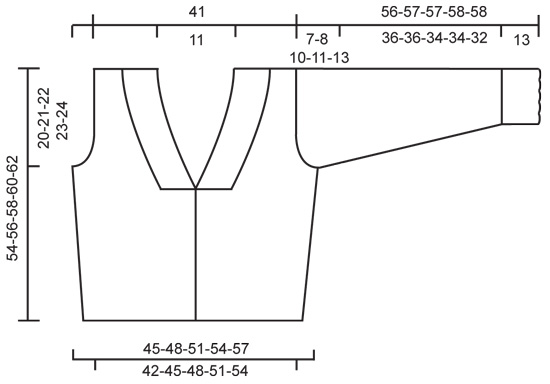
The diagram shown at the end of the pattern where it gives measurements does not match the design of the cardigan. Why is this?
05.04.2024 - 20:04DROPS Design answered:
Dear Patricia, this is an old pattern of ours, and we used the schematic drawing only to indicate the place of the major measurements. Latter drawings are much closer to the actual piece. Happy Knitting!
07.04.2024 - 19:07
![]() Sophie wrote:
Sophie wrote:
Hej! När jag plockar upp för framkant blir det ju avigsidan jag börjar sticka på. Stämmer det? Och...när jag plockat upp 62-76 maskor och ska sätta tillbaka de 58 maskorna, så får jag ju klippa av tråden. Likadant före de ca 12 maskorna. Finns det ett sätt att göra annorlunda, så det inte blir så trådigt? Koftan är väldigt fin/Sophie
26.10.2023 - 19:51DROPS Design answered:
Hej Sophie, du kan sticka maskorna du sätter tillbaka, så behöver du inte klippa tråden:)
27.10.2023 - 15:33
![]() Charpenay wrote:
Charpenay wrote:
Il manque le diagramme M2
16.09.2023 - 15:52DROPS Design answered:
Bonjour Mme Charpeneay, en fait de diagramme, le point fantaisie M.2 est expliqué en texte au début des explications sous Point fantaisie 2 : . Bon tricot!
18.09.2023 - 16:30
![]() Irma Bösch wrote:
Irma Bösch wrote:
Hallo Betrifft Kragen: Wenn ich die 58 Maschen aufgenommen habe, befinde ich mich an der Vorderseite. Das heisst es geht im Muster 2 auf der Rückreihe weiter, dadurch entfällt die 1. Runde des Musters?Herzlichen Dank für Rückmeldung Irma Bösch
14.06.2023 - 10:44
![]() Le Terrier wrote:
Le Terrier wrote:
Je souhaite faire ce gilet mais en ajoutant des poches Quelle serait la la largeur et hauteur des poches et nombre de maille pour un bel effet sans alourdir le gilet Merci
30.10.2022 - 19:40DROPS Design answered:
Bonjour Mme Le Terrier, nous ne sommes malheureusement pas en mesure de pouvoir adapter chacun de nos modèles à chaque demande, vous pouvez vous inspirer de nos modèles avec poches. Merci pour votre compréhension. Bon tricot!
31.10.2022 - 09:10
![]() Schneeberger Manuela wrote:
Schneeberger Manuela wrote:
Guten Tag Nach meiner Meinung passt die Anleitung nicht zum Foto. Möchte gerne diese Jacke stricken, aber die Beschreibung ist für eine Jacke mit Kragen. Können Sie mir die richtige Anleitung zum Foto Drops 74-21 senden? Vielen Dank für Ihre Bemühungen. Manuela
14.10.2022 - 20:49DROPS Design answered:
Liebe Frau Schneeberger, der sogennante Teil "Kragen" gilt hier für das Lochmuster, die am Ende seitlich gestrickt wird und dann an den abgeketteten Maschen beim beiden Vorderteil angenäht wird. Viel Spaß beim stricken!
17.10.2022 - 08:57
![]() Susan Arnold wrote:
Susan Arnold wrote:
Thank you so much. It now makes sense! I have just returned to knitting after many years and sometimes am uncertain of instructions. Thanks again! P.S. your patterns are lovely!
01.08.2022 - 13:36
![]() Susan Arnold wrote:
Susan Arnold wrote:
Please will you answer my two questions asap because I can’t continue and finish this cardigan without your advise. Thank you.
28.07.2022 - 12:00
|
|||||||
Pauline |
|||||||
|
|
|||||||
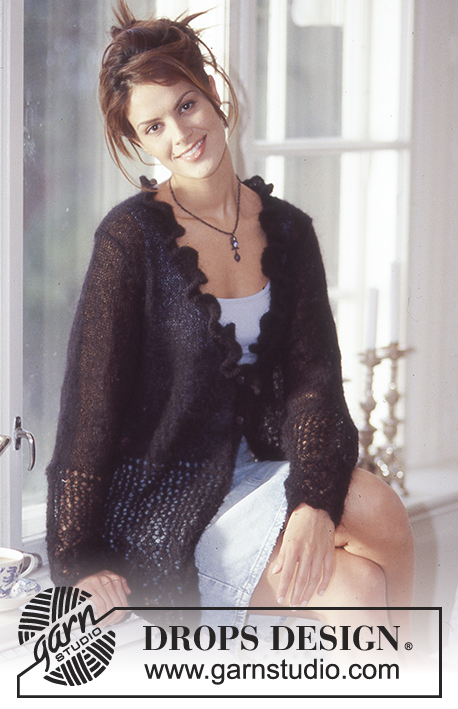
DROPS Cardigan in Muskat
DROPS 74-21 |
|||||||
|
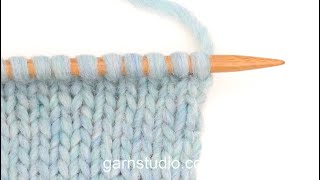
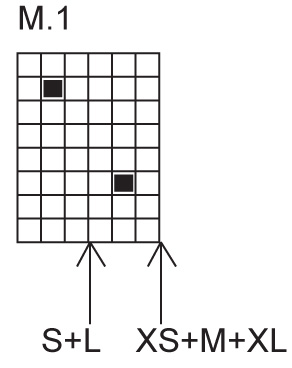
Gauge: 20 sts x 26 rows = 10 x 10 cm on larger needles in stockinette st. Seed Stitch (on an even number of sts): Row 1: * K 1, P 1 * Row 2: * P 1, K 1 * Repeat Rows 1-2. Pattern 1: See chart. The pattern is seen from the right side. Arrows indicate the starting point for different sizes for the right front only – the chart is the same for all sizes for the back and left front. Pattern 2: divisible by 8 + 2 sts (1 edge st each side) Row 1 (right side row): K 1 (edge st), * yo, K 1 through back of st, yo, sl 1, K 1, psso, K 5 *, repeat from * - *, K 1 (edge st). Row 2 (wrong side row): P 1 (edge st), * P 4, P 2 tog through back of sts, P 3 *, repeat from * - *, P 1 (edge st). Row 3: K 1, * yo, K 1 through back of st, yo, K 2, sl 1, K 1, psso, K 3 *, repeat from * - *, K 1. Row 4: P 1, * P 2, P 2 tog through back of sts, P 5*, repeat from * - *, P 1. Row 5: K 1, * K 1 through back of st, yo, K 4, sl 1, K 1, psso, K 1, yo *, repeat from * - *, K 1. Row 6: P 1, * P 1, P 2 tog through back of st, P 6 *, repeat from * - *, P 1. Row 7: K 1, * K 5, K 2 tog, yo, K 1 through back of st, yo *, repeat from * - *, K 1. Row 8: P 1, * P 3, P 2 tog, P 4 *, repeat from * - *, P 1. Row 9: K 1, * K 3, K 2 tog, K 2, yo, K 1 through back of st, yo *, repeat from * - *, K 1. Row 10: P 1, * P 5, P 2 tog, P 2 *, repeat from * - *, P 1. Row 11: K 1, * yo, K 1, K 2 tog, K 4, yo, K 1 through back of st *, repeat from * - *, K 1. Row 12: P 1, * P 6, P 2 tog, P 1 *, repeat from * - *, P 1. Repeat rows 1-12. ------------------------------------------------------------------ Back: Cast on 86-92-98-104-110 sts on smaller needles. Knit 5 rows seed st, change to larger needles and Pattern 1 - start pattern at lower right corner on chart for all sizes, but do not knit 1 edge st at each side in the pattern. When the piece measures 7 cm inc 1 st at each side every 8 cm a total of 3 times = 92-98-104-110-116 sts - the increased sts are knit in the pattern as you go along. When the piece measures 34-35-36-37-38 cm bind off for armhole at each side every other row: 3 sts 1 time, 2 sts 0-1-2-3-4 times and 1 st 2-3-4-5-6 times = 82 sts remain for all sizes. When the piece measures 52-54-56-58-60 cm bind off the center 20 sts for the neck. On the next row dec 1 st at each neck edge = 30 sts remain on each shoulder. Bind off when the piece measures 54-56-58-60-62 cm. Right front: Cast on 44-47-50-53-56 sts on smaller needles. Knit 5 rows seed st, change to larger needles and Pattern 1, starting from center front edge at appropriate arrow on the chart (1 edge st at each side is not knit in the pattern). When the piece measures 7 cm inc 1 st at the side edge every 8 cm a total of 3 times = 47-50-53-56-59 sts - the increased sts are knit in the pattern as you go along. Read the entire next section before knitting: Neckband: When the piece measures 30-32-34-36-38 cm bind off 24 sts at center front edge for neck. Then dec 1 st for the neck on alternately every 4th and 5th row a total of 13 times. Armhole: At the same time when the piece measures 34-35-36-37-38 cm bind off for armhole at the side as on back. After all armhole and neck shaping is complete 5 sts remain on each shoulder. Bind off when the piece measures 54-56-58-60-62 cm. Left front: Cast on and knit the same as the right - start Pattern 1 at lower right corner so that the pattern will be the same on each side at the center front – for armhole and neck reverse all shaping. Sleeve: Cast on 42-42-50-50-50 sts on smaller needles. Knit Pattern 2 for 13 cm. Change to larger needles and Pattern 1, increasing 8-8-6-6-6 sts evenly distributed on the 1st row = 50-50-56-56-56 sts. When the piece measures 16 cm inc 1 st at each side every 7-6-6-5-4 rows a total of 12-14-13-15-17 times = 74-78-82-86-90 sts - the increased sts are knit in the pattern as you go along. When sleeve measures 49-49-47-47-45 cm bind off for sleeve cap at each side every other row: 4 sts 1 time, 3 sts 1 time, 2 sts 3 times, 1 st 0-0-4-5-8 times, then bind off 2 sts at each side until the piece measures 55-56-56-57-57 cm and then bind off 3 sts 1 time. The piece measures approx. 56-57-57-58-58 cm, bind off the remaining sts. Assembly: Right collar: Pick up 58 sts on smaller needles along left neck edge and knit approx. 12 cm of Pattern 2 - see instructions above, put all sts on a st holder. Left collar: knit the same as the right collar. Sew shoulder seams. Right button band and neckband: Pick up on smaller circular needles approx. 62-76 sts along right button band, then put 58 sts from right collar back on needles and pick up approx. 12 sts to center back = 132 -146 sts. Knit 2 rows seed st. On the next row make 5 buttonholes evenly distributed along button bands - the bottom should be approx. 1 cm from bottom edge and the top should be just before the collar starts. 1 buttonhole = K 2 tog, yo. Knit 1 row seed st more, then bind off sts around back of the neck and along the collar in seed st. Continue with 3 rows seed st along button bands – K 2 tog the 2 sts at the top of button bands every row so that there will be a smooth transition from neckband. After these 3 rows bind off the remaining sts in seed st. Left button band and neckband: Knit the same as the right, reversing all shaping and without buttonholes. Sew in sleeves. Sew sleeve and side seams using edge sts as a seam allowance. Sew on buttons. |
|||||||
Diagram explanations |
|||||||
|
|||||||
 |
|||||||
 |
|||||||
Have you finished this pattern?Tag your pictures with #dropspattern or submit them to the #dropsfan gallery. Do you need help with this pattern?You'll find 22 tutorial videos, a Comments/Questions area and more by visiting the pattern on garnstudio.com. © 1982-2026 DROPS Design A/S. We reserve all rights. This document, including all its sub-sections, has copyrights. Read more about what you can do with our patterns at the bottom of each pattern on our site. |
|||||||


With over 40 years in knitting and crochet design, DROPS Design offers one of the most extensive collections of free patterns on the internet - translated to 17 languages. As of today we count 325 catalogues and 12298 patterns translated into English (UK/cm). 12298
We work hard to bring you the best knitting and crochet have to offer, inspiration and advice as well as great quality yarns at incredible prices! Would you like to use our patterns for other than personal use? You can read what you are allowed to do in the Copyright text at the bottom of all our patterns. Happy crafting!
Post a comment to pattern DROPS 74-21
We would love to hear what you have to say about this pattern!
If you want to leave a question, please make sure you select the correct category in the form below, to speed up the answering process. Required fields are marked *.