
Popular categories
Looking for a yarn?


Comments / Questions (27)
![]() Yvonne wrote:
Yvonne wrote:
Wat is patroon2?
23.09.2014 - 20:23DROPS Design answered:
Hoi Yvonne. Patroon 2 is M.2, die onderaan het patroon staat. Ik heb de vertaling aangepast zodat het klopt met de teltekeningen onderaan.
24.09.2014 - 16:49
![]() Marie Jonsson wrote:
Marie Jonsson wrote:
Har precis börjat med denna, men då jag kommer till ökningen och mönstret så blir det ju ojämnt på varje sida efter ökningen. Gör stl 9/10 år. Hur menas det att man då gör? Marie
10.08.2014 - 14:18DROPS Design answered:
Ökningen stickas samtidigt som du stickar mönstret första gången, så mönstret inte blir ojämnt. Du kan även öka på ett slätstickat varv innan om det är svårt att öka samtidigt som du stickar mönster!
04.09.2014 - 11:23
![]() Sue wrote:
Sue wrote:
Trying to figure out the stitch count at the beginning of this pattern. Could you help with that? Many thanks
22.03.2014 - 12:45DROPS Design answered:
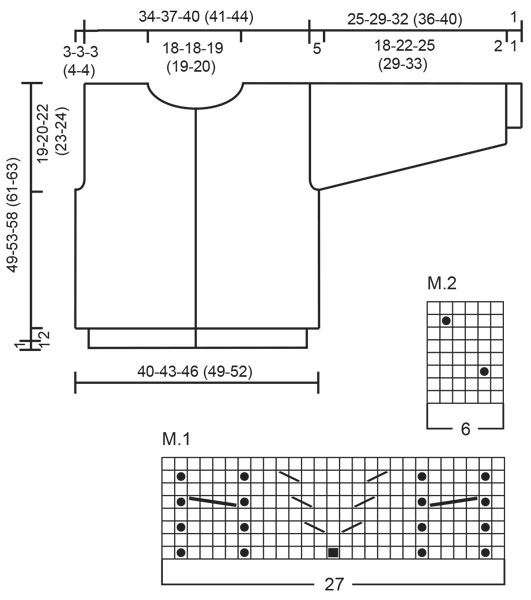
Dear Sue, you will start pattern as follows : 4 sts in moss st, then 27 sts following diagram M.1, then work diagram M.2 on the next sts until 31 sts remain, work then the next 27 sts in M.1 and finish with 4 sts in moss st. Happy knitting!
23.03.2014 - 17:40
![]() Sue wrote:
Sue wrote:
Trying to figure out the stitch count in the beginning of the pattern. Can you make this clearer? My math is terrible. Many thanks.
22.03.2014 - 01:46
![]() Sylvia Johansson wrote:
Sylvia Johansson wrote:
Varför finns ingen uppgift om hur man maskar av mot halsen på bakstycket? Tacksam för svar
01.03.2014 - 14:03
![]() Kirsti wrote:
Kirsti wrote:
Hej, jag har problem med att förstå diagrammet, får det inte till att stämma. Stickar 4m moss stk, sedan 27m M1,138m M2,27m M1 och slutar med 4m moss stk och då stämmer inte diagrammet. Börjar o slutar M1 med en rätm, sedan ska M2 börja med en rätm o en avig, o sluta med 4 rätm, sedan börjar M1 med en rätm o en avig. Då får jag inte diagrammet till att stämma på mina 200m, vad tänker jag för fel?
19.01.2014 - 19:00DROPS Design answered:
Hej Kirsti. Du öker m jevnt fordelt i förste pind. Jeg vil foreslaa du öker i maskerne til M.2. Dvs, du stickar: 4 m moss st, M.1 (= 27 m), 166 m av M.2 (138+28 ökede m) = 27 gentagelser af M.2 + de förste 4 m af M.2, M.1 og slut av med 4 m moss-st. Saa kommer dit mönster til at gaa op.
21.01.2014 - 16:42
![]() Kirsti wrote:
Kirsti wrote:
Hej, jag undrar om M.1 börjar direkte efter 4m moss-st? Är M1 bara 27m på varje sida om moss-st stolparna? Är hela ryggen M2? Och till slut, hur ökar jag på första varvet i M1 diagrammet? Mycket tacksam för svar!
19.01.2014 - 11:50DROPS Design answered:
Hej Kirsti. Se mit svar herover.
21.01.2014 - 16:43
![]() Nadia wrote:
Nadia wrote:
Bonsoir, En fait,sur le diagramme le deuxième rang du diagramme est celui à l'envers. Merci
05.12.2013 - 21:28DROPS Design answered:
Bonjour Nadia, c'est tout à fait exact, dans les diagrammes, le 1er rang et les rangs impairs se font sur l'endroit et le 2ème rang et tous les rangs pairs se font sur l'envers. Bon tricot!
06.12.2013 - 09:35
![]() Nadia wrote:
Nadia wrote:
Désolée encore, votre diagramme se lis de droite à gauche? Merci
03.12.2013 - 18:37DROPS Design answered:
Bonjour Nadia, dans les diagrammes, 1 case = 1 m x 1 rang, tous les rangs sont représentés, ceux sur l'endroit et ceux sur l'envers. Ils se lisent en commençant en bas à droite vers la gauche. Bon tricot!
03.12.2013 - 20:45
![]() Nadia wrote:
Nadia wrote:
Bonsoir, Est-ce bien un seul marqueur pour une manche au début du rang pour les augmentations de chaque côté de celui-ci? Merci
02.12.2013 - 21:37DROPS Design answered:
Bonjour Nadia, tout à fait, on met le marqueur pour repérer la fin/le début du tour et les augmentations se font avant/après ce marqueur. Bon tricot!
03.12.2013 - 09:16
|
||||||||||||||||||||||
Lacy Bobbles#lacybobblessweater |
||||||||||||||||||||||
|
|
||||||||||||||||||||||
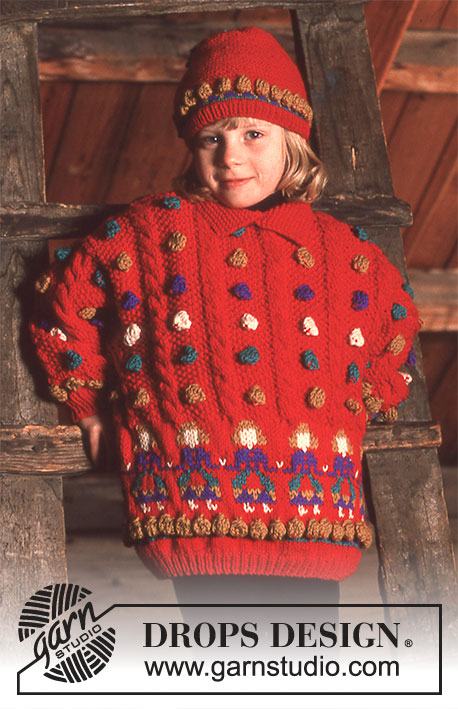
DROPS Children’s knitted jacket in Muskat Soft with Cables and Bobbles.
DROPS Children 6-10 |
||||||||||||||||||||||
|
Knitting tension: 20 stitches x 26 rows with needle size 4 mm and M.2 = 10 x 10 cm. Moss stitch: Row 1: K1, P1. Row 2: Knit over purl and purl over knit. Repeat row 2 onwards. Bobble: Work 3 stitches in 1 stitch, work 3 rows stocking stitch back and forth over these 3 stitches. On row 4 work the 3 stitches together to 1 stitch. Buttonhole: When piece measures 1-1-1 (1-1), 8-9-9 (10-10), 15-16-18 (19-19), 22-24-26 (28-28), 29-32-34 (36-37), 35-40-43 (45-46) and 42-46-51 (53-55) cm work buttonholes as follows: Knit the 3rd and 4th stitch together and increase 1 stitch over these stitches on the next row. ----------------------------------------------------- Body: The jacket is worked back and forth with circular needle. Remember buttonholes on right side. Cast on 152-162-172 (182-192) stitches with circular needle size 3 mm and off white and work 2 cm moss stitch. Change to circular needle size 4 mm and work the next row as follows: 4 stitches moss stitch, M.1, 114-126-138 (150-162) stitches of M.2, M.1, 4 stitches moss stitch, at the same time as you increase 24-26-28 (30-32) stitches evenly on row = 176-188-200 (212-224) stitches. Continue this pattern upwards. The outermost 4 stitches in each side = band - these stitches are worked in moss stitch up to the neck. Remember the knitting tension. When piece measures 30-33-36 (38-39) cm work the next row as follows: 46-49-52 (55-58) stitches front piece, cast off 4 stitches for armhole, 76-82-88 (94-100) stitches back piece, cast off 4 stitches for armhole, 46-49-52 (55-58) stitches front piece. Each piece is finished separately. Front piece: = 46-49-52 (55-58) stitches. Continue decreasing for armhole every 2nd row: 2 stitches x 1-1-1 (2-2), 1 stitch x 2-2-2 (2-2) = 42-45-48 (49-52) stitches. When piece measures 43-47-52 (54-56) cm, cast off towards neck every 2nd row: 14-14-15 (15-16) stitches x 1, 2 stitches x 5. When piece measures 49-53-58 (61-63) cm, cast off the remaining 18-21-23 (24-26) stitches for shoulder. Back piece: = 76-82-88 (94-100) stitches. Decrease for armholes as for front piece = 68-74-80 (82-88) stitches. When piece measures 47-51-56 (59-61) cm, cast off the middle 34-34-36 (36-38) stitches for neck. Then decrease 1 stitch in each side on the next row towards neck. When piece measures 49-53-58 (61-63) cm, cast off the remaining 16-19-21 (22-24) stitches for shoulder. Sleeve: Cast on 36-38-40 (42-44) stitches with double pointed needles size 3 mm and off white and work 2 cm moss stitch. Change to double pointed needles size 4 mm, work 1 round stocking stitch and increase 8-6-8 (10-8) stitches evenly on round = 44-44-48 (52-52) stitches. Work M.1 mid top of sleeve with M.2 on each side. At the same time after the moss stitch, increase mid under sleeve: 2 stitches x 18-20-22 (22-24) in Size 3/4: Every 2nd round, Sizes 5/6+7/8: Alternately every 2nd and 3rd round and Sizes 9/10+11/12: Every 3rd round = 80-84-92 (96-100) stitches. The increased stitches are worked into M.2 as you go. When piece measures 18-22-25 (29-33) cm, cast off 6 stitches mid under sleeve and finish working back and forth on needle. Continue to decrease in each side every 2nd row: 4 stitches x 5, cast off. Piece measures approx. 25-29-32 (36-40) cm. Assembly: Sew shoulder seams. Knit up approx. 80-96 stitches around neck with circular needle size 3 mm and off white and work 4 rows moss stitch back and forth on needle, cast off. Sew in sleeves. Now crochet an edge with hook size 3 mm and off white around bottom of sleeves, body and around the neck as follows: 1 double crochet, * 3 chain stitches, 1 double crochet in first chain stitch, skip 2 stitches and work 1 double crochet *. Repeat from *-*. Sew on buttons. |
||||||||||||||||||||||
Diagram explanations |
||||||||||||||||||||||
|
||||||||||||||||||||||
 |
||||||||||||||||||||||
Have you finished this pattern?Tag your pictures with #dropspattern #lacybobblessweater or submit them to the #dropsfan gallery. Do you need help with this pattern?You'll find 22 tutorial videos, a Comments/Questions area and more by visiting the pattern on garnstudio.com. © 1982-2026 DROPS Design A/S. We reserve all rights. This document, including all its sub-sections, has copyrights. Read more about what you can do with our patterns at the bottom of each pattern on our site. |
||||||||||||||||||||||


With over 40 years in knitting and crochet design, DROPS Design offers one of the most extensive collections of free patterns on the internet - translated to 17 languages. As of today we count 324 catalogues and 12290 patterns translated into English (UK/cm). 12290
We work hard to bring you the best knitting and crochet have to offer, inspiration and advice as well as great quality yarns at incredible prices! Would you like to use our patterns for other than personal use? You can read what you are allowed to do in the Copyright text at the bottom of all our patterns. Happy crafting!
Post a comment to pattern DROPS Children 6-10
We would love to hear what you have to say about this pattern!
If you want to leave a question, please make sure you select the correct category in the form below, to speed up the answering process. Required fields are marked *.