
Categorias populares
Procura um fio?


Comentários / Perguntas (116)
![]() Janette escreveu:
Janette escreveu:
Is it possible to crochet this bag using raffia? If so, how many strands would you suggest equivalent to Drops Paris? Thank you
03.09.2025 - 21:06DROPS Design respondeu:
Dear Janette, this pattern has been calculated with the indicated yarn. If you wish to use a different thread you will need to check that you can get the same knitting gauge and use this lesson to check how to change yarns. Happy knitting!
22.09.2025 - 00:44
![]() Laura escreveu:
Laura escreveu:
The materials list says to use a 5.5 mm hook. The instructions indicate to use a 4.5 mm hook. Which is the correct size?
20.08.2025 - 19:11DROPS Design respondeu:
Dear Laura, it seems to be a typo in the pattern; it should be a 5.5mm hook. We will correct it as soon as possible. Happy crochetting!
25.08.2025 - 13:00
![]() Janet escreveu:
Janet escreveu:
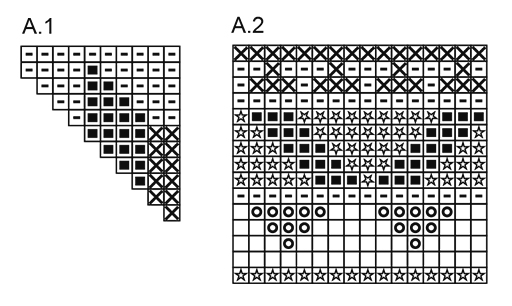
Hello, I want to clarify that each square in the diagram represents one double crochet, not a chain, correct? This is what I understand to work on Round 3: 1 dc, 2 dc, 1 dc, 2 dc The 1st stitch is to chain 3 (pink) Next chain: 2 dc (pink+gray) Next chain: 1 dc (pink) Next chain: 2 dc (pink+gray) follow the same color combination to the end. Do I understand the pattern correctly? Thank you very much for your kind help!
08.06.2025 - 16:10
![]() Desiree Williams escreveu:
Desiree Williams escreveu:
I’m confused about the beginning, where it says to chain 5 to form a ring, and then you are supposed to work 12 dc in the ring. How do you go from 5 to 12? I can see if there are 6 in the ring, and then two dc per stitch to make 12. Am I missing something? Thanks!
01.02.2025 - 19:37DROPS Design respondeu:
Dear Desiree, with the 5 chain stitches you form a ring. Then, you will work 12 dc inside the hole of the ring, not in each of the chain stitches. Happy crochetting!
02.02.2025 - 23:44
![]() Lisa escreveu:
Lisa escreveu:
Hi, Working on the bag, love it! At the point round 12, After decrease to 112. Dou you do consist rounds of 112.? With no more decreases? About how many rows to gain the bucket bag? Thanks Lisa
09.06.2024 - 17:35DROPS Design respondeu:
Dear Lisa, after decreasing to 112, simply finish 1 vertical repeat of chart A.2, without increases or decreases, just the 112 stitches. So work all rows of chart A.2 once and you can fasten off. Happy crochetting!
09.06.2024 - 19:47
![]() Ruth Burton escreveu:
Ruth Burton escreveu:
Your suggested hook size to get correct tension is 5.5mm but the pattern says use 4.5mm! Obviously I'll do a tension square before starting my bag.
30.05.2024 - 08:51DROPS Design respondeu:
Dear Ruth, gauge is personal to each individual, therefore we suggest that a gauge swatch is donw ALWAYS for each project and final needle (or hook) size is selected accordingly. Happy Crafting!
04.06.2024 - 02:59
![]() Prasanthi escreveu:
Prasanthi escreveu:
Made this beautiful bag. Gifted it to my niece on her birthday and she is so thrilled to receive this. Thank you so much for the clear instructions and graph. Would love to post the picture of the bag but I don't see where to attach the pic.
18.03.2024 - 09:50
![]() Andrea escreveu:
Andrea escreveu:
On A.2 where it says (= 7 repetitions in width) does this mean “the next 7 rounds?” And when it says “AT THE SAME TIME on 1st round in A.2 dec 4 dc evenly = 112 dc.” Does this mean the last round should decrease to 112 dc?
04.01.2024 - 17:23DROPS Design respondeu:
Dear Andrea, no this means you have to repeat A.2 a total of 7 times in the round as follows: work the 16 stitches in diagram A.2 (- there are 114 sts, work the first round A.2 decreasing 4 sts evenly on this round = 112 sts remain); Work each round a total of 7 times in the round until A.2 is done. Happy crocheting!
05.01.2024 - 08:06
![]() Petra escreveu:
Petra escreveu:
Man soll die Tasche mit 2 Fäden "Paris" häkeln. Bezieht sich das auf die Tapestry Technik, die ja immer mindestens 2fädig ist? Ansonsten müsste ich ja bei 2 Farben mit 4 Fäden arbeiten. Ich verstehe es nicht.
21.10.2023 - 15:07DROPS Design respondeu:
Liebe Petra, es wird immer mit 2 Fäden also doppelfäddig gehäkelt - siehe Maschenprobe: 12 Stäbchen x 7 Reihen mit 2 Fäden = 10 x 10 cm, in diesem Video zeigen wir (für ein anderes Modell), wie das Muster gehäkelt wird - hier wird man genauso häkeln, aber mit 2 Fäden jeder Farbe anstatt nur 1 Faden jeder Farbe wie im Video. Viel Spaß beim häkeln!
23.10.2023 - 09:38
![]() Joanne Seitz escreveu:
Joanne Seitz escreveu:
At the end of Row 4, it says in bold letters, REMEMBER THE CROCHET GAUGE. How big should the circle measure at this point? I do not see that mentioned.
05.07.2023 - 01:31
|
|||||||||||||||||||
Market Day#marketdaybag |
|||||||||||||||||||
 |
 |
||||||||||||||||||
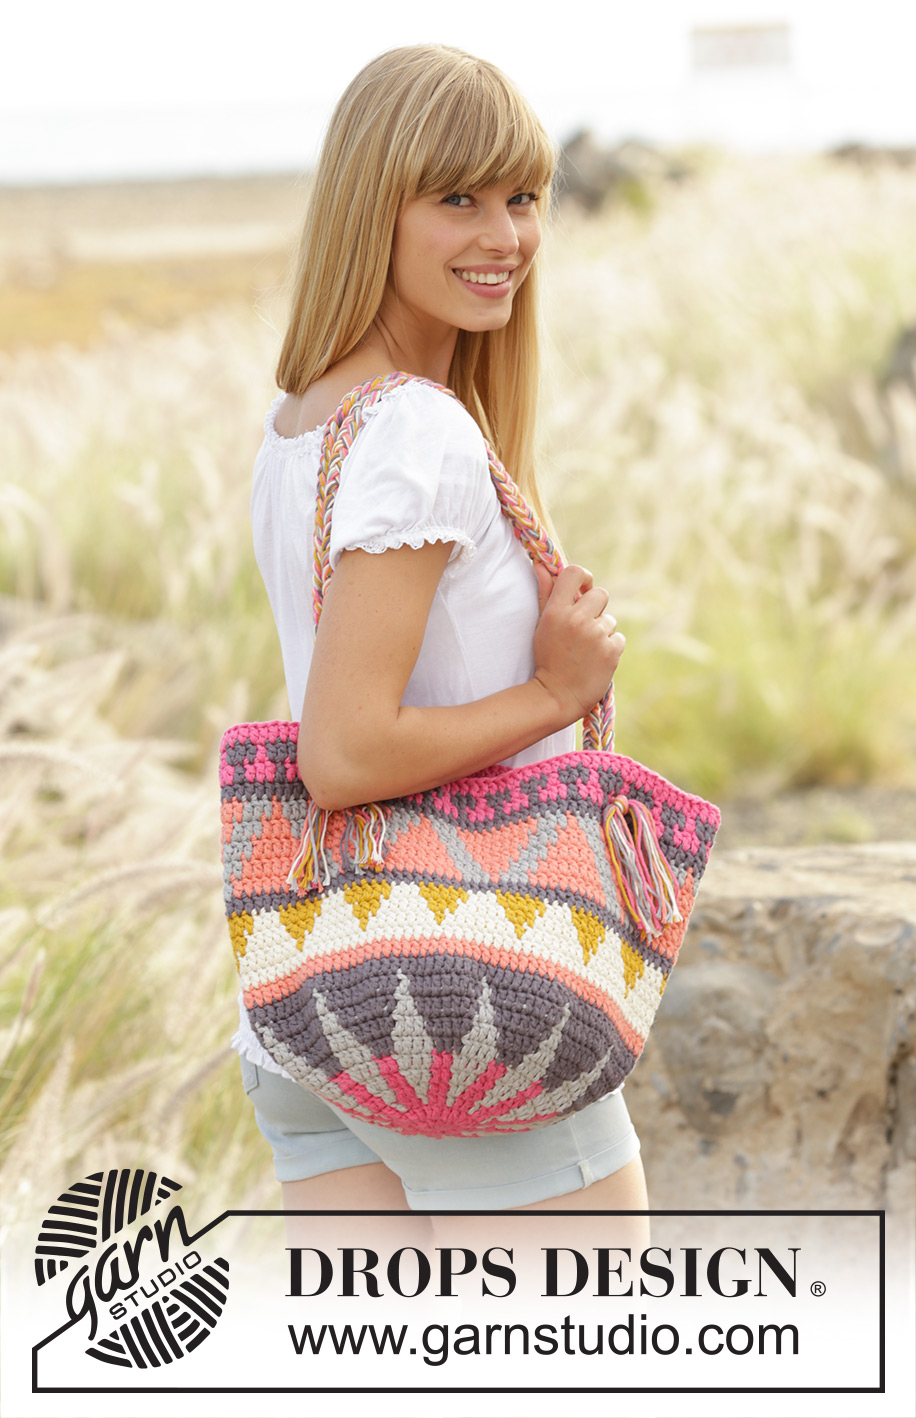
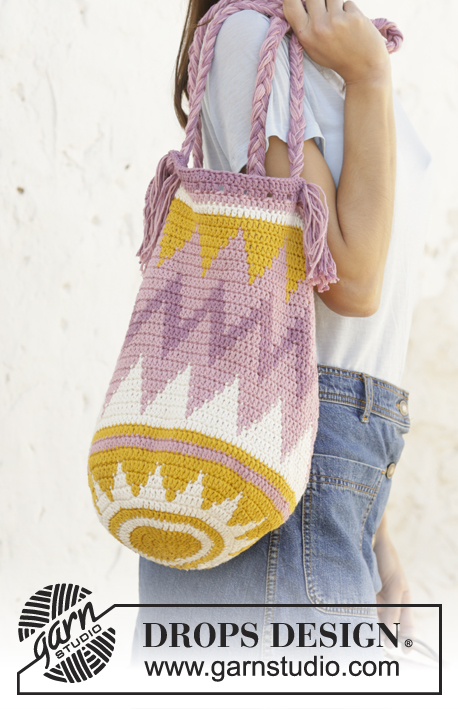
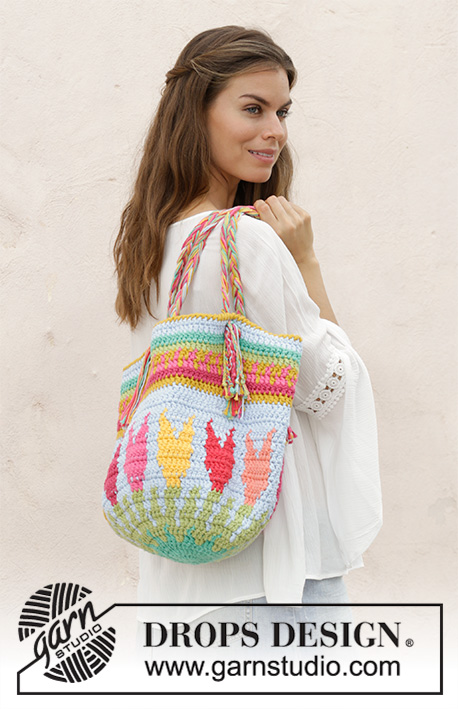
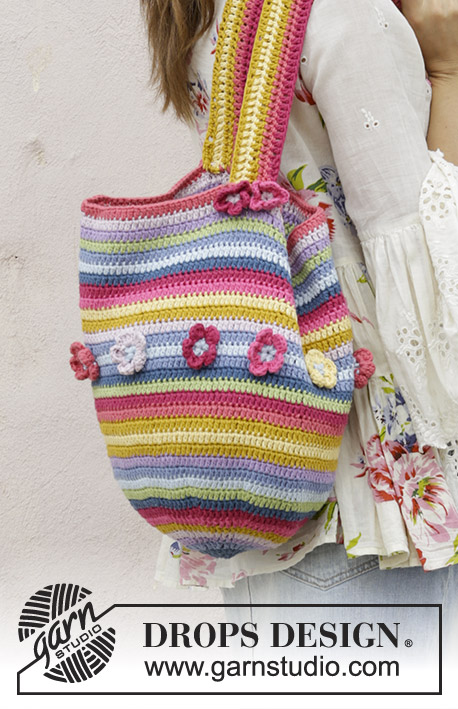
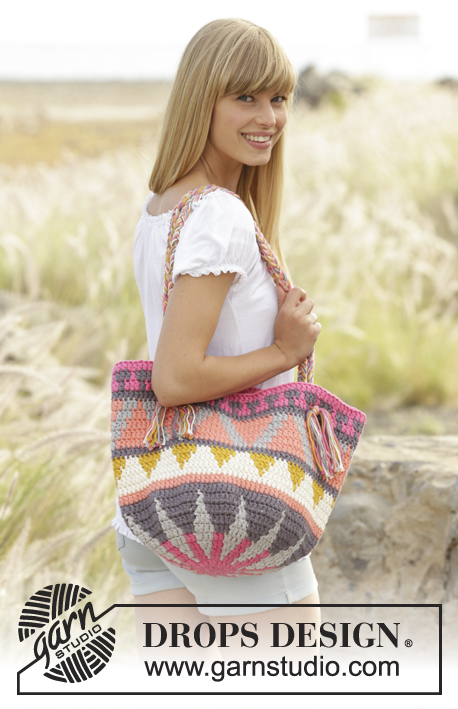
Saco jacquard DROPS em croché, feito com 2 fios "Paris".
DROPS 170-1 |
|||||||||||||||||||
|
---------------------------------------------------------- NOTA: Existem termos diferentes de tricô e croché em português de Portugal e do Brasil. Tricô: Malha = Ponto Canelado = Barra Ponto Jarreteira = Cordões de Tricô Ponto Liga = Ponto Tricô Croché: mpa - meio ponto alto pa - ponto alto pad - ponto alto duplo pat - ponto alto triplo pb - ponto baixo pbx - ponto baixíssimo pc - ponto corrente ---------------------------------------------------------- JACQUARD: Ver diagramas A.1 e A.2. Os diagramas mostram as cores do jacquard. 1 quadrado = 1 pa. DICA CROCHETAR COM 2 FIOS: Usar alternadamente o fio do interior e do exterior do novelo. Quando se muda do novelo, tentar evitar mudar os 2 fios ao mesmo tempo - para evitar uma espessura no croché. CROCHETAR VÁRIAS CORES (em redondo): Mudar de cor da seguinte maneira: Crochetar o último pa com a 1.ª cor mas não fazer a última laçada, fazer esta última laçada com a cor seguinte, crochetar então o pa seguinte. Quando se crocheta com 2 cores, colocar a cor não usada por cima do pontos da carreira precedente, crochetar à volta dos fios para que fiquem escondidos e sigam as carreiras. DICA CROCHÉ: Substituir o 1.º pa no princípio de cada carreira por 3 pc, terminar a carreira com 1 pbx no 3.º pc. DIMINUIÇÕES: Para diminuir 1 pa, crochetar 2 pa juntamente da seguinte maneira: Crochetar o 1.º pa mas não fazer a última laçada (= 2 argolas que estão na agulha de croché), crochetar o pa seguinte, mas, na última laçada, crochetar as 3 argolas que estão na agulha de croché. ---------------------------------------------------------- SACO: Crocheta-se em redondo com 2 fios de cada cor - VER DICA CROCHETAR COM 2 FIOS. Montar uma corrente de 5 pc com 2 fios rosa magenta e a agulha de croché 4,5 mm e unir em redondo com 1 pbx no 1.º pc. Crochetar então em redondo e seguindo A.1 (repetir 12 vezes A.1 em largura = em toda a carreira) - VER CROCHETAR VÁRIAS CORES. CARREIRA 1: 12 pa no aro – ver DICA CROCHÉ. CARREIRA 2: 2 pa em cada pa = 24 pa. CARREIRA 3: *1 pa no pa seguinte, 2 pa no pa seguinte *, repetir de * a * em toda a carreira = 36 pa. CARREIRA 4: *1 pa em cada um dos 2 pa seguintes, 2 pa no pa seguinte,*, repetir de * a * em toda a carreira = 48 pa. NÃO ESQUECER DE MANTER A MESMA TENSÃO DA INDICADA PARA A AMOSTRA! CARREIRAS 5-10: Continuor os aumentos e o motivo como antes, ou seja, a cada carreira, crochetar 1 pa a mais entre cada aumento = 120 pa. CARREIRA 11: Crochetar a última carreira de A.1 e, AO MESMO TEMPO, diminuir 4 pa a intervalos regulares, para diminuir 1 pa, crochetar 2 pa juntamente = 116 pa. CARREIRA 12: Continuar, então, em redondo, mas sem aumentar e crochetar A.2 (= 7 vezes em largura = em toda a carreira) e, AO MESMO TEMPO, na 1.ª carreira de A.2 diminuir 4 pa a intervalos regulares = 112 pa. Continuar até A.2 ter sido crochetado e arrematar. ALÇAS: Cortar 6 fios com 120 cm de comprimento em cada cor = 36 fios. Pegar nos fios juntamente e dar um nó lasso, a cerca de 12 cm de uma das extremidades. Distribuir os fios em 3 grupos de 12 fios cada um. Entrançar estes 3 grupos até a trança medir cerca de 68 cm. Dividir, então, os fios em 2 grupos. Enfiar os 2 grupos de fios no saco, a 1 pa de distância, na 3.ª carreira a partir do rebordo. Atar os fios na parte da frente do saco. Desfazer o nó na outra extremidade da trança e fixá-lo ao saco da mesma maneira, mas do outro lado da saco. Fazer uma outra trança da mesma maneira - ver foto. |
|||||||||||||||||||
Explicações do diagrama |
|||||||||||||||||||
|
|||||||||||||||||||
 |
|||||||||||||||||||
Terminou este projecto?Então, identifique as suas fotos com as tags #dropspattern #marketdaybag ou mostre-as na galeria #dropsfan. Precisa de ajuda para este modelo?Encontrará 9 turotiais em vídeo, uma rubrica Comentários/Perguntas e muito mais ao visitar a página do modelo em www.garnstudio.com © 1982-2026 DROPS Design A/S. Todos os direitos reservados. Este documento, incluuindo as suas su-secções, tem copyrights. Saia mais o que pode fazer com os nossos modelos no fim de cada uma das páginas do nosso site. |
|||||||||||||||||||


Com mais de 40 anos no design de modelos de tricô e de croché, a DROPS Design oferece uma das mais vastas colecções demodelos gratuitos na Internet - traduzidos em 17 línguas. Neste dia de hoje, temos 324 catálogos e 12290 modelos - dos quais 12271 estão traduzidos em português.
Trabalhamos com muito empenho para lhe proporcionar o melhor que o tricô e o croché têm para oferecer, para lhe fornecer inspiração e conselhos bem como fios da mais elevada qualidade a preços incríveis! Gostaria de usar os nossos modelos para outros fins que não uso pessoal? Pode ler o que lhe é permitido fazer no Copyright texto que se encontra na parte de baixo de todos os nossos modelos. Bom tricô! Bom croché!
Deixe um comentário acerca do modelo DROPS 170-1
Gostaríamos muito de saber o que tem a dizer-nos acerca deste modelo!
Se deixar uma pergunta acerca do modelo, certifique-se de que escolhe a categoria adequada no formulário abaixo para acelerar o processo relativo à resposta. Os campos obrigatórios estão assinalados com um *.