
Popular categories
Looking for a yarn?


Comments / Questions (24)
![]() Edith wrote:
Edith wrote:
Pour la T1, il est dit de placer un marqueur dans les 11eme et 31eme maille pour créer le haut de la mouffle. La maille centrale au dessus du pouce devrait être ́a première à être marquée puisque les diminutions doivent se placer latéralement avec le pouce sur le côté. La seconde m marquée devrait être 20 m plus loin. Ainsi les diminutions sont placées dans l’alignement du pouce et à l’opposé. Sinon, on se retrouve avec les diminutions au milieu de la paume et du dos de main.
29.12.2025 - 11:27DROPS Design answered:
Bonjour Edith, vous pouvez également probablement tricoter ainsi les diminutions du haut de la moufle, mais les explications des moufles correspondent bien à la façon de faire sur le modèle photographié (cf. dernière photo),, les diminutions ne sont pas faites ici de chaque côté de la main (comme on le fait souvent/traditionnellement). Bon tricot!
02.01.2026 - 13:05
![]() Edith wrote:
Edith wrote:
Bonjour, mon commentaire porte sur la confection du pouce en T1. Le modèle indique de reprendre 11 m et d’en relever 3 au dessus du pouce. Avec 14 m, on ne peut pas respecter la ligne de côtes partant du poignet. Il faut donc soit contrarier les cotes et ce n’est pas joli soit augmenter de mailles envers de chaque côté de la maille endroit partant du poignet sous le pouce, soit 16 m au lieu de 14. Ainsi la ligne de côtes partant du mlignet n’est pas interrompue.
29.12.2025 - 11:03DROPS Design answered:
Bonjour Edith, la maille du pouce est 1 m end, lorsque les augmentations du pouce sont terminées, vous avez 11 m (=1 m env, 1 m end)x 5 + 1 m env; vous relevez 3 m que vous tricotez ainsi: 1 m end, 1 m env, 1 m end, ainsi vos 14 mailles continuent les 11 m en côtes du pouce. Bon tricot!
02.01.2026 - 13:03
![]() Mortelmans wrote:
Mortelmans wrote:
Hoeveel bollen heb ik nodig voor deze muts? Ik zou alpaca silk willen gebruiken in combinatie met alpaca uno colour. Dank u
05.05.2025 - 14:36DROPS Design answered:
Dag Mortelmans,
We hebben een artikel op de site staan waarin uitgelegd is hoe je garen kunt vervangen met een ander garen en hoe je dit uitrekent. Zie hier.
14.05.2025 - 13:27
![]() Jackie Fielding wrote:
Jackie Fielding wrote:
Can the pattern be adapter to knit with two needles ?
10.03.2025 - 11:07DROPS Design answered:
Dear Mrs Fielding, you will easily be able to adjust the pattern for hat for straight needles with the help of this lesson. Happy knitting!
10.03.2025 - 13:03
![]() Joanna wrote:
Joanna wrote:
Dziękuję, to jak zamykać oczka rozumiem. Nie zgadza mi się ta częć opisu: Przerabiać, aż zostaje 5 oczek przed oczkiem z markerem, przerobić 2 oczka razem na prawo, przerabiać ściągaczem jak wcześniej ponad 7 następnymi oczkami, zdjąć 1 oczko jak do przerobienia na prawo, 1 oczko prawe i przełożyć oczko zdjęte nad przerobionym oczkiem.
04.03.2025 - 10:43DROPS Design answered:
Witaj Joanno, zamykasz po 1 oczku z każdej strony każdego oczka z markerem: po prawej stronie oczka z markerem, gdy zostaje 5 oczek przed oczkiem z markerem przerabiasz 2 oczka razem na prawo. Następnie przerabiasz 7 oczek ściągaczem (oczko z markerem znajduje się na środku tych oczek, czyli jest oczkiem nr 4). Teraz zamykasz oczko następująco: 'zdjąć 1 oczko jak do przerobienia na prawo, 1 oczko prawe i przełożyć oczko zdjęte nad przerobionym oczkiem'. W okrążeniu zostanie zamkniętych 8 o. Pozdrawiamy!
04.03.2025 - 11:16
![]() Merethe wrote:
Merethe wrote:
Hei! Jeg strikker vottene. Skal jeg alltid felle av 5 masker fra markeringstråden, eller gjelder dette bare den første fellinga? Blir neste fellingsrunde da 4 masker fra markeringstråden, og så 3 masker osv. ?
03.03.2025 - 22:24DROPS Design answered:
Hei Merethe. Det strikkes etter FELLETIPS -2 hver gang (til det gjenstår 5 masker...). mvh DROPS Design
10.03.2025 - 09:58
![]() Joanna Kluszczynska wrote:
Joanna Kluszczynska wrote:
Dzień dobry, nie rozumiem opisu zamykania oczek w czapce, mogę prosić o pomoc. Dziekuję
03.03.2025 - 20:25DROPS Design answered:
Witaj Joanno, patrz ZAMYKANIE OCZEK-1 (czapka). Jak przerobić 2 oczka razem na prawo znajdziesz TUTAJ. Jak przerobić sekwencję 'zdjąć 1 oczko jak do przerobienia na prawo, 1 oczko prawe i przełożyć oczko zdjęte nad przerobionym oczkiem' znajdziesz TUTAJ. Pozdrawiamy!
04.03.2025 - 09:09
![]() Sofie Wennblad wrote:
Sofie Wennblad wrote:
Hej! Kan man använda två trådar av Kid Silk istället för att använda en tråd av den och en tråd av Alpacka?
26.02.2025 - 16:40DROPS Design answered:
Hej Sofie, ja det kan du, den vil dog ikke blive så elastisk, men strikkefastheden stemmer :)
05.03.2025 - 15:04
![]() Hannah wrote:
Hannah wrote:
Opmerking bij de want maat M/L: De tweede markeerdraad voor de minderingen moet volgens mij in steek 37 geplaatst worden en niet in steek 33. Anders zijn de minderingen niet symmetrisch en overlappen ze elkaar uiteindelijk.
18.01.2024 - 09:12
![]() Anna wrote:
Anna wrote:
W opisie wykonania prawej rękawiczki brakuje informacji, gdzie umieścić markery, które wyznaczają kciuk i dodawanie oczek. Bardzo proszę o uzupełnienie.
02.12.2023 - 23:52DROPS Design answered:
Witaj Aniu, informacje, o których piszesz są zawarte we wzorze. Pozdrawiamy!
04.12.2023 - 08:56
|
|
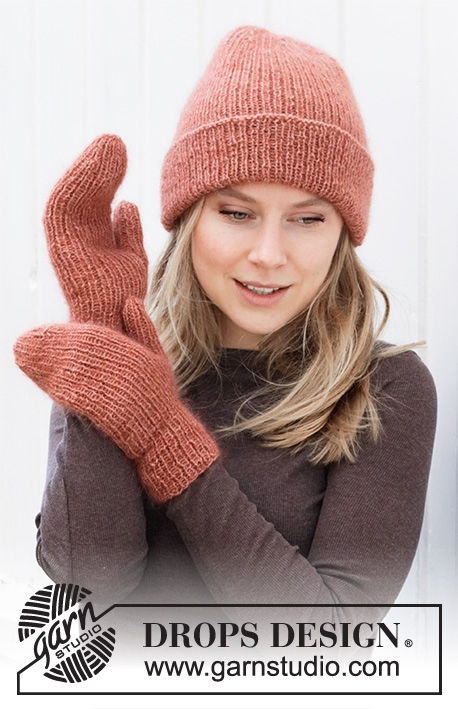
Blushing Fall#blushingfallset |
|
 |
 |
Knitted beanie / hipster hat and mittens in DROPS Alpaca and DROPS Kid-Silk. The piece is worked in rib.
DROPS 214-2 |
|
|
------------------------------------------------------- EXPLANATIONS FOR THE PATTERN: ------------------------------------------------------- DECREASE TIP-1 (for hat): Decrease 8 stitches on each decrease-round. Work until there are 5 stitches left before the stitch with the marker, knit 2 together, work rib as before over the next 7 stitches, slip 1 stitch as if to knit, knit 1 and pass the slipped stitch over. Repeat at all the other markers. DECREASE TIP-2 (for mittens): Decrease 1 stitch on each side of the marker thread as follows: Work until there are 5 stitches left before the stitch with the marker, knit 2 together, work rib as before over the next 7 stitches (the middle of these stitches has the marker thread), slip 1 stitch as if to knit, knit 1 and pass the slipped stitch over. INCREASE TIP (for mittens): Increase 1 stitch by making 1 yarn over. On the next round work the yarn over twisted to avoid a hole. Then work the new stitch in rib. ------------------------------------------------------- START THE PIECE HERE: ------------------------------------------------------- HAT – SHORT OVERVIEW OF THE PIECE: The piece is worked in the round with circular needle, bottom up. Change to double pointed needles when necessary. HAT: Cast on 120 stitches with circular needle size 3.5 mm and 1 strand Alpaca and 1 strand Kid-Silk (= 2 strands). Purl 1 round. Work rib (= knit 1, purl 1) in the round. REMEMBER THE KNITTING TENSION! When the piece measures 23 cm, insert 4 markers as follows: Insert the first marker in the first knitted stitch on the round (in the stitch, not between 2 stitches) and the other 3 markers with 29 stitches between each marker-stitch. All the markers are inserted into knitted stitches. Continue with rib and on the next round begin to decrease - read DECREASE TIP-1. Decrease like this every 2nd round 10 times = 40 stitches left. The next round is worked as follows: * Rib as before over the first 4 stitches, slip 1 stitch as if to knit, knit 2 together and pass the slipped stitch over the knitted-together stitches (= 2 stitches decreased), rib over the next 3 stitches *, work from *-* a total of 4 times on the round = 32 stitches. Work 1 round with knit over knit and purl over purl. Knit all stitches together 2 and 2 = 16 stitches. Cut the strand, thread it through the remaining stitches, tighten and fasten well. The hat measures approx. 25 cm with a 6 cm turn-up (= a total of 31 cm). ------------------------------------------------------- MITTENS – SHORT OVERVIEW OF THE PIECE: The piece is worked in the round with double pointed needles. RIGHT MITTEN: Cast on 40-48 stitches with double pointed needles size 3.5 mm and 1 strand Alpaca and 1 strand Kid-Silk (= 2 strands). Insert a marker thread at the beginning of the round and work rib (= knit 1, purl 1) in the round for 8-8 cm. REMEMBER THE KNITTING TENSION! Insert a marker in the first stitch (a knitted stitch = thumb-stitch). Continue with rib and increase 1 stitch on each side of the thumb-stitch (= 2 stitches increased) – read INCREASE TIP! Increase like this, on each side of the increased stitches, every 2nd round a total of 5-6 times = 50-60 stitches. Now place the 11-13 thumb-stitches on a thread. Continue in the round with rib and cast on 1 stitch behind the thumb-stitches on the next round = 40-48 stitches. When the mitten measures 22-22 cm (there is approx. 5-7 cm left to finished length; you can try the mitten on and work to desired length), insert 2 marker threads (in the stitch, not between 2 stitches) as follows: Insert the first thread in the 11th-13th stitch (= 1 knitted stitch under the mitten) and the other thread in the 31st-33rd stitch (= 1 knitted stitch on top of the mitten). Continue with rib and begin to decrease on the next round - read DECREASE TIP-2. Decrease like this every 4th round 1-1 time then every 2nd round 4-6 times = 20-20 stitches. Knit all stitches together 2 and 2; 5-5 stitches left. Cut the strand, thread it through the remaining stitches, tighten and fasten well. The mitten measures approx. 27-29 cm. THUMB: Place the 11-13 thumb-stitches from the thread back on double pointed needles size 3.5 mm and knit up 3-3 stitches behind the thumb = 14-16 stitches. Work rib in the round until the thumb measures 5½-6 cm (there is approx. ½ cm left to finished length; you can try the mitten on and work to desired length). Knit all stitches together 2 and 2 until there are 4 stitches left. Cut the strand, thread it through the remaining stitches, tighten and fasten well. LEFT MITTEN: Cast on 40-48 stitches with double pointed needles size 3.5 mm and 1 strand Alpaca and 1 strand Kid-Silk (= 2 strands). Insert a marker thread at the beginning of the round and work rib (= knit 1, purl 1) in the round for 8-8 cm. Insert a marker in the 19th-23rd stitch on the round (= thumb-stitch). Continue with rib and increase 1 stitch on each side of the thumb-stitch (= 2 stitches increased) – remember INCREASE TIP! Increase like this, on each side of the increased stitches, every 2nd round a total of 5-6 times = 50-60 stitches. Now place the 11-13 thumb-stitches on a thread. Continue with rib and cast on 1 stitch behind the thumb-stitches on the next round = 40-48 stitches. When the mitten measures 22-22 cm (there is approx. 5-7 cm left to finished length; you can try the mitten on and work to desired length), insert 2 marker threads (in the stitch, not between 2 stitches) as follows: Insert the first thread in the 11th-13th stitch (= 1 knitted stitch under the mitten) and the other thread in the 31st-33rd stitch (= 1 knitted stitch on top of the mitten). Continue with rib and begin to decrease on the next round - remember DECREASE TIP-2. Decrease like this every 4th round 1-1 time then every 2nd round 4-6 times = 20-20 stitches. Knit all stitches together 2 and 2; there are 5-5 stitches left. Cut the strand, thread it through the remaining stitches, tighten and fasten well. The mitten measures approx. 27-29 cm. THUMB: Work in the same way as the right thumb. |
|
Have you finished this pattern?Tag your pictures with #dropspattern #blushingfallset or submit them to the #dropsfan gallery. Do you need help with this pattern?You'll find 23 tutorial videos, a Comments/Questions area and more by visiting the pattern on garnstudio.com. © 1982-2026 DROPS Design A/S. We reserve all rights. This document, including all its sub-sections, has copyrights. Read more about what you can do with our patterns at the bottom of each pattern on our site. |
|


With over 40 years in knitting and crochet design, DROPS Design offers one of the most extensive collections of free patterns on the internet - translated to 17 languages. As of today we count 324 catalogues and 12290 patterns translated into English (UK/cm). 12290
We work hard to bring you the best knitting and crochet have to offer, inspiration and advice as well as great quality yarns at incredible prices! Would you like to use our patterns for other than personal use? You can read what you are allowed to do in the Copyright text at the bottom of all our patterns. Happy crafting!
Post a comment to pattern DROPS 214-2
We would love to hear what you have to say about this pattern!
If you want to leave a question, please make sure you select the correct category in the form below, to speed up the answering process. Required fields are marked *.