
Oblíbené kategorie
Hledáte přízi?


|
|
Blushing Fall |
|
 |
 |
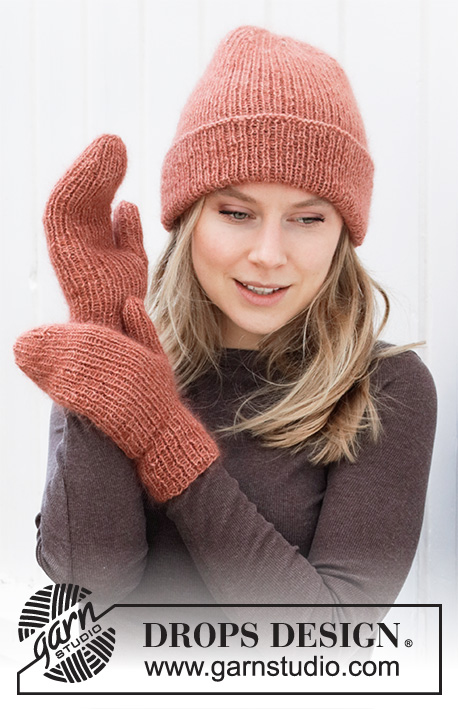
Čepice a rukavice – palčáky pletené pružným vzorem z příze DROPS Alpaca a DROPS Kid-Silk.
DROPS 214-2 |
|
|
------------------------------------------------------- VYSVĚTLIVKY: ------------------------------------------------------- TIP – UJÍMÁNÍ 1 (čepice): V každé kruhové řadě s ujímáním ujmeme 8 ok. Pleteme po posledních 5 ok před označeným okem: 2 oka spleteme hladce, následujících 7 ok upleteme pružným vzorem jako dosud, 1 oko sejmeme hladce, 1 upleteme hladce a sejmuté přes ně přetáhneme. Takto postupujeme u každé značky. TIP – UJÍMÁNÍ 2 (rukavice): Na každé straně značky ujmeme 1 oko, takto – začínáme 5 ok před označeným okem: 2 oka spleteme hladce, následujících 7 ok upleteme pružným vzorem jako dosud (prostřední z těchto ok je označené), 1 oko sejmeme hladce, 1 upleteme hladce a sejmuté přes ně přetáhneme. TIP – PŘIDÁVÁNÍ (rukavice): Přidáváme nahozením. V následující kruhové řadě pleteme nahození za zadní nit, aby se v pletenině netvořily dírky. Nová oka pak zapracujeme do pružného vzoru. ------------------------------------------------------- POPIS PRÁCE: ------------------------------------------------------- ČEPICE - JAK BUDEME POSTUPOVAT: Pleteme v kruhových řadách na kruhové jehlici. Podle potřeby převedeme pleteninu s ubývajícím počtem ok na ponožkové jehlice. ČEPICE: Na kruhovou jehlici č.3,5 nahodíme 1 vláknem příze Kid-Silk a 1 vláknem příze Alpaca (= dvojitou přízí) 120 ok a upleteme 1 kruhovou řadu obrace. Pak pleteme v kruhových řadách pružným vzorem 1/1 (tj. střídáme 1 oko hladce, 1 obrace). Ve výši 23 cm vložíme do pleteniny 4 značky v těchto rozestupech: 1. značkou označíme 1. hladké oko v kruhové řadě (značku vložíme DO oka, ne mezi oka), každou z dalších 3 značek pak vložíme po 29 okách (tj. do 30. oka). Značky vkládáme vždy do hladkého oka. Dál pleteme pružným vzorem a v následující kruhové řadě začneme ujímat – TIP – UJÍMÁNÍ 1. Toto ujímání opakujeme v každé 2. kruhové řadě, celkem 10x = zbývá 40 ok. Následující kruhovou řadu pleteme takto: *první 4 oka pleteme pružným vzorem jako dosud, 1 oko sejmeme hladce, 2 oka spleteme hladce a sejmuté přes ně přetáhneme (= ujmuli jsme 2 oka), následující 3 oka pleteme pružným vzorem*, *-* opakujeme celkem 4x = 32 ok. Upleteme 1 kruhovou řadu, jak se oka jeví (tj. hladká hladce, obrácená obrace). V následující kruhové řadě spleteme každá 2 oka hladce = 16 ok. Přízi odstřihneme, konec příze protáhneme zbylými oky, stáhneme a zapošijeme. Čepice měří asi 25 cm se 6 cm ohrnutého lemu (= celkem měří čepice 31 cm). ------------------------------------------------------- RUKAVICE - JAK BUDEME POSTUPOVAT: Pleteme v kruhových řadách na ponožkových jehlicích. PRAVÁ RUKAVICE: Na ponožkové jehlice č.3,5 nahodíme 1 vláknem příze Alpaca a 1 vláknem příze Kid-Silk (= dvojitou přízí) 40-48 ok. Označíme si začátek kruhové řady a pleteme v kruhových řadách pružným vzorem 1/1 (= střídáme 1 oko hladce, 1 obrace). Ve výši 8-8 cm si označíme 1. oko (hladké oko = začátek palce). Pokračujeme pružným vzorem a SOUČASNĚ přidáme na obou stranách označeného oka pro palec 1 oko (= přidali jsme 2 oka) – viz TIP - PŘIDÁVÁNÍ! Toto přidávání opakujeme v každé 2. kruhové řadě, celkem 5-6x – přidáváme vždy na vnějším okraji vznikajícího klínu = 50-60 ok. Nyní odložíme všech 11-13 ok palce na pomocnou jehlici. Dál pleteme v kruhových řadách pružným vzorem a za odloženými oky palce nahodíme v následující kruhové řadě 1 oko nové = 40-48 ok. Ve výši 22-22 cm (do ukončení práce zbývá doplést asi 5-7 cm výšky; rukavici si teď můžete vyzkoušet a míry upravit) vložíme do pleteniny 2 značky, takto (značky vkládáme DO ok, ne mezi oka): 1. značkou označíme 11.-13. oko (= 1 hladké oko na dlani), 2. značkou označíme 31.-33. oko (= 1 hladké oko na hřbetě rukavice). Pokračujeme pružným vzorem a v následující kruhové řadě začneme ujímat – viz TIP – UJÍMÁNÍ 2. Takto ujmeme 1-1x ve 4. kruhové řadě, pak ujímáme v každé 2. kruhové řadě, celkem 4-6x = 20-20 ok. Nyní spleteme každá 2 oka hladce; zbývá 5-5 ok. Přízi odstřihneme, konec příze protáhneme zbylými oky, stáhneme a zapošijeme. Rukavice měří asi 27-29 cm. PALEC: Odložených 11-13 ok palce vrátíme z pomocné jehlice zpět na ponožkové jehlice č.3,5 a navíc k nim nabereme 3-3 ok z okraje za palcem = 14-16 ok. Pleteme v kruhových řadách pružným vzorem do výše 5,5-6 cm (do ukončení práce zbývá doplést asi 0,5 cm výšky; rukavici si teď můžete vyzkoušet a míry upravit). Nyní spleteme každá 2 oka hladce a postup opakujeme, až nám zbudou poslední 4 oka. Přízi odstřihneme, konec příze protáhneme zbylými oky, stáhneme a zapošijeme. LEVÁ RUKAVICE: Na ponožkové jehlice č.3,5 nahodíme 1 vláknem příze Alpaca a 1 vláknem příze Kid-Silk (= dvojitou přízí) 40-48 ok. Označíme si začátek kruhové řady a pleteme v kruhových řadách pružným vzorem 1/1 (= střídáme 1 oko hladce, 1 obrace). Ve výši 8-8 cm si označíme 19.-23. oko v kruhové řadě (hladké oko = začátek palce). Pokračujeme pružným vzorem a SOUČASNĚ přidáme na obou stranách označeného oka pro palec 1 oko (= přidali jsme 2 oka) – viz TIP - PŘIDÁVÁNÍ! Toto přidávání opakujeme v každé 2. kruhové řadě, celkem 5-6x – přidáváme vždy na vnějším okraji vznikajícího klínu = 50-60 ok. Nyní odložíme všech 11-13 ok palce na pomocnou jehlici. Dál pleteme v kruhových řadách pružným vzorem a za odloženými oky palce nahodíme v následující kruhové řadě 1 oko nové = 40-48 ok. Ve výši 22-22 cm (do ukončení práce zbývá doplést asi 5-7 cm výšky; rukavici si teď můžete vyzkoušet a míry upravit) vložíme do pleteniny 2 značky, takto (značky vkládáme DO ok, ne mezi oka): 1. značkou označíme 11.-13. oko (= 1 hladké oko na dlani), 2. značkou označíme 31.-33. oko (= 1 hladké oko na hřbetě rukavice). Pokračujeme pružným vzorem a v následující kruhové řadě začneme ujímat – viz TIP – UJÍMÁNÍ 2. Takto ujmeme 1-1x ve 4. kruhové řadě, pak ujímáme v každé 2. kruhové řadě, celkem 4-6x = 20-20 ok. Nyní spleteme každá 2 oka hladce; zbývá 5-5 ok. Přízi odstřihneme, konec příze protáhneme zbylými oky, stáhneme a zapošijeme. Rukavice měří asi 27-29 cm. PALEC: Pleteme stejně jako pravý palec. |
|
|
Vyrobili jste si tento nebo nějaký jiný z našich modelů? Přidejte ke svým fotkám na sociálních sítích tag #dropsdesign - díky tomu je uvidíme i my! Potřebujete s tímto návodem poradit?Otevřete-li si návod na stránce garnstudio.com, najdete tam výukových video-ukázek, Komentáře/Dotazy a další užitečné informace. © 1982-2024 DROPS Design A/S. Vyhrazujeme si veškerá práva. Tento dokument, včetně všech jeho dílčích částí, podléhá autorským právům. Podrobnější komentář k možnostem užití našich návodů najdete dole pod každým návodem na našich stránkách. |
|


V oblasti pletené a háčkované módy působí DROPS Design více než 40 let. Díky tomu vám můžeme nabídnout jednu z nejrozsáhlejších kolekcí modelů s bezplatnými návody dostupnými na internetu - navíc v 17 jazycích. K dnešnímu dni máme na 304 katalogů a 11422 návodů celkem - z nich je už 6300 dostupných v češtině.
Komentáře / Otázky (16)
Opmerking bij de want maat M/L: De tweede markeerdraad voor de minderingen moet volgens mij in steek 37 geplaatst worden en niet in steek 33. Anders zijn de minderingen niet symmetrisch en overlappen ze elkaar uiteindelijk.
18.01.2024 - 09:12W opisie wykonania prawej rękawiczki brakuje informacji, gdzie umieścić markery, które wyznaczają kciuk i dodawanie oczek. Bardzo proszę o uzupełnienie.
02.12.2023 - 23:52DROPS Design answered:
Witaj Aniu, informacje, o których piszesz są zawarte we wzorze. Pozdrawiamy!
04.12.2023 - 08:56Hallo liebe Team, Übersetzungsfehler bei den Handschuhen: Im Norwegische. Original steht es eigentlich so: Auf diese Weise in jeder 4. Runde 1-1 x abnehmen, dann in jeder 2. Runde 4-6 x abnehmen = 20-20 Maschen. Für Anfänger ist es missverständlich, hier steht nur: Weiter in Runden im Rippenmuster stricken, dabei in der nächsten 4. Runde mit den Abnahmen beginnen - ABNAHMETIPP-2 beachten. Dann in jeder 2. Runde 4-6 x abnehmen = 20-20 Maschen. Danke!
21.11.2022 - 11:39DROPS Design answered:
Liebe Barbara, hier ist es anders gemeint, dh nach der 1. Abnahmen stricken Sie 3 Reihen, dann nehmen Sie in jeder 2. Runde 4-6 Mal ab. Viel Spaß beim stricken!
21.11.2022 - 16:28Muchísimas gracias por vuestra atención, ahora lo entiendo perfectamente
06.03.2022 - 18:47Gracias por vuestra respuesta pero no me cuadra con esto, que es lo que pone en el patrón para hacer las disminuciones, perdonad si voy errada pero no me acaba de cuadrar... "Tejer hasta que resten 5 puntos antes del punto con el marcador, tejer 2 puntos juntos de derecho, tejer en resorte como antes sobre los 7 puntos siguientes, deslizar 1 punto como de derecho, tejer 1 punto derecho y pasar el punto deslizado por encima. Repetir en todos los otros marcadores." Muchas gracias
04.03.2022 - 11:48DROPS Design answered:
Hola Alicia, sí, perdona, pensaba que se trataba de 2 puntos juntos de derecho, no 2 derechos seguidos. Es habitual que al trabajar disminuciones queden 2 puntos iguales (derechos o reveses) seguidos. En este caso se trabajarían como se presentan los puntos (los dos de derecho o de revés). En la última foto del gorro pueden ver que se empieza a interrumpir el punto elástico de esta manera.
06.03.2022 - 12:51Hola, tengo una duda con el gorro, después de hacer una vuelta de disminuciones, en la siguiente vuelta me encuentro puntos del derecho juntos, cómo debo hacer? sigo tejiendo uno del derecho y uno del revés o tejo los dos del derecho? gracias
28.02.2022 - 11:32DROPS Design answered:
Hola Alicia, la disminución se trabaja como sigue: deslizar 1 punto de derecho, 2 puntos juntos de derecho y pasar el punto deslizado sobre los puntos trabajados juntos. Por lo que de 3 puntos queda 1 punto. Esto debería cuadrar bien en el punto elástico de la siguiente vuelta.
28.02.2022 - 16:46Hi! Can I work this hat and mitten patterns using the yarn Sky? I have many Sky at the moment, and DK yarns are abundant in my stash. According to your Ravelry page of this particular pattern, this seems to be DK pattern. Please advise if it is ok to use your yarn Sky using this pattern.
20.01.2022 - 14:19DROPS Design answered:
Dear Ellie, work a swatch and check your tension/texture, you might work with Sky (it might just look somewhat different). Happy knitting!
20.01.2022 - 17:23Witam serdecznie. Czy zamiast włóczki kid silk w tym wzorze mogę użyć jako alternatywę brushed alpaca silk?
16.11.2021 - 20:30DROPS Design answered:
Witaj Justyno, spróbuj, ale wcześniej zrób próbkę i zobacz czy nie trzeba będzie zmniejszyć początkowej liczby oczek w czapce, gdyż Brushed Alpaca Silk jest znacznie grubsza od Kid-Silka. Pozdrawiamy!
17.11.2021 - 08:20Bonjour, lors des diminutions un tour sur deux sur le bonnet, sur le rang sans diminution, tricote-on en côte en suivant les côtes des mailles du rang précédent (on se retrouvé avec plusieurs mailles endroit à la suite ) ou tricote-on en côte en ignorant les mailles du rang précédent entre les diminutions? Merci!
18.03.2021 - 17:43DROPS Design answered:
Bonjour Jessie, au tour suivant les diminutions, tricotez les mailles comme elles se présentent (= les mailles endroit à l'endroit et les mailles envers à l'envers). Bon tricot!
19.03.2021 - 06:28Kan man bruge brushed alpaca silk til huen? Hvor meget garn skal bruges og er det bare 1 tråd, der skal strikkes med?
20.01.2021 - 21:19DROPS Design answered:
Hej Lene, prøv garnomregneren, vælg DROPS Alpaca - garnforbrug til din størrelse x 2 - og vælg 2 tråde - God fornøjelse!
26.01.2021 - 16:17