
Popular categories
Looking for a yarn?


Comments / Questions (32)
![]() Eva Karlsson wrote:
Eva Karlsson wrote:
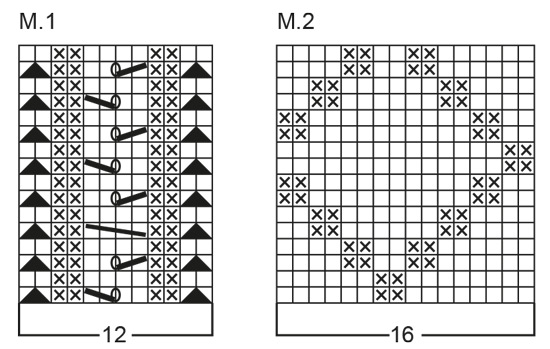
Bålen: ..... När arb mäter 44 (49) cm ” avm det 1 rätst m på varje v i varje sida mot mitt fram 4 ggr, ...... samtidigt som det avm 1 m till hals innanför M.1 (avm i M.2) så här: 11 (12) ggr på vartannat v, 4 (4) ggr på vart 4e v, 2 (2) ggr på vart 6e v, Jag förstår inte vad ni menar med ”sida mot mitt fram” . Var avmaskar jag ? Är det där ärmhålet ska vara?
07.03.2021 - 17:09DROPS Design answered:
Hej Eva. Du avmaskar mot mitt fram (dvs på framkanterna) och du minskar även till hals innanför M.1 för att skapa en V-ringning. Samtidigt avmaskar du även till ärmhål (när arbetet mäter 46(50) cm). Mvh DROPS Design
11.03.2021 - 07:01
![]() Reta Harbaugh wrote:
Reta Harbaugh wrote:
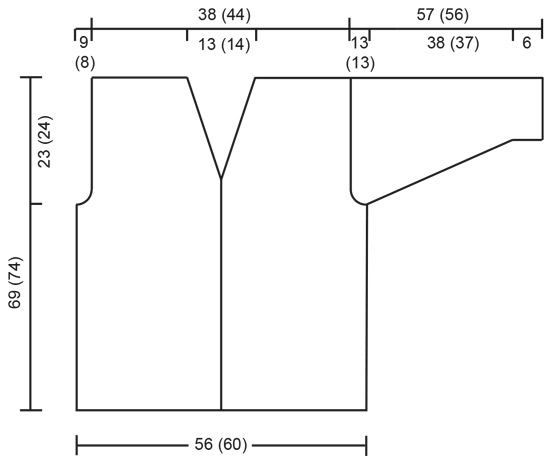
When you are at the end of the sleeve how many stitches are you binding off for the (Med/Lg) "When the work measures 6 cm [2-3/8"], inc 1 st each side of marker 22 (23) times every 4th row = 92 (94) sts. When the work measures 44 (43) cm [17.25" (16-7/8")] bind off 2 sts each side of marker, and knit the rest back and forth on the needles. Bind off at each side for sleeve caps every other row: 3 sts 2 times, 2 sts 4 (5) times, 1 st 5 (4) times, 2 sts 5 times, 3 sts 2 times, bind off. "
31.05.2020 - 02:30DROPS Design answered:
Dear Mrs Harbaugh, in larger size 16 sts should remain. Happy knitting!
02.06.2020 - 09:43
![]() Debbie Crouch wrote:
Debbie Crouch wrote:
Hi, I need help with the following instructions; I understand "When the work measures 44 cms bind off 1st at each centre front edge every other row 4 times" ( I believe this means the two front edges) but I don't understand "& at the same time decrease for the neck inside pattern1 (make decreases in pattern 2 sts....." please can you explain a little clearer what you mean. thanks
10.05.2020 - 16:06DROPS Design answered:
Dear Mrs Couch, you will bind off 1 stitch on each side a total of 4 times (= from the 6 sts worked in garter stitch, 2 sts remain when all decreases are done) and at the same time decrease for neck after M.1 on right front piece and before M.1 on left front piece (the number of sts in M.2 will decrease). Happy knitting!
11.05.2020 - 10:05
![]() Nicole Steger wrote:
Nicole Steger wrote:
Hallo, ich habe nochmals eine frage: werden beim rechten seitenstück die 4 m. krausripp nach einer gesamtlänge von 12 cm abgekettet? und wie genau wird dann der schlitz zusammen genäht? viel lieben dank
23.09.2019 - 21:09DROPS Design answered:
Liebe Frau Steger, die 4 abgekettene Maschen beim rechten Teil werden dann unter den linken Teil zusammengenäht (siehe Zusammennähen - für das Foto schauen wir mal, ob wir so eins haben. Viel Spaß beim stricken!
24.09.2019 - 10:29
![]() Nicole Steger wrote:
Nicole Steger wrote:
Gibt es auch ein Foto von hinten? Wäre noch schön zu sehen wie es mit dem Schlitz aussieht. Dankeschön
23.09.2019 - 11:39DROPS Design answered:
Liebe Frau Steger, leider haben wir kein Foto von hinten. Viel Spaß beim stricken!
02.10.2019 - 14:40
![]() Nicole wrote:
Nicole wrote:
.... das Muster M2 kann man 7x stricken und darum ist dann 1 M zuwenig. Ich bin der Meinung das man anstatt 133 M anschlagen, muss man 134 M anschlagen.
24.08.2019 - 15:34
![]() Nicole wrote:
Nicole wrote:
Wenn ich bei 6 M Krausrippe, M1, 111 M M2 stricke habe ich am Ende nur noch 3M anstatt 4 M. Aber isch sollte noch 4 M Krausrippe stricken. Stimmt di Anleitung nicht oder habe ich mich verrechnet?
24.08.2019 - 15:25DROPS Design answered:
Liebe Nicole, die Maschenanzahl sollte richtig sein: 6 M + 12 M (M.1) + 111 M (= M.2) + 4 M = 133 M. Viel Spaß beim stricken!
26.08.2019 - 08:42
![]() Tineke Van Rijn-Smits wrote:
Tineke Van Rijn-Smits wrote:
Als ik de linkerhelft in spiegelbeeld ga breien, begin ik dan M2 aan de linkerkant of toch ook rechts? En als ik na het samenvoegen van het linker en rechterpand de 4 steken van het split in M2 moet meebreien,, heb ik m.i. 2 steken te veel om in M2 goed uit te komen. In het Duitse patroon lees ik dat het split uit 2 steken bestaat. Mist er een stukje in het Nederlandse patroon of begrijp ik het zelf niet goed .
27.03.2019 - 16:46DROPS Design answered:
Dag Tineke,
Bij de linker helft (gezien zoals het kledingstuk gedragen wordt) zit M.1 het dichts bij midden voor, dus naast de 6 ribbelsteken. Het is de bedoeling dat je de volgorde van de telpatronen in spiegelbeeld breit, zodat M.1 het dichtst bij de bies zit en M.2 daarnaast.
31.03.2019 - 12:16
![]() Nicole wrote:
Nicole wrote:
Vielen Dank!
24.03.2019 - 21:56
![]() Nicole wrote:
Nicole wrote:
Sind im Diagramm Hin-und Rückreihen gezeichnet?Oder nur die Hinreihen, und in der Rückreihe werden die Maschen so gestrickt wie sie erscheinen? Also hat ein Muster 16 Reihen....?
24.03.2019 - 14:27DROPS Design answered:
Liebe Nicole. Die Diagramme zeigen alle Hin- und Rück-Reihen, Hin-Reihen werden von rechts nach links, Rück-Reihen von links nach rechts gelesen. Viel Spaß beim stricken!
24.03.2019 - 20:00
|
||||||||||||||||||||||
DROPS 60-3 |
||||||||||||||||||||||
 |
 |
|||||||||||||||||||||
DROPS Cardigan in Bomull-Lin
DROPS 60-3 |
||||||||||||||||||||||
|
Gauge: 21 sts x 28 rows on larger needles in stockinette st = 10 x 10 cm. Pattern: See charts (1 chart = 1 repeat). The pattern is seen from the right side. Buttonholes: Make buttonholes on the right front as follows: bind off the 4th and 5th sts and cast on 2 new sts over the bound-off sts on the next row when the work measures: 1 cm 7 (8) cm 13.5 (14.5) cm 19.5 (21.5) cm 25.5 (28.5) cm 31.5 (35.5) cm 38 (42) cm and 44 (49) cm Garter st, when knitting flat: Knit all sts, all rows. Garter st, when knitting in the round: *Rnd 1, knit. Rnd 2, purl.* Repeat from * - *. Right side piece: There is a split at the center back; because of this, knit the cardigan in two parts for the first 12 (14) cm. Cast on 125 (133) sts on smaller needles and knit 4 rows garter st. Change to larger needles and knit the next row as follows beginning at the center front: 6 sts garter st (for the button band, knit these sts in garter st throughout), Pattern 1, 103 (111) sts of Pattern 2, 4 sts garter st (for the split placket). Continue with pattern as established. Make buttonholes as instructed above. When the work measures 12 (14) cm bind off the 4 garter sts at the center back and put the work aside. Left side piece: Cast on and work like right side piece, but reversed and without button holes, and do not bind off the 4 sts in garter st mid back. Body: Put both side pieces on the same circular needle with the two sides of the split placket meeting in the center of the row = 246 (262) sts. Attach a marker for each side, fronts = 65 (69) sts each, back = 116 (124) sts. Continue with the pattern as established, but now knit the 4 placket sts from the left side piece into Pattern 2. When the work measures 44 (49) cm bind off 1 st at each center front edge every other row 4 times, and at the same time decrease for the neck inside Pattern 1 (make decreases in Pattern 2 sts) as follows: 1 st 11 (12) times every other row, 1 st 4 times every 4th row, then 1 st 2 times every 6th row. Make decreases as follows: on the right front: slip 1, K 1, psso; and on the left front: K 2 tog. At the same time, when the work measures 46 (50) cm, bind off 2 sts each side of each marker for armholes (4 sts bound off for each armhole), and knit the rest of the front and back separately. Front: Bind off for armholes every other row: 3 sts 2 times, 2 sts 3 (2) times, 1 st 4 times. When all sts have been bound off for the neck and the armholes 26 (31) sts remain on the needles. Bind off when the work measures 69 (74) cm. Back: = 112 (120) sts. Bind off for armholes as on the front = 80 (92) sts. When the work measures 66 (71) cm knit 4 rows garter st over the center 28 (30) sts (keep the rest of the row in pattern st), then bind off the center 24 (26) sts for the neck on the next row. Bind off 1 st 2 times at each neck edge every row inside the 2 edge sts which are knit in garter st throughout. Bind off when the work measures 69 (74) cm. Sleeves: Cast on 48 (48) sts on smaller double pointed needles; join and place a marker at the join. Knit 4 rows garter st. Change to larger double pointed needles and knit Pattern 2, centering the pattern on the sleeve. When the work measures 6 cm, inc 1 st each side of marker 22 (23) times every 4th row = 92 (94) sts. When the work measures 44 (43) cm bind off 2 sts each side of marker, and knit the rest back and forth on the needles. Bind off at each side for sleeve caps every other row: 3 sts 2 times, 2 sts 4 (5) times, 1 st 5 (4) times, 2 sts 5 times, 3 sts 2 times, bind off. The work measures 57 (56) cm. Assembly: Sew shoulder seams. Sew in the sleeves and the buttons. Lay the bound-off placket sts underneath and sew together at the top. You can crochet a row of single crochets around the neck to make a firmer edge. |
||||||||||||||||||||||
Diagram explanations |
||||||||||||||||||||||
|
||||||||||||||||||||||
 |
||||||||||||||||||||||
 |
||||||||||||||||||||||
Have you finished this pattern?Tag your pictures with #dropspattern or submit them to the #dropsfan gallery. Do you need help with this pattern?You'll find 23 tutorial videos, a Comments/Questions area and more by visiting the pattern on garnstudio.com. © 1982-2026 DROPS Design A/S. We reserve all rights. This document, including all its sub-sections, has copyrights. Read more about what you can do with our patterns at the bottom of each pattern on our site. |
||||||||||||||||||||||


With over 40 years in knitting and crochet design, DROPS Design offers one of the most extensive collections of free patterns on the internet - translated to 17 languages. As of today we count 324 catalogues and 12290 patterns translated into English (UK/cm). 12290
We work hard to bring you the best knitting and crochet have to offer, inspiration and advice as well as great quality yarns at incredible prices! Would you like to use our patterns for other than personal use? You can read what you are allowed to do in the Copyright text at the bottom of all our patterns. Happy crafting!
Post a comment to pattern DROPS 60-3
We would love to hear what you have to say about this pattern!
If you want to leave a question, please make sure you select the correct category in the form below, to speed up the answering process. Required fields are marked *.