
Popular categories
Looking for a yarn?


Comments / Questions (35)
![]() Linda F Macdonald wrote:
Linda F Macdonald wrote:
Having difficulty with row row 7 in A2 section...I pulled 1 strand to front as directed ,when you work the next row , when you purl the picked up stitch and pearl stitch together to decrease, should you have 2 strands crossing the 14 stitches or 1 strand. Wish there was a video. :).
27.11.2020 - 02:18DROPS Design answered:
Dear Mrs Macdonald, there will be 2 strands crossing in front of the stitches (the 2 strands from row 7 as you picked the strand). Happy knitting!
27.11.2020 - 07:45
![]() Elísabet Valdimarsdóttir wrote:
Elísabet Valdimarsdóttir wrote:
Hver er munurinn á? x = brugðið - = brugðið
25.01.2020 - 16:57DROPS Design answered:
Blessuð það er enginn munur, bara mismunandi tákn til útskýringar
26.01.2020 - 10:27
![]() YVONNE wrote:
YVONNE wrote:
Bonjour, Après le bonnet 192-24, je commence le TOUR DE COU. Je ne comprends pas la raison de la répartition des 112 m. en 6 X le diagramme A2 et 1X le diagramme A3 sur le même rang. Chaque diagramme fait 16 m. D'avance merci de votre éclaircissement ! Cordialement. Yvonne
04.12.2019 - 17:50DROPS Design answered:
Bonjour Yvonne, les deux diagrammes sont effectivement semblables, mais au 22ème tour, A.3 va se tricoter différemment (parce qu'on le tricote à la fin du tour). Suivez bien les deux diagrammes comme indiqué. Bon tricot!
05.12.2019 - 10:13
![]() Grete Holmsen wrote:
Grete Holmsen wrote:
Jeg skjønner ikke hva jeg skal gjøre når det står: strikk pinnen fra retten inn mellom 15. og 16. maske, 1 kast om pinnen på baksiden av arbeidet, trekk tråden igjennom til retten av arbeidet.....
10.10.2019 - 21:00
![]() Viviana wrote:
Viviana wrote:
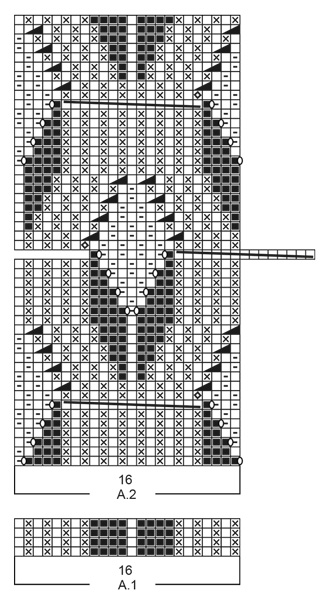
I’m planning to knit this pattern but the symbols don’t make sense, maybe is my tablet, the first is for knitting, second and third for purl. And what about the symbol in the graph with an x? Thank you
21.06.2019 - 06:30DROPS Design answered:
Dear Viviana, 2nd and 3rd symbol both apply to a purl stitch, we choose to have different symbols for the same stitch (= P1), to make the diagram easier to read, the cross x is worked for the rib pattern while the small - is worked for the double moss stitch. Happy knitting!
21.06.2019 - 07:03
![]() Helenne wrote:
Helenne wrote:
Hej. Jeg har mange problemer med at lavet der Hvor Garnet skal om de 15 masker. Forstår ikke helt den med slå om og så det på næsten pinde hvor man skal tage to ind. Hilsen Helene, som meget gerne vil lave denne fine hue.
08.03.2019 - 18:19
![]() Jacinthe wrote:
Jacinthe wrote:
Bonjour, je suis bloquée au rang indiquant « piquer entre la 15e et la 16e maille » ainsi que toute la suite du rang. Pouvez-vous publier une vidéo ou développer davantage l’explication ? Merci par avance, j’aimerais vraiment tricoter ce modèle.
10.01.2019 - 11:33DROPS Design answered:
Bonjour Jacinthe, nous n'avons pas de vidéo pour cette technique, quand vous arrivez à ce symbole, comptez 15 mailles sur l'aiguille gauche, piquez l'aiguille après cette 15ème maille (avant la 16ème = entre 2 mailles), attrapez le fil sur l'envers et ramenez-le sur l'aiguille droite (= vous avez 1 maille en plus), tricotez les 15 m suivantes comme indiqué. Au tour suivant, tricotez ensemble à l'envers cette maille que vous avez relevé au tour précédent ensemble à l'envers avec la maille suivante. Bon tricot!
10.01.2019 - 13:07
![]() Mireille Brault wrote:
Mireille Brault wrote:
Bonjour, je ne comprends pas le rang du diagramme quand on pique entre la 15ième et la 16ieme, là ça va, ensuite où piquer pour faire la maille au_dessus des 14 mailles suivantes???
18.12.2018 - 12:39DROPS Design answered:
Bonjour Mme Brault, quand vous avez ramené le jeté sur l'endroit et que vous avez 1 nouvelle maille, tricotez les 14 m suivantes "normalement": 1 m end, 1 m env et tricotez ensuite 1 m env. Bon tricot!
18.12.2018 - 13:11
![]() Catherine wrote:
Catherine wrote:
Pour ce bonnet, j'ai déjà posé la question: que faire des mailles représentées par un carré noir? Y a-t-il un tuto ( vidéo ) qui montre ce parcours délicat? Merci beaucoup d'avance. Je veux vraiment réaliser ce bonnet.
03.12.2018 - 10:49DROPS Design answered:
Bonjour Catherine, vous trouverez la réponse à votre question ci-dessous: les carrés noirs ne sont pas des mailles, ne vous occupez pas de ces cases et passez directement à la case suivante, elles sont soit encore inexistantes (les augmentations n'ont pas encore été faites), soit elles ont été diminuées (par 2 m ens à l'env dans A.2). Bon tricot!
03.12.2018 - 11:18
![]() Ewa Chojnowska-Rzepińska wrote:
Ewa Chojnowska-Rzepińska wrote:
Wzór czapki jest przepiękny. Mam zaczętą czapkę i doszłam do momentu: = na prawej stronie robótki, wbić drut między 15-te i 16-te oczko, wykonać 1 narzut na lewej stronie robótki, przeciągnąć narzut na prawą stronę robótki (= 1 nowe oczko), przerobić *1 oczko lewe, 1 oczko prawe* ponad 14 następnymi oczkami, 1 oczko lewe (= dodane 1 oczko) , i nie wiem jak to zrobć. Czy mozliwe jest zamieszczenie filmiku, Dziękuję
03.12.2018 - 07:05DROPS Design answered:
Witaj Ewo! Prośba o dodanie video została przesłana do właściwej jednostki i instrukcja powinna się niedługo pojawić na naszej stronie. Pozdrawiamy!
03.12.2018 - 17:40
|
||||||||||||||||||||||||||||
Warm Joy#warmjoyset |
||||||||||||||||||||||||||||
|
|
||||||||||||||||||||||||||||
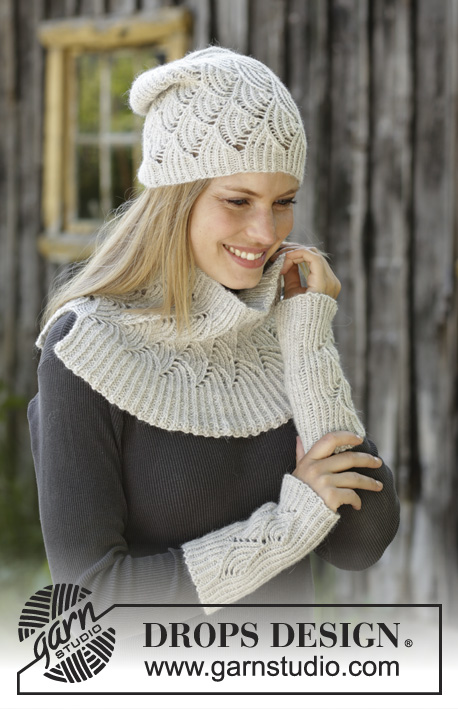
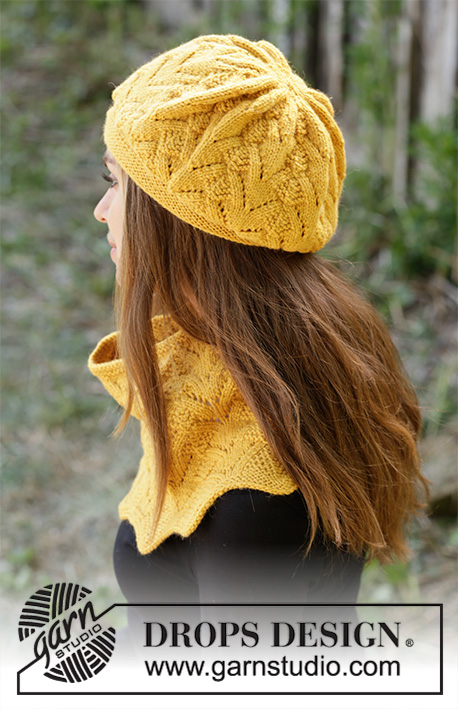
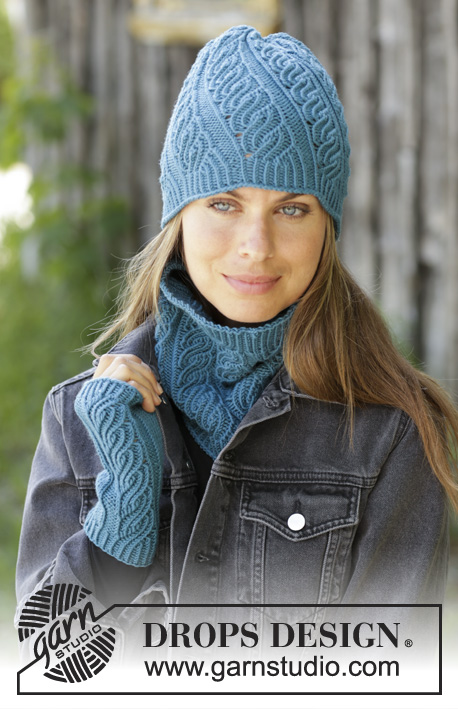
Knitted hat in 1 strand DROPS Alpaca + 1 strand DROPS Kid-Silk. Piece is knitted in the round with rib and lace pattern. Knitted neck warmer in 1 strand DROPS Alpaca + 1 strand DROPS Kid-Silk. Piece is knitted in the round with rib and lace pattern.
DROPS 192-24 |
||||||||||||||||||||||||||||
|
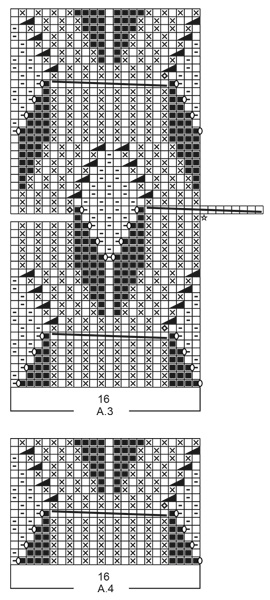
EXPLANATION FOR THE PATTERN: ---------------------------------------------------------- PATTERN: Hat: See diagrams A.1 and A.4. Neck warmer: See diagrams A.1, A.2 and A.3. Diagrams show all rows in pattern seen from the right side. DECREASE TIP: Work until 3 stitches remain before marker thread, knit the next 3 stitches together (= 2 stitches decreased). Repeat at each of the remaining marker threads on round = 16 stitches decreased on round. ---------------------------------------------------------- START THE PIECE HERE: ---------------------------------------------------------- HAT - SHORT OVERVIEW OF THE PIECE: Worked in the round on circular needle. Switch to double pointed needles when needed. HAT: Cast on 80 stitches on circular needle size 5 mm with 1 strand Alpaca and 1 strand Kid-Silk (= 2 strands). Knit 1 round. Then work A.1 (= 16 stitches) 5 times in total on round. Work A.1 2 times in total vertically. REMEMBER THE KNITTING TENSION! Now work pattern A.4 (= 16 stitches) over every repetition of A.1. When A.4 has been worked vertically, continue with knit over knit and purl over purl until piece measures 18 cm from cast-on edge. Now insert 8 marker threads in the piece. Insert first marker thread after 10 stitches (i.e. after a knit stitch), then insert the next 7 marker threads 10 stitches apart. Every marker thread is now after a knit stitch. On next round, decrease 2 stitches before every marker thread (= 16 stitches decreased on round) – read DECREASE TIP! Decrease like this every 6th round 4 times in total = 16 stitches remain on round. Cut the yarn and pull it through the remaining stitches, tighten together and fasten. Hat measures approx. 26 cm. ---------------------------------------------------------- NECK WARMER - SHORT SUMMARY OF PIECE: Worked in the round on circular needle, bottom up. NECK WARMER: Cast on 112 stitches on circular needle size 5 mm with 1 strand Alpaca and 1 strand Kid-Silk (= 2 strands). Knit 1 round. Then work pattern in the round as follows: Work A.1 (= 16 stitches) 7 times in total on round. When A.1 has been worked, continue as follows: A.2 (= 16 stitches) 6 times in total, A.3 (= 16 stitches) 1 time. REMEMBER THE KNITTING TENSION! Continue in the round like this until diagrams have been worked vertically. Now work A.1, 7 repetitions in total on round. Cast off stitches with knit over knit and purl over purl. Fasten off. |
||||||||||||||||||||||||||||
Diagram explanations |
||||||||||||||||||||||||||||
|
||||||||||||||||||||||||||||
 |
||||||||||||||||||||||||||||
 |
||||||||||||||||||||||||||||
Have you finished this pattern?Tag your pictures with #dropspattern #warmjoyset or submit them to the #dropsfan gallery. Do you need help with this pattern?You'll find 17 tutorial videos, a Comments/Questions area and more by visiting the pattern on garnstudio.com. © 1982-2026 DROPS Design A/S. We reserve all rights. This document, including all its sub-sections, has copyrights. Read more about what you can do with our patterns at the bottom of each pattern on our site. |
||||||||||||||||||||||||||||


With over 40 years in knitting and crochet design, DROPS Design offers one of the most extensive collections of free patterns on the internet - translated to 17 languages. As of today we count 324 catalogues and 12290 patterns translated into English (UK/cm). 12290
We work hard to bring you the best knitting and crochet have to offer, inspiration and advice as well as great quality yarns at incredible prices! Would you like to use our patterns for other than personal use? You can read what you are allowed to do in the Copyright text at the bottom of all our patterns. Happy crafting!
Post a comment to pattern DROPS 192-24
We would love to hear what you have to say about this pattern!
If you want to leave a question, please make sure you select the correct category in the form below, to speed up the answering process. Required fields are marked *.