
Popular categories
Looking for a yarn?


Comments / Questions (75)
![]() Julie Klint wrote:
Julie Klint wrote:
Hej Skøn opskrift, men hvordan finder jeg min størrelse her...l/xl eller større....hvad måler jeg efter? Bh Julie
28.01.2024 - 11:43DROPS Design answered:
Hej Julie, Hætten er den samme, omkredsen er hhv 107-115-122cm og længden er 58-60-62 cm
02.02.2024 - 12:19
![]() Sophia wrote:
Sophia wrote:
Can you please also confirm at what point I sew the hood together and which sides are being sewn together? Is this at the end of the project or will I need to sew this together before knitting the ‘body’ part?
24.01.2024 - 17:04DROPS Design answered:
Dear Sophia, when hood is done you will fold the cast on edge double and sew the stitches together = mid top on hood, then sew the sides on mid back (from where you started to work in rows as explained in previous question). Happy knitting!
25.01.2024 - 08:32
![]() Sophie wrote:
Sophie wrote:
Can you please Clarify: At what point I start knitting in the round? After the 28 stitches for the face opening? And whether I should skip the 28 stitches ( I cast for for face opening) and then knit 62 stitches? Also this is not clear: Now divide the piece and work back and forth from here - mid back (this is done so that the seam is mid back). Thank you.
24.01.2024 - 16:57DROPS Design answered:
Dear Sophie, after you have cast on ne new 28 stitches, work the next 62 stitches = mid back, this is now the new beg of the rows so that the seam will be on mid back; now work back and forth from here, the 28 sts are now in the middle of the row. Happy knitting!
25.01.2024 - 08:30
![]() Gaby wrote:
Gaby wrote:
Auch ich habe Probleme mit der Anleitung von 192-2: Nach der Zunahme der 28 M , stricke ich über die 28 M und weitere 62M, dann Arbeit wenden und in Hin-Rückreihen 10 cm stricken. Was wird mit den restlichen Maschen, wann strickt man diese weiter ??? Gibt es eine Zeichnung zur Anleitung ????
03.12.2023 - 18:34DROPS Design answered:
Liebe Gaby, schlagen Sie die 28 neuen Maschen am Ende einer Hin-Reihe dann setzen Sie die Arbeit zusammen in Runden, dh jetzt stricken Sie 62 Maschen rechts (diese Maschen waren früher die ersten Maschen der Hinreihen); dann wenden Sie und stricken alle die 152 Maschen : diese 62 Maschen die Sie gerade gestrickt haben, dann die 28 neuen Maschen und endlich die restlichen 62 Maschen. So jetzt stricken Sie immer noch in Reihen aber von der hinteren Mitte und nicht mehr von der vorderen Mitten. Viel Spaß beim stricken!
04.12.2023 - 08:30
![]() Linda wrote:
Linda wrote:
Hei Hva betyr "Fell av med 2 tråder." ? Har dere noen Instruksjonsvideoer som viser hvordan det gjøres?
26.11.2023 - 18:04DROPS Design answered:
Hei Linda. Ta en titt på denne hjelpevideoen: Hvordan legge opp og felle med 2 tråder mvh DROPS Design
27.11.2023 - 10:04
![]() Julie wrote:
Julie wrote:
Skal man altså strikke ribbekanten fram og tilbake? Så når det står 1 omg vrang, 1 rett, 1 vrang, 1 r, så vil det si 4 omg glattstrikk før man starter ribbestrikk? Eller skal man sy toppen først og plukke opp masker rundt slik at man får 2 riller før ribbestrikk?
26.12.2022 - 13:15DROPS Design answered:
Hei Julie. Nei, vrangborden rundt ansiktsåpningen strikkes rundt. Plukk opp fra retten 158 masker rundt ansiktsåpningen på liten rundpinne. Strikk 1 omgang vrang, 1 omgang rett, 1 omgang vrang, 1 omgang rett. Deretter strikkes det vrangbord (1 rett / 1 vrang) i 6 cm. mvh DROPS Design
02.01.2023 - 11:23
![]() Julie wrote:
Julie wrote:
Dere sier stadig at man skal fortsette til midt bak etter å ha lagt opp de 28 masker, men da får man en halv omgang (de 62 masker etter man har lagt opp) rett på rett. Man har jo nettopp kommet fra en omgang rett på den siden når man legger opp masker på slutten av pinnen. Jeg løste det ved å snu (28+124 masker), bryte tråden og deretter starte en ny omg midt bak, så syr jeg så det ikke blir 'hakk' der til slutt siden jeg ikke fikk samlet maskene på én omgang med en gang.
26.12.2022 - 13:13
![]() Birgit Marx wrote:
Birgit Marx wrote:
Nachdem ich die 27+62 M 10cm hoch gestrickt habe, müssen die übrigen 62 M dann auch separat noch 10cm hoch gestrickt werden, oder gehe ich quasi direkt in die komplette Maschenzahl über? Wir rätseln mittlerweile mit 4 teils sehr geübten Strickerinnen an der Anleitung und können sie uns einfach nicht erklären...vielleicht wären mal 1- 2 Skizzen hilfreich
20.12.2022 - 11:46DROPS Design answered:
Liebe Frau Marx, man soll diese 10 cm über alle Maschen stricken, aber die Reihen beginnen nun ab der Mitte hinten, dh man strickt zuerst 62 M nach den neuen 28 M - hier beginnen jetzt die Reihen und dann wird es über alle die 152 Maschen hin- und zurück gestrickt bis die Arbeit 10 cm nach den neuen Maschen misst (= unter das Kinn). Hoffentlich kann dies Ihnen erklären. Viel Spaß beim stricken!
20.12.2022 - 12:33
![]() Ania wrote:
Ania wrote:
BARDZO dziękuję za odpowiedź. A co należy zrobić z drugą częścią oczek (gdzie nie dobiera się 28 oczek), która pozostaje po podziale tyłu?
01.12.2022 - 15:40DROPS Design answered:
Witaj Aniu, te nabrane oczka to te na środku przodu (dolna część otworu). Następnie łączysz obie części razem z pozostałą częścią (jakbyś miała przerabiać na okrągło). Przerabiasz w tę i z powrotem, szew będzie na środku tyłu (tutaj dzielisz robótkę). Poprosiłam również o schematyczny rysunek do tego wzoru. Pozdrawiamy
05.12.2022 - 14:50
![]() Anna Kucharska wrote:
Anna Kucharska wrote:
Dzień dobry, czy muszę dodać 28 oczek także z drugiej strony?
30.11.2022 - 16:44DROPS Design answered:
Witaj Aniu, nabierasz 28 oczek tylko z jednej strony. Pozdrawiamy!
30.11.2022 - 19:35
|
|
Lawless#lawlesshood |
|
 |
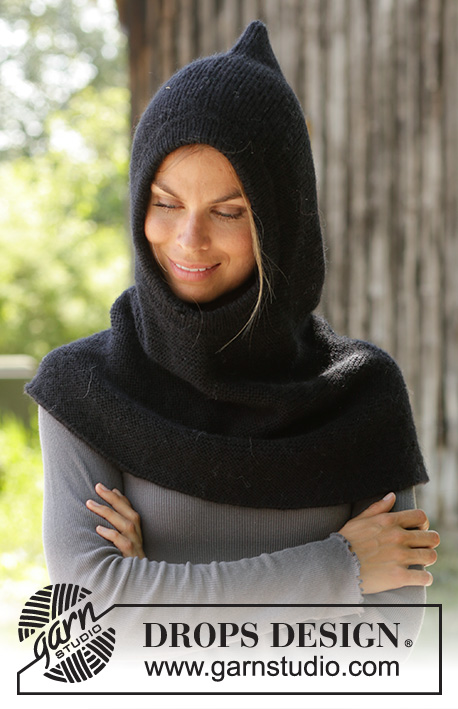 |
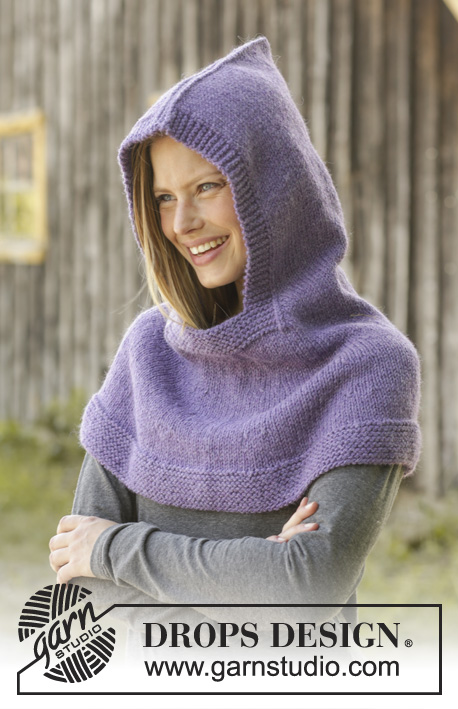
Knitted hooded cowl in DROPS Merino Extra Fine or DROPS Karisma. Piece is knitted top down in garter stitch. Size: S - XXXL
DROPS 192-2 |
|
|
---------------------------------------------------------- EXPLANATION FOR THE PATTERN: ---------------------------------------------------------- GARTER STITCH (back and forth): 1 ridge = knit 2 rows. INCREASE TIP: Work until 1 stitch remains before marker thread, 1 yarn over, knit 2 (marker thread is in the middle of these stitches), 1 yarn over. On next round work yarn over twisted to avoid hole. ---------------------------------------------------------- START THE PIECE HERE: ---------------------------------------------------------- HOODED COWL - SHORT OVERVIEW OF THE PIECE: Worked back and forth on circular needle, top down. At the end the work is sewn together in the back and on top of the hood. HOODED COWL: Cast on 100 stitches on circular needle size 3 mm with Merino Extra Fine or Karisma. Work in GARTER STITCH - read explanation above, back and forth. REMEMBER THE KNITTING TENSION! When piece measures 24 cm, cast on stitches at the end of every row in each side (towards mid front – towards face) as follows: Cast on 1 stitch 2 times and 2 stitches 5 times (= 12 stitches increased in each side) = 124 stitches. At the end of next row cast on 28 stitches at the end of row (towards mid front – under opening for face) = 152 stitches. Knit until mid back on helmet hat by knitting 62 stitches from after the 28 stitches cast on mid front. Now divide the piece and work back and forth from here - mid back (this is done so that the seam is mid back). Work in garter stitch back and forth until piece measures 10 cm from the 28 stitches cast on mid front. Now insert 8 marker threads in the piece as follows: Begin mid back and insert first marker thread after 10 stitches, then insert the next 7 marker threads after 19 stitches, there are now 9 stitches on needle after last marker thread. Continue in garter stitch. On next row from right side, increase 1 stitch on each side of every marker thread - read INCREASE TIP. Increase like this approx. every 3 cm 6-7-8 times in total = 248-264-280 stitches. Work until piece measures 58-60-62 cm in total. Cast off with 2 strands. ASSEMBLY: Sew together helmet hat in outer loop of outermost stitch mid back and along the cast on edge at the top of hood. EDGE AROUND FACE: Pick up from right side 158 stitches around face opening on a short circular needle size 2.5 mm. Purl 1 round, knit 1 round, purl 1 round, knit 1 round. Then work rib (= knit 1/purl 1) for 6 cm. Cast off stitches with knit over knit and purl over purl. Fold edge double towards wrong side and fasten it. |
|
Have you finished this pattern?Tag your pictures with #dropspattern #lawlesshood or submit them to the #dropsfan gallery. Do you need help with this pattern?You'll find 17 tutorial videos, a Comments/Questions area and more by visiting the pattern on garnstudio.com. © 1982-2026 DROPS Design A/S. We reserve all rights. This document, including all its sub-sections, has copyrights. Read more about what you can do with our patterns at the bottom of each pattern on our site. |
|


With over 40 years in knitting and crochet design, DROPS Design offers one of the most extensive collections of free patterns on the internet - translated to 17 languages. As of today we count 324 catalogues and 12290 patterns translated into English (UK/cm). 12290
We work hard to bring you the best knitting and crochet have to offer, inspiration and advice as well as great quality yarns at incredible prices! Would you like to use our patterns for other than personal use? You can read what you are allowed to do in the Copyright text at the bottom of all our patterns. Happy crafting!
Post a comment to pattern DROPS 192-2
We would love to hear what you have to say about this pattern!
If you want to leave a question, please make sure you select the correct category in the form below, to speed up the answering process. Required fields are marked *.