
Popular categories
Looking for a yarn?


Comments / Questions (41)
![]() Coraline wrote:
Coraline wrote:
Merci beaucoup pour votre réponse !
24.04.2019 - 21:33
![]() Coraline wrote:
Coraline wrote:
Bonjour , pour Diminution-2, pourquoi est ce une méthode différente pour diminuer de chaque côté du marqueur ? Pourquoi n’est pas pour les deux cotés en tricotant deux mailles ensemble ? Merci beaucoup
23.04.2019 - 21:19DROPS Design answered:
Bonjour Coraline, on diminue ainsi pour que les diminutions soient inclinées comme on le souhaite. Bon tricot!
24.04.2019 - 09:31
![]() Sielva wrote:
Sielva wrote:
Bonjour, merci pour ce très joli modèle. J'ai un souci pour les explications des manches. Que signifie rabattre 2 m de chaque côté jusqu'à ce que la manche mesure environ 54 cm ? N'y a-t-il pas plutôt un nombre précis de rangs pour lesquels on va rabattre les 2 m ? Merci d'avance pour votre réponse
01.02.2019 - 19:22DROPS Design answered:
Bonjour Sielva, on va rabattre 2 mailles de chaque côté (sur l'endroit et sur l'envers) jusqu'à ce que la manche mesure 54 cm pour que la hauteur soit juste, le nombre de rangs dépendant de votre tension en hauteur, pour l'arrondi de la manche, on va se concentrer sur la hauteur et pas sur le nombre de mailles. Bon tricot!
04.02.2019 - 08:12
![]() Anja M. wrote:
Anja M. wrote:
"Bei einer Gesamtlänge von 60-62-64-64-66-68 cm die ersten 5-5-5-6-6-6 M am Anfang der R, die am vorderen Rand der Jacke beginnt, für den Halsausschnitt stilllegen"... gehe ich recht in der Annahme, daß es sich dabei um die Blendenmaschen handelt? Und bei " GLEICHZEITIG für den Halsausschnitt am Anfang jeder R, die am vorderen Rand beginnt, wie folgt abketten: 2 M 1 x und 1 M 2 x = 21-22-22-22-22-23 M"... ebenfalls die Seite, wo die Blendenmaschen waren, gemeint ist?
03.10.2018 - 21:37DROPS Design answered:
Liebe Anja M., bei dem rechten Vorderteil stricken Sie zuerst eine Hinreihe und die ersten 6 Maschen am Anfang der Reihe stilllegen (diese Maschen zuerst stricken), diese Hinreihe bis zur Ende stricken, wenden, die Rückreihe stricken, und jetzt am Anfang jeder Hinreihe nehmen Sie für den Halsausschnitt ab. Viel Spaß beim stricken!
04.10.2018 - 10:08Celina wrote:
Hola tengo duda con respecto a la lana, ciertamente no soy de las personas que le pica la lana, pero quisiera saber que tan suave al contacto es Eskimo, o con que lana se puede sustituir que sea más suave. gracias
18.09.2018 - 17:54DROPS Design answered:
Hola Celina, Eskimo es una lana que se usa normalmente para fieltrar, compuesta por lana 100%. Por lo tanto no es especialmente suave. Sin embargo, se trata de una lana bastante particular por lo que es díficil sustituirla. Se podría usar Drops Andes, que tiene grosor parecido pero diferente composición, o Big Merino trabajado a doble hilo, para que tenga el mismo grosor que Eskimo. Estas calidades son más suaves pero no van a darle a la prenda el mismo efecto que les daría Eskimo.
29.09.2018 - 20:33
![]() Anja M. wrote:
Anja M. wrote:
Ich möchte gerne diese fantastische Jacke stricken, mag jedoch nicht so gerne Knöpfe. Ob man auch einen Reißverschluss anstatt der Knöpfe einnähen kann? Oder würde sich die Jacke zu sehr verziehen?
16.09.2018 - 16:33DROPS Design answered:
Liebe Anja, wir können leider nicht jede Anleitung nach jeder individuellen Anfrage anpassen, nehmen Sie bitte Kontakt mit Ihrem DROPS Laden auf, Sie werden dann weitere persönnliche HIlfen bekommen. Viel Spaß beim stricken!
17.09.2018 - 09:22
![]() Magdalena Runnfors wrote:
Magdalena Runnfors wrote:
Jag har kommit till knapphålet och får inte ihop bilden på koftan och instruktionen om hur jag gör. Först så ser det ut som att knapphålet ska sitta på höger sida när jag har koftan på mig. Sen förstår jag inte hur jag gör knapphålet enligt mönstret, jag har försökt att kolla på Youtube (såg inte att det fanns video hos er) men hittar ingen som motsvarar mönstret. HJÄLP /Magdalena
01.05.2018 - 16:39DROPS Design answered:
Hej Magdalena, det ser ut som bilden har blivit spegelvänt, du stickar knapphålet på höger framkant, precis som det står i mönstret. KNAPPHÅL: Det avm för knapphål på höger framkant. 1 knapphål = börja från rätsidan, lyft första m som förut, sticka 2 m i nästa m (dvs sticka fram och bak i samma m = 1 m ökad) och sticka de 2 nästa m tills (= 1 m minskad).
17.05.2018 - 15:08
![]() Mimi wrote:
Mimi wrote:
Thanks for your help! I knew I missed something, in this case the two magic words "each side",,, :-)
09.12.2017 - 18:50
![]() Mimi wrote:
Mimi wrote:
I wonder if there is no mistake in the count of stitches for the back piece for L size. Instructions start at 52 st, then dec start at beg of each row as follows: bind off 3 sts 0 times (for L), 2 sts 2 times & 1 st 2 times for a total of 6 sts decrease which should leave 46 sts on needle & not 40 sts as per instructions (which is 12 sts dec). That can happen if 3 sts are bind off 2 times for size L. Am I mistaken or did I misread instructions? Thanks for clarifying
06.12.2017 - 01:47DROPS Design answered:
Dear Mimi, in size L you will bind off at the beg of each row on each side (= both from RS and from WS): 2 sts 2 times and 2 st 1 time = 6 sts will be cast off on each side x 2 sides = 12 sts less = 40 sts remain. Happy knitting!
06.12.2017 - 09:38
![]() Meyers wrote:
Meyers wrote:
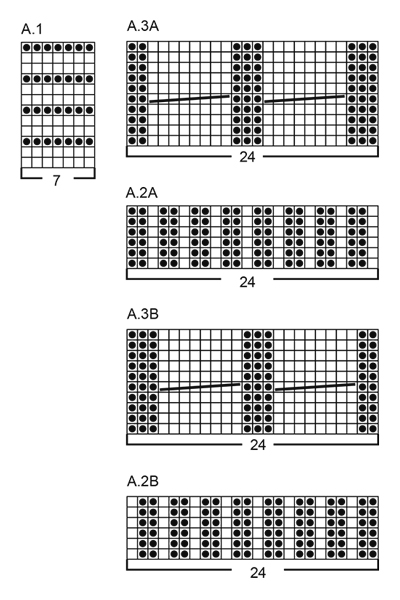
Bonjour Je ne trouve pas le diagramme A3 indiqué dans vos explications, il n'y a que A31et A32 qui sont je suppose les diagrammes juste après les bordures. Dois-je en déduire que A3 fait 3 - 8 - 3 - 8 - 3 ?
11.06.2017 - 13:43DROPS Design answered:
Bonjour Mme Meyers, les diagrammes A.3A (= 24 m) et A.3B (= 24 m) se trouvent entre la légende et le schéma des mesures. Quand on dit de répéter A.3, on répète les 24 m et les 10 rangs de A.3A ou A.3B en fonction de ce qu'on a déjà commencé. Bon tricot!
12.06.2017 - 09:44
|
||||||||||
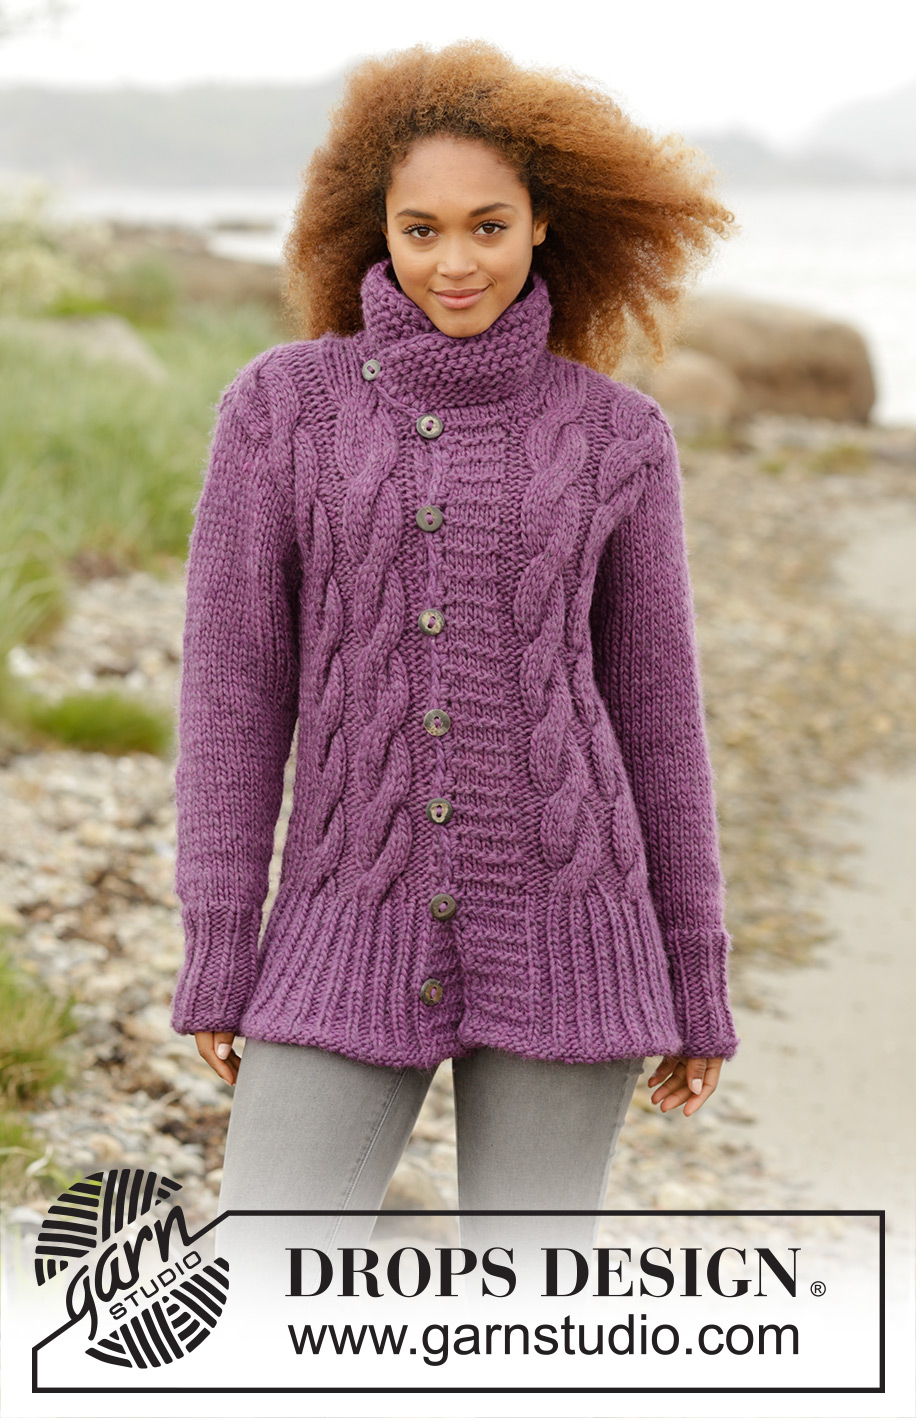
Winter Orchid#winterorchidjacket |
||||||||||
|
|
||||||||||
Knitted DROPS jacket with cables and collar in ”Snow”. Size: S - XXXL.
DROPS 172-39 |
||||||||||
|
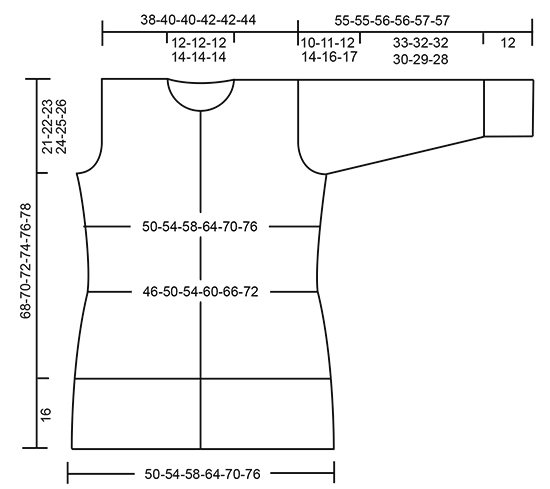
GARTER ST (back and forth): K all rows. 1 ridge = 2 rows K. BAND: Work band in pattern according to diagram A.1 until finished measurements - NOTE: Slip first st at beg of every row from mid front (as if to K). PATTERN: See diagrams A.1 to A.3. The diagrams show all rows in pattern seen from RS. DECREASE TIP-1: To calculate how often dec should be done, use the total no of sts on row (e.g. 73 sts) and divide by no of dec to be done (e.g. 13) = 5.6. I.e. in this example work alternately approx. every 4th and 5th st and every 5th and 6th st tog. DECREASE TIP-2 (applies to sides of body): All dec are done from RS! Beg 4 sts before marker and K 2 tog, K 4 (marker is between these 4 sts), slip 1 st as if to K, K 1, psso (= 2 sts dec). INCREASE TIP (applies to sides on body and mid under sleeve): Work until 2 sts remain before marker: Make 1 YO, K 4 (marker is in the middle of these 4 sts), make 1 YO (= 2 sts inc). On next row/round work YOs twisted to avoid holes - work inc sts in stocking st. BUTTONHOLES: Dec for buttonholes on right band. 1 buttonhole = beg from RS, slip first st as before, work 2 sts in next st (i.e. work front and back in same st = 1 st inc) and work the next 2 tog (= 1 st dec). Dec for buttonholes when piece measures: SIZE S: 5, 14, 23, 32, 41, 50 and 59 cm SIZE M: 7, 16, 25, 34, 43, 52 and 61 cm SIZE L: 9, 18, 27, 36, 45, 54 and 63 cm SIZE XL: 7, 15, 23, 31, 39, 47, 55 and 63 cm. SIZE XXL: 9, 17, 25, 33, 41, 49, 57 and 65 cm. SIZE XXXL: 11, 19, 27, 35, 43, 51, 59 and 67 cm. ---------------------------------------------------------- JACKET: Work back and forth on circular needle from mid front up to armholes. Then finish front and back piece separately. Work sleeves in the round on double pointed needle/a short circular needle and work from bottom up. BODY: Cast on 135-147-156-168-183-195 sts (incl 7 band sts in each side towards mid front) on circular needle size 8 mm with Snow. Work first row as follows from RS: Work 7 sts BAND - see explanation above - work rib according to diagram A.2A (= 24 sts), * K 1, P 2 *, repeat from until 32 sts remain on needle, K 1, A.2B (= 24 sts) and finish with 7 sts band. Continue rib like this with 7 band sts in each side towards mid front – remember BUTTONHOLES on right band – see explanation above. When piece measures 16 cm, work next row as follows from RS: 7 band sts as before, work A.3A (= 24 sts), work in stocking st over the next 73-85-94-106-121-133 sts AT THE SAME TIME dec 13-17-18-18-21-21 sts evenly over these sts – READ DECREASE TIP-1, work A.3B (= 24 sts) and finish with 7 band sts as before = 122-130-138-150-162-174 sts. Switch to circular needle size 9 mm. Insert 2 markers in the piece; 36-38-40-43-46-49 sts in from each side (= 50-54-58-64-70-76 sts between markers on back piece). Continue in stocking st + A.3 and 7 band sts in each side towards mid front. REMEMBER THE KNITTING TENSION When piece measures 18 cm in all sizes, dec 1 st on each side of both markers - READ DECREASE TIP-2 (= 4 sts dec). Repeat dec when piece measures 28 cm in all sizes = 114-122-130-142-154-166 sts. When piece measures 34 cm in all sizes, inc 1 st on each side of both markers - READ INCREASE TIP (= 4 sts inc). Repeat inc when piece measures 42-42-44-44-46-46 cm = 122-130-138-150-162-174 sts. When piece measures 47-48-49-50-51-52 cm, work next row from WS as follows: Work as before over the first 33-35-37-40-43-46 sts (= left front piece), cast off 6 sts for armhole (i.e. 3 sts on each side of marker), work stocking st over the next 44-48-52-58-64-70 sts (= back piece), cast off 6 sts for armhole and work as before over the remaining 33-35-37-40-43-46 sts (= right front piece). Finish front and back piece separately. RIGHT FRONT PIECE: = 33-35-37-40-43-46 sts. Continue back and forth with 7 band sts, A.3A and stocking st. AT THE SAME TIME cast off for armhole at beg of every row from the side as follows: Cast off 3 sts 0-0-0-0-1-1 time, 2 sts 1-1-2-3-3-3 times, and 1 st 1-2-2-2-2-4 times = 30-31-31-32-32-33 sts on needle. Continue pattern as before with 0-0-0-1-1-2 sts in stocking st towards the armhole - NOTE: In size S there is now 1 st less in A.3A towards armhole. When piece measures 60-62-64-64-66-68 cm, slip the first 5-5-5-6-6-6 sts at beg of row from mid front on 1 stitch holder for neck (work them before slipping them on stitch holder to avoid cutting the yarn). Continue with the pattern as before while AT THE SAME TIME cast off for neck at beg of every row from mid front as follows: Cast off 2 sts 1 time and 1 st 2 times = 21-22-22-22-22-23 sts. Work until 2 rows remain before piece measures approx. 68-70-72-74-76-78 cm, adjust so that next row is worked from RS. On next row work sts in the two cables K tog 2 by 2 (= 8 sts dec) = 13-14-14-14-14-15 sts remain on shoulder. K 1 row from WS and cast off with K from RS. Piece measures approx. 68-70-72-74-76-78 cm from shoulder and down. LEFT FRONT PIECE: = 33-35-37-40-43-46 sts. Work as right front piece but reversed (i.e. continue in stocking st, A.3B and 7 band sts). BACK PIECE: 44-48-52-58-64-70 sts. Work in stocking st back and forth over all sts AT THE SAME TIME cast off for armholes at beg of every row in each side as follows: Cast off 3 sts 0-0-0-0-1-1 time, 2 sts 1-1-2-3-3-3 times, and 1 st 1-2-2-2-2-4 times = 38-40-40-42-42-44 sts on needle. Continue to work until piece measures 66-68-70-72-74-76 cm. Now cast off the middle 10-10-10-12-12-12 sts for neck and finish each shoulder separately. Cast off 1 st on next row from neck = 13-14-14-14-14-15 sts remain on the shoulder. Work until 1 rows remain before piece measures approx. 68-70-72-74-76-78 cm, adjust so that next row is worked from WS. K 1 row from WS and cast off with K from RS. Repeat on the other shoulder. SLEEVE: Work in the round on double pointed needles bottom up, switch to a short circular needle when needed. Cast on 24-27-27-27-30-30 sts on double pointed needles size 8 mm with Snow. Work rib in the round (= K 1/P 2). When rib measures 12 cm, K 1 round while dec 4-5-3-3-4-4 sts evenly = 20-22-24-24-26-26 sts. Insert 1 marker at beg of round (= mid under sleeve) and move the marker upwards. Switch to double pointed needles size 9 mm and work in stocking st. When piece measures 14-14-14-13-13-15 cm, inc 1 st on each side of marker – READ INCREASE TIP (= 2 sts inc). Inc like this every 3½-3½-3½-3-2½-2 cm 9-9-9-10-11-12 times in total = 38-40-42-44-48-50 sts. When piece measures 45-44-44-42-41-40 cm (shorter measurements in the larger sizes because of longer sleeve cap and wider shoulders), cast off the middle 6 sts mid under sleeve and work sleeve back and forth on circular needle until finished measurements. Continue with stocking st and cast off for sleeve cap at beg of every row in each side as follows: Cast off 2 sts 2 times in all sizes, 1 st 2-2-2-4-5-6 times. Then cast off 2 sts in each side until piece measures approx. 54-54-55-55-56-56 cm, then cast off 3 sts 1 time in each side. Cast off the remaining sts, sleeve measures approx. 55-55-56-56-57-57 cm. Knit another sleeve. ASSEMBLY: Sew the shoulder seams. NECK EDGE: Pick up from RS approx. 40 to 48 sts around the neck (incl sts on stitch holders at the front) on circular needle size 8 mm with Snow. K 1 row from WS while at the same time inc evenly to 48-50-52-54-56-58 sts. Work 3 rows in stocking st, K 1 row from WS and 3 rows in stocking st, then cast off. Fold the neck edge double towards the WS and fasten with neat stitches. COLLAR: Beg from RS and pick up 1 st in every P st where neck edge was folded on circular needle size 9 mm with 1 strand Snow = 48-50-52-54-56-58 sts. Then work in garter st back and forth with 2 strands in Snow. AT THE SAME TIME on first row from RS inc 1 st inside 1 edge st in each side (inc 1 st by making 1 YO, on next row K YO twisted to avoid holes). Inc like this every other row (i.e. every row from RS), 4 times in total = 56-58-60-62-64-66 sts. When collar measures 8-9-10-10-11-11 cm, cast off with K from RS. CROCHET BORDER: Work a finishing edge along front pieces and around collar on hook size 8 mm with 1 strand Snow as follows: Beg from RS at the bottom of right front piece, work 1 dc in first st, * 1 ch, skip 1 st/row, 1 dc in next st/row *, repeat from *-* up along entire right front piece, around the collar and then along left front piece. Fasten off. MORE ASSEMBLY: Sew in the sleeves inside 1 edge st. Sew the buttons on to left front piece. Sew on the small button approx. 8-9-10-10-11-11 cm from the top along neck line. Button this through crochet edge in the corner on collar - see picture. |
||||||||||
Diagram explanations |
||||||||||
|
||||||||||
 |
||||||||||
 |
||||||||||
Have you finished this pattern?Tag your pictures with #dropspattern #winterorchidjacket or submit them to the #dropsfan gallery. Do you need help with this pattern?You'll find 30 tutorial videos, a Comments/Questions area and more by visiting the pattern on garnstudio.com. © 1982-2026 DROPS Design A/S. We reserve all rights. This document, including all its sub-sections, has copyrights. Read more about what you can do with our patterns at the bottom of each pattern on our site. |
||||||||||


With over 40 years in knitting and crochet design, DROPS Design offers one of the most extensive collections of free patterns on the internet - translated to 17 languages. As of today we count 324 catalogues and 12245 patterns translated into English (UK/cm). 12245
We work hard to bring you the best knitting and crochet have to offer, inspiration and advice as well as great quality yarns at incredible prices! Would you like to use our patterns for other than personal use? You can read what you are allowed to do in the Copyright text at the bottom of all our patterns. Happy crafting!
Post a comment to pattern DROPS 172-39
We would love to hear what you have to say about this pattern!
If you want to leave a question, please make sure you select the correct category in the form below, to speed up the answering process. Required fields are marked *.