
Popular categories
Looking for a yarn?


Comments / Questions (36)
![]() Christine wrote:
Christine wrote:
Danke, aber das verstehe ich nicht. Welche Hinreihe kommt denn noch vor A.7 ? A.7 beginnt doch mit einer Hinreihe, die aber mit festen Maschen anfängt. Wenn es also mit A.7 weitergeht (wie es im Text steht), müßte die Blende mit 4 festen Maschen (und nicht mit Stäbchen) gehäkelt werden. So steht es doch bei BITTE BEACHTEN. Viele Grüße !
28.10.2024 - 11:00DROPS Design answered:
Liebe Christine, deshalb habe ich unser Design Team darüber weitergefragt, häkeln Sie beim linken Vorderteil genauso wie Sie beim rechten Vorderteil gehäkelt haben, damit beide Vorderteile spiegelverkehrt sind, und dann mit einer Reihe feste Masche beginnen, wenn es so gemacht wurde. Viel Spaß beim Häkeln!
28.10.2024 - 13:11
![]() Christine wrote:
Christine wrote:
Beim linken Vorderteil soll man in der letzten Reihe ( also von 4c bis 6c ) am Ende der Reihe die entsprechende Anzahl Luftmaschen einschließlich 3 Wendeluftmaschen häkeln. Warum ? Die nächste Reihe in A7 bzw. A9 beginnt doch laut Diagramm ( anders als im Text ! ) mit festen Maschen, also würde doch eine Wendeluftmasche reichen, oder ? Die Reihe mit dem Sternchen davor wird doch nicht mitgehäkelt, oder ? Viele Grüße !
26.10.2024 - 19:27DROPS Design answered:
Liebe Christine, beim linken Vorderteil wir die nächste Reihe eine Hinreihe sein, die mit 4 Stäbchen beginnt, dann wird erst A.7 gehäkelt, also entweder Stäbchen oder festen Maschen wie unter BITTE BEACHTEN. Viel Spaß beim Häkeln!
28.10.2024 - 08:35
![]() Christine wrote:
Christine wrote:
Danke für die Erklärung ! Wenn ich das richtig verstanden habe, wird es genau so gemacht, wie ich es vermutet habe. Viele Grüße !
21.10.2024 - 19:34
![]() Christine wrote:
Christine wrote:
Danke für die Auskunft, genau so sieht es bei mir aus : an beiden Rändern habe ich jetzt jeweils zwei Stäbchen ( also anders als auf dem Diagramm abgebildet ). Aber wie geht es weiter, wenn man A7b bis A9b 1x gehäkelt hat ? A7a, A8a, A9a, anschließend das Muster dazwischen, dann erneut A7b bis A9b und danach wieder von vorn? Ist das so gemeint ?
18.10.2024 - 21:49DROPS Design answered:
Liebe Christine, von der Vorderseite gesehen häkeln Sie: A.7b, dann A.8b wiederholen und mit A.9b enden - wenn das "b" Teil von den Diagrammen gehäkelt ist, wird man die Diagramme ab der 1. Reihe wiederholen (dh 1. Reihe "a" gennant bis letzte Reihe "b" gennant = die 14 Reihen). Viel Spaß beim Häkeln!
21.10.2024 - 07:45
![]() Christine wrote:
Christine wrote:
Nachdem die rechte mit der linken Schulter verbunden ist, soll man von A7b über A8b zu A9b häkeln. Dann hat man aber am Anfang der Reihe zwei, am Ende jedoch nur ein Stäbchen, d.h. die äußeren Ränder sind nicht gleich. Ist das wirklich so gedacht ? Man könnte beim Zusammenhäkeln der Schultern doch in der Mitte ein Stäbchen mehr (also 40) häkeln, dann würde das Muster besser aufgehen, oder ? Viele Grüße !
17.10.2024 - 21:50DROPS Design answered:
Liebe Christine, die 2 ersten Stäbchen wenn man A.2b häkelt sind jetzt A.7b und das letzte Stäbchen vom letzten Rapport + das letzte Stäbchen der Reihe sind jetzt am Ende A.9b; dazwischen wird man A.8b häkeln, und das Muster ist beidseitig symmetrisch. Viel Spaß beim Häkeln!
18.10.2024 - 08:25
![]() Christine wrote:
Christine wrote:
Danke für die schnelle Antwort ! Ich habe es ausprobiert : Ohne die zwei Anfangsstäbchen bei der rechten Schulter kommt man mit A4b bis A6b trotzdem zu dem gleichen Ergebnis. Viele Grüße !
17.10.2024 - 18:39
![]() Christine wrote:
Christine wrote:
Beim Zusammenhäkeln der Schultern beginnt man links mit A1b bis A3b. Ist es nicht eindeutiger, daß man die rechte Schulter dann mit A4b bis A6b anfügt und nicht A2b wie im Text ? Das Stäbchen in A5b sitzt doch gespiegelt zu A2b, oder ? Viele Grüße !
15.10.2024 - 11:26DROPS Design answered:
Liebe Christine, die Muster sollen aber so gehäkelt damit es weiter geht, dh zuerst 1 Stb in je die 2 ersten Stb vom rechten Schulter, dann mit A.2b weiter häkeln und mit 1 Stäbchen in der letzte Masche (A.6a) enden. Viel Spaß beim Häkeln!
15.10.2024 - 13:23
![]() Julia wrote:
Julia wrote:
What does it mean to vent? The instructions says to go back and forth after venting, but how do I vent?
24.07.2024 - 21:36DROPS Design answered:
Hi Julia, there is a split on one side of the skirt, like in an ordinary skirt (where the zip is sawn). Happy crocheting!
26.07.2024 - 14:44
![]() Hannelore Van Hauwermeiren wrote:
Hannelore Van Hauwermeiren wrote:
Hoe kan ik dan van 17 losse naar 32 stokjes gaan als ik enkel de laatste toer van a3c tot a1c moet haken?
08.03.2023 - 19:07DROPS Design answered:
Dag Hannelore,
Als ik het goed begrijp ben je bij het rechter voorpand waar staat dat je 17 lossen moet haken en dan de laatste toer van A.3c tot A.1C moet haken. Het is niet de bedoeling om de laatste toer in die 17 stokjes te haken, maar na die stokjes haak je verder in de vorige toer van A.3C tot A.1C, dus de 17 stokjes bungelen ernaast.
08.03.2023 - 20:17
![]() Hannelore Van Hauwermeiren wrote:
Hannelore Van Hauwermeiren wrote:
Ik zit in de knoop bij het patroon rechtervoorpand. Er staat haal 17 l en dan laatste toer van ac3 tor ac1= 32 st en 17l. Als ik het patroon colg zijn dit enkel stokjes?
08.03.2023 - 00:34DROPS Design answered:
Dag Hannelore,
Ja dat klopt hoor. De laatste toer zijn enkel stokjes. Let er bij A.3 op dat je de laatste 3 stokjes in 1 steek haakt.
08.03.2023 - 12:00
|
|||||||||||||||||||||||||||||||
Daniella#daniellacardigan |
|||||||||||||||||||||||||||||||
 |
 |
||||||||||||||||||||||||||||||
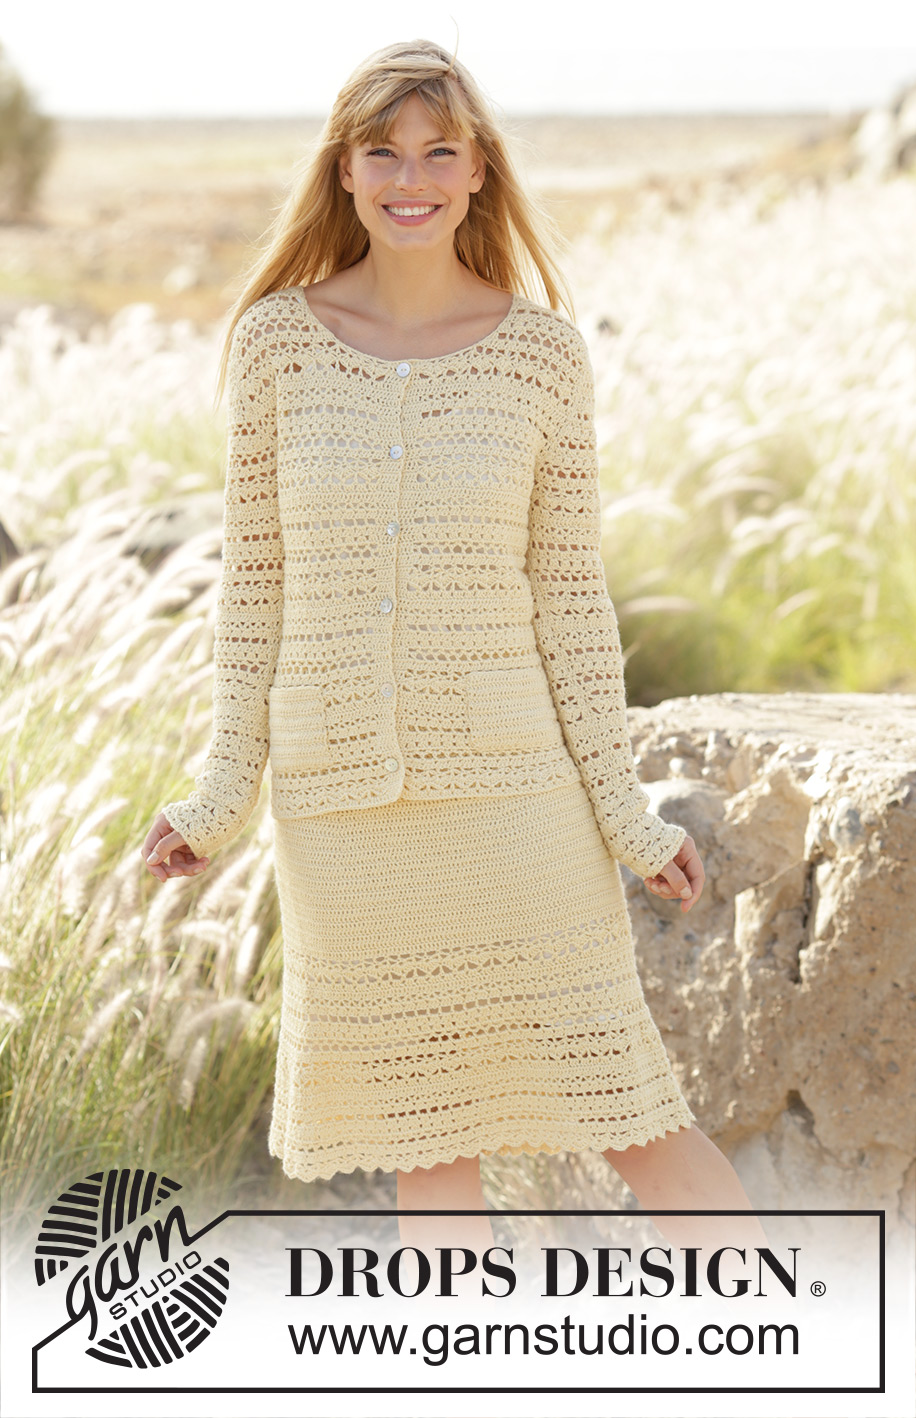
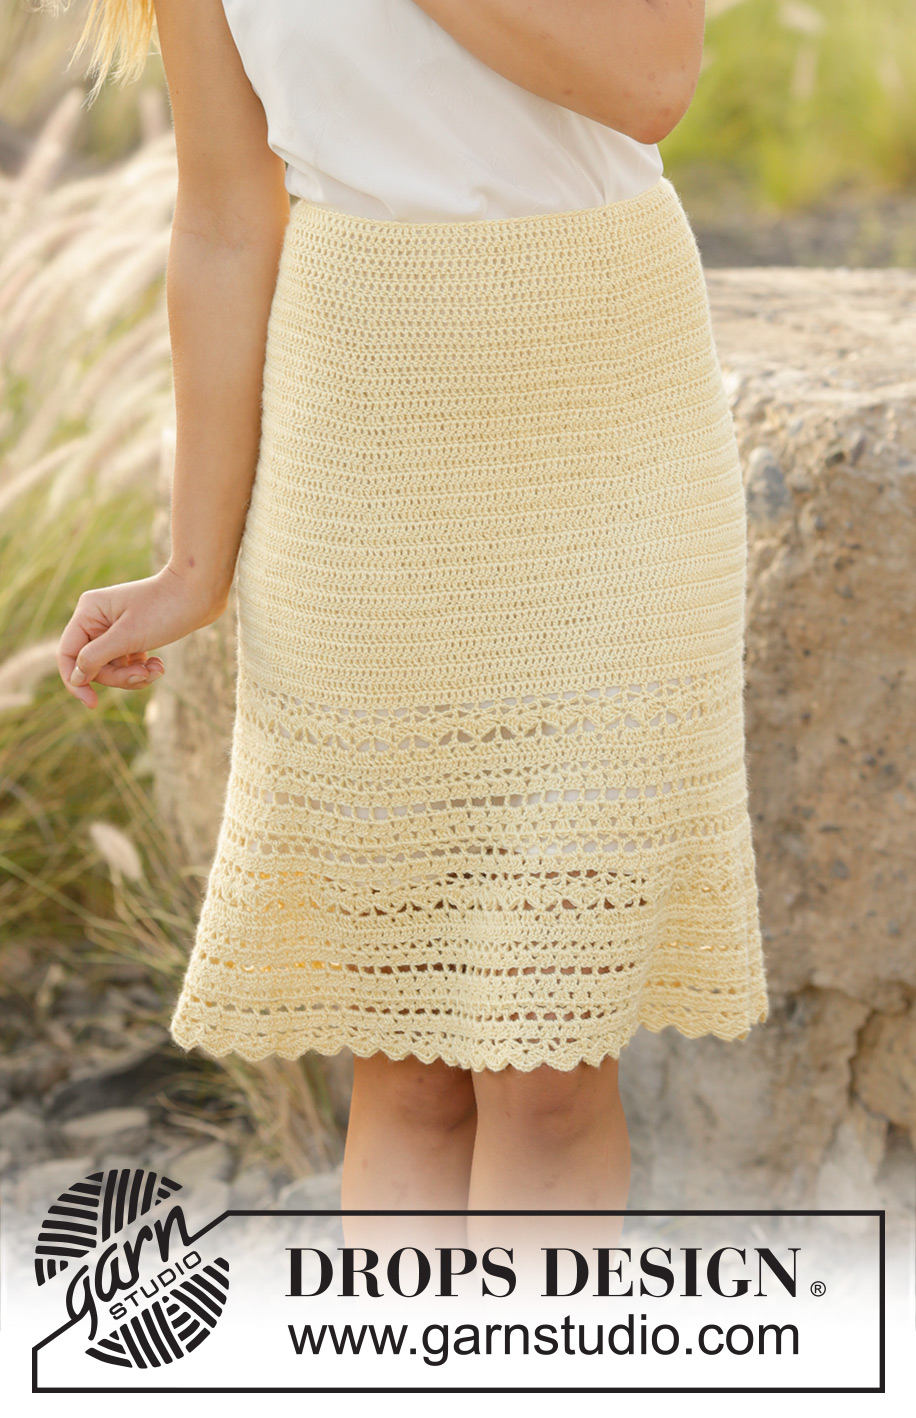
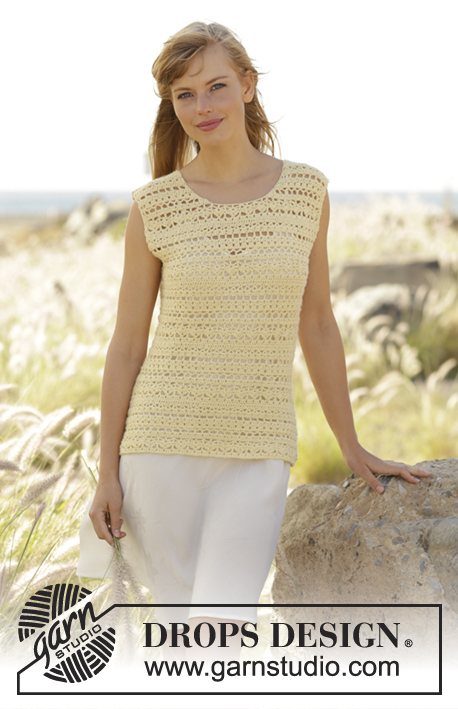
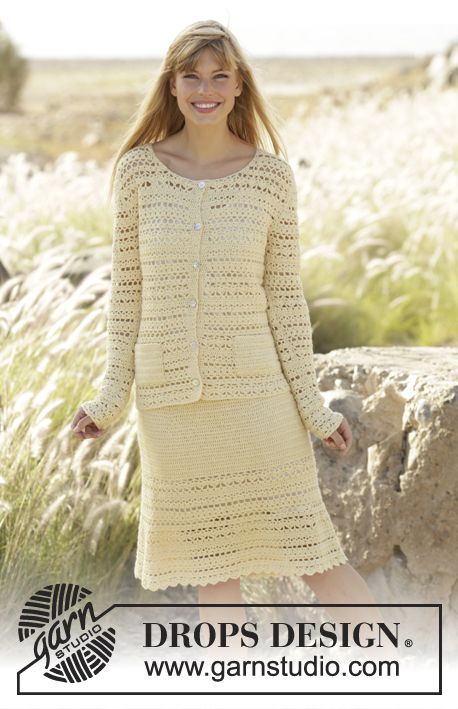
Crochet DROPS jacket with pockets and skirt with lace and fan pattern, worked top down in ”Alpaca”. Size: S - XXXL.
DROPS 170-31 |
|||||||||||||||||||||||||||||||
|
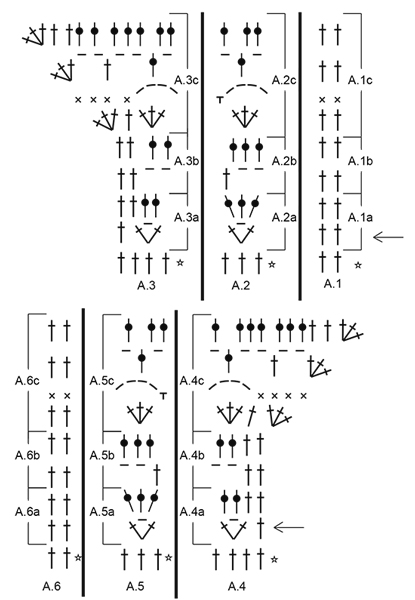
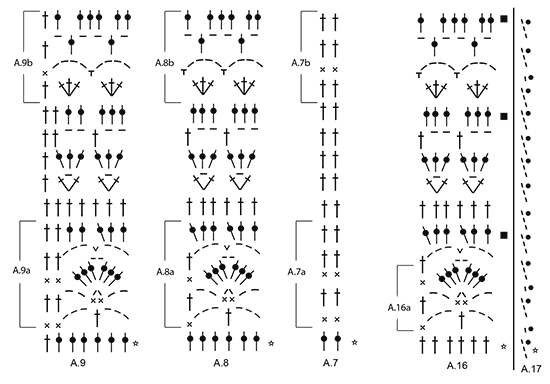
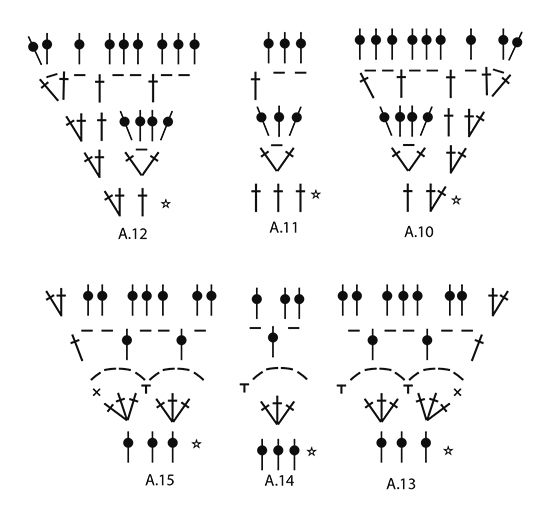
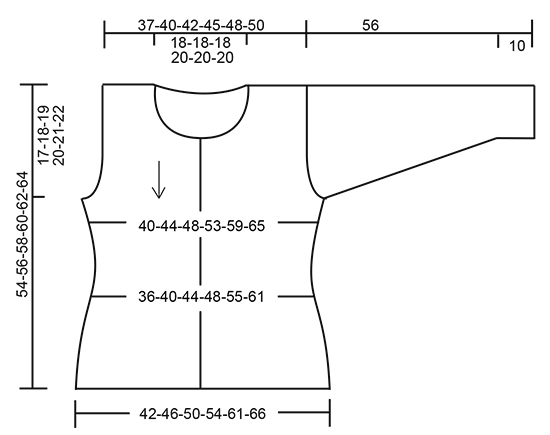
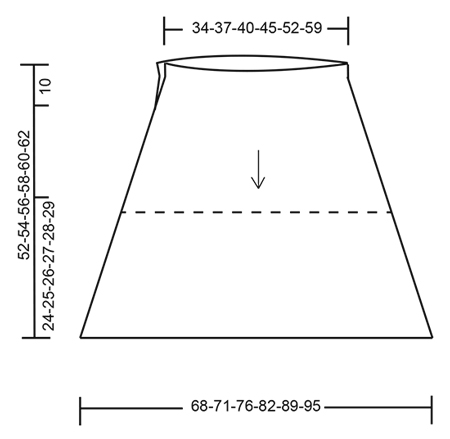
PATTERN: See diagrams A.1 to A.15. CROCHET INFO: On every tr row replace first tr with 3 ch. On every dc row replace first dc with 1 ch. DECREASE TIP: Work until 5 tr remain before markers in the side, work the next 2 tr tog, work 1 tr in each of the next 2 tr, work the next 2 tr tog, work 1 tr in each of the next 2 tr, work the next 2 tog (= 3 tr dec at each marker = 6 tr dec in total). INCREASE TIP: Work until 4 tr remain before markers in the side, work 2 tr in next tr, work 1 tr in each of the next 2 tr, work 2 tr in next tr, work 1 tr in each of the next 2 tr, work 2 tr in next tr (= 3 tr in at each marker = 6 tr inc in total). ---------------------------------------------------------- JACKET: Worked top down, back and forth. BACK PIECE: RIGHT SHOULDER: Work 27-31-35-35-39-42 ch on hook size 3.5 mm with Alpaca. Work next row as follows: Work 1 tr in 4th ch from hook (= 2 tr) - READ CROCHET INFO, 1 tr in each of the next 3-2-1-1-0-3 ch, * skip 1 ch, 1 tr in each of the next 4 ch *, repeat from *-* = 21-24-27-27-30-33 tr. Then work next row from RS as follows: Work A.4a over the first 4 tr, repeat A.5a over the next 15-18-21-21-24-27 tr (= 5-6-7-7-8-9 times in total in width), A.6a over the last 2 tr. When A.4a and A.6a have been worked 1 time vertically (= last row is from WS). Put piece aside and work left shoulder. REMEMBER THE CROCHET TENSION! LEFT SHOULDER: Work 27-31-35-35-39-42 ch on hook size 3.5 mm with Alpaca. Work next row as follows: Work 1 tr in 4th ch from hook (= 2 tr), 1 tr in each of the next 3-2-1-1-0-3 ch, * skip 1 ch, 1 tr in each of the next 4 ch *, repeat from *-* = 21-24-27-27-30-33 tr. Then work next row from RS as follows: Work A.1a over the first 2 tr, repeat A.2a over the next 15-18-21-21-24-27 tr (= 5-6-7-7-8-9 times in total in width), A.3a over the last 4 tr. When A.1a to A.3a have been worked 1 time vertically, work left shoulder tog with right shoulder from RS as follows: BACK PIECE: SIZE S-M: Work A.1b over the first 2 tr on left shoulder, repeat A.2b over the next 18-21 tr, 1 tr in last tr on left shoulder, work 39-39 ch for neck, work 1 tr in each of the first 2 tr on right shoulder, repeat A.2b over the next 18-21 tr and 1 tr in last tr over right shoulder as before = 42-48 tr and 39-39 ch on row. On next row work pattern as before but work 1 tr in every ch = 81-87 tr. SIZE L-XL-XXL-XXXL: Work A.1a over the first 2 tr on left shoulder, repeat A.2a over the next 24-24-27-30 tr, 1 tr in last tr on left shoulder, work 39-45-45-45 ch for neck, work 1 tr in first tr on right shoulder, repeat A.5a over the next 24-24-27-30 tr and A.6a over the last 2 tr on right shoulder as before = 54-54-60-66 tr and 39-45-45-45 ch on row. On next row work pattern as before but work 1 tr in every ch = 93-99-105-111 tr. When A.1a and A.6a have been worked 1 time vertically, work as follows from RS: Work 1 tr in each of the first 2 tr, repeat A.2b until 1 tr remains, finish with 1 tr in last tr. Repeat A.2b 1-1-2-2 times in total. ALL SIZES: = 81-87-93-99-105-111 tr. Work as follows from RS: A.7b over the first 2 tr, repeat A.8b over the next 72-78-84-90-96-102 tr (= 12-13-14-15-16-17 times in total in width), finish with A.9b over the last 7 tr. When A.7b to A.9b have been worked 1 time vertically, repeat A.7 over A.7b, A.8 over A.8b and A.9 over A.9b vertically. SIZE L-XL-XXL-XXXL: When piece measures 17-18-16-16 cm, inc 1 tr in each side of piece by working 2 tr in first and last tr (= 2 tr inc). Repeat inc on every row 1-1-5-6 more times (= 4-4-12-14 tr inc in total). Work the inc tr into pattern. Work sts that do not fit pattern as A.7. After inc piece measures approx. 19-20-21-22 cm. ALL SIZES: When piece measures 17-18-19-20-21-22 cm – adjust so that next row is from RS and is a row with tr (in diagram A.8), fasten off. Put piece aside and work front piece. RIGHT FRONT PIECE: Work 27-31-35-35-39-42 ch on hook size 3.5 mm with Alpaca. Work next row as follows: Work 1 tr in 4th ch from hook (= 2 tr), 1 tr in each of the next 3-2-1-1-0-3 ch, * skip 1 ch, 1 tr in each of the next 4 ch *, repeat from *-* = 21-24-27-27-30-33 tr. Then work next row from RS as follows: Work A.1a over the first 2 tr, repeat A.2a over the next 15-18-21-21-24-27 tr (= 5-6-7-7-8-9 times in total in width), A.3a over the last 4 tr. Repeat A.1a to A.3a vertically 1-1-2-2-2-2 times in total. Then work A.1b over A.1a, A.2b over A.2a and A.3b over A.3a. Repeat A.1b to A.3b vertically 1-1-1-1-2-2 times in total. Work A.1c over A.1b, A.2c over A.2b and A.3c over A.3b. Cut and fasten the yarn when 1 row remains in diagram. Work 14-17-14-20-17-20 loose ch in hook size 3.5 mm with Alpaca, work last row of diagram A.3c to A.1c from WS = 29-32-35-35-38-41 tr and 14-17-14-20-17-20 ch. On next row work as follows from RS: Work A.7 over the first 2 tr, repeat A.8 over the next 30-36-36-42-42-48 tr/ch (= 5-6-6-7-7-8 times in total in width), A.9 over the next 7 ch, finish with 1 tr in each of the last 4 ch (= band). NOTE: Work band as A.7, i.e. on rows with dc work band in dc and on rows with tr work band in tr. SIZE L-XL-XXL-XXXL: When piece measures 17-18-16-16 cm, inc 1 tr in the side of piece by working 2 tr in first tr from RS and last tr from WS (= 1 tr inc per row). Repeat inc on every row 1-1-5-6 more times (= 2-2-6-7 tr inc in total). Work the inc tr into pattern. Work sts that do not fit pattern as A.7. After inc piece measures approx. 19-20-21-22 cm. ALL SIZES: Continue pattern like this. When piece measures 17-18-19-20-21-22 cm, adjust pattern according to back piece, fasten off. Put piece aside and work left front piece. LEFT FRONT PIECE: Work 27-31-35-35-39-42 ch on hook size 3.5 mm with Alpaca. Work next row as follows: Work 1 tr in 4th ch from hook (= 2 tr), 1 tr in each of the next 3-2-1-1-0-3 ch, * skip 1 ch, 1 tr in each of the next 4 ch *, repeat from *-* the entire row = 21-24-27-27-30-33 tr. Then work next row from RS as follows: Work A.4a over the first 4 tr, repeat A.5a over the next 15-18-21-21-24-27 tr (= 5-6-7-7-8-9 times in total in width), A.6a over the last 2 tr. Repeat A.4a to A.6a vertically 1-1-2-2-2-2 times in total. Then work A.4b over A.4a, A.5b over A.5a and A.6b over A.6a. Repeat A.4b to A.6b vertically 1-1-1-1-2-2 times in total. Work A.4c over A.4b, A.5c over A.5b and A.6c over A.6b. On last row in diagram A.4c to A.6c work 17-20-17-23-20-23 ch (incl 3 ch to turn with) at the end of row from WS = 29-32-35-35-38-41 tr and 17-20-17-23-20-23 ch. On next row work as follows from RS: Work 1 tr in 4th ch from hook, 1 tr in each of the next 3 ch (= band), A.7 over the next 2 ch, repeat A.8 over the next 30-36-36-42-42-48 ch/tr (= 5-6-6-7-7-8 times in total in width), finish with A.9 over the last 7 tr. Continue pattern like this. NOTE: Work band as A.7, i.e. on rows with dc work band in dc and on rows with tr work band in tr. SIZE L-XL-XXL-XXXL: When piece measures 17-18-16-16 cm (adjust according to back piece), inc 1 tr in the side of piece by working 2 tr in first tr from WS and last tr from RS (= 1 tr inc per row). Repeat inc on every row 1-1-5-6 more times (= 2-2-6-7 tr inc in total). Work the inc tr into pattern. Work sts that do not fit pattern as A.7. After inc piece measures approx. 19-20-21-22 cm. ALL SIZES: When piece measures 17-18-19-20-21-22 cm, adjust pattern according to back piece, fasten off. BODY: Now work the parts tog as follows from RS: Work from left front piece, over back piece and then over right front piece. Work 1 tr in each of the first 4 tr (= left band), work A.7-A.9 over left front piece as before, work 9-9-11-11-15-16 loose ch for armhole (insert a marker thread in the middle of these new sts = under sleeve), work A.7-A.9 over back piece as before, work 9-9-11-11-15-16 loose ch for armhole (insert a marker thread in the middle of these new sts = under sleeve), work A.7-A.9 over right front piece as before, work 1 tr in each of the last 4 tr (= right band) = 167-185-199-217-239-261 tr and 9-9-11-11-15-16 ch in each side of piece (= 185-203-221-239-269-293 sts in total). Insert 1 marker in piece, NOW MEASURE PIECE FROM HERE. Leave marker in piece, move marker threads when working. Work next row as follows from WS: Work 1 tr/dc in each of the first 4 tr/dc (= right band), A.9 over the next 7 tr, repeat A.8 over the next 168-186-204-222-252-276 tr/ch (= 28-31-34-37-42-46 times in total in width), A.7 over the next 2 ch, 1 tr/dc in each of the 4 tr/dc (= left band). NOTE: Work bands as A.7 until finished measurements, i.e. on rows with dc work band in dc and on rows with tr work band in tr. Continue pattern like this. When piece measures 4 cm, adjust so that next row is with tr, dec 3 tr at each marker thread in the side – READ DECREASE TIP, repeat dec every 6 cm 2 more times = 167-185-203-221-251-275 tr on row. NOTE: Every time you dec, repeat A.8 1 time less in width. When piece measures 18 cm from marker, adjust so that next row is a row with tr, inc 3 tr at each marker thread – READ INCREASE TIP, repeat inc every 3 cm 3 more times = 191-209-227-245-275-299 tr. NOTE: Every time you inc, repeat A.8 1 more time in width. When piece measures 33-34-35-36-37-38 cm from marker, adjust so that last row is a row with tr from WS, work as follows on next row from RS: Work band as before over the first 4 band sts, A.7a over the next 2 tr, repeat A.8a over the next 174-192-210-228-258-282 tr (= 29-32-35-38-43-47 times in total in width), A.9a over the next 7 tr, work over the 4 band sts as before. Fasten off when A.7a to A.9a have been worked 1 time vertically. Piece measures approx. 54-56-58-60-62-64 cm in total. SLEEVE: The piece is worked top down. Work 21-28-31-38-42-45 ch on hook size 3.5 mm with Alpaca. Work 2 tr in 4th ch from hook, 1 tr in each of the next 1-1-2-2-1-2 tr, * skip 1 ch, 1 tr in each of the next 6 ch *, repeat from *-* 1-2-2-3-4-4 more times, 1 tr in each of the next 1-1-3-3-1-3 tr, 2 tr in last tr = 18-24-27-33-36-39 tr. Then work as follows from RS: Work A.10 over the first 3 tr, repeat A.11 over the next 12-18-21-27-30-33 tr (= 4-6-7-9-10-11 times in total in width), finish with A.12 over the last 3 tr. When A.10 to A.12 have been worked 1 time vertically, there are 30-36-39-45-48-51 tr on last row. Work next row as follows from RS: Work A.10 over the first 3 tr, repeat A.11 over the next 24-30-33-39-42-45 tr (= 8-10-11-13-14-15 times in total in width), finish with A.11 over the last 3 tr. When A.10 to A.12 have been worked 1 more time vertically, there are 42-48-51-57-60-63 tr on last row. Work next row as follows from RS: Work A.13 over the first 3 tr, repeat A.14 over the next 36-42-45-51-54-57 tr (= 12-14-15-17-18-19 times in total in width), finish with A.15 over the last 3 tr. When A.13 to A.15 have been worked 1 time vertically, there are 54-60-63-69-72-75 tr on last row. Work next row as follows from RS: Work A.12 over the first 3 tr, repeat A.14 over the next 48-54-57-63-66-69 tr (= 16-18-19-21-22-23 times in total in width), finish with A.15 over the last 3 tr. When last row of A.13 to A.15 remain, cut the yarn. Work 5-5-6-6-8-8 loose ch. Work from RS last row of A.15, repeat last row of A.14 16-18-19-21-22-23 times in total in width AT THE SAME TIME inc 0-0-1-1-0-2 tr evenly, work last row of A.13, finish by working 4-4-5-5-7-8 ch at the end of row = 66-72-76-82-84-89 tr and 9-9-11-11-15-16 ch (= 75-81-87-93-99-105 sts in total). Work next row as follows from RS: Work A.7 over the first 2 ch, repeat A.8 over the next 66-72-78-84-90-96 ch/tr (= 11-12-13-14-15-16 times in total in width), finish with A.9 over the last 7 tr/ch. Insert 1 marker in the piece. NOW MEASURE PIECE FROM HERE. Insert 1 marker thread mid under sleeve. Then work piece back and forth but work every row tog at the end of row with 1 sl st in 3rd ch on row. Turn piece. When piece measures 4 cm, adjust so that next row is with tr, dec 6 tr evenly. Repeat dec every 9-7-5-5-4½-4 cm 3-4-5-5-6-7 more times = 51-51-51-57-57-57 tr. NOTE: Every time you dec, repeat A.8 1 time less in width. When piece measures 34 cm, adjust so that next row is with tr, dec 3 tr evenly = 48-48-48-54-54-54 tr. Then repeat A.8a 8-8-8-9-9-9 times in total in width. Work A.8a 3 times in total vertically. Fasten off when piece measures 56 cm in total, finish neatly according to pattern. Work another sleeve the same way. POCKETS: Cast on 30 ch on hook size 3.5 mm with Alpaca. Work 1 tr in 4th ch from hook (= 2 tr), 1 tr in each of the next 2 tr, * skip 1 ch, 1 tr in each of the next 5 ch *, repeat from *-* = 24 tr. Work 1 tr in every tr until piece measures approx. 9 cm. Work 1 row with * 1 dc, 3 ch, skip 1 cm *, repeat from *-*, adjust to finish with 1 dc in last tr. Fasten off. Work another pocket the same way. ASSEMBLY: Sew the shoulder seams. Sew in sleeves in outer loops of edge sts. Sew pockets in the middle of front piece approx. 8 cm up from edge. Fasten buttons on left front piece, fasten the top button approx. 2 cm from neck edge, then fasten them approx. 9-9-8-8-8-8 cm apart. Button between 2nd and 3rd tr on band. NECK EDGE: Work an edge around the neck as follows (beg mid front): Work 1 dc in first tr, * 3 ch, skip approx. 1 cm *, repeat from *-* around the entire neck, make sure to avoid a tight edge, adjust to finish with 1 dc in last tr. Fasten off. ---------------------------------------------------------- SKIRT: PATTERN: See diagrams A.16 and A.17. Diagram A.17 shows how every round beg and ends when working A.16 in the round. CROCHET INFO: Replace first tr at beg of every tr row with 3 ch. Replace first dc at beg of every dc row with 1 ch. Beg every round with tr with 3 ch (= first tr) and finish with 1 sl st in 3rd ch. Beg every round with dc with 1 ch (replace first dc) and finish with 1 sl st in first ch. INCREASE TIP-1: Inc 1 tr by working 2 tr in/around same st. INCREASE TIP-2 (evenly spaced): To calculate how often inc should be done on row, use the total no of sts (e.g. 228 tr) and divide the remaining sts by no of inc to be done (e.g. 12) = 18.33. I.e. in this example work 2 tr in approx. 18th tr. ---------------------------------------------------------- SKIRT: Work back and forth, top down to after vent in the side, then work in the round. Work 176-190-204-232-267-302 ch (incl 3 ch to turn with) on hook size 3.5 mm with Alpaca. Work first row as follows: 1 tr in 4th ch from hook (= 2 tr), 1 tr in each of the next 4 ch, * skip 1 ch, 1 tr in each of the next 6 ch *, repeat from *-* = 150-162-174-198-228-258 tr. Then work back and forth with 1 tr in every tr - READ CROCHET INFO. REMEMBER THE CROCHET TENSION! When 6-6-4-4-6-6 rows have been worked vertically, insert 6 markers in the piece as follows: First marker after 13-14-15-17-19-21 tr, then there should be 25-27-29-33-38-43 tr between every marker, there will be 12-13-14-16-19-22 tr after last marker at the end of row. Let markers follow in piece. On next row inc 1 tr before all markers (= 6 tr inc) – READ INCREASE TIP-1! Repeat inc every other row/round 12-12-14-14-14-14 more times. - NOTE: Inc alternately before and after markers = 228-240-264-288-318-348 tr. AT THE SAME TIME when 12 rows in total have been worked vertically, end the vent in the side and continue piece in the round, beg round in the side. When piece measures 28-29-30-31-32-33 cm, work A.16 (= 6 tr) 38-40-44-48-53-58 times in total on round. On 5th, 10th and 14th round in A.16 (= tr round) inc 12 tr evenly on each round – READ INCREASE TIP-2 = 264-276-300-324-354-384 tr. For every inc, work A.16 2 times more in width. When A.16 has been worked 1 time vertically, piece measures approx. 39-40-41-42-43-44 cm. Repeat A.16 and inc 1 more time = 300-312-336-360-390-420 tr. When piece measures 50-52-54-56-58-60 cm in total, adjust so that last round is a round with tr, work A.16a 50-52-56-60-65-70 times in total in width. Fasten off when A.16a has been worked 1 time vertically. Piece measures approx. 52-54-56-58-60-62 cm. BUTTONHOLE LOOPS: Along one side of the opening on front piece work buttonhole loops as follows (beg at the bottom): 2 dc in first tr, 3 ch, skip 1 tr, * work 2 dc in each of the next 2 tr, 3 ch, skip 1 tr *, repeat from *-* 3 times in total and finish with 2 dc in last tr at the top, turn and work back as follows: 1 dc in every dc and 3 dc in every ch-space. BUTTON BAND: Along the other side of the opening work 5 rows with dc back and forth (on first row work 2 dc in every tr = 24 dc), cut the yarn. Sew the buttons on to the button band. |
|||||||||||||||||||||||||||||||
Diagram explanations |
|||||||||||||||||||||||||||||||
|
|||||||||||||||||||||||||||||||
 |
|||||||||||||||||||||||||||||||
 |
|||||||||||||||||||||||||||||||
 |
|||||||||||||||||||||||||||||||
 |
|||||||||||||||||||||||||||||||
 |
|||||||||||||||||||||||||||||||
Have you finished this pattern?Tag your pictures with #dropspattern #daniellacardigan or submit them to the #dropsfan gallery. Do you need help with this pattern?You'll find 12 tutorial videos, a Comments/Questions area and more by visiting the pattern on garnstudio.com. © 1982-2026 DROPS Design A/S. We reserve all rights. This document, including all its sub-sections, has copyrights. Read more about what you can do with our patterns at the bottom of each pattern on our site. |
|||||||||||||||||||||||||||||||


With over 40 years in knitting and crochet design, DROPS Design offers one of the most extensive collections of free patterns on the internet - translated to 17 languages. As of today we count 324 catalogues and 12245 patterns translated into English (UK/cm). 12245
We work hard to bring you the best knitting and crochet have to offer, inspiration and advice as well as great quality yarns at incredible prices! Would you like to use our patterns for other than personal use? You can read what you are allowed to do in the Copyright text at the bottom of all our patterns. Happy crafting!
Post a comment to pattern DROPS 170-31
We would love to hear what you have to say about this pattern!
If you want to leave a question, please make sure you select the correct category in the form below, to speed up the answering process. Required fields are marked *.