
Popular categories
Looking for a yarn?


Comments / Questions (7)
![]() Marjon wrote:
Marjon wrote:
Beste mensen, Dank voor het antwoord, maar dit is niet wat ik bedoel. Ik bedoel: kant vanaf een hoogte van 14 cm middenvoor af in iedere 2e nld: 1 keer 5 st., 1 keer 3 st. Maar als ik dit midden in een nld doe krijg ik een gat en dat is ook niet de bedoeling.
18.09.2025 - 11:01DROPS Design answered:
Dag Marjon,
Aha, je bedoelt het afkanten bij de overslagsluiting. Als bezig bent met het rechter voorpand, zit de overslag dus aan de linker kant. Op het moment dat je 14 cm in de hoogte hebt gebreid, kant je aan die linker kant af zoals beschreven. (Je kan daardoor dus niet afkanten in de zijkant niet afmaken, maar dat geeft niet, daar stop je gewoon mee aan de kant waar de overslag zit).
21.09.2025 - 19:58
![]() Marjon wrote:
Marjon wrote:
Beste mensen, Hoe doe ik de meerderingen en de minderingen tegelijk in het voorpant met overslagsluiting?
17.09.2025 - 19:02DROPS Design answered:
Dag Marjon,
Het meerderen vindt plaats aan de zijkant. Op het moment dat je in de zijkant mindert voor het armsgat, zijn de meerderingen al klaar.
17.09.2025 - 21:17
![]() Nathalie wrote:
Nathalie wrote:
Sur le devant droit il est dit qu'il faut augmenter 4fois de chaque côté et à 14cm rabattre milieu devant, on augmente et diminue en même temps ? On arrête les côtes lors du rabattage? Merci d'avance pour votre réponse
23.10.2020 - 14:40DROPS Design answered:
Bonjour Nathalie, désolée, il y avait ici une erreur, on doit augmenter sur un seul des côtés (= celui qui sera cousu au dos), et on va rabattre ensuite (à 14 cm) côté milieu devant (= côté encolure/bordure devant). La correction a été faite, merci pour votre retour. Bon tricot!
23.10.2020 - 15:51
![]() Nathalie wrote:
Nathalie wrote:
Merci
19.10.2020 - 14:35
![]() Nathalie wrote:
Nathalie wrote:
Bonjour, je ne comprends pas quand vous dîtes "tricoter en côtes à partir du milieu devant"
18.10.2020 - 16:21DROPS Design answered:
Bonjour Nathalie, le devant droit se tricote sur l'endroit à partir du milieu du devant = du côté ouverture jusqu'au côté couture au dos. Bon tricot!
19.10.2020 - 10:06
![]() Roos wrote:
Roos wrote:
Dank voor het antwoord. En hoe doe ik dat als er 5, 3 en 2 sreken afgekant moeten worden?
02.01.2019 - 10:52
![]() Roos wrote:
Roos wrote:
Bij de voorpanden wordt midvoor 5 steken boorsteek gebreid. Wat doe ik met deze boordsteken als er na 14 cm. steken afgekant moeten worden. Schuiven de boorsteken mee? (ziet er raar uit).
28.12.2018 - 10:22DROPS Design answered:
Dag Roos,
Het mooist is om dan af te kanten (of minderen) naast de boordsteken, zodat de bies automatisch opschuift. Kant bij het linker voorpand als volgt af aan de goede kant (aan het begin van de naald, maar na de biessteken): 1 steek afhalen, 1 recht, de afgehaalde steek overhalen. Bij het linker voorpand aan de goede kant (dus aan het eind van de naald, maar voor de biessteken): 2 steken samen breien
01.01.2019 - 20:03
|
|||||||||||||
DROPS 71-9 |
|||||||||||||
 |
 |
||||||||||||
DROPS Cardigan in Vivaldi
DROPS 71-9 |
|||||||||||||
|
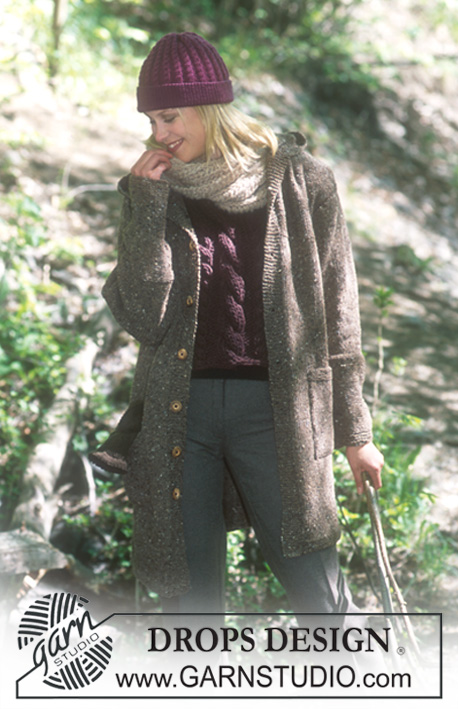
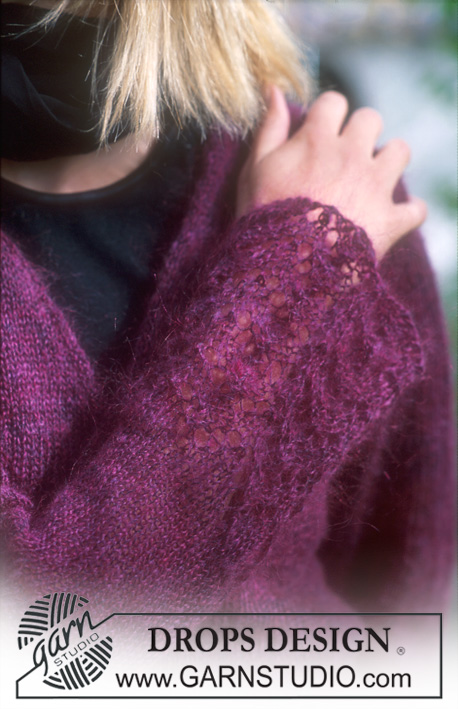
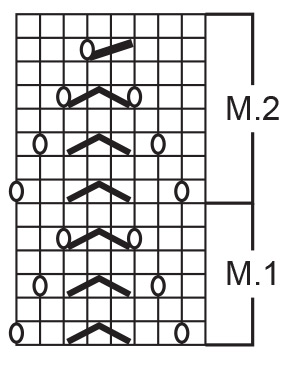
Gauge: 20 sts x 28 rows on mid-size needles in stockinette st = 10 x 10 cm [4" x 4"]. Rib: * K 1, P 1 *. Repeat from * - *. Pattern: See chart. The pattern is seen from the right side. 1 chart = 1 repeat. Garter st, when knitting flat: Knit all sts, all rows. Knitting tip: When the instructions state right and left sides, this refers to the right and left sides as when the garment is worn. -------------------------------------------------------------------- Back: Cast on 86-94-102-110 sts on smallest needles and knit rib for 1.5 cm [5/8"]. Change to mid-size needles and stockinette st. When the piece measures 8 cm [3-1/8"] inc 1 st at each side every 6.5 cm [2.5"] 4 times = 94-102-110-118 sts. When the piece measures 34-35-36-37 cm [13-3/8" - 13.75" - 14-1/8" - 14.5"] bind off for armhole at each side every other row: 3 sts 1-1-2-2 times, 2 sts 1-2-2-4 times and 1 st 3-5-4-4 times = 78-78-82-82 sts. When the piece measures 52-54-56-58 cm [20.5" - 21.25" - 22" - 22-7/8"] bind off the center 24 sts for the neck. Bind off 2 sts at each neck edge on the next row = 25-25-27-27 sts remain on each shoulder. Bind off when the piece measures 54-56-58-60 cm [21.25" - 22" - 22-7/8" - 23-5/8"]. Right Front (wrap-around): Cast on 75-83-91-99 sts on smallest needles and knit rib as follows from center front: K 1 (edge st knit in garter st throughout), K 1, * P 1, K 1 *, repeat * - *, end with K 1 (edge st knit in garter st throughout). When rib measures 1.5 cm [5/8"] change to mid-size needles and stockinette st, but continue to knit the 5 edge sts at each edge in rib with the outermost st in garter st (that is, 1 st garter st and 4 sts rib). Read the next section entirely before knitting: When the piece measures 8 cm [3-1/8"] inc 1 st at the side every 6.5 cm [2.5"] a total of 4 times. At the same time when the piece measures 14-14-15-15 cm [5.5" - 5.5" - 5-7/8" - 5-7/8"] bind off at the center front every other row: 5 sts 1 time, 3 sts 1 time, 2 sts 2-3-5-7 times, then dec 1 st 20-22-22-22 times, then every 4 rows 14 times. At the same time when the piece measures 34-35-36-37 cm [13-3/8" - 13.75" - 14-1/8" - 14.5"] bind off for armhole at the side as on back. After all armhole and neck shaping is complete there are 25-25-27-27 sts. Bind off when the piece measures 54-56-58-60 cm [21.25" - 22" - 22-7/8" - 23-5/8"]. Right Front (with buttons and deep V-neck): Cast on 44-48-52-56 sts on smallest needles and knit rib (from center front edge): K 1 (edge st knit in garter st throughout), K 1, * P 1, K 1 *, repeat * - *, end with K 1 (edge st knit in garter st throughout). When rib measures 1.5 cm [5/8"] change to mid-size needles and stockinette st. Read the next section entirely before knitting: When the piece measures 8 cm [3-1/8"] inc 1 st at the side edge every 6.5 cm [2.5"] 4 times = 48-52-56-60 sts. At the same time when the piece measures 32-34-35-36 cm [12-5/8" - 13-3/8" - 13.75" - 14-1/8"] dec 1 st at neck edge every other row 7 times and then every 4 rows 8 times. At the same time when the piece measures 34-35-36-37 cm [13-3/8" - 13.75" - 14-1/8" - 14.5"] bind off for armhole at the side as on back. After all armhole and neck shaping is complete there are 25-25-27-27 sts on the needles. Bind off when the piece measures 54-56-58-60 cm [21.25" - 22" - 22-7/8" - 23-5/8"] Left front: Cast on and knit the same as the right, reversing shaping. Sleeve: Cast on loosely 43-51-51-51 sts on largest needles with 2 strands yarn. Change to 1 strand and knit Pattern 1, but do not knit 1 edge st at each side in the pattern. Repeat Pattern 1 a total of 5 times, then knit Pattern 2 once. The piece measures approx. 15 cm [5-7/8"], change to mid-size needles and stockinette st. After Pattern 2 inc 1 st at each side 16-14-16-18 times: Size S: every 6 rows. Size M: alternately every 6th and 7th row. Size L: alternately every 5th and 6th row. Size XL: every 5 rows = 75-79-83-87 sts. When the piece measures 50-49-48-47 cm bind off for sleeve cap at each side every other row: 3 sts 2-2-1-1 times, 2 sts 3-3-4-3 times, 1 st 1-4-5-10 times, then bind off 2 sts at each side until the piece measures 57-58-58-59 cm, then bind off 3 sts at each side 1 time. The piece measures approx. 58-59-59-60 cm , bind off the remaining sts. Assembly (wrap-around version): Button band/Neckband: Sew shoulder seams. Pick up approx. 130 to 140 sts on smallest needles over all sts along front edge to center back of neck. Knit reverse stockinette st for 2.5 cm , bind off. Repeat along the other front edge. Sew band together at center back. Fold band double to wrong side and sew in place. Sew side seams, leaving an opening approx. 3 cm at right side, approx. 11-12 cm from lower edge (for belt). Stitch around opening with buttonhole st. Sew the sleeve seams and set into Body. Belt: Pick up 17 sts on smallest needles on the right front edge from the point where you began shaping and down towards lower edge. Knit rib, keeping 1 st at each side in garter st. When belt measures 3 and 6 cm dec 1 st at each side (inside edge sts) = 13 sts. Knit until belt measures approx. 70 cm, bind off in pattern. Make a matching belt on left front edge. Assembly (cardigan with buttons): Sew shoulder seams. Button band/Neckband: Pick up approx. 120 to 130 sts on smallest needles along right front up to center back neck - put a marker between button bands and neck. Knit rib over all sts, keeping 1 st at each edge in garter st. Inc 1 st on neck side of marker every row. When band measures 1 cm make 6 buttonholes evenly distributed from bottom edge to marker (1 buttonhole = bind off 2 sts and cast on 2 new sts on the next row). Bind off in rib when band measures 2.5 cm . Repeat along left front. Sew neckbands together at center back. Assembly: Sew in sleeves. Sew sleeve and side seams. Sew on buttons. |
|||||||||||||
Diagram explanations |
|||||||||||||
|
|||||||||||||
 |
|||||||||||||
 |
|||||||||||||
Have you finished this pattern?Tag your pictures with #dropspattern or submit them to the #dropsfan gallery. Do you need help with this pattern?You'll find 21 tutorial videos, a Comments/Questions area and more by visiting the pattern on garnstudio.com. © 1982-2026 DROPS Design A/S. We reserve all rights. This document, including all its sub-sections, has copyrights. Read more about what you can do with our patterns at the bottom of each pattern on our site. |
|||||||||||||


With over 40 years in knitting and crochet design, DROPS Design offers one of the most extensive collections of free patterns on the internet - translated to 17 languages. As of today we count 325 catalogues and 12298 patterns translated into English (UK/cm). 12298
We work hard to bring you the best knitting and crochet have to offer, inspiration and advice as well as great quality yarns at incredible prices! Would you like to use our patterns for other than personal use? You can read what you are allowed to do in the Copyright text at the bottom of all our patterns. Happy crafting!
Post a comment to pattern DROPS 71-9
We would love to hear what you have to say about this pattern!
If you want to leave a question, please make sure you select the correct category in the form below, to speed up the answering process. Required fields are marked *.