
Popular categories
Looking for a yarn?


Comments / Questions (71)
![]() Deras wrote:
Deras wrote:
Bonsoir j ai bien compris pour le dos et le devant droit, mais pourquoi on remonte plus de maille pour le coté gauche expliquez moi c car je ne comprends pas merci d'avance marie danièle deras
22.07.2015 - 21:56DROPS Design answered:
Bonjour Mme Deras, le devant gauche se tricote à partir du milieu devant (y compris les mailles du col châle que l'on rabat ensuite) et se termine par le côté (couture au dos) soit 144 m. Le devant droit se commence à partir du côté (144 m) et se termine par le milieu devant avec le col). Bon tricot!
27.07.2015 - 16:49
![]() Deras wrote:
Deras wrote:
Bonjour j 'ai bien compris pour le dos et le devant droit, pour le devant gauche pouquoi remonter plus de maille expliquez moi car j ne comprends ps comment faire bonne journée marie danièlederas
14.07.2015 - 08:41DROPS Design answered:
Bonjour Mme Deras, le devant droit se tricote à partir du côté vers le milieu devant (on commence avec 144 m pour terminer avec 182 m en taille S par ex), le devant gauche se tricote à partir du milieu devant vers le côté (= on commence par 182 m et on termine par 144 m toujours en taille S). Bon tricot!
27.07.2015 - 11:28
![]() Deras wrote:
Deras wrote:
Bonsoir j 'ai bien recu maa laine pour ce modèle, j avais choisi la couleur écorce, lais je suis décu , est 'il possible de faire un échange avec la couleur poivre et sel si oui comment dois je faire ?* bonne journée a vous marie danièle deras
05.07.2015 - 20:32DROPS Design answered:
Bonjour Mme Deras, merci de bien vouloir contacter directement le magasin où vous avez acheté votre laine. Vous trouverez ses coordonnées dans le mail de confirmation de votre commande et sur votre facture jointe à votre laine, et dans la liste des détaillants en France. Bon tricot!
06.07.2015 - 10:38
![]() Deras wrote:
Deras wrote:
Bonjour n°157 SI E COMPRENDS BIEN LES RANGS RACOURCIS E SONT QUE POUR LE FIL NOIR ...MERCI DE ME LE CONFIRMER BONNE SOIR2E A VOUS MARE DANIELE DERAS
01.07.2015 - 17:40DROPS Design answered:
Bonjour Mme Deras, dans le point fantaisie, on tricote effectivement les rangs raccourcis en noir et les 4 côtes mousse en clair obscur. Bon tricot!
02.07.2015 - 09:46
![]() Birthe Bjerg wrote:
Birthe Bjerg wrote:
Hej Garnstudio Det er en super lækker trøje, som jeg har besluttet mig for at strikke. Det undrer mig dog, hvorfor der skal slås op med dobbeltgarn på chiaroscuro på højre forstykke. Det bevirker da bare at sømmen, hvor trøjen strikkes sammen bliver tykkere og det er da sjældent ønskværdigt. Eller tager jeg fejl, er der en speciel grund til det?
26.04.2015 - 10:49DROPS Design answered:
Hej Birthe. Det er saadan set bare saadan jakken er designet - og gör kanten lidt tydeligere. Hvis du ikke er enig i dette og selv synes det er paenere med 1 traad, saa gör du det.
29.04.2015 - 14:21
![]() Brigitte Benz wrote:
Brigitte Benz wrote:
Leider ist mir kurz vor Ende des zweite Ärmels die Wolle ausgegangen. Ich habe 543p rot/orange gewählt und kann jetzt zumindest online keinen Händler finden, der diese Farbe noch vorrätig hat. Hier auf der website steht, dass die Farbe noch bei einigen Händler erhältlich ist. Wie kann ich herausfinden, bei welchem?
17.04.2015 - 07:18DROPS Design answered:
Sie können oben in der Leiste auf der Hauptseite auf "Händler" klicken, dort dann Deutschland auswählen und dann sehen Sie die Händler in Deutschland, die Drops-Wolle verkaufen. Am besten schauen Sie dann dort auf deren Homepages, rufen an oder schreiben eine E-Mail. Es ist leider nicht garantiert, dass die Wolle noch irgendwie erhältlich ist, ich hoffe, Sie haben Glück!
17.04.2015 - 10:10Vickii Wilson wrote:
Can somebody help me with the beginning of left front? I have tried to knit this 4 times with no success. Urgently please.
30.03.2015 - 05:31DROPS Design answered:
Dear Mrs Wilson, you are welcome to ask your question here or to contact your DROPS store for any individual assistance. Happy knitting!
30.03.2015 - 15:58
![]() Hellequin wrote:
Hellequin wrote:
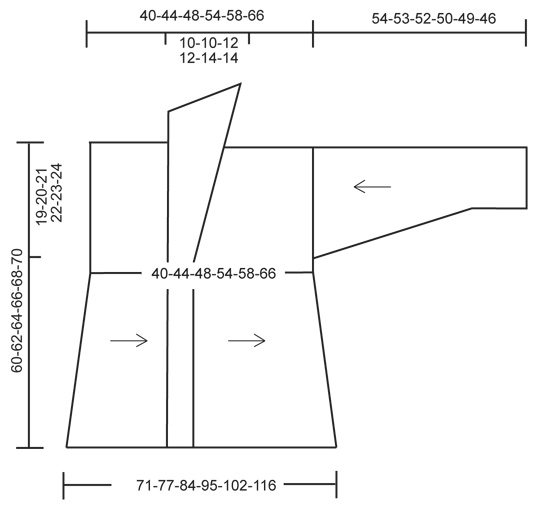
Je ne comprends pas bien le croquis. est-il possible d'avoir le dessin de chaque partie du modèle DROPS 157-13 séparément, avant montage ? merci d'avance
02.03.2015 - 16:45DROPS Design answered:
Bonjour Mme Hellequin, le dos et les devant se tricotent dans le sens de la longueur: le dos d'un côté à l'autre, le devant droit à partir du côté couture dos vers le milieu devant (bordure devant) et le devant gauche à partir de la bordure devant vers le côté dos - voir flèches dans le schéma. Les rangs raccourcis permettent de donner la forme voulue. Bon tricot!
03.03.2015 - 08:57
![]() Gil Danielle wrote:
Gil Danielle wrote:
Dans l'explication du point fantaisie du modèle 157-13 j'aimerai avoir confirmation du 3 rang :tricoter 3 m point mousse,jersey sur les 25 m suivantes (après les 55 m du premier rang,les 79 m du second ,on revient à 25 m sur le troisième ? °) je vous remercie .
13.02.2015 - 16:55DROPS Design answered:
Bonjour Mme Gil, on tricote 2 rangs sur 3 m point mousse + 55 m jersey, puis 2 rangs sur 3 m point mousse + 79 m jersey, puis 2 rangs sur 3 m point mousse + 25 m jersey, puis on change de couleur et on tricote 4 côtes mousse sur toutes les mailles (= 8 rangs) = 1 série des rangs raccourcis, soit 14 rangs en bas du gilet (à droite, vu sur l'endroit), et 8 rangs en haut (à gauche, vu sur l'endroit). Bon tricot!
13.02.2015 - 18:18
![]() Andrea wrote:
Andrea wrote:
Liebes DROPS-Team. Ich bin mit der Anleitung vom rechten Vorderteil nicht zurechtgekommen. Ich habe erst das linke gestrickt und dann das rechte spiegelverkehrt. Wenn ich den Schalkragen an der rückwärtigen Mitte zusammennähe und an den Halsausschnitt nähe, läuft der Schalkragen spitz nach unten zu. Es sieht hinten aus wie ein Dreieck. Ist das so richtig?
03.02.2015 - 16:04DROPS Design answered:
Sie können in der Maßskizze sehen, wie die eine Seite des Kragens geschnitten ist, er hat tatsächlich eine Art Dreiecksform. Wenn die Spitze bei Ihnen genauso aussieht wie in der Skizze, haben Sie alles richtig gemacht.
04.02.2015 - 18:01
|
||||
Dragonfly#dragonflycardigan |
||||
|
|
||||
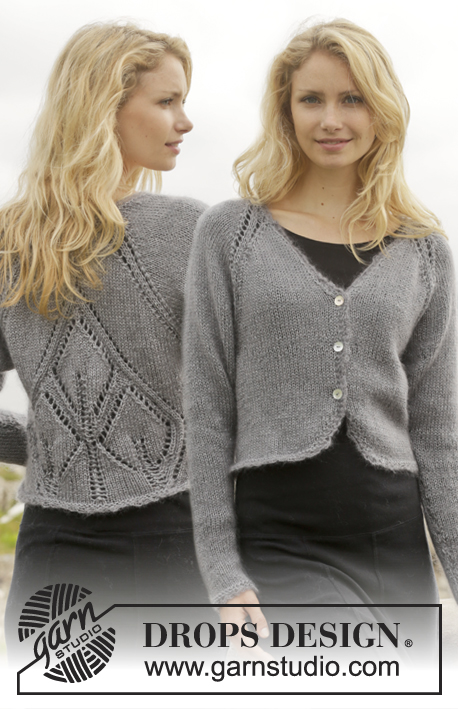
Knitted DROPS jacket with short rows and shawl collar in ”Fabel”. Size: S - XXXL.
DROPS 157-13 |
||||
|
GARTER ST (back and forth on needle): K all rows. 1 ridge = 2 rows K. GARTER ST (in the round on circular needle): * K 1 round and P 1 round *, repeat from *-*. 1 ridge = 2 rounds. PATTERN: * Switch colour to black. Then work short rows, beg from RS as follows (always work the first 3 sts in garter st): Work 3 sts in garter st, stocking st over the next 55 sts, turn and work back. Work 3 sts in garter st, stocking st over the next 79 sts, turn and work back. Work 3 sts in garter st, stocking st over the next 25 sts, turn and work back. Switch colour to chiaroscuro. Work 4 ridges back and forth over all sts *, repeat from *-*. 1 repetition = 8 rows at the top and 14 rows at the bottom. NOTE: Work the 4 ridges in chiaroscuro and the short rows in black until finished measurements. BUTTONHOLES: Dec for buttonholes on right band. Beg from RS and work as follows: K 86-86-88-88-90-90, 1 YO, K 2 tog, K 12, 1 YO, K 2 tog, and K the rest of row. On next row K YOs. -------------------------------------------------------- BACK PIECE: Worked back and forth from side to side on circular needle to make room for all the sts. Cast on 144-148-154-158-164-168 sts on circular needle size 3 mm with 2 strands chiaroscuro. Then continue piece with 1 strand chiaroscuro. Work 6 ridges in GARTER ST – see explanation above, AT THE SAME TIME on 1st row from RS insert 1 marker in piece when 46-48-50-52-54-56 sts remain on needle. This marks where to sew in sleeve. Work PATTERN - see explanation above. REMEMBER THE KNITTING TENSION! Continue with pattern until piece measures 15-17-18-21-22-26 cm measured at the shortest, adjust to finish before the 4 ridges. On next row from WS, cast off the first 5 sts for neck, work the rest of row = 139-143-149-153-159-163 sts. Work pattern until piece measures 25-27-30-33-36-40 cm (10-10-12-12-14-14 cm from dec for neck), adjust to finish before the 4 ridges. Cast on 5 new sts at the end of next row from RS = 144-148-154-158-164-168 sts. Continue as before. When piece measures 40-44-48-54-58-66 cm - adjust to finish with a whole repetition of pattern, work 2 ridges over all sts with chiaroscuro AT THE SAME TIME insert a marker on last row from RS when 46-48-50-52-54-56 sts remain on needle. This marks where to sew in sleeve. Cast off with 2 strands chiaroscuro. RIGHT FRONT PIECE: Work from the side to mid front. Cast on 144-148-154-158-164-168 sts on circular needle size 3 mm with 2 strands chiaroscuro. Then continue piece with 1 strand chiaroscuro. Work 6 ridges, AT THE SAME TIME on 1st row from RS insert 1 marker in piece when 46-48-50-52-54-56 sts remain on needle. This marks where to sew in sleeve. Work pattern until piece measures 15-17-18-21-22-26 cm measured at the shortest, adjust to finish before the 4 ridges. At the end of the next row from RS, cast on 20-20-22-22-24-24 new sts for collar = 164-168-176-180-188-192 sts. Insert 1 marker in piece, NOW MEASURE PIECE FROM HERE. Now continue piece in chiaroscuro. READ ALL OF THE FOLLOWING SECTION BEFORE CONTINUING! Work short rows, beg from WS as follows: Work the first 68-68-90-90-108-108 sts, insert 1 marker, turn and work back. Work until 4 sts remain before marker, turn and work back. Continue like this by working 4 sts less on every turn until 13-13-18-18-22-22 ridges have been worked in total. When short rows are done, work in garter st over all sts until piece measures 10-10-12-12-14-14 cm. AT THE SAME TIME when piece measures 4 cm at the widest, inc 1 st at the end of next row from RS, repeat inc every 4th row 3-3-3-3-6-6 more times then on every row from RS 14-14-18-18-17-17 times = 182-186-198-202-212-216 sts. AT THE SAME TIME when piece measures 9-9-11-11-13-13 cm, dec for BUTTONHOLES - see explanation above, on next row from RS. Work 1 ridge in black. Cast off with 2 strands black. LEFT FRONT PIECE: Work from mid front to the side. Cast on 182-186-198-202-212-216 sts on circular needle size 3 mm with 2 strands black. Then continue piece with 1 strand black. Work 1 ridge AT THE SAME TIME on row from WS insert 1 marker after 38-38-44-44-48-48 sts. Switch colour to chiaroscuro. READ ALL OF THE FOLLOWING SECTION BEFORE CONTINUING! Work in garter st over all sts AT THE SAME TIME on 1st row from RS, dec 1 st at the end of row by K tog the last 2 sts, repeat dec on every row from RS 13-13-17-17-16-16 more times, then every 4th row 4-4-4-4-7-7 times = 164-168-176-180-188-192 sts. AT THE SAME TIME when piece measures 4 cm, work short rows as follows – beg from WS: Work until marker, turn and work back. Work 4 sts after marker, turn and work back. Continue like this by working 4 sts more on every turn until 13-13-18-18-22-22 ridges have been worked in total. When short rows have been worked, piece measures approx. 10-10-12-12-14-14 cm. Insert 1 marker in piece, now measure piece from here. On next row from WS, cast off the first 20-20-22-22-24-24 sts = 144-148-154-158-164-168 sts on needle. Work pattern until piece measures 15-17-18-21-22-26 cm measured at the shortest, adjust to finish before the 4 ridges. Work 6 ridges over all sts with chiaroscuro, AT THE SAME TIME on last row from RS insert 1 marker in piece when 46-48-50-52-54-56 sts remain on needle (seen from RS). This marks where to sew in sleeve. Cast off with 2 strands chiaroscuro. SLEEVE: Worked in the round on double pointed needles. Cast on 56-58-60-62-64-66 sts on double pointed needles size 3 mm with 2 strands black. Then continue piece with 1 strand black. Work 1 ridge in GARTER ST - see explanation above. Switch colour to chiaroscuro and work in garter st until piece measures 4 cm. Then work in stocking st. Insert 1 marker at the beg of round. When piece measures 8 cm, inc 1 st on each side of marker, repeat inc every 2½-2-2-2-1½-1½ cm 17-18-19-20-21-22 more times = 92-96-100-104-108-112 sts. When piece measures 54-53-52-50-49-46 cm (shorter measurements in the larger sizes because of wider shoulders), cast off all sts. ASSEMBLY: Sew the shoulder seams. Sew side seams from marker and down. Sew in sleeves with WS outwards. Sew shawl collar tog mid back and sew it to the neckline. Sew the buttons on to left band. CROCHET EDGE: Crochet an edge around the bottom edge of jacket, beg at the bottom of left front piece. Work with black on hook size 3 mm as follows: 1 dc, * 3 ch, 1 tr in 1st ch, skip approx. 1 cm, 1 dc *, repeat from *-* around the entire jacket. Fasten off. |
||||
Diagram explanations |
||||
|
||||
 |
||||
Have you finished this pattern?Tag your pictures with #dropspattern #dragonflycardigan or submit them to the #dropsfan gallery. Do you need help with this pattern?You'll find 26 tutorial videos, a Comments/Questions area and more by visiting the pattern on garnstudio.com. © 1982-2026 DROPS Design A/S. We reserve all rights. This document, including all its sub-sections, has copyrights. Read more about what you can do with our patterns at the bottom of each pattern on our site. |
||||


With over 40 years in knitting and crochet design, DROPS Design offers one of the most extensive collections of free patterns on the internet - translated to 17 languages. As of today we count 324 catalogues and 12290 patterns translated into English (UK/cm). 12290
We work hard to bring you the best knitting and crochet have to offer, inspiration and advice as well as great quality yarns at incredible prices! Would you like to use our patterns for other than personal use? You can read what you are allowed to do in the Copyright text at the bottom of all our patterns. Happy crafting!
Post a comment to pattern DROPS 157-13
We would love to hear what you have to say about this pattern!
If you want to leave a question, please make sure you select the correct category in the form below, to speed up the answering process. Required fields are marked *.