
Popular categories
Looking for a yarn?


Comments / Questions (71)
![]() Judy Kruse wrote:
Judy Kruse wrote:
The yarn requirements are listed only by weight, but they do not list yardage. How do we determine the yardage requirements when none are listed.
01.08.2023 - 05:02DROPS Design answered:
Hi Judy, You click on the box 'Yarns and Needles' at the top of the page and choose Fabel. There you will find all the details about this particular yarn. Happy crafting!
01.08.2023 - 06:40
![]() Ulrika Nielsen wrote:
Ulrika Nielsen wrote:
Hej! Stickar man kilar över hela framstyckena? Jag tycker att det blir en väldigt lång bit som bara stickas fram o tillbaka utan kilar.
08.03.2022 - 21:49DROPS Design answered:
Hei Ulrika. Når du starter på høyre forstykket, strikkes det 6 riller(12 pinner/ca 2,5-3 cm) før man starter med MØNSTER. Så strikkes det mønster til arbeidet måler 15-17-18-21-22-26 cm målt på det korteste. Det blir endel "kilar" på de målene. Bare husk at det skal måles på det korteste og avpass at det avsluttes rett før de 4 rillene. mvh DROPS Design
14.03.2022 - 10:47
![]() Ulrika Nielsen wrote:
Ulrika Nielsen wrote:
På vänster framstycke står att man ska sticka 13 förkortade varv i den svenska beskrivningen. I det norska originalet står det ”riller”. En ”rille” är väl 2 varv? Alltså borde det stå att man ska sticka 26 varv!
07.03.2022 - 21:35
![]() Lynn Travers Despins wrote:
Lynn Travers Despins wrote:
Hello...still having difficulty with short rows on R side & L front sides. R side short rows I turn before the 22 sts and work the 22 stitches only when short rows are done. The left side it seems that I have no choice but to knit the 22 stitches on every turn then work WSide back down to marker and add 4 stitches., etc...The L front collar will be larger than the R front in this case...
31.05.2021 - 15:12DROPS Design answered:
Dear Mrs Travers Despins, the left front piece is worked the same way but just reversed, ie you start from the mid front towards the shoulder, work the short rows the same way over the stitches on collar, maybe looking at the right front piece from WS could be help you to get the same number of short rows worked on both front pieces?
01.06.2021 - 08:02
![]() Lynn wrote:
Lynn wrote:
Fa-280. hello..I really need your help. I am having so much trouble with this pattern, I have ripped out so many times I had to buy new yarn. The problem lies with the short rows at the top of the garment for the left and right sides...each time I think I am doing it right I get different results for both sides and have to restart. When we cast on the 22 stitches I am assuming we do not work the 22 stitches when doing the short rows, am I understanding and same thing for the other side.
08.05.2021 - 19:19DROPS Design answered:
Dear Lynn, you are right, when you cast on the stitches for the collar, and then do the short rows, the shortrow turns do not reach the collar-stitches, they are only knitted in the full rows (rows knitted on every stitches). Happy Knitting!
09.05.2021 - 22:21
![]() Lynn wrote:
Lynn wrote:
Fa-280 Hello, I am a visual person and am not understanding how to do the short rows for the left side of the sweater. I placed my marker at the 44th stitch and with all the decreases, my marker is not in line with the 22 stitch from the first stitch WSide. I am stuck there to do the short rows...compared to the right side where I placed my first marker at the 90th stitch. I wish there was a video for mirror short rows. Thank you for your time. Regards Lynn
01.05.2021 - 19:37
![]() Carmen-Gabriela wrote:
Carmen-Gabriela wrote:
Hallo:) Hier sind die verk. Reihen nicht synchron (nicht wie bei 145-23 od. 178-26) Kann es sein, dass sich somit das untere Teil auf eine Seite zieht, in Strickrichtung? (sich um einen wickelt?) Ich habe es ab der rückwärtigen Mitte gegengleich versucht, da wippen aber die "Fächer" nicht so schön. - Was meinen Sie? - Wieder ein sehr schönes Modell:)!
04.06.2020 - 17:58DROPS Design answered:
Liebe Carmen-Gabriela, am besten zeigen Sie Ihr Strickstück Ihrem DROPS Laden - auch ein Foto per mail senden, damit kan man dort Ihnen am besten weiterhelfen. Viel Spaß beim stricken!
05.06.2020 - 07:22
![]() Birgit Bang-Jensen wrote:
Birgit Bang-Jensen wrote:
Fejl i opskrift? Højre forstykke, str S. Forkortede p over totalt 13 p retstrik. Derefter ret til 10 cm = ca 6 cm efter forkortede p. Venstreforstykke (spejlvendt) Retstrik til 4 cm. Forkortede p over totalt 26 p ret. Mens der 13 ell 26 p ??? NB. Højre forstykke er strikket !!!
08.04.2018 - 08:26DROPS Design answered:
Hei Birgit. Du har helt ret, der strikkes forkortede pinde over 26 pinde ret (ikke 13) det er nu rettet i opskriften. Tak for info!
12.04.2018 - 15:43
![]() Magali wrote:
Magali wrote:
Bonjour, il est écrit "les manches se tricotent en rond sur aiguilles doubles pointes", pouvez-vous m'expliquer ? Les aiguilles doubles pointes sont droites, n'est-ce pas ? Donc comment tricoter en rond ? Merci beaucoup de votre aide. Magali
16.03.2018 - 10:45
![]() Marianne wrote:
Marianne wrote:
Ifølge opskriften er højre og venstre forstykke meget forskellige. På højre forstykke laves de forkorte pinde lige efter, at der er slået m op til hals og dermed omkring 10 cm fra forkanten, og der strikkes kun 13 forkortede p. På venstre forstykke strikkes de tættere på forkanten (efter 4 cm), og der strikkes 26 p. Jeg synes, at det virker meget mærkeligt, og at det ikke ser pænt ud.
09.10.2017 - 21:56DROPS Design answered:
Hej Marianne, har du set at højre forstykke strikkes fra siden til midt foran og venstre forstykke strikkes fra midt foran til siden? De skal naturligvis se ligedan ud. God fornøjelse!
12.10.2017 - 12:28
|
||||
Dragonfly#dragonflycardigan |
||||
|
|
||||
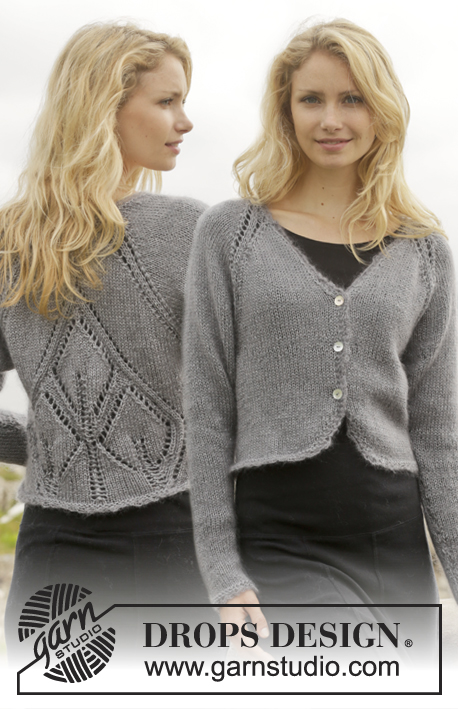
Knitted DROPS jacket with short rows and shawl collar in ”Fabel”. Size: S - XXXL.
DROPS 157-13 |
||||
|
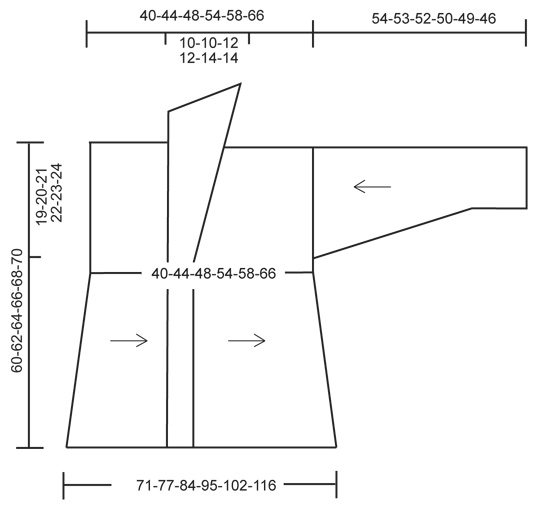
GARTER ST (back and forth on needle): K all rows. 1 ridge = 2 rows K. GARTER ST (in the round on circular needle): * K 1 round and P 1 round *, repeat from *-*. 1 ridge = 2 rounds. PATTERN: * Switch colour to black. Then work short rows, beg from RS as follows (always work the first 3 sts in garter st): Work 3 sts in garter st, stocking st over the next 55 sts, turn and work back. Work 3 sts in garter st, stocking st over the next 79 sts, turn and work back. Work 3 sts in garter st, stocking st over the next 25 sts, turn and work back. Switch colour to chiaroscuro. Work 4 ridges back and forth over all sts *, repeat from *-*. 1 repetition = 8 rows at the top and 14 rows at the bottom. NOTE: Work the 4 ridges in chiaroscuro and the short rows in black until finished measurements. BUTTONHOLES: Dec for buttonholes on right band. Beg from RS and work as follows: K 86-86-88-88-90-90, 1 YO, K 2 tog, K 12, 1 YO, K 2 tog, and K the rest of row. On next row K YOs. -------------------------------------------------------- BACK PIECE: Worked back and forth from side to side on circular needle to make room for all the sts. Cast on 144-148-154-158-164-168 sts on circular needle size 3 mm with 2 strands chiaroscuro. Then continue piece with 1 strand chiaroscuro. Work 6 ridges in GARTER ST – see explanation above, AT THE SAME TIME on 1st row from RS insert 1 marker in piece when 46-48-50-52-54-56 sts remain on needle. This marks where to sew in sleeve. Work PATTERN - see explanation above. REMEMBER THE KNITTING TENSION! Continue with pattern until piece measures 15-17-18-21-22-26 cm measured at the shortest, adjust to finish before the 4 ridges. On next row from WS, cast off the first 5 sts for neck, work the rest of row = 139-143-149-153-159-163 sts. Work pattern until piece measures 25-27-30-33-36-40 cm (10-10-12-12-14-14 cm from dec for neck), adjust to finish before the 4 ridges. Cast on 5 new sts at the end of next row from RS = 144-148-154-158-164-168 sts. Continue as before. When piece measures 40-44-48-54-58-66 cm - adjust to finish with a whole repetition of pattern, work 2 ridges over all sts with chiaroscuro AT THE SAME TIME insert a marker on last row from RS when 46-48-50-52-54-56 sts remain on needle. This marks where to sew in sleeve. Cast off with 2 strands chiaroscuro. RIGHT FRONT PIECE: Work from the side to mid front. Cast on 144-148-154-158-164-168 sts on circular needle size 3 mm with 2 strands chiaroscuro. Then continue piece with 1 strand chiaroscuro. Work 6 ridges, AT THE SAME TIME on 1st row from RS insert 1 marker in piece when 46-48-50-52-54-56 sts remain on needle. This marks where to sew in sleeve. Work pattern until piece measures 15-17-18-21-22-26 cm measured at the shortest, adjust to finish before the 4 ridges. At the end of the next row from RS, cast on 20-20-22-22-24-24 new sts for collar = 164-168-176-180-188-192 sts. Insert 1 marker in piece, NOW MEASURE PIECE FROM HERE. Now continue piece in chiaroscuro. READ ALL OF THE FOLLOWING SECTION BEFORE CONTINUING! Work short rows, beg from WS as follows: Work the first 68-68-90-90-108-108 sts, insert 1 marker, turn and work back. Work until 4 sts remain before marker, turn and work back. Continue like this by working 4 sts less on every turn until 13-13-18-18-22-22 ridges have been worked in total. When short rows are done, work in garter st over all sts until piece measures 10-10-12-12-14-14 cm. AT THE SAME TIME when piece measures 4 cm at the widest, inc 1 st at the end of next row from RS, repeat inc every 4th row 3-3-3-3-6-6 more times then on every row from RS 14-14-18-18-17-17 times = 182-186-198-202-212-216 sts. AT THE SAME TIME when piece measures 9-9-11-11-13-13 cm, dec for BUTTONHOLES - see explanation above, on next row from RS. Work 1 ridge in black. Cast off with 2 strands black. LEFT FRONT PIECE: Work from mid front to the side. Cast on 182-186-198-202-212-216 sts on circular needle size 3 mm with 2 strands black. Then continue piece with 1 strand black. Work 1 ridge AT THE SAME TIME on row from WS insert 1 marker after 38-38-44-44-48-48 sts. Switch colour to chiaroscuro. READ ALL OF THE FOLLOWING SECTION BEFORE CONTINUING! Work in garter st over all sts AT THE SAME TIME on 1st row from RS, dec 1 st at the end of row by K tog the last 2 sts, repeat dec on every row from RS 13-13-17-17-16-16 more times, then every 4th row 4-4-4-4-7-7 times = 164-168-176-180-188-192 sts. AT THE SAME TIME when piece measures 4 cm, work short rows as follows – beg from WS: Work until marker, turn and work back. Work 4 sts after marker, turn and work back. Continue like this by working 4 sts more on every turn until 13-13-18-18-22-22 ridges have been worked in total. When short rows have been worked, piece measures approx. 10-10-12-12-14-14 cm. Insert 1 marker in piece, now measure piece from here. On next row from WS, cast off the first 20-20-22-22-24-24 sts = 144-148-154-158-164-168 sts on needle. Work pattern until piece measures 15-17-18-21-22-26 cm measured at the shortest, adjust to finish before the 4 ridges. Work 6 ridges over all sts with chiaroscuro, AT THE SAME TIME on last row from RS insert 1 marker in piece when 46-48-50-52-54-56 sts remain on needle (seen from RS). This marks where to sew in sleeve. Cast off with 2 strands chiaroscuro. SLEEVE: Worked in the round on double pointed needles. Cast on 56-58-60-62-64-66 sts on double pointed needles size 3 mm with 2 strands black. Then continue piece with 1 strand black. Work 1 ridge in GARTER ST - see explanation above. Switch colour to chiaroscuro and work in garter st until piece measures 4 cm. Then work in stocking st. Insert 1 marker at the beg of round. When piece measures 8 cm, inc 1 st on each side of marker, repeat inc every 2½-2-2-2-1½-1½ cm 17-18-19-20-21-22 more times = 92-96-100-104-108-112 sts. When piece measures 54-53-52-50-49-46 cm (shorter measurements in the larger sizes because of wider shoulders), cast off all sts. ASSEMBLY: Sew the shoulder seams. Sew side seams from marker and down. Sew in sleeves with WS outwards. Sew shawl collar tog mid back and sew it to the neckline. Sew the buttons on to left band. CROCHET EDGE: Crochet an edge around the bottom edge of jacket, beg at the bottom of left front piece. Work with black on hook size 3 mm as follows: 1 dc, * 3 ch, 1 tr in 1st ch, skip approx. 1 cm, 1 dc *, repeat from *-* around the entire jacket. Fasten off. |
||||
Diagram explanations |
||||
|
||||
 |
||||
Have you finished this pattern?Tag your pictures with #dropspattern #dragonflycardigan or submit them to the #dropsfan gallery. Do you need help with this pattern?You'll find 26 tutorial videos, a Comments/Questions area and more by visiting the pattern on garnstudio.com. © 1982-2026 DROPS Design A/S. We reserve all rights. This document, including all its sub-sections, has copyrights. Read more about what you can do with our patterns at the bottom of each pattern on our site. |
||||


With over 40 years in knitting and crochet design, DROPS Design offers one of the most extensive collections of free patterns on the internet - translated to 17 languages. As of today we count 324 catalogues and 12290 patterns translated into English (UK/cm). 12290
We work hard to bring you the best knitting and crochet have to offer, inspiration and advice as well as great quality yarns at incredible prices! Would you like to use our patterns for other than personal use? You can read what you are allowed to do in the Copyright text at the bottom of all our patterns. Happy crafting!
Post a comment to pattern DROPS 157-13
We would love to hear what you have to say about this pattern!
If you want to leave a question, please make sure you select the correct category in the form below, to speed up the answering process. Required fields are marked *.