
Popular categories
Looking for a yarn?


Comments / Questions (111)
![]() Orte wrote:
Orte wrote:
Dat zwart ovaal tekentje wel ar staat dat voor?
31.05.2016 - 19:24DROPS Design answered:
Hoi Orte. 3 lossen? Zie ook uitleg voor het telpatroon onderaan.
01.06.2016 - 14:33
![]() Gunilla wrote:
Gunilla wrote:
Hej! Jag är väldigt sugen på att göra den här koftan. Jag ser att ni ger drops love you #6 som alternativt garn, men kan man räkna med samma garnåtgång eller bör jag köpa mer då det är färre meter per nystan?
11.05.2016 - 12:12DROPS Design answered:
Hej. Du måste räkna om garnmängden när du använder ett annat garn än det som uppges i mönstret. Här kan du se hur du gör det. Lycka till!
11.05.2016 - 13:29
![]() Alëna wrote:
Alëna wrote:
Hallo, ik heb twee vragen over dit patroon. De eerste vraag is over rij 3 en rij 12: ik begrijp niet zo goed of de samengehaakte stokjes in één steek ook met andere twee samengehaakte stokjes samen worden gehaakt of vormen zij uiteindelijk toch twee steken in de volgende rij? De tweede vraag is over rij 4: daar waar er een stokje boven een zwart nopje afgebeeld staat, wordt die dan in de vierde losse gehaakt of om de lossen heen van de vorige rij? Alvast bedankt voor uw hulp.
10.04.2016 - 13:26DROPS Design answered:
Hoi Alëna. Je maakt 1 steek per keer dat je samen haakt, dus in toer 3 en 12 heb je 2 keer stk samen haken. Maar zoals ik het zie, dan haak je maar 1 stk boven deze 2 in de volgende toer - dus haak om het garen in de tussenruimte tussen de twee st (als je mij kan volgen). En tweede vraag, je haakt 2 stk, 1 l (= zwart nopje), 2 stk
12.04.2016 - 15:12Filiz wrote:
Thnak you for your kind reply and if you don't mind i have one more question? According to your reply i should work A6, A4, 2 times A2, 1 ch-space etc. after piece measures 22cm but which row should i crochet from A4-A1 diagram? 9th row from beg?
22.03.2016 - 19:52DROPS Design answered:
Dear Filiz, crochet the next row in diagram after the one you have done, continue following diagram (A.X part). Happy crocheting!
23.03.2016 - 08:11Filiz wrote:
Whether continue or stop i still have trouble how to work after here? The text says ' On next row from WS continue as before with A.6, A.4 and A.2 until 1-1-2-2-2-3 repetitions of A.2 have been worked in width. Then work ch-spaces as follows: Work 1 sc in next st, * ch 3, skip approx. 1 cm / 3/8'', 1 sc *, repeat 1-2-0-1-2-0 more times (= 2-3-1-2-3-1 ch-space in total)....I'm completely lost in this explanation! Please help me! Thank you
22.03.2016 - 16:11DROPS Design answered:
Dear Filiz, after piece measures 22 cm, adjust to work next row from WS and work A.6, A.4 and 2 repetitions in A.2 in width, then work 1 ch-space (= 1 sc in next st, 3 ch, skip approx. 1 cm, 1 sc). And continue then with A.2, A.4 and A.6 as before until piece measures 56 cm (adjust after a full repeat in height). Happy crocheting!
22.03.2016 - 16:47Filiz wrote:
Hello! Please help me with the right front piece (size L); I've worked till A3 has been done (which means 11 rows) and worked 23 new ch for A4 and A6 (=band). I've continued work A6,A4,A2 (3 times),A1,A6 back and forth till piece measured 22 cm (which means 5 rows). Should I have been worked to the end of AX or is it correct to stop at row 16 from beg?
22.03.2016 - 16:10DROPS Design answered:
Dear Filiz, you should stop when piece measures 22 cm (height of sleeve in size L), adjust to finish with a row from RS to start on next row from RS with A.6, A.4 and A.2 and working 1 ch-space (1 only in size L). Happy crocheting!
22.03.2016 - 16:43Nada wrote:
Please help with row 12 of right front piece for M size, I can not understand how to work on the additional 23 sts.
17.09.2015 - 00:40DROPS Design answered:
Dear Nada, the 23 sts are worked with the last row in A.3, on next row (= from WS), work A.6 over the first 6 ch, A.4 over 17 ch, (the 23 ch are worked), then work A.2 and A.6 as before. Happy crocheting!
17.09.2015 - 09:10Nada wrote:
Thanks for your reply, but I mean row 4 in the right front piece :) Sorry for the misunderstanding/
22.08.2015 - 00:26DROPS Design answered:
Dear Nada, after first 2 rows in tr (UK-English crochet) you work row 4 (from RS) in the right front piece work as follows: 1 time A.6 over the first 6 sts, then 1 time A.1 over the next 18 sts, then repeat A.2 (= 16 sts) over the next 16-48 sts (= 1-3times, see size), and finish with 1 time A.3 over the last 8 sts. Start reading diagram from RS from the right towards the left and from WS from the left towards the right, ie from WS you work: A.3, A.2, A.1 and A.6. Happy crocheting!
24.08.2015 - 10:23Nada wrote:
I am very perplexed with row 4, can you please explain it in a more simple way?
21.08.2015 - 00:59DROPS Design answered:
Dear Nada, do you mean row 4 on back piece, when you have 143-207 sts (see size) ? then you have to work next row (4) as follows: 1 time A.6 over the next 6 tr, 1 time A.4 over the next 17 tr, repeat A.2 over the next 96-160 tr (ie repeat A.2 6 - 10 times in width), 1 time A.1 over the next 18 tr and 1 time A.6 over the last 6 tr. (see info crochet for A.6). Happy crocheting!
21.08.2015 - 08:57
![]() Nathalie wrote:
Nathalie wrote:
Bonjour, je ne comprend pas la partie avec les arceaux ? a quoi servent ils? merci de m'éclairer
20.07.2015 - 14:37DROPS Design answered:
Bonjour Nathalie, à la fin du devant droit, on crochète le 3ème rang de A.6 dans les arceaux indiqués et on continue le motif en ajustant après un motif complet en hauteur. Bon crochet!
27.07.2015 - 15:56
|
||||||||||||||||||||||
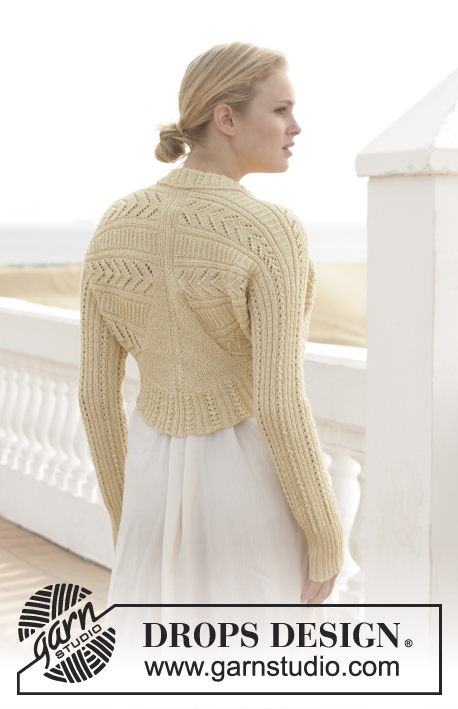
Nostalgia#nostalgiacardigan |
||||||||||||||||||||||
|
|
||||||||||||||||||||||
Crochet DROPS jacket with lace pattern in ”Safran”. Size: S - XXXL.
DROPS 152-3 |
||||||||||||||||||||||
|
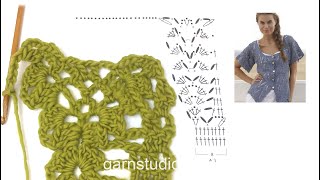
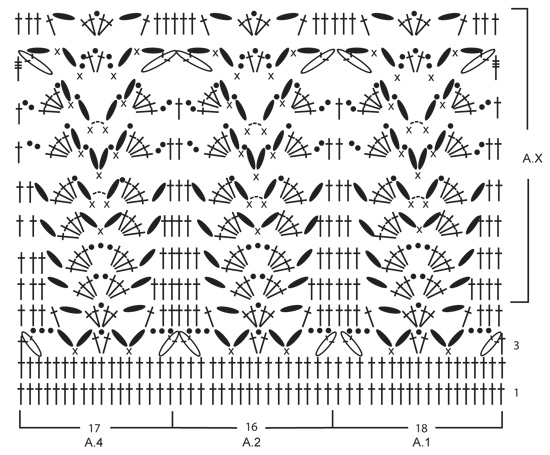
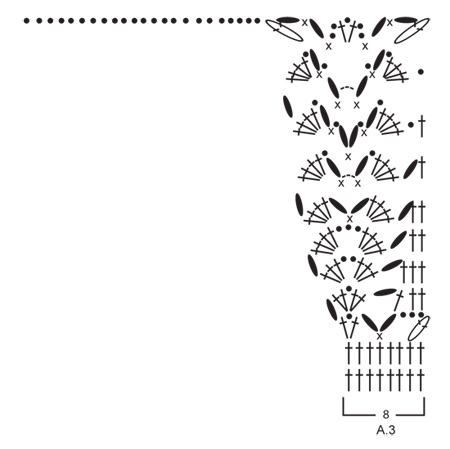
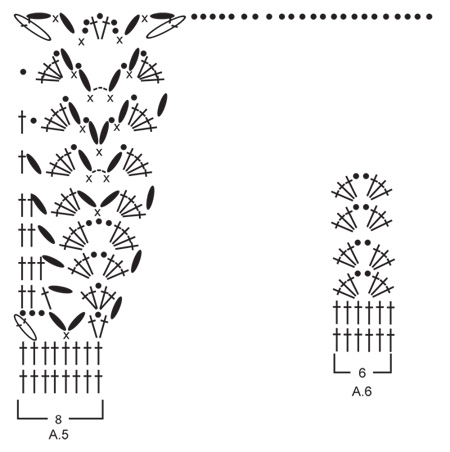
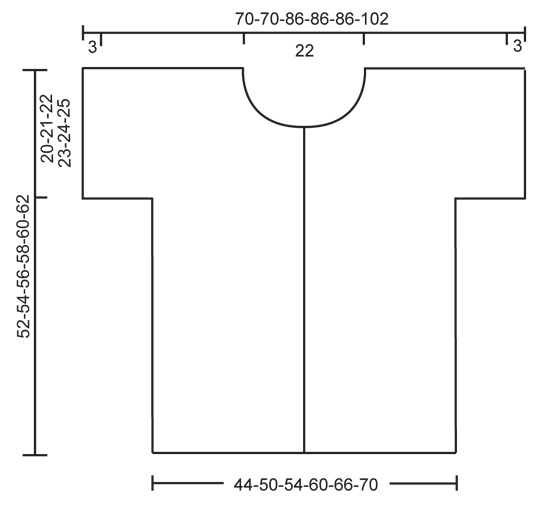
CROCHET INFO: Replace first tr at beg of every tr row with 3 ch. CROCHET TIP 1: When one whole repetition of pattern vertically in diagrams A.1-A.4 have been worked, continue with pattern but now work A.X. CROCHET TIP 2: Work 3RD ROW of A.6 as follows over 6 tr: Work 3 ch (to turn with), 3 tr in 3rd tr from hook, 2 ch, 3 tr in next tr. On each row starting with A.6 (i.e rows with tr-groups) ch 3 to turn with before working A.6. Repeat pattern in chart from 4th row. CROCHET TIP 3: When working A.6 on front band work 1st row as follows: Work 3 ch (to turn with), 3 tr in 6th ch from hook, ch 2, 3 tr in next tr. On each row starting with A.6 (i.e rows with tr-groups) ch 3 to turn with before working A.6. Repeat pattern in chart from 4th row. PATTERN: See diagrams A.1 to A.6. The diagrams show all rows in pattern seen from RS. BUTTONHOLES: Measure from neck edge at the front and sew buttons on left band: SIZE S: 2, 8, 14, 20 and 26 cm SIZE M: 2, 8, 14, 20 and 26 cm SIZE L: 2, 9, 16, 23 and 30 cm SIZE XL: 2, 9, 16, 23 and 30 cm SIZE XXL: 2, 10, 18, 26 and 34 cm SIZE XXXL: 2, 10, 18, 26 and 34 cm ---------------------------------------------------------- JACKET: The piece is worked top down. RIGHT FRONT PIECE: Work 62-62-82-82-82-102 ch on hook size 4 mm with Safran. Work 1ST ROW (= RS)(= 1ST ROW in diagram A.1, A.2, A.3 and A.6) as follows: 1 tr in 4th ch from hook, 1 tr in next ch, * skip 1 ch, 1 tr in each of the next 4 ch *, repeat from *-* 11-11-15-15-15-19 times in total, skip 1 ch, 1 tr in last ch = 48-48-64-64-64-80 tr – READ CROCHET INFO. ROW 2: Work 1 tr in each of the 48-48-64-64-64-80 tr. ROW 3 (= RS): Then work PATTERN according to diagram A.6 over 6 tr 1 time - READ CROCHET TIP 2! Continue with A.1 over 18 tr, A.2 over 16-16-32-32-32-48 tr, and A.3 over 8 tr. Continue like this back and forth with pattern the same way, AT THE SAME TIME inc sts for neck in diagram A.3. When 1 whole repetition vertically of A.3 has been worked, work 23 new ch towards mid front for A.4 and A.6 (= band) – READ CROCHET TIP 1 and CROCHET TIP 3! Then work as follows with pattern from WS: A.6, A.4 over 17 ch, A.2 2-2-3-3-3-4 times, A.1 1 time, and A.6 1 time. Continue like this back and forth until piece measures 20-21-22-23-24-25 cm in total = right sleeve. On next row from WS continue as before with A.6, A.4 and A.2 until 1-1-2-2-2-3 repetitions of A.2 have been worked in width. Then work ch-spaces as follows: Work 1 dc in next st, * 3 ch, skip approx. 1 cm, 1 dc *, repeat 1-2-0-1-2-0 more times (= 2-3-1-2-3-1 ch-space in total). Turn and work as follows from RS: Beg on 3rd row in A.6 and work 1 repetition in the next 2-3-1-2-3-1 ch-space, continue with A.2, A.4 and A.6 as before until piece measures 52-54-56-58-60-62 cm in total, - or adjust after one whole repetition vertically. LEFT FRONT PIECE: Work 61-61-81-81-81-101 ch on hook size 4 mm with Safran. Work 1ST ROW (= RS)(= 1ST ROW in diagram A.2, A.4, A.5 and A.6) as follows: 1 tr in 4th ch from hook, * skip 1 ch, 1 tr in each of the next 4 ch *, repeat from *-* 11-11-15-15-15-19 times in total, skip 1 ch, 1 tr in last ch = 47-47-63-63-63-79 tr. ROW 2: Work 1 tr in each of the 47-47-63-63-63-79 tr. Then work as right front piece but reversed and work according to diagram A.5 instead of A.3, A.4 instead of A.1, and A.1 instead of A.4. BACK PIECE: Work right shoulder as follows: Work 62-62-82-82-82-102 ch on hook size 4 mm with Safran. Work 1ST ROW as follows: 1 tr in 4th ch from hook, 1 tr in next ch, * skip 1 ch, 1 tr in each of the next 4 ch *, repeat from *-* 11-11-15-15-15-19 times in total, skip 1 ch, 1 tr in last ch = 48-48-64-64-64-80 tr. ROW 2 (= 1ST ROW in diagram A.2, A.4 and A.6): Work 1 tr in each of the first 47-47-63-63-63-79 tr on row, work 2 tr in last tr on row = 49-49-65-65-65-81 tr. Cut the yarn and put piece aside. Work left shoulder as follows: Work 61-61-81-81-81-101 ch on hook size 4 mm with Safran. Work 1ST ROW as follows from RS: 1 tr in 4th ch from hook, * skip 1 ch, 1 tr in each of the next 4 ch *, repeat from *-* 11-11-15-15-15-19 times in total, skip 1 ch, 1 tr in last ch = 47-47-63-63-63-79 tr. ROW 2 (= 1ST ROW in diagram A.1, A.2 and A.6): Work 2 tr in the first tr on row, then work 1 tr in each of the remaining 46-46-62-62-62-78 tr on row = 48-48-64-64-64-80 tr. ROW 3: Work 1 tr in each of the next tr on left shoulder, work 46 LOOSE ch for neck, 1 tr in every tr on right shoulder = 143-143-175-175-175-207 tr. ROW 4: 1 repetition A.6 over 6 tr, A.4 over 17 tr, A.2 over 96-96-128-128-128-160 tr, A.1 over 18 tr, and finally A.6 over 6 tr - read CROCHET TIP 2. Continue this pattern back and forth until piece measures 20-21-22-23-24-25 cm in total (adjust according to front piece). Fasten off. Then work ch-spaces along one sleeve as on front piece – adjust to beg the same distance from edge on sleeve as on front piece and work ch-spaces as follows: * 1 dc, 3 ch, skip approx. 1 cm, 1 dc *, repeat 1-2-0-1-2-0 more times (= 2-3-1-2-3-1 ch-space in total). Continue over back piece with pattern as before, and finish with ch-spaces the same way in the other side. Continue as on front piece with A.6 in each side and pattern as before until piece measures 52-54-56-58-60-62 cm in total. ASSEMBLY: Sew the shoulder seams. Place front piece on top of back piece and work the sides and underarm seams tog in one as follows: Work 1 dc in front piece, 3 ch, 1 dc in back piece, * 3 ch, 1 dc in front piece approx. 1 cm higher up, 3 ch, 1 dc in back piece approx. 1 cm higher up *, repeat from *-*, finish with 1 sl st. Fasten off. Repeat in the other side. Sew buttons on to the left band and button through right band - see explanation above. NECK EDGE: When piece is assembled, work a neck edge as follows: Beg from RS, mid front on right band, fasten yarn with 1 sl st, * 3 ch, skip approx. 1 cm, 1 dc *, repeat from *-* around the entire neck. Fasten off. |
||||||||||||||||||||||
Diagram explanations |
||||||||||||||||||||||
|
||||||||||||||||||||||
 |
||||||||||||||||||||||
 |
||||||||||||||||||||||
 |
||||||||||||||||||||||
 |
||||||||||||||||||||||
Have you finished this pattern?Tag your pictures with #dropspattern #nostalgiacardigan or submit them to the #dropsfan gallery. Do you need help with this pattern?You'll find 8 tutorial videos, a Comments/Questions area and more by visiting the pattern on garnstudio.com. © 1982-2026 DROPS Design A/S. We reserve all rights. This document, including all its sub-sections, has copyrights. Read more about what you can do with our patterns at the bottom of each pattern on our site. |
||||||||||||||||||||||


With over 40 years in knitting and crochet design, DROPS Design offers one of the most extensive collections of free patterns on the internet - translated to 17 languages. As of today we count 324 catalogues and 12290 patterns translated into English (UK/cm). 12290
We work hard to bring you the best knitting and crochet have to offer, inspiration and advice as well as great quality yarns at incredible prices! Would you like to use our patterns for other than personal use? You can read what you are allowed to do in the Copyright text at the bottom of all our patterns. Happy crafting!
Post a comment to pattern DROPS 152-3
We would love to hear what you have to say about this pattern!
If you want to leave a question, please make sure you select the correct category in the form below, to speed up the answering process. Required fields are marked *.