
Popular categories
Looking for a yarn?


Comments / Questions (15)
![]() Jana Nemcakova wrote:
Jana Nemcakova wrote:
Dobry den. Mohli by jste mi vyscetlit ci znamema tohleto : *-*? Jsem zacatecnice a vubec tomu nerozumim. Dekuji Vam za odpoved. S pozdravem Jana
26.09.2013 - 10:46Vera wrote:
Thank you for your reply! I mean that the pattern says to join in the round for the "yoke", bind off facing bind off. But then you'll end up with holes in the armpit :) Did I miss something? I've just sewn the holes closed now. Love the pattern!
14.12.2012 - 19:47Vera wrote:
In the english version, the instructions for finishing the armpit are missing
14.12.2012 - 13:19DROPS Design answered:
Dear Vera, the arms will be joined with the rest of the body under shoulders and head. Happy knitting !
14.12.2012 - 14:11
![]() Gerrie Roozeboom wrote:
Gerrie Roozeboom wrote:
In het hoofdstuk Schouder en hoofd, bij het minderen, de laatste alinea: gelijk na 12 st, hoeveel naalden moeten er dan nog gebreid worden? Graag uw toelichting
13.12.2012 - 16:08DROPS Design answered:
2 naalden: "Brei nog een nld. Minder dan als volgt: * brei 1 st, minder 1 st *, herhaal van *-* de hele nld = 8 st, knip de draad af en haal deze door de overgebleven 8 st, trek de draad aan en zet vast."
19.12.2012 - 13:34
![]() Cécile wrote:
Cécile wrote:
Votre modèle, le bonhomme Julius" en tricot est adorable.Pourrions nous avoir les explications au crochet?Je voudrais tant le réaliser...
08.12.2012 - 03:10DROPS Design answered:
Bonjour Cécile, C'est peut être l'occasion de débuter le tricot avec ce modèle ? Notre vidéothèque, votre magasin Drops et le forum sont à votre disposition pour vous aider. Bon crochet !
08.12.2012 - 11:14
|
|
Julius#dropsjulius |
|
 |
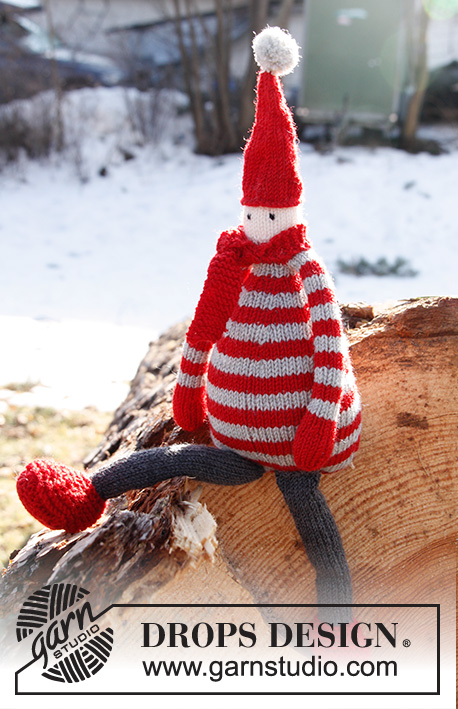 |
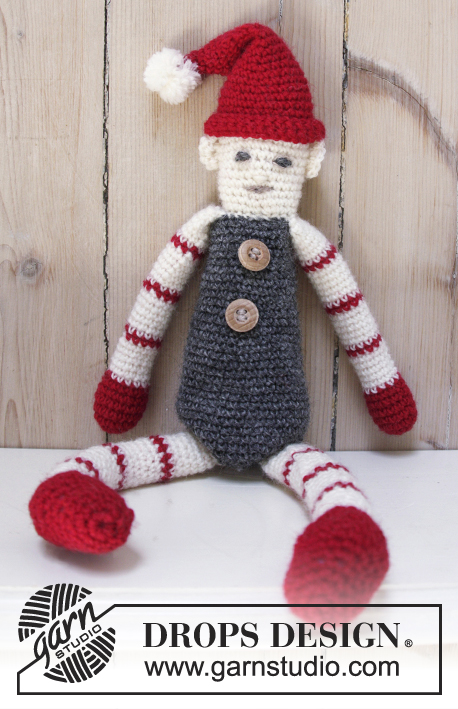
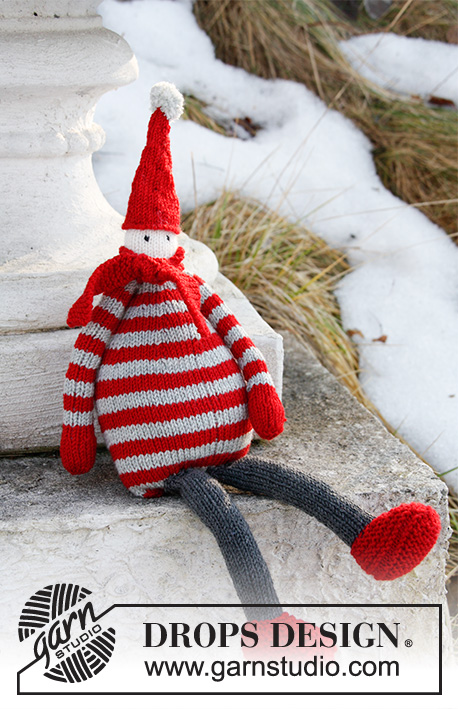
Knitted DROPS Santa in "BabyMerino".
DROPS Extra 0-861 |
|
|
GARTER ST (back and forth on double pointed needles): K all rows. 1 ridge = 2 rows K. GARTER ST (in the round on double pointed needles): * K 1 round and P 1 round *, repeat from *-*. INCREASE TIP: Inc 1 st by working 2 sts in the next st as follows: Work in front and back loop of same st. DECREASE TIP: Dec 1 st by K 2 tog. STRIPES: Work * 4 rounds light grey, 4 rounds red *, repeat from *-*. --------------------------------------------------------- SANTA: Worked on double pointed needles. The body, arms and head are worked in one, and the legs and feet are worked in one. BODY: Worked in stocking st in the round on double pointed needles. Worked from the bottom and up to head. Cast on 40 sts on 4 double pointed needles size 2.5 mm with red. ROUND 1: * 4 sts, inc 1 st in next st - Read INCREASE TIP above *, repeat from *-* the entire round = 48 sts (8 sts inc). ROUND 2: * 5 sts, inc 1 st in next st *, repeat from *-* the entire round = 56 sts. ROUND 3: * 6 sts, inc 1 st in next st *, repeat from *-* the entire round = 64 sts. On next round switch to light grey and work STRIPES - see explanation above. When 5 stripes in light grey have been worked, dec in the piece as follows: ROUND 1: Switch to red, *work 6 sts, dec 1 st - Read DECREASE TIP above *, repeat from *-* the entire round = 56 sts (8 sts dec). ROUND 2-4: K all sts. ROUND 5: Switch to light grey, *work 5 sts, dec 1 st *, repeat from *-* the entire round = 48 sts. ROUND 6-8: K all sts. ROUND 9: Switch to red, *work 4 sts, dec 1 st *, repeat from *-* the entire round = 40 sts. ROUND 10-12: K all sts. ROUND 13: Switch to light grey, *work 3 sts, dec 1 st *, repeat from *-* the entire round = 32 sts. ROUND 14-16: K all sts. ROUND 17: Switch to red, *work 2 sts, dec 1 st *, repeat from *-* the entire round = 24 sts. ROUND 18-20: K all sts. ROUND 21: Switch to light grey, *work 1 st, dec 1 st *, repeat from *-* the entire round = 16 sts. ROUND 22-23: K all sts. ROUND 24: Cast off the first 2 sts (= armhole), work 5 sts, cast off the next 2 sts (= armhole), work the remaining 5 sts = 12 sts remain. Slip all sts on a stitch holder and put piece aside. HAND AND ARM: Worked in one in stocking st. The hand is first worked back and forth and then in the round on double pointed needles. Cast on 4 sts on 1 double pointed needle with red. On next row inc 1 st in every st = 8 sts. Then continue to work on 4 double pointed needles in the round as follows: Inc 1 st in every st = 16 sts. Then K all sts for a total of 9 rounds. On next round, dec as follows: * Work 2 sts, dec 1 st *, repeat from *-* the entire round = 12 sts. K all sts for 2 more rounds. On next round switch to light grey and continue with STRIPES. Continue with stripes until 6 stripes in light grey have been worked - NOTE: Work last round (= 4th round) in light grey as follows: Cast off the first 2 sts (= armhole), work the remaining sts on round = 10 sts remain. Slip all sts on a stitch holder. Take the cast on tail and pull it through the 4 sts cast on at the edge of hand, tighten tog. Fill the hand with some cotton wool and fill the arm with some cotton wool (until approx. 1 cm from last round, so that you can bend the arm), put the piece aside. Knit another hand and arm the same way. SHOULDER AND HEAD: Slip sts from stitch holder from body and arms back on needle (cast off against cast off). Then work the body and arms tog for shoulder with red as follows: Work 10 sts from one arm, 6 sts from body, 10 sts from the other arm, 6 sts from body = 32 sts on round. K 1 round. On next round, dec as follows: * Work 2 sts, dec 1 st *, repeat from *-* the entire round = 24 sts (8 sts dec). K another round. On next round switch to off white (for head) and dec as follows: * Work 1 st, dec 1 st *, repeat from *-* the entire round = 16 sts. K another round. Then inc as follows: * Work 1 st, inc 1 st in next st *, repeat from *-* the entire round = 24 sts. Continue to K all sts for 11 more rounds. Then dec as follows: * Work 1 st, dec 1 st *, repeat from *-* the entire round = 16 sts. K all sts for 3 more rounds. Then dec as follows: * Work 2 sts, dec 1 st *, repeat from *-* the entire round = 12 sts. K another round. Then dec as follows: * Work 1 st, dec 1 st *, repeat from *-* the entire round = 8 sts, cut the thread. Pull thread through the 8 sts, tighten tog. HAT: Worked in the round in stocking st. Cast on 28 sts on double pointed needles size 2.5 mm with red. K all sts for 6 rounds. Then dec in the piece as follows: ROUND 1: * Work 5 sts, dec 1 st *, repeat from *-* the entire round = 24 sts (4 sts dec). ROUND 2-6: K all sts. ROUND 7: * Work 4 sts, dec 1 st *, repeat from *-* the entire round = 20 sts. ROUND 8-12: K all sts. ROUND 13: * Work 3 sts, dec 1 st *, repeat from *-* the entire round = 16 sts. ROUND 14-18: K all sts. ROUND 19: * Work 2 sts, dec 1 st *, repeat from *-* the entire round = 12 sts. ROUND 20-24: K all sts. ROUND 25: * Work 1 st, dec 1 st *, repeat from *-* the entire round = 8 sts. ROUND 26-28: K all sts. ROUND 29: * Work all sts tog 2 by 2 = 4 sts, cut the thread. Pull thread through the 4 sts, tighten tog. FOOT AND LEG: Work from bottom (sole) up. The sole is first worked back and forth in garter st - Read explanation above, then the foot is worked in the round in garter st and the leg in the round in stocking st. Cast on 4 sts with red. Work next row as follows: K 1, inc 1 st in each of the next 2 sts, K 1 = 6 sts (2 sts inc). * K 1 row, on next row inc 1 st in the 2nd st and in the next to last st on row * = 8 sts. Repeat from *-* 1 more time = 10 sts. Continue in garter st back and forth until piece measures approx. 3½ cm. On next row, dec as follows: Dec 1 st in each side = 8 sts. K 1 row, on next row dec 1 st in each side = 6 sts. K 1 row, on next row dec 1 st in each side while AT THE SAME TIME casting off, cut the thread. Then knit up new sts as follows: Beg in the middle of cast off edge (= back part of foot), knit up 40 sts around the entire sole. Then work in the round as follows: ROUND 1 (and then every uneven numbered round): P all sts. ROUND 2: K 16, dec 1 st, K 4, dec 1 st, K 16 = 38 sts. ROUND 4: K 15, dec 1 st, K 4, dec 1 st, K 15 = 36 sts. ROUND 6: K 14, dec 1 st, K 4, dec 1 st, K 14 = 34 sts. ROUND 8: K 13, dec 1 st, K 4, dec 1 st, K 13 = 32 sts. ROUND 10: K 12, dec 4 sts (i.e. work the next 8 sts tog 2 by 2), K 12 = 28 sts. ROUND 12: K 10, dec 4 sts, K 10 = 24 sts. ROUND 14: K 4, dec 8 sts, K 4 = 16 sts. On next round switch to dark grey and K all sts. Then K until foot and leg measures approx. 13 cm vertically. Fill the piece with some cotton wool (until approx. 1 cm from cast off edge remain, so that you can bend the leg). Knit another foot and leg the same way. ASSEMBLY: Make 1 pompom with a diameter of approx. 1½ cm with 1 thread off white and 1 thread light grey, fasten it on the hat and fasten the hat at the top of head. Embroider eyes on the head with black. Fill the body with some cotton wool. Sew tog the cast on edge on body. Place the cast off edge on the legs flat and sew them under the body. SCARF: Work a scarf back and forth as follows: Cast on 6 sts with red, work in garter st until scarf measures approx. 26 cm (or desired length), cast off. Tie the scarf around the neck. |
|
Have you finished this pattern?Tag your pictures with #dropspattern #dropsjulius or submit them to the #dropsfan gallery. Do you need help with this pattern?You'll find 16 tutorial videos, a Comments/Questions area and more by visiting the pattern on garnstudio.com. © 1982-2026 DROPS Design A/S. We reserve all rights. This document, including all its sub-sections, has copyrights. Read more about what you can do with our patterns at the bottom of each pattern on our site. |
|


With over 40 years in knitting and crochet design, DROPS Design offers one of the most extensive collections of free patterns on the internet - translated to 17 languages. As of today we count 324 catalogues and 12239 patterns translated into English (UK/cm). 12239
We work hard to bring you the best knitting and crochet have to offer, inspiration and advice as well as great quality yarns at incredible prices! Would you like to use our patterns for other than personal use? You can read what you are allowed to do in the Copyright text at the bottom of all our patterns. Happy crafting!
Post a comment to pattern DROPS Extra 0-861
We would love to hear what you have to say about this pattern!
If you want to leave a question, please make sure you select the correct category in the form below, to speed up the answering process. Required fields are marked *.