
Popular categories
Looking for a yarn?


Comments / Questions (94)
![]() Francesca wrote:
Francesca wrote:
Mi consigliate un filato in cotone per realizzare questa giacca? Grazie
14.02.2017 - 15:31DROPS Design answered:
Buongiorno Francesca. Può usare i cotoni Safran, Drops Loves You 6 (controlli la disponibilità presso il rivenditore), Drops Loves You 7, anch’essi del gruppo A come il filato Alpaca. Alla seguente pagina trova le indicazioni per sostituire correttamente i filati. Verifichi sempre di ottenere lo stesso campione indicato nelle spiegazioni. Buon lavoro!
14.02.2017 - 16:04
![]() Raquel wrote:
Raquel wrote:
Estoy haciendo el delantero derecho y no entiendo eso de empezar a partir del centro del frente y trabajar hacia el lado. Que tengo que ir tejiéndo directamente con la espalda o cómo y si cuando mida 15 cm que tengo que disminuir de un lado o ambos como en la espalda. Gracias
25.04.2016 - 17:38DROPS Design answered:
Hola Raquel, el centro del frente se refiere a la parte de las cenefas, donde se abotona la chaqueta. Los delanteros y la espalda se trabajan por separado pero la espalda nos sirve de referencia para trabajar el delantero. Ten en cuenta que trabajamos 2 delanteros con lo cual las dism se trabajan solo a un lado en este caso y no como en la espalda.
26.04.2016 - 12:21
![]() Raquel wrote:
Raquel wrote:
Estoy haciendo el delantero derecho y no entiendo eso de empezar a partir del centro del frente y trabajar hacia el lado. Que tengo que ir tejiéndo directamente con la espalda o cómo y si cuando mida 15 cm que tengo que disminuir de un lado o ambos como en la espalda. Gracias
25.04.2016 - 17:29DROPS Design answered:
ver respuesta arriba
26.04.2016 - 12:23
![]() Wilma wrote:
Wilma wrote:
Ik hem met maat L bezig maar ik kom niet uit de beschrijving voor de mouw kop. Hoeveel herhalingen moet ik uiteindelijk over houden?
17.04.2016 - 15:27DROPS Design answered:
Hoi Wilma. Je mindert 1 heel herhaling en 8 keer 1/2 herhalingen aan elke zijkant = 6 herhalingen over
18.04.2016 - 14:14Vana Giannitsopoulou wrote:
Hello, I have a problem I cannot understand the 1/2 increase in the sleeve pattern. The diagram given is only for the left side I cannot figure out how it will be done for the other side. Thank you
03.02.2016 - 19:52DROPS Design answered:
Dear Mrs Giannitsopoulou, diagram X.2 shows on the right side how to work the dec at beg of row (work 3 sl sts) and on the left side how to dec at the end of row (finish with 1 tr (UK-English) in the last ch-space (ie leave uworked the remaining sts on row). Happy crocheting!
04.02.2016 - 09:50Lorena wrote:
Excelentes diseños. Gracias. ***
01.02.2016 - 21:37Vana Giannitsopoulou wrote:
Hello, I do not understand in the back piece what am I going to do when the piece measures 10 cm and what when it measures 20 cm ? Thank you
23.01.2016 - 14:37DROPS Design answered:
Dear Mrs Giannitsopoulou, when piece measures 10 and then 20 cm, you dec ½ reepetition in each side, ie at beg of row replace ½ repetition with 3 sl t and at theh end of row, turn when ½ repetition remain - see diag. X.2. Happy crocheting!
25.01.2016 - 11:12
![]() Kate wrote:
Kate wrote:
Thanks for your reply but I'm still a bit confused. Am I then crocheting the front right piece until it mesures 15 before I start the decrease or 25? Sorry!
10.09.2015 - 13:19DROPS Design answered:
Dear Kate, you will decrease on the side as you did for back piece (= 1/2 repetitions - see Decrease tip) a total of 2 times: first time when front piece measures 15 cm and 2nd time when pice measures 25 cm. Happy crocheting!
10.09.2015 - 14:07
![]() Kate wrote:
Kate wrote:
Hello, where it says "When piece measures 15 and 25 cm" why measurements? Thanks
09.09.2015 - 21:37DROPS Design answered:
Dear Kate, these measurements refer to the dec on the side, they were different on back piece so that they are not so marked on the side (they will look smoother when piece is sewn tog). Happy crocheting!
10.09.2015 - 10:00Magda Grobbelaar wrote:
Sorry, I dont want to seem clueless....................but obviously I am. Where do I find the diagram M.1 for the pattern?
25.05.2015 - 20:39DROPS Design answered:
Dear Mrs Grobbelaar, you will find all diagrams at the bottom of the page, just above measurement chart. Happy crocheting!
26.05.2015 - 10:46
|
||||||||||
Whispers#whisperscardigan |
||||||||||
 |
 |
|||||||||
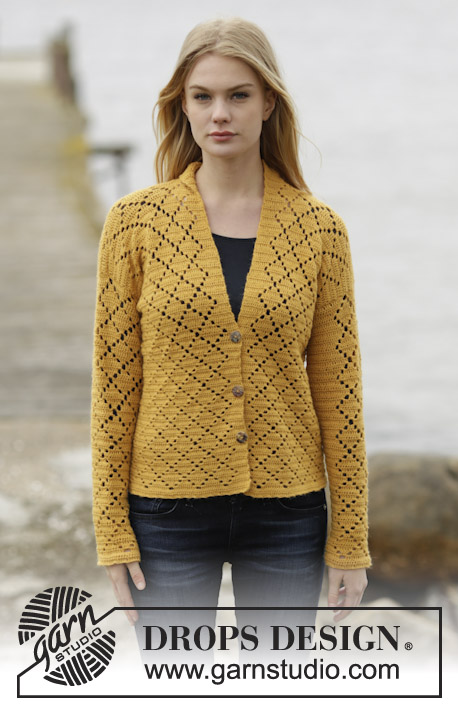
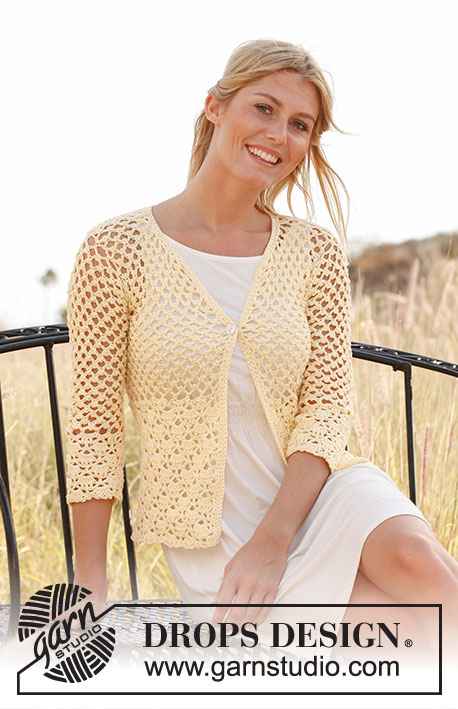
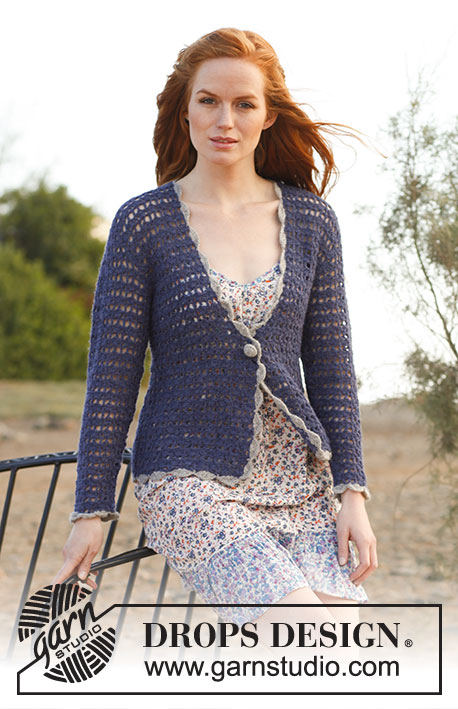
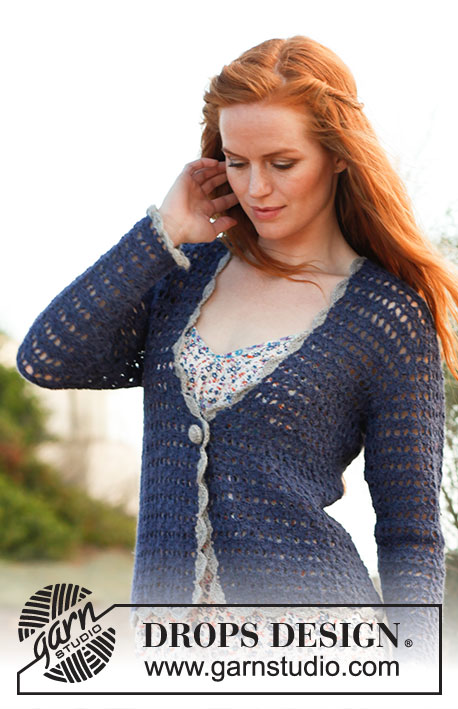
Crochet DROPS jacket in ”Alpaca”. Size: S - XXXL.
DROPS 136-13 |
||||||||||
|
CROCHET INFO: Replace first tr at beg of row with 3 ch. PATTERN: See diagram M.1. Repeat row 1 and 2. M.1 shows 3 repeats in width and 1 repeat in height. MEASURING TIP: The garment will be longer because of pattern. All measurements must therefore be done while holding up the garment. DECREASE TIP: Dec 1 repetition in diagram X.1, or ½ repetition in diagram X.2. Dec at beg of row as follows: Replace 1 repetition with 6 sl st and ½ repetition with 3 sl st. Dec at end of row as follows: Turn piece when either 1 or ½ repetition remains. INCREASE TIP (applies to sleeve): Inc ½ repetition. Inc by turning with 6/7 ch instead of 3, see diagram X.3. -------------------------------------------------------- -------------------------------------------------------- BACK PIECE: Work 120-132-144-156-168-180 ch (incl 8 ch to turn with) on hook size 3.5 mm with blue. Work 1 tr in the 9th ch from hook, * 2 ch, skip 2 ch, 1 tr in next ch *, repeat from *-* = 39-43-47-51-55-59 tr. Continue to work diagram M.1 (1st row is now done, beg on 2nd row) = 19-21-23-25-27-29 repetitions. When piece measures 10 and 20 cm - Read MEASURING TIP, dec ½ repetition in each side – read DECREASE TIP and see diagram X.2 = 17-19-21-23-25-27 repetitions. When piece measures 35-36-37-38-39-40 cm, dec for armholes in each side on every row as follows: 1 repetition 1-1-2-2-2-2 times, then ½ repetitions 0-2-2-2-4-4 times = 15-15-15-17-17-19 repetitions. When piece measures 52-54-56-58-60-62 cm, work 1 row only over the outermost 6-6-6-6-6-7 repetitions in each side (do not work over the middle 3-3-3-5-5-5 repetitions = neck line). Work 1 more row, cut and fasten the thread, the piece measures approx. 54-56-58-60-62-64 cm. RIGHT FRONT PIECE: READ ALL OF THE FOLLOWING SECTION BEFORE CONTINUING! Work 66-72-78-84-90-96 ch (incl 8 ch to turn with) on hook size 3.5 mm with blue. Beg from mid front and work towards the side. Work 1 tr in the 9th ch from hook, * 2 ch, skip 2 ch, 1 tr in next ch *, repeat from *-* = 21-23-25-27-29-31 tr. Continue to work diagram M.1 (1st row is now done, beg on 2nd row) = 10-11-12-13-14-15 repetitions. When piece measures 15 and 25 cm, dec in the side as on back piece. AT THE SAME TIME when piece measures 23-24-25-26-27-28 cm, dec for neck on every other row towards mid front as follows: Dec ½ repetition 4-4-4-6-6-6 times. AT THE SAME TIME when piece measures 35-36-37-38-39-40 cm, dec for armhole in the side as on back piece. After all dec, 6-6-6-6-6-7 repetitions remain for shoulder. Work until piece measures 54-56-58-60-62-64 cm, cut and fasten the thread. LEFT FRONT PIECE: Work as right front piece. SLEEVE: Work 60-60-66-66-72-72 ch (incl 8 ch to turn with) on hook size 3.5 mm with blue. Work 1 tr in the 9th ch from hook, * 2 ch, skip 2 ch, 1 tr in next ch *, repeat from *-* = 19-19-21-21-23-23 tr. Continue to work diagram M.1 (1st row is now done, beg on 2nd row) = 9-9-10-10-11-11 repetitions. When piece measures 6 cm, inc ½ repetition in each side, repeat inc every 12-7-7-7-7-7 cm 3-5-5-5-5-5 more times - read INCREASE TIP = 13-15-16-16-17-17 repetitions. When piece measures 48-47-47-46-46-45 cm (shorter measurements in the larger sizes because of longer sleeve cap and broader shoulder width) dec 1 repetition in each side for sleeve cap. Then dec ½ repetition in each side on every other row a total of 0-0-0-0-2-2 times, then on every row 6-7-8-8-6-6 times = 5-6-6-6-7-7 repetitions. Work until piece measures 57-57-58-58-59-59 cm, cut and fasten the thread. ASSEMBLY: Sew the shoulder seams. Sew in sleeves. Sew sleeve and side seams in one - sew edge to edge with neat, little stitches. CROCHET EDGE: Work an edge on hook size 3.5 mm with light grey up along right front piece, around the neckline, down along left front piece, around the bottom edge and then around the sleeves as follows: Work 1 dc, * skip 2 cm, 4 dtr in next ch, 2 ch, 4 dtr in same st, skip 2 cm, 1 dc in next st *, repeat from *-* and finish with one sl st in first dc. BUTTON COVER: Work cover for 1 button on hook size 3.5 mm with light grey as follows: Work 2 ch, then work 16 tr in the first of the 2 ch worked, finish with 1 sl st at top of first tr (= 1ST ROUND). ROUND 2: Work 1 dc in every tr and finish with 1 sl st in first dc on round. ROUND 3: Work 1 tr in every other dc and finish with 1 sl st in first tr on round = 8 tr. Place button inside the cover, sew around the edge and tighten tog. Sew button on to left front piece, directly before neck dec beg. Use holes in the pattern as button hole. |
||||||||||
Diagram explanations |
||||||||||
|
||||||||||
 |
||||||||||
 |
||||||||||
Have you finished this pattern?Tag your pictures with #dropspattern #whisperscardigan or submit them to the #dropsfan gallery. Do you need help with this pattern?You'll find 6 tutorial videos, a Comments/Questions area and more by visiting the pattern on garnstudio.com. © 1982-2026 DROPS Design A/S. We reserve all rights. This document, including all its sub-sections, has copyrights. Read more about what you can do with our patterns at the bottom of each pattern on our site. |
||||||||||


With over 40 years in knitting and crochet design, DROPS Design offers one of the most extensive collections of free patterns on the internet - translated to 17 languages. As of today we count 324 catalogues and 12290 patterns translated into English (UK/cm). 12290
We work hard to bring you the best knitting and crochet have to offer, inspiration and advice as well as great quality yarns at incredible prices! Would you like to use our patterns for other than personal use? You can read what you are allowed to do in the Copyright text at the bottom of all our patterns. Happy crafting!
Post a comment to pattern DROPS 136-13
We would love to hear what you have to say about this pattern!
If you want to leave a question, please make sure you select the correct category in the form below, to speed up the answering process. Required fields are marked *.