
Popular categories
Looking for a yarn?


Comments / Questions (101)
![]() Barbet wrote:
Barbet wrote:
Bonsoir, Puis-je réaliser l’écharpe et le bonnet avec des aiguilles droites ? Si oui comment dois-je faire ? Merci beaucoup de votre réponse. Florence
05.02.2021 - 00:10DROPS Design answered:
Bonjour Mme Barbet, tout à fait, l'écharpe se tricote en rangs, donc vous pouvez utiliser des aiguilles droites sans aucune modifications. Vous trouverez ici comment adapter les explications pour le bonnet. Bon tricot!
05.02.2021 - 08:43
![]() Marlies wrote:
Marlies wrote:
Moet ik bij de muts na 1x patroon M2 de steekmarkeerders 1 steek naar rechts verplaatsen of laat ik deze staan?
15.09.2019 - 02:33DROPS Design answered:
Dag Marlies,
Het patroon verschuift inderdaad 1 steek naar rechts na iedere herhaling in de hoogte, dus als je een markeerder hebt op het begin van de naald, verschuif je die inderdaad 1 steek naar rechts.
17.09.2019 - 08:15
![]() Tatiana wrote:
Tatiana wrote:
This pattern is absolutely same in another instruction named Lake District, drops 158-21
05.04.2019 - 22:51DROPS Design answered:
Dear Tatiana, patterns look both similar but there are slightly differences. Happy knitting!
08.04.2019 - 10:37
![]() Donna wrote:
Donna wrote:
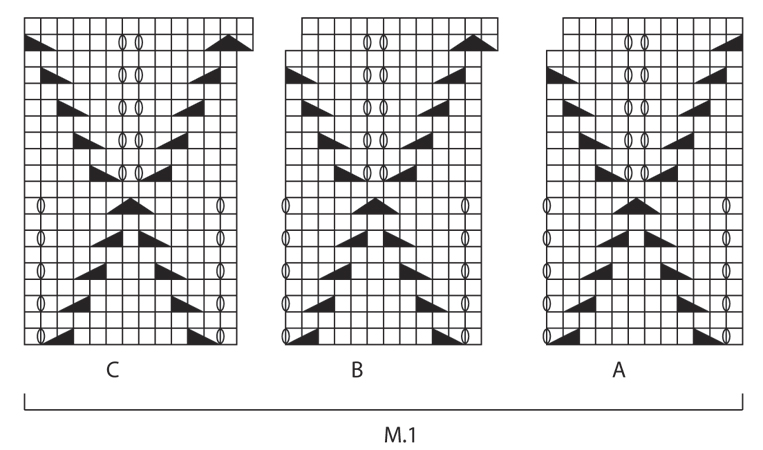
So sorry to ask, what I assume is, an elementary question: Since your chart lines are not numbered, do they start at the bottom left as RS and proceed up through the finished pattern?
29.07.2018 - 18:28DROPS Design answered:
Dear Donna, read charts from bottom RIGHT corner and go to the left, line by line (ass if you knit). All rows are seen from RS. Happy crafting!
29.07.2018 - 19:57
![]() Asma wrote:
Asma wrote:
Bonjour, pourriez-vous avoir la gentillesse de me répondre, merci!
29.12.2016 - 08:36DROPS Design answered:
Bonjour Asma, vous trouverez la réponse ci-dessous. Merci pour votre patience, bon tricot!
29.12.2016 - 14:45
![]() Asma wrote:
Asma wrote:
Bonjour,pour l'echarpe est ce qu'on tricote les 4 points mousse de chaque cote lorsqu'on tricote les 2 cm de cotes Merci
23.12.2016 - 14:31DROPS Design answered:
Bonjour Asma, les côtes anglaises vont se tricoter juste avec 1 m lis au point mousse de chaque côté (elles sont mentionnées dans l'explications des côtes anglaises). Bon tricot!
29.12.2016 - 13:22
![]() Asma wrote:
Asma wrote:
Bonjour, faut-il tricoter les 4 point mousse tout le long de l'echarpe? merci
19.12.2016 - 13:18DROPS Design answered:
Bonjour Asma, tout à fait, on tricote les diagrammes comme indiqué avec 4 m point mousse de chaque côté (= au début et à la fin de chaque rang). Bon tricot!
19.12.2016 - 16:18
![]() Chometon Laura wrote:
Chometon Laura wrote:
Bonjour Doit on joindre ou tricoter en a/r svp ?
20.11.2016 - 10:46DROPS Design answered:
Bonjour Mme Chometon, le bonnet se tricote en rond, d'abord sur l'aiguille circulaire, puis sur les aiguilles doubles pointes quand on commence les diminutions et qu'il n'y a plus suffisamment de mailles pour la circulaire. Bon tricot!
21.11.2016 - 09:53
![]() Donatella wrote:
Donatella wrote:
Grazie, sono stupita della Vostra efficienza: rispondete anche la domenica! Sto imparando molte cose nuove grazie a Voi, e la differenza nella lavorazione si nota, eccome se si nota! Un saluto da Donatella S.
03.01.2016 - 14:14
![]() Sandra wrote:
Sandra wrote:
Danke für die schnelle Antwort. Ich interpretiere das Diagramm so, dass ich die erst Runde mit Muster stricke, die zweite Runde glatt rechts, dann wieder eine Runde mit Muster und dann immer so weiter. Also das M2 insgesammt 20 Runden hat.
16.06.2015 - 11:22DROPS Design answered:
Ja, Sie haben 100%-ig richtig interpretiert, genau so machen Sie es! :-) Viel Spaß beim Stricken und gutes Gelingen!
16.06.2015 - 11:29
|
||||||||||||||||
Sweet Caroline#sweetcarolineset |
||||||||||||||||
|
|
||||||||||||||||
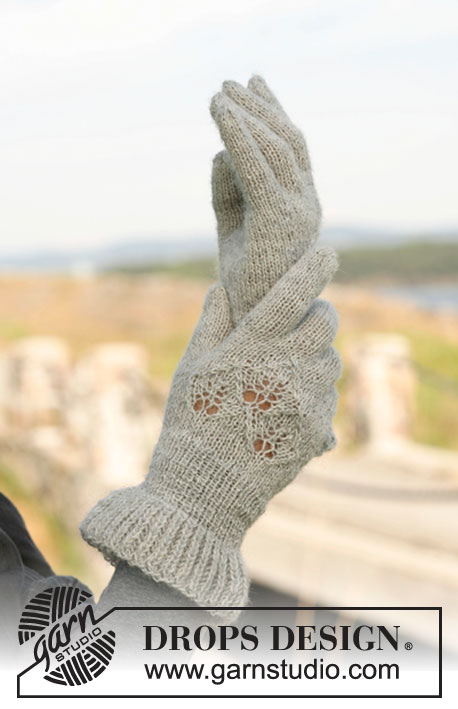
Set consists of: Knitted DROPS scarf and hat with lace pattern in “Alpaca”.
DROPS 131-11 |
||||||||||||||||
|
GARTER ST (back and forth on needle): K all rows. PATTERN: See diagrams M.1 and M.2. The diagrams show the pattern from RS. ENGLISH RIB (back and forth on needle): 1st row: 1 st in garter st, * K 1, 1 YO, slip 1 st as if to P *, repeat from *-* until 2 sts remain, finish with K 1 and 1 st in garter st. 2nd row: 1 st in garter st, * 1 YO, slip 1 st as if to P, K tog YO and slipped st *, repeat from *-* until 2 sts remain, finish with 1 YO, slip 1 st as if to P, 1 st in garter st. 3rd row: 1 st in garter st, * K tog YO and slipped st, 1 YO, slip 1 st as if to P *, repeat from *-* until 3 sts remain, K tog YO and slipped st, 1 st in garter st. Repeat 2nd and 3rd row upwards. RIB: 1st row: * K 1, P 1 *, repeat from *-* and finish with K 1. 2nd row: K over K and P over P. Repeat 2nd row upwards. --------------------------------------------------------- SCARF: The scarf consist of 2 equal parts that are sewn together in the middle at the end. Cast on 57 sts on needle size 3.5 mm with Alpaca and work 4 rows in GARTER ST - see explanation above. Work next row from RS as follows: 4 sts in garter st, diagram M.1A 1 time, diagram M.1B 2 times, diagram M.1C 1 time, 4 sts in garter st. Continue like this until piece measures approx. 72 cm, finish nicely according to pattern. On next row inc by working * K 2, 1 YO *, repeat from *-* until 1 st remains, K 1 = 85 sts. Now work 4 cm in RIB - see explanation above - make sure to work 1 row from WS at the end. Then switch to needle size 4.5 mm and work 10 rows in ENGLISH RIB - see explanation above. LOOSELY cast off on next row, cast off YOs as K sts. Knit another part the same way. ASSEMBLY: Sew the two parts tog in front loop of outermost st along cast on edge. The piece measures approx. 160 cm. HAT: Worked in the round on circular needle and then on double pointed needles. Cast on 120 sts on circular needle size 3.5 mm with Alpaca and work 5 cm in rib; K1, P1. Work next round in stocking st while at the same time inc 36 sts evenly = 156 sts. Then work diagram M.2 13 times. NOTE! After each repetition of diagram M.2 vertically, the pattern will shift 1 st to the right. Work diagram M.2 a total of 3 times vertically. Work 1 round in stocking st. * On next round dec by working all sts tog 2 by 2. Switch to double pointed needles when needed. Work 2 cm in stocking st *, repeat from *-* 1 more time = 39 sts. Dec on next round by working all sts tog 2 by 2, finish with K 1 = 20 sts. Cut the thread and pull it through the remaining sts and tighten tog, fasten tightly. |
||||||||||||||||
Diagram explanations |
||||||||||||||||
|
||||||||||||||||
 |
||||||||||||||||
 |
||||||||||||||||
Have you finished this pattern?Tag your pictures with #dropspattern #sweetcarolineset or submit them to the #dropsfan gallery. Do you need help with this pattern?You'll find 12 tutorial videos, a Comments/Questions area and more by visiting the pattern on garnstudio.com. © 1982-2026 DROPS Design A/S. We reserve all rights. This document, including all its sub-sections, has copyrights. Read more about what you can do with our patterns at the bottom of each pattern on our site. |
||||||||||||||||


With over 40 years in knitting and crochet design, DROPS Design offers one of the most extensive collections of free patterns on the internet - translated to 17 languages. As of today we count 324 catalogues and 12290 patterns translated into English (UK/cm). 12290
We work hard to bring you the best knitting and crochet have to offer, inspiration and advice as well as great quality yarns at incredible prices! Would you like to use our patterns for other than personal use? You can read what you are allowed to do in the Copyright text at the bottom of all our patterns. Happy crafting!
Post a comment to pattern DROPS 131-11
We would love to hear what you have to say about this pattern!
If you want to leave a question, please make sure you select the correct category in the form below, to speed up the answering process. Required fields are marked *.