
Popular categories
Looking for a yarn?


Comments / Questions (23)
![]() Joanna wrote:
Joanna wrote:
In M1, where do you place the stitch marker for the mid back? Do you place it at st #1 at the beginning of row, or on st #34?
01.01.2026 - 02:02DROPS Design answered:
Hi Joanna, between the first and last stitch in round. Happy knitting!
05.01.2026 - 13:32
![]() Joanna wrote:
Joanna wrote:
M1 is for 33 sts. You said to cast on 88 sts. So if you repeat the pattern twice (66sts), what happens to the remaining 22 sts?
07.12.2025 - 19:49DROPS Design answered:
Hi Joanna, you have to repeat M1 for the 3rd time (from the beginning) and work 22 remaining stitches. Please see the lesson HERE and 'When stitch count doesn’t match whole repeats of diagram'. Happy knitting!
07.12.2025 - 20:32
![]() Nicole wrote:
Nicole wrote:
Hallo, ik ben bezig met de sokken en ben bijna klaar met M2, dan begin ik met M3, met nog 68 st. op de naald. M3 is 30 st met daarbij 2 delen van 4 av. In het patroon staat dat ik bij een hoogte van 28-29-30 cm in de av delen 2x moet minderen, van 6 av naar 4 av, maar hoe kan dat als ik maar 4 av had?
08.02.2020 - 09:38DROPS Design answered:
Dag Nicole<,/p>
Deze 6 averecht steken zitten in het midden van M.3, het is de bedoeling dat je daar mindert.
09.02.2020 - 11:26
![]() Aissela Laudo wrote:
Aissela Laudo wrote:
Grazie mille per il consiglio. Allora chiedo anche se mi potete indicare su quanti ferri a doppia punta metter su i punti iniziali (3, 4 o altro) e...come meglio dividerli su questi. Grazie ancora,sempre chiari e gentili.
27.04.2018 - 23:23DROPS Design answered:
Buongiorno Aissela. Generalmente le maglie vengono divise in parti uguali sui ferri. Può usare 4 ferri a doppia punta; quando poi il numero delle maglie si riduce bastano 3 ferri. Valuti sempre in base a quale soluzione le consente di lavorare il più comodamente possibile. Buon lavoro!
28.04.2018 - 08:46
![]() Aissela Laudo wrote:
Aissela Laudo wrote:
Non appena avrò finito il modello Kaia inizierò questo bellissimo progetto. Posso chiedere se è possibile lavorarlo con ferri circolari anziché a doppia punta e nel caso che lunghezza cavo? Grazie in anticipo
23.04.2018 - 02:46DROPS Design answered:
Buongiorno Aissela, potrebbe provare ad utilizzare i ferri circolari da 23 cm, ma in ogni caso ad un certo punto andranno utilizzati i ferri a doppia punta, a causa del numero di maglie troppo basso. Buon lavoro!
23.04.2018 - 11:17
![]() Liz wrote:
Liz wrote:
Just to clarify the previous answer, should the decreases in the large P sections be done on the same rows where the decreases are occurring in the M2 pattern? Or should they be done on a different row? Thank you!!
07.02.2018 - 01:47DROPS Design answered:
Dear Liz, the decreases in the large P sections will occur on different places as in M2 pattern, they start when piece measures 12 cm and are repeated then every 4th cm a total of 3 times while decrease in M2 patterns are shown in diagram. Happy knitting!
07.02.2018 - 09:07
![]() Liz wrote:
Liz wrote:
I am enjoying working on this pattern. I am having trouble understanding where to decrease in the large P sections (where I would be decreasing from 92 sts on my needles to 68sts). I understand that at the end of section M2 there should be 68sts and I should be decreasing 3 times in the P sections does this happen on the same rows that there are decreases in the patterned sections? Thanks in advance for the help.
03.02.2018 - 02:41DROPS Design answered:
Dear Liz, you dec 4 sts in each of the large P sections a total of 3 times (= 4 sts x 2 sections x 4 times = 12 sts dec in the large P sections) + dec 6 sts in each M.2 pattern - see diagram (= 6 sts x 2 repeats = 12 sts dec) = 92 sts - 12 - 12 = 68 sts remain when all dec in P-sections are done and after M.2 has been completed in height. Happy knitting!
05.02.2018 - 10:54
![]() Erin wrote:
Erin wrote:
Sorry to have to ask another question, I am trying to understand how the decreases occur in section M2. Which row do they occur in on the M2 diagram? Where I see 2 less stitches in each row of the diagram? Thank you!
21.01.2018 - 02:37DROPS Design answered:
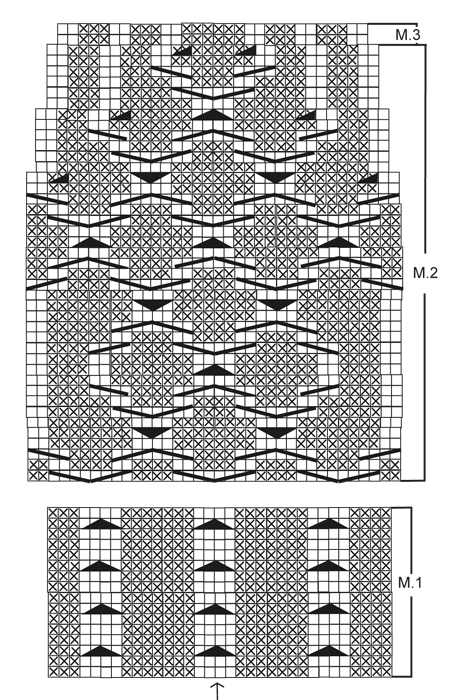
Hi Erin, The 2 squares with the dark triangle inside (the last symbol in the list where the instructions say purl 2 together) is where you decrease in M2. The symbol is first on row 29 where the 3rd and 4th stitches on the row and the 33rd and 34th stitches are purled together and then again on rows 35 and 41, where you purl 2 stitches together each time you reach the symbol. I hope this helps and happy knitting!
21.01.2018 - 07:15
![]() Erin wrote:
Erin wrote:
I'm new to knitting socks, as I'm reading the pattern should I be starting at the bottom of M1 diagram and work up (as it appears I do this for the M2 diagram)?
15.01.2018 - 04:24DROPS Design answered:
Hi Erin, Yes, unless stated otherwise, the diagrams are always read from bottom right to bottom left and then on upwards. Happy knitting!
15.01.2018 - 06:09
![]() Trine wrote:
Trine wrote:
Nå har jeg telt og finlest om og om igjen, og det står når man begynner på M2 at man skal strikke sammen to og to masker over fletten i det feltet med vrange masker. Da blir det etter hva jeg forstår bare 10 masker igjen i dette feltet og 92 masker på pinnen. Så når jeg har strikket 12 cm, står det at jeg skal felle to masker i dette feltet og da ha 10 masker igjen. Men etter den forrige fellingen hadde jeg bare 10 masker igjen allerede. Hva har jeg gått glipp av?
15.09.2017 - 13:27DROPS Design answered:
Hei Trine. Det at det står = 10 m er at det gjelder de 2 store vr-partiene som er på 10 masker, men etter fellingene er det 8 masker i hver at de 2 store vr-partiene (= 8 masker). God Fornøyelse!
20.09.2017 - 11:44
|
||||||||||||||||||||||
Riverdance#riverdancesocks |
||||||||||||||||||||||
 |
 |
|||||||||||||||||||||
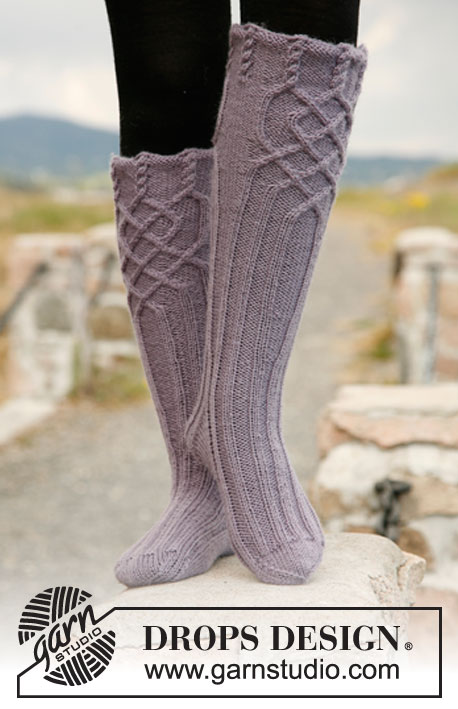
Knitted DROPS socks with cables in ”Karisma”.
DROPS 132-8 |
||||||||||||||||||||||
|
PATTERN: See diagram M.1, M.2 and M.3 - diagrams are shown from RS and show 1 repetition of pattern in width and height. HEEL DECREASE: 1st row (= RS): Work until 8 sts remain, slip 1 st as if to K, K 1, psso, turn piece. 2nd row (= WS): Work until 8 sts remain, slip 1 st as if to P, P 1, psso, turn piece. 3rd row (= RS): Work until 7 sts remain, slip 1 st as if to K, K 1, psso, turn piece. 4th row (= WS): Work until 7 sts remain, slip 1 st as if to P, P 1, psso, turn piece. Continue dec like this with 1 less st before each dec until there are 12 sts on needle. ---------------------------------------------------------- SOCK: Worked in the round on double pointed needles. Cast on 88 sts in all sizes on double pointed needles size 3 mm with Karisma. K 1 round, then work diagram M.1, insert a marker at beg of round (= mid back). AT THE SAME TIME on last round in diagram M.1, inc 1 st in every P section by working 2 P sts in the first P st in all P sections (for P section mid back make the inc at end of round) = 96 sts. Switch to double pointed needles size 3.5 mm and continue as follows: Work diagram M.2 over the first 36 sts, P the next 12 sts – at the same time K the 4 sts over cable tog 2 by 2 (i.e. dec 2 sts), work diagram M.2 over the next 36 sts and P the last 12 sts - at the same time K the 4 sts over cable tog 2 by 2 (i.e. dec 2 sts) = 92 sts. Continue like this upwards with diagram M.2 and P sts in each side. REMEMBER THE KNITTING TENSION! When piece measures 12 cm, dec 2 sts in each of the large P sections (= 10 sts) in each side – i.e. that the first 2 and last 2 P sts are worked tog. Repeat dec every 4 cm a total of 3 times. When diagram M.2 has been worked, piece measures approx. 20 cm and there are 68 sts on needle. Continue with diagram M.3 over diagram M.2 and 4 P sts in each side. When piece measures 28-29-30 cm, dec 2 sts in the large P section at the front and the back (i.e. 6 P sts becomes 4 P sts) = 64 sts. When piece measures 33-34-35 cm, dec all P 4 sts to P 2 sts (i.e. dec 8 sts) = 56 sts. When piece measures 38-40-42 cm, keep the first 26 sts (from beg of round) on needle for heel (see arrow in diagram, this marks mid back and mid front). Slip the remaining 30 sts on a stitch holder (= mid upper foot). Continue with pattern as before over the 26 heel sts for 5-5½-6 cm. Insert a marker, measure foot from here. Then work HEEL DECREASE in stocking st over all sts - see explanation above! After heel dec, knit up 11-12-13 sts on each side of heel and slip the 30 sts from stitch holder back on needle = 64-66-68 sts. Insert a marker on each side of the middle 30 sts on upper foot. Continue pattern as before over these sts and stocking st over the remaining sts – At the same time K the last 2 sts BEFORE first marker on upper foot twisted tog (i.e. work in back loop of st instead of front) and K the first 2 sts AFTER marker on upper foot tog. Repeat dec every other round a total of 8-9-8 times = 48-48-52 sts. Continue until piece measures 18-20-22 cm from marker on heel (= approx. 4-4-5 cm remain). Insert a marker in each side so that there are 24-24-26 sts on upper foot and 24-24-26 sts under foot. K all sts while AT THE SAME TIME dec for toes on each side of both markers as follows: Work until 3 sts remain before marker, K 2 tog, K 2 (marker is between these 2 sts), K 2 twisted tog. Repeat dec every other round a total of 4-4-5 times and then on every round a total of 6 times = 8 sts remain on needle. Cut the thread and pull it through the remaining sts, tighten tog and fasten. |
||||||||||||||||||||||
Diagram explanations |
||||||||||||||||||||||
|
||||||||||||||||||||||
 |
||||||||||||||||||||||
Have you finished this pattern?Tag your pictures with #dropspattern #riverdancesocks or submit them to the #dropsfan gallery. Do you need help with this pattern?You'll find 10 tutorial videos, a Comments/Questions area and more by visiting the pattern on garnstudio.com. © 1982-2026 DROPS Design A/S. We reserve all rights. This document, including all its sub-sections, has copyrights. Read more about what you can do with our patterns at the bottom of each pattern on our site. |
||||||||||||||||||||||


With over 40 years in knitting and crochet design, DROPS Design offers one of the most extensive collections of free patterns on the internet - translated to 17 languages. As of today we count 324 catalogues and 12290 patterns translated into English (UK/cm). 12290
We work hard to bring you the best knitting and crochet have to offer, inspiration and advice as well as great quality yarns at incredible prices! Would you like to use our patterns for other than personal use? You can read what you are allowed to do in the Copyright text at the bottom of all our patterns. Happy crafting!
Post a comment to pattern DROPS 132-8
We would love to hear what you have to say about this pattern!
If you want to leave a question, please make sure you select the correct category in the form below, to speed up the answering process. Required fields are marked *.