
Popular categories
Looking for a yarn?


Comments / Questions (62)
![]() Esther Schermer wrote:
Esther Schermer wrote:
Helemaal duidelijk! Bedankt voor het antwoord.
13.12.2012 - 18:08
![]() Esther Schermer wrote:
Esther Schermer wrote:
Vraag: Na het plaatsen van 2 markeerders meerden: Meerder TEGELIJKERTIJD bij een hoogte van 8 cm 1 st aan iedere kant van beide markeerders. Herhaal dit meerderen elke 4.5-5-5.5-6.5-9-9.5 cm in totaal 6-6-6-5-4-4 keer. Per keer kom ik dan op 4 st meerderen, x6 = 24 st meerderen. Daarvan zijn er 12 op het rugpand en 12 op de voorpanden (elk voorpand 6steken). Voor het rugpand kom ik op 36 cm dan dus uit op 110 st (98 +12) niet op 104 st. Wat doe ik verkeerd? Esther Schermer
12.12.2012 - 12:51DROPS Design answered:
Je hebt voor maat M 98 st voor het achterpand. Dan meerder je inderdaad 12 st in totaal op het achterpand = 110 st. Dan moet je ook 6 st afkanten voor de armsgaten bij 36 cm. 3 st op het voor- en 3 op het achterpand (= 6 st af op het achterpand) = 104 st totaal.
13.12.2012 - 16:49
![]() Mari wrote:
Mari wrote:
Ei saa aru sellest kohast: SAMAL AJAL, kui töö kõrgus on 25-26-27-28-29-30 cm, kasvata 1 silmus krae jaoks, kududes 1 õs 2 silmust seestpoolt esiosa äärt. Järgmisel ringil koo õhksilmus keerdsilmusena.
26.09.2012 - 20:15DROPS Design answered:
Pärast kahte ääresilmust tuleb teha 1 õhksilmus kraesilmuse kasvatamiseks.
30.10.2012 - 03:03
![]() Tilly wrote:
Tilly wrote:
Het meerderen voor de kraag begrijp ik niet zo: "Meerder (...) 1 st voor de kraag door 1 omsl te maken naast 2 st aan iedere kant van de voorbies". Ik neem aan dat je zowel rechts als links maar 1 steek moet meerderen. Maak je de omslag 2 steken vanaf middenvoor of 2 steken vanaf M1?
19.09.2012 - 13:57DROPS Design answered:
Je maakt de omslag 2 stk vanaf middenvoor aan beide kanten.
20.09.2012 - 13:37
![]() Evaluna wrote:
Evaluna wrote:
Ik heb er uiteindelijk nog een boord ribbelsteek aangebreid in de andere richting. Het naadje is amper te zien. Met een boord ribbelsteek van in totaal 4 cm krult het niet meer om...
09.03.2011 - 14:53
![]() DROPS Design NL wrote:
DROPS Design NL wrote:
Ik heb helaas niet zo veel ervaring mee dat Alpaca zo erg krult, alleen als u geen ribbelst breit eerst. Of vaak wordt het minder na het wassen. Tips zijn dus welkom. Gr. Tine
07.03.2011 - 15:39
![]() Evaluna wrote:
Evaluna wrote:
Ja, met Drops Alpaca.
07.03.2011 - 15:05
![]() DROPS Design NL wrote:
DROPS Design NL wrote:
Hoi. Heeft u met Alpaca gebreid of een andere kwaliteit. Alpaca krult niet zo, maar bijv merinoswol, dat heel elastisch is, dan krult het wel. Acryl krult ook sterker. Gr. Tine
07.03.2011 - 12:14
![]() Evaluna wrote:
Evaluna wrote:
Prachtig vest, alleen vind ik het jammer dat de onderste rand omkrult. Ik heb het werk al opgespeld en vochtig gemaakt, maar het wordt niet beter. Heeft u tips om dit te verhelpen?
06.03.2011 - 11:15
![]() DROPS Design NL wrote:
DROPS Design NL wrote:
Hoi. Je kan in de rondte breien op 4 of 5 nld zonder knoop (net zoals met sokken), maar je kunt ook kiezen voor een kleine rondbreinld (40 cm) of brei de magic loop op de 80 cm breinld (zie onze instructievideo's. Succes. Gr. Tine
18.02.2011 - 14:11
|
|||||||||||||
Musical Night |
|||||||||||||
|
|
|||||||||||||
Fitted DROPS jacket in stocking st with cables in ”Alpaca”. Size S-XXXL.
DROPS 123-6 |
|||||||||||||
|
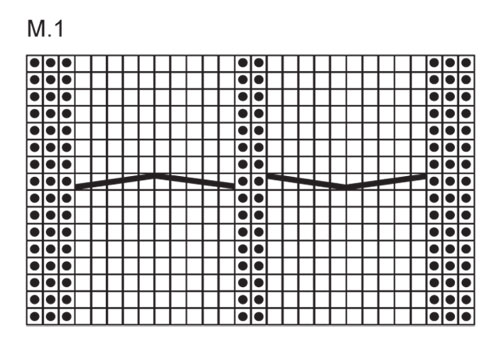
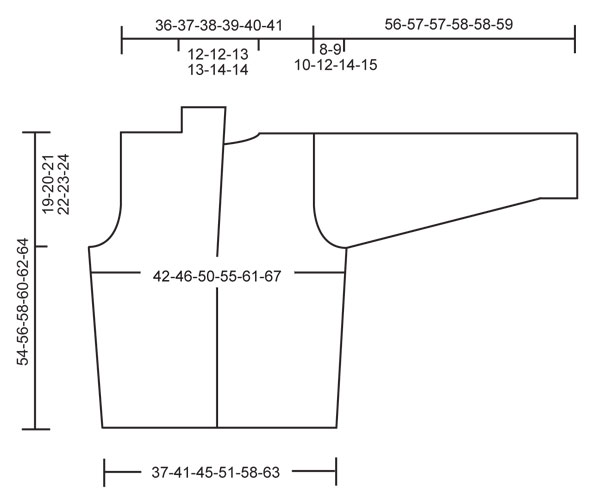
GARTER ST (back and forth on needle): K all rows. GARTER ST (in the round): K 1 round, P 1 round PATTERN: See diagram M.1 (= 28 sts). Diagram shows the pattern from RS. SHORTENED ROWS: Work shortened rows on front bands each side to make them more elastic. * K 2 rows back and forth on the 12 front band sts on one side only (or the no of sts on front band after inc), work 1 row on all sts, K 2 rows back and forth on front band sts the other side only *. NOTE! When turning mid piece tighten thread and continue as before. DECREASING TIP 1: Dec for neck from RS as follows: Right front piece (= after M.1): slip 1 st as if to K, K1, psso. Left front piece (= 2 sts before M.1): K2 tog. DECREASING TIP 2: Dec sts evenly over M.1 on cast off row by K2 tog before casting the st off. -------------------------------------------------------- JACKET: Worked back and forth on circular needle. Cast on 200-220-240-268-300-328 sts with Alpaca on circular needle size 3 mm. K 5 rows and work next row as follows from WS: K 12, 1 YO, * P2, 1 YO *, repeat from *-* a total of 9 times, K sts on row until 30 sts remain, 1 YO, repeat from *-* a total of 9 times, finish with K 12 = 220-240-260-288-320-348 sts. Work next row from RS as follows: 12 GARTER STS – see above, M.1 – see above, stocking st until 40 sts remain, finish with M.1 and 12 garter sts. Continue in pattern, stocking st and garter st like this with front bands (12 garter sts each side) in garter st until finished measurements. Insert 2 markers in piece, 66-71-76-83-91-98 sts in from each side (back piece = 88-98-108-122-138-152 sts). REMEMBER THE KNITTING TENSION! When piece measures 4 cm work SHORTENED ROWS on front bands each side – see above! Repeat the shortened rows on every 4 cm until finished measurements. AT THE SAME TIME when piece measures 8 cm inc 1 st each side of both markers. Repeat the inc on every 4.5-5-5.5-6.5-9-9.5 cm a total of 6-6-6-5-4-4 times. AT THE SAME TIME when piece measures 24-25-26-27-28-29 cm dec 1 st for neck inside M.1 on each front piece – See DECREASING TIP 1! Repeat the dec on every 1.5 cm a total of 14-14-15-15-17-17 times. AT THE SAME TIME when piece measures 25-26-27-28-29-30 cm inc 1 st for collar with 1 YO inside 2 sts each side towards front edge. On next row K YO into back of loop. Repeat the inc on every 4th row (i.e. every cm) a total of 16-17-18-19-20-21 times, work inc sts in garter st. When piece measures 35-36-37-38-39-40 cm cast off 6 sts mid under sleeve each side (= 3 sts each side of marker). Now complete each piece separately. BACK PIECE: = 94-104-114-126-140-154 sts. Cast of for armhole at beg of row each side as follows: 2 sts 1-3-4-6-8-10 times and 1 st 2-2-3-4-6-8 times = 86-88-92-94-96-98 sts. Continue in stocking st. When piece measures 52-54-56-58-60-62 cm cast off the middle 26-26-28-28-32-32 sts for neck and complete each shoulder separately. Cast off 1 st on neckline on next row = 29-30-31-32-31-32 sts left on shoulder. Cast off when piece measures 54-56-58-60-62-64 cm. LEFT FRONT PIECE: Cast off for armhole at the side as described for back piece. Continue to dec for neck and inc for collar. When all dec and inc are complete there are 67-69-71-73-73-75 sts on needle. When piece measures 54-56-58-60-62-64 cm cast off 39-40-41-42-41-42 sts for shoulder, AT THE SAME TIME dec 10 sts evenly on M.1 – See DECREASING TIP 2 = 28-29-30-31-32-33 sts left on collar. Work remaining sts on row. Continue with shortened rows on collar as follows (beg from WS): * back and forth on the 14-14-15-15-16-16 sts towards front edge only, back and forth on all sts *, repeat from *-* until collar measures 9-9-9.5-9.5-10-10 cm where shortest (measured from shoulder). Cast off. RIGHT FRONT PIECE: Like left front piece, but mirrored. SLEEVE: Worked in the round. Cast on 52-56-58-60-62-64 sts on double pointed needles size 3 mm with Alpaca. Work GARTER ST - see above! When piece measures 8 cm continue in stocking st. Insert a marker at beg of round. When piece measures 10 cm inc 1 st each side of marker. Repeat the inc on every 2.5-2.5-2-2-1.5-1.5 cm a total of 14-15-17-18-20-23 times = 80-86-92-96-102-110 sts. When piece measures 48-48-47-46-44-44 cm - NOTE! Less for the larger sizes because of longer sleeve cap and wider shoulder- cast off 6 sts mid under sleeve (= 3 sts each side of marker) and complete piece back and forth on needle, AT THE SAME TIME cast off for sleeve cap at the beg of every row each side: 2 sts 4-5-5-4-4-4 times, 1 st 2-2-4-9-12-14 times, then 2 sts each side until piece measures 55-56-56-57-57-58 cm, cast off 3 sts 1 time each side and cast off remaining sts. ASSEMBLY: Sew shoulder seams. Set in sleeves. Sew collar tog mid back and sew to back piece. Crochet buttonhole loops on right front band with crochet hook size 2.5 mm and Alpaca as follows: 1 dc, 5 ch, skip 1 cm, 1 dc. Make the loops after 4 cm, 10 cm, 16 cm and 22 cm, measured from bottom edge of jacket. |
|||||||||||||
Diagram explanations |
|||||||||||||
|
|||||||||||||
 |
|||||||||||||
 |
|||||||||||||
Have you finished this pattern?Tag your pictures with #dropspattern or submit them to the #dropsfan gallery. Do you need help with this pattern?You'll find 23 tutorial videos, a Comments/Questions area and more by visiting the pattern on garnstudio.com. © 1982-2026 DROPS Design A/S. We reserve all rights. This document, including all its sub-sections, has copyrights. Read more about what you can do with our patterns at the bottom of each pattern on our site. |
|||||||||||||


With over 40 years in knitting and crochet design, DROPS Design offers one of the most extensive collections of free patterns on the internet - translated to 17 languages. As of today we count 324 catalogues and 12290 patterns translated into English (UK/cm). 12290
We work hard to bring you the best knitting and crochet have to offer, inspiration and advice as well as great quality yarns at incredible prices! Would you like to use our patterns for other than personal use? You can read what you are allowed to do in the Copyright text at the bottom of all our patterns. Happy crafting!
Post a comment to pattern DROPS 123-6
We would love to hear what you have to say about this pattern!
If you want to leave a question, please make sure you select the correct category in the form below, to speed up the answering process. Required fields are marked *.