
Popular categories
Looking for a yarn?


Comments / Questions (94)
![]() Jonna wrote:
Jonna wrote:
Hei, Onko tämä malli mahdollista neuloa Safran puuvillalangalla vai tuleeko jakusta löysä ja ei niin istuva?
21.02.2017 - 22:28DROPS Design answered:
Hei! Voit hyvin neuloa jakun Safran-langalla, neuleesta tulee yhtä istuva kuin Alpaca-langalla neulottaessa.
27.02.2017 - 15:41
![]() Bitte Holmstrand wrote:
Bitte Holmstrand wrote:
Jeg har akkurat samme problem som Anna Lena Jawette her ovenfor med å strikke sammen en maske fra hjp foran, en fra pinnen og en fra hjp bakom arbeidet. Forklaringen som gis til Anna Lena her i kommentarfeltet er jo det samme som står i oppskriften, så spørsmålet er fortsatt : hvordan skal de tre maskene strikken SAMMEN?
26.10.2016 - 17:07DROPS Design answered:
Hej Bitte. Der er jo ikke meget mere at sige end at göre praecis som der staar i opskriften ;) 9 masker skal strikkes sammen til 3. Du saetter de förste 3 m paa en hjaelpepind bag arbejdet. Herefter de 3 naeste m paa endnu en hjaelpepind foran arbejdet. Dvs, du har nu 3 pinde med 3 masker: foran = 1, midt = 2 og bag = 3. Du strikker nu förste m p 1, p 2 og p 3 sammen (3 förste masker sammen = 1 ny maske), gentag igen med anden maske fra p 1, 2 og 3 og til slut med tredje maske: 3 masker paa pinden og du har mindsket 6 m i alt.
27.10.2016 - 10:14
![]() Charmaine wrote:
Charmaine wrote:
It should say Collar not coloured
16.10.2016 - 17:55
![]() Charmaine wrote:
Charmaine wrote:
I have knit colour up to 21 stitches but struggling with instructions from there i.e. how many times do i work back and forth on 10 stitches and how many times on all stitches. Can you please explain it in simple terms as it doesn't make sense to me
16.10.2016 - 17:46DROPS Design answered:
Dear Charmaine, repeat the short rows for the collar until this section worked over the 21 sts measures 7 cm, ie the side towards shoulder which will be then sewn along neckline on back piece, ie *work 2 rows over the first 10 sts, 2 rows over the 21 sts*, repeat from *-* until shortest side measues 7 cm. Happy knitting!
17.10.2016 - 10:05Kay W wrote:
Hi I'mknitting the sleeve and decreasing for the armhole. I'm struggling as it's not going to be 57cm in length. It also looks as if it will be much too small to sew into main piece armhole.
09.09.2016 - 17:46DROPS Design answered:
Dear Kay, check if your tension corresponds to that indicated in the pattern. Happy knitting!
10.09.2016 - 10:48Kay W wrote:
Hi I'mknitting the sleeve and decreasing for the armhole. I'm struggling as it's not going to be 57cm in length.
09.09.2016 - 17:36DROPS Design answered:
Dear Kay, have you check your tension? Happy knitting!
11.09.2016 - 09:56
![]() Charmaine wrote:
Charmaine wrote:
Hello - i have just finished decreasing for the armhole at beginning of each row as instructed below BUT i have 109 stitches left on needles not 92 as in pattern - so exactly 17 different and i don't know whether to start again with the decreasing or repeat the decreases for a second time.................. AT THE SAME TIME cast off for armhole at beg of every row each side: 2 sts 2-4-8 times and 1 st 2-9-11 times = 87-92-98 sts Many thanks
01.09.2016 - 16:57DROPS Design answered:
Dear Charmaine, there were 126 sts before starting dec for armhole, you cast off then at the beg of every row on each side: 2 sts 4 times (= 2 sts x 4 times x 2 sides = 16 sts) then dec 1 st 9 times (= 1 st x 9 times x 2 sides = 18 sts). 126 - (16+18)=92 sts. Happy knitting!
01.09.2016 - 17:16
![]() Charmaine wrote:
Charmaine wrote:
Thank you so much - I now understand and am enjoying this challenge.
02.07.2016 - 12:06
![]() Charmaine wrote:
Charmaine wrote:
Hello - I am totally stuck as i cannot work out M1 diagram to begin the decreasing - this is the first time it have used circular needles and this many stitches - i wanted to challenge myself but this is beyond me - please make it simple so that i can progress beyond the hem
27.06.2016 - 21:26DROPS Design answered:
Dear Charmaine, there will be less sts after M.1 have been worked, insert a marker at the beg and end of each repeat of M.1 and start reading pattern at the bottom corner on the right side towards the left from RS, and from the left towards the right from WS. On 1st row in M.1, work: K3, P2, K2 tog, K1, slip 1, K1, psso, P2, K3. Happy knitting!
28.06.2016 - 08:25Kay wrote:
Hi love the pattern - just a bit confused with the collar shaping - Do I only work short rows once or every time I increase/decrease at the neck edge/ collar? Thanks KAy
25.03.2016 - 17:12DROPS Design answered:
Dear Kay, the short rows worked over the 6 sts when piece measures 46-48-52 cm are worked only 1 time. After you have worked these, dec then for neck and inc for collar. Happy knitting!
29.03.2016 - 08:27
|
||||||||||||||||
Niagara Falls |
||||||||||||||||
|
|
||||||||||||||||
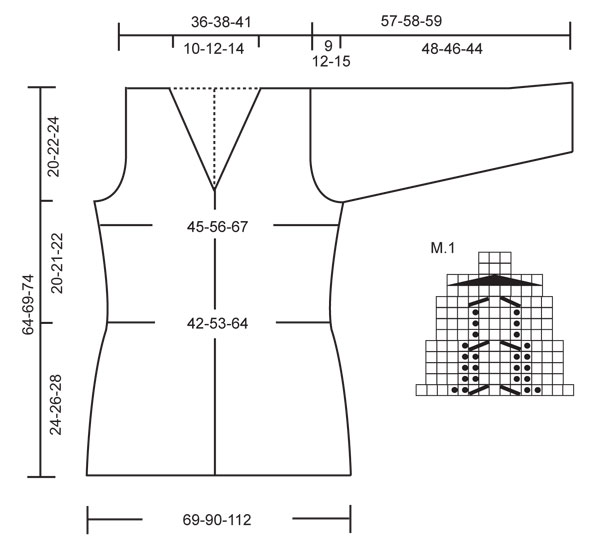
Knitted DROPS jacket with rib-pattern in ”Alpaca”. Size S - XXXL.
DROPS 123-1 |
||||||||||||||||
|
GARTER ST, back and forth on needle: K all rows. PATTERN: See diagram M.1. Diagram shows the pattern from RS. DECREASING TIP: Dec as follows after front band + K3 + P3: Slip 1 st as if to K, K1, psso. Dec as follows before P3 + K3 + front band: K2 tog. BUTTONHOLES: Make buttonholes on right front band. 1 buttonhole = cast off 3rd and 4th st from mid front and cast on 2 new sts on next row. Make buttonholes when piece measures: SIZE S/M: 8, 14, 20, 26, 32, 38 and 44 cm. SIZE L/XL: 10, 16, 22, 28, 34, 40 and 46 cm. SIZE XXL/XXXL: 8, 15, 22, 29, 36, 43 and 50 cm. -------------------------------------------------------- JACKET: Worked back and forth on circular needle from mid front. Cast on 699-915-1131 sts (includes 6 front band sts each side) on circular needle size 3 mm with Alpaca. Work front bands in GARTER ST – see above – throughout. P 1 row from WS with 6 front band sts each side and continue in rib as follows (from RS): 6 front band sts, * K3, P3 *, repeat from *-* and finish with K3 and 6 front band sts. Continue like this until piece measures approx 2-3-4 cm. Now continue as follows (from RS): 6 front band sts, 12 sts in rib as before, * M.1, 39 sts in rib as before *, repeat from *-* and finish with M.1, 12 sts in rib as before and 6 front band sts. After 1 vertical repeat of M.1 there are 543-711-879 sts on needle. Continue with K over K and P over P until piece measures 7-8-9 cm. Now continue as follows (from RS): 6 front band sts, 6 sts in rib as before, * M.1, 27 sts in rib as before *, repeat from *-* and finish with M.1, 6 sts rib as before and 6 front band sts. Remember BUTTONHOLES - see above. After M.1 there are 387-507-627 sts on needle. Continue with K over K and P over P until piece measures 12-13-14 cm. Now continue as follows (from RS): 6 front band sts, * M.1, 15 sts in rib as before *, repeat from *-* and finish with M.1 and 6 front band sts. After M.1 there are 231-303-375 sts on needle. Continue with K over K and P over P until piece measures approx 17-18-19 cm. On next row from RS inc 1 st in each P-section by making 1 YO after P3 = 267-351-435 sts. On next row (from WS) work all YO into back of loop to avoid a hole. Continue with K over K and P over P until piece measures 24-26-28 cm. On next row from RS dec 1 st in each P-section by P tog the last 2 P sts = 231-303-375 sts. Work 1 row from WS with K over K and P over P. Now insert a marker in the 62nd-80th-98th st from each side (back piece = 107-143-179 sts). Continue as follows (from RS): 6 front band sts, K3, P3, stocking st on the next 39-57-75 sts AT THE SAME TIME dec 4-8-13 sts evenly, P3, K3, P3, K3 (marker sits in the middle of these sts), P3, K3, P3, stocking st on the next 87-123-159 sts AT THE SAME TIME dec 6-15-25 sts evenly, P3, K3, P3, K3 (marker sits in the middle of these sts), P3, K3, P3, stocking st on the next 39-57-75 sts AT THE SAME TIME dec 4-8-13 sts evenly, P3, K3 and 6 front band sts. There are now 217-272-324 sts on needle. Continue with K over K, P over P and stocking st over stocking st, and front bands as before. When piece measures 27-29-31 cm inc 1 st before and after rib-section (= 21 sts) each side (= 4 inc). Inc by making 1 YO. On next row work YO into back of loop and continue to work inc sts in stocking st. Repeat the inc on every 6 cm a total of 3 times = 229-284-336 sts. Continue as before until piece measures 44-47-50 cm. Now cast off 9 sts each side (i.e. st with markers + 4 sts each side of marker) for armhole and complete each piece separately. BACK PIECE: = 99-126-152 sts. Continue back and forth on needle with K over K, P over P and stocking st over stocking st. AT THE SAME TIME cast off for armhole at beg of every row each side: 2 sts 2-4-8 times and 1 st 2-9-11 times = 87-92-98 sts. Now continue in stocking st on all sts. When piece measures 62-67-72 cm cast off the middle 19-24-30 sts for neck and complete each shoulder separately. Continue in stocking st and cast off to shape the neckline at the beg of every row from mid front: 1 st 2 times = 32 sts left on shoulder. Piece measures approx 64-69-74 cm. Cast off remaining sts. RIGHT FRONT PIECE: = 56-70-83 sts. Continue back and forth on needle with K over K, P over P and stocking st over stocking st. AT THE SAME TIME cast off for armhole at the side as described for back piece. AT THE SAME TIME when piece measures 46-48-52 cm work 2 rows back and forth on the 6 front band sts only. Now dec for neck and inc for collar as follows: Inc 1 st by making 1 YO inside 6 front band sts, on next row K YO into back of loop to avoid a hole, and then include inc sts in garter st on front band. Dec 1 st inside front band + K3/P3 - See DECREASING TIP! Inc 1 st and dec 1 st on approx every 1 cm a total of 12-15-18 times = 18-21-24 front band sts. When piece measures 64-69-74 cm cast off 32 sts for shoulder, work the 18-21-24 front band sts and now continue with collar as follows (Row 1 = from RS): * Work back and forth on 8-10-12 sts only, work back and forth on all sts *, repeat from *-* until collar measures approx 6-7-8 cm (measured where shortest). Cast off. LEFT FRONT PIECE: Like right front piece, but mirrored. SLEEVE: Worked in the round. Cast on 91-103-103 sts on circular needle size 3 mm with Alpaca. K 1 round. Insert a marker at beg of round = mid under sleeve. Continue as follows: P2, * K3, P3 *, repeat from *-* and finish with K3 and P2. Continue like this until piece measures 2-3-4 cm. Now continue as follows: 17-23-23 stocking sts, rib as before on the next 21 sts, M.1, rib as before on the next 21 sts and 17-23-23 stocking sts. AT THE SAME TIME when piece measures approx 3 cm inc 2 sts mid under sleeve (i.e. 1 st each side of marker). Repeat the inc on every 2.5-2-1.5 cm a total of 18-19-25 times (work inc sts in stocking st). After M.1 continue with K over K, P over P and stocking st over stocking st until piece measures 7-8-9 cm. Now continue as follows: stocking st to the rib, 15 sts in rib as before, M.1, 15 sts in rib as before and stocking st to the end of round. After M.1 continue with K over K, P over P and stocking st over stocking st until piece measures 12-13-14 cm. Now continue as follows: stocking st to the rib, 9 sts in rib, M.1, 9 sts in rib and stocking st to the end of round. After M.1 continue with stocking st each side and 21 sts in rib mid upper sleeve. When all inc and dec are complete there are 91-105-117 sts on needle. Continue until piece measures 48-46-44 cm (less for the larger sizes because of longer sleeve cap and wider shoulders). Now cast off 8 sts mid under sleeve (i.e. 4 sts each side of marker) and continue back and forth on needle. AT THE SAME TIME cast off for sleeve cap at the beg of every row each side: 2 sts 4-5-5 times and 1 st 4-8-13 times, then 2 sts each side until sleeve measures 56-57-58 cm. Now cast off 4 sts at beg of the next 2 rows and cast off remaining sts. Piece measures approx 57-58-59 cm. ASSEMBLY: Sew shoulder seams. Set in sleeves. Sew tog collar mid back and sew to neck on back piece. Sew on buttons. |
||||||||||||||||
Diagram explanations |
||||||||||||||||
|
||||||||||||||||
 |
||||||||||||||||
Have you finished this pattern?Tag your pictures with #dropspattern or submit them to the #dropsfan gallery. Do you need help with this pattern?You'll find 22 tutorial videos, a Comments/Questions area and more by visiting the pattern on garnstudio.com. © 1982-2026 DROPS Design A/S. We reserve all rights. This document, including all its sub-sections, has copyrights. Read more about what you can do with our patterns at the bottom of each pattern on our site. |
||||||||||||||||


With over 40 years in knitting and crochet design, DROPS Design offers one of the most extensive collections of free patterns on the internet - translated to 17 languages. As of today we count 324 catalogues and 12290 patterns translated into English (UK/cm). 12290
We work hard to bring you the best knitting and crochet have to offer, inspiration and advice as well as great quality yarns at incredible prices! Would you like to use our patterns for other than personal use? You can read what you are allowed to do in the Copyright text at the bottom of all our patterns. Happy crafting!
Post a comment to pattern DROPS 123-1
We would love to hear what you have to say about this pattern!
If you want to leave a question, please make sure you select the correct category in the form below, to speed up the answering process. Required fields are marked *.