
Popular categories
Looking for a yarn?


Comments / Questions (27)
![]() Mette wrote:
Mette wrote:
Hvordan skal jeg forstå M1 ? Når den siger tre af hver i diagrammet?
04.05.2020 - 20:12
![]() Tona Bengtsson wrote:
Tona Bengtsson wrote:
Alpace er spundet af 3 tråde. Skal man kun bruge den ene?
21.03.2018 - 15:40DROPS Design answered:
Hej Tona, nej du bruger hele tråden og strikker den sammen med DROPS Kid-Silk. God fornøjelse!
22.03.2018 - 12:20
![]() Bianca Van Dam wrote:
Bianca Van Dam wrote:
Is dit patroon ook te maken met een enkele draad? Bv. Door andere naald of andere wol (welke dan?) te gebruiken?
16.12.2012 - 15:34DROPS Design answered:
Ja, kijk op het overzicht van garencategorieën en kies een garen uit categorie B (naald 4). Maar brei altijd eerst een proeflapje om zeker te zijn van de stekenverhouding van het patroon.
19.12.2012 - 13:04
![]() Muslima wrote:
Muslima wrote:
Absolument superbe,j'ai deja la laine
11.04.2010 - 19:44
![]() Maila wrote:
Maila wrote:
Tämä on aivan ihana malli tyttärilleni jotka odottavat kesävauvaa.loistava malli ison masun päälle ja kevyt t-paidan ja leggingsien kanssa.
05.04.2010 - 08:15
![]() DROPS Design NL wrote:
DROPS Design NL wrote:
Je wilt dus dit model met 2 draden Alpaca breien? Je moet dan gewoon het dubbele aantal bollen Alpaca nemen. Dwz, voor maat S 600 gram (12 bollen). Normaal zou je het aantal berekenen met gebruik van de looplengte van de garens. Deze kan je vinden op de kleurenoverzichten. Maar het is hier heel eenvoudig omdat je al met 1 draad Alpaca breit. Let dan wel op dat de stekenverhouding gaat kloppen! 2 draden Alpaca is dikker dan 1 draad Alpaca/1 draad Kid Silk. Succes ermee. Gr. Tine
12.02.2010 - 10:02
![]() Sally wrote:
Sally wrote:
Als ik bij dit patroon het aantal bollen KID-Silk wil vervangen voor Alpaca, heb ik dan dezelfde hoeveelheid nodig? Of is er misschien een andere optie?
11.02.2010 - 16:37Treacy wrote:
Lovely
24.01.2010 - 07:36
![]() Irene Hansen wrote:
Irene Hansen wrote:
Den bliver jeg også nødt til at strikke,flot farve og god model..
22.01.2010 - 22:23
![]() Tytti wrote:
Tytti wrote:
Ihana!!!
19.01.2010 - 10:18
|
||||||||||
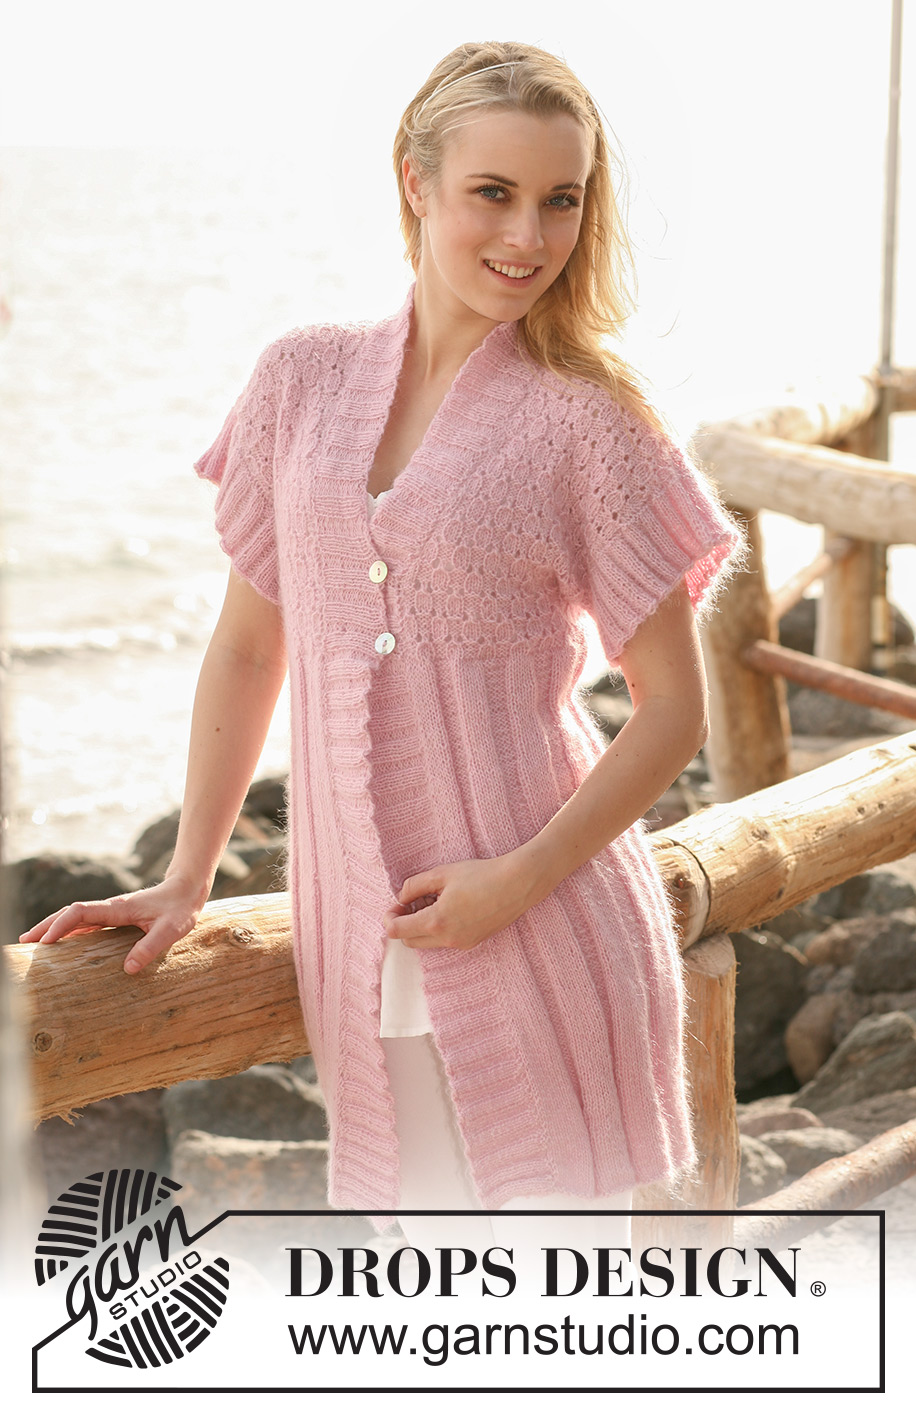
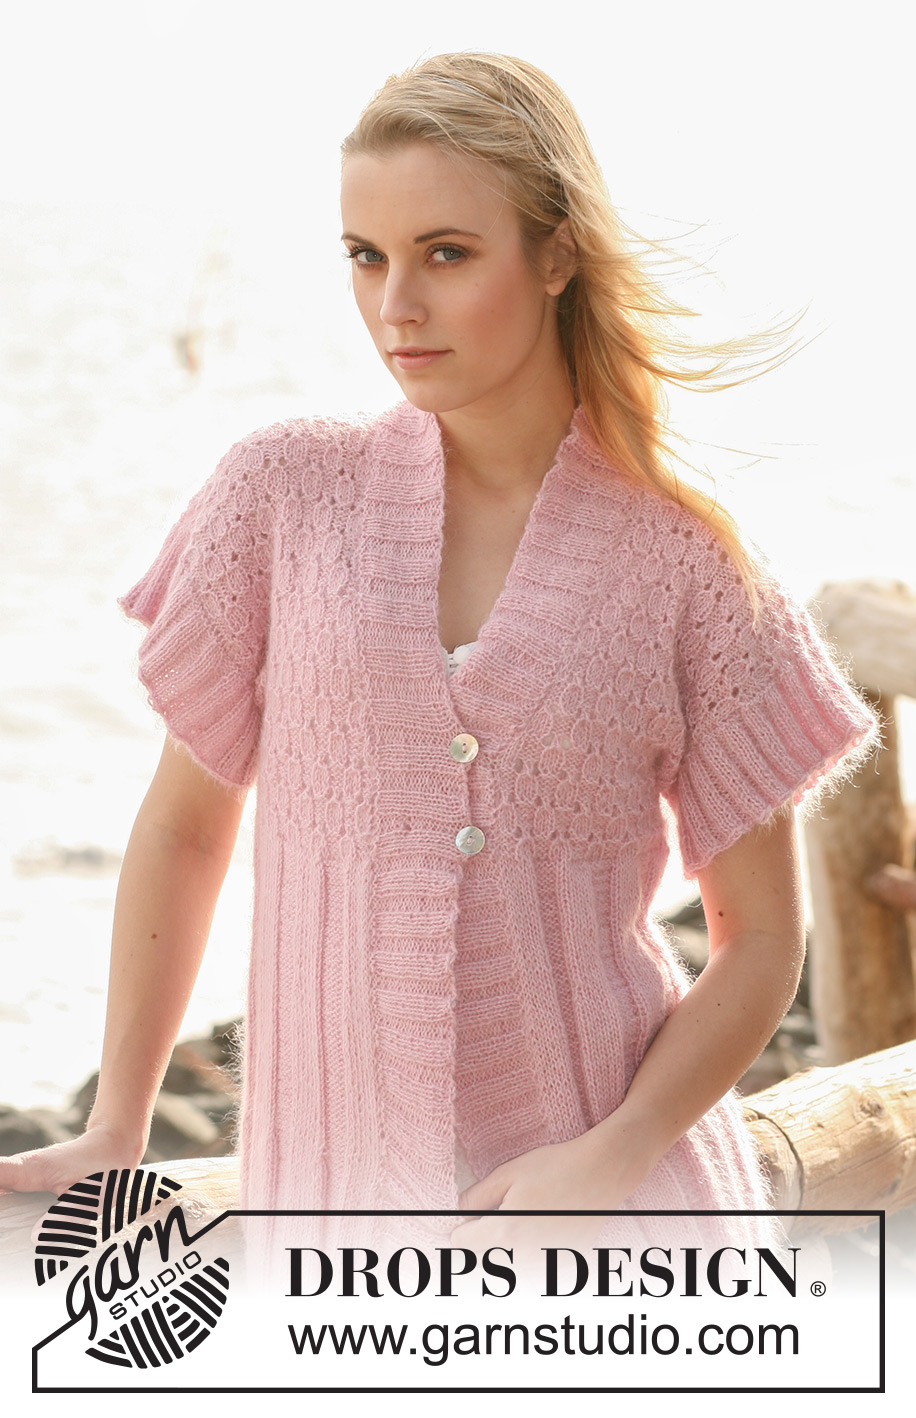
Gotha#gothacardigan |
||||||||||
 |
 |
|||||||||
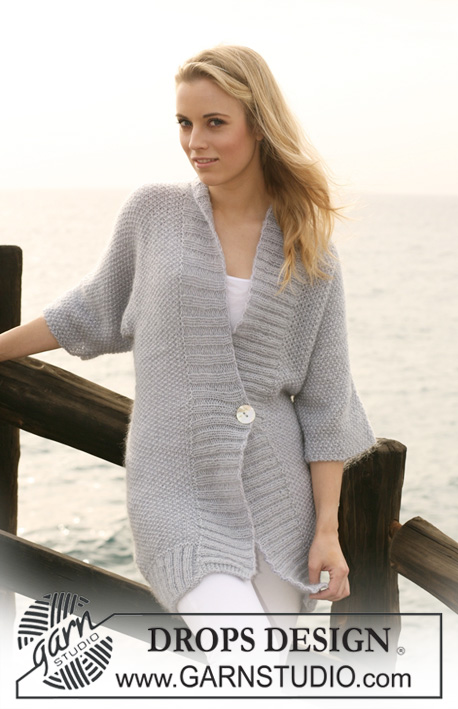
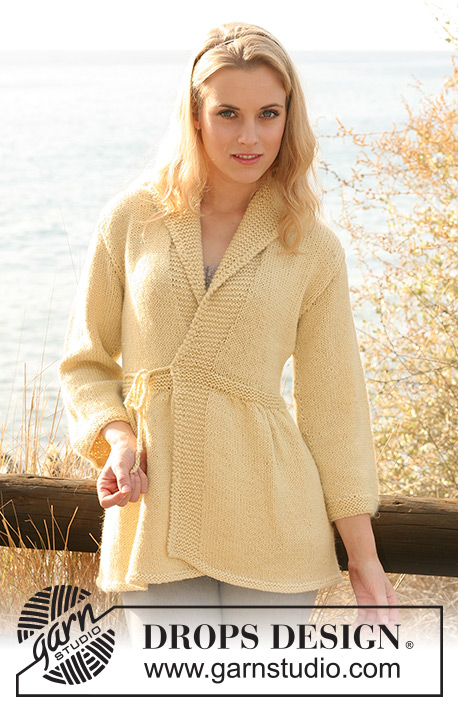
Knitted DROPS jacket with short sleeves, rib and textured pattern in ”Alpaca” and ”Kid-Silk”. Size S - XXXL.
DROPS 118-30 |
||||||||||
|
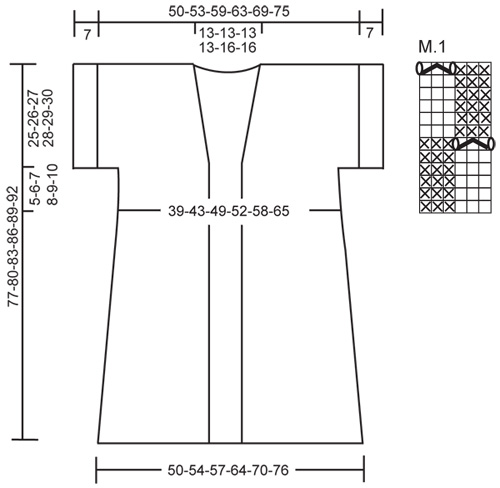
GARTER ST (back and forth on needle): K all rows. PATTERN: See diagram M.1. Diagram shows the pattern from RS – NOTE: first row in diagram = WS. DECREASING TIP (applies to neckline): Dec 1 st for neck by K/P 2 tog inside 1 edge st. INCREASING TIP (applies to sleeve edge and front bands): Inc 1 st by making 1 YO. On next row work YO into back of loop to avoid a hole. BUTTONHOLES: Make 2 buttonholes on right front band approx 24-26-27-29-30-32 and 30-32-34-36-38-40 cm from shoulder (or where required). 1 BUTTONHOLE = cast off 2 sts and cast on 2 new sts on next row (for neatest result make buttonholes in P-section, as seen from RS). -------------------------------------------------------- -------------------------------------------------------- JACKET: Worked back and forth on circular needle from mid front. Cast on 236-252-268-300-332-364 sts (includes 1 edge st each side) on circular needle size 4 mm with Alpaca and Kid-Silk (= 2 threads). Work 2 rows GARTER ST - see above - (first row = RS), then 2 rows stocking st and now continue as follows from RS: 1 edge st in garter st, rib, K10/P6, until 11 sts remain, finish with K10 and 1 edge st in garter st. Continue in rib like this. When piece measures 10 cm dec 1 st on the right side of each K-section (as seen from RS) = K9/P6. Continue in rib K9/P6 with 1 edge st each side. Now repeat the dec on the left and on the right side alternately of all K-sections (as seen from RS) when piece measures 20, 30 and 40 cm = 176-188-200-224-248-272 sts = K6/P6. Continue in rib. When piece measures 47-48-49-50-51-52 cm K 1 row on all sts from RS, AT THE SAME TIME dec 39-33-21-39-39-39 sts evenly = 137-155-179-185-209-233 sts. Now continue in M.1 with 1 edge st each side (first row in diagram = WS). When piece measures approx 52-54-56-58-60-62 cm - adjust to after the 6th or the last row in a repeat – divide piece in 2 and complete back and front pieces separately. Slip 31-37-43-43-49-55 sts each side towards mid front on separate stitch holders. BACK PIECE: = 75-81-93-99-111-123 sts. Continue in M.1. AT THE SAME TIME cast on 10 new sts each side at the end of the next 2 rows for sleeves = 95-101-113-119-131-143 sts. Continue in M.1 with 1 edge st each side. When piece measures 75-78-81-84-87-90 cm cast off the middle 23-23-23-23-29-29 sts for neck and complete each shoulder separately. Cast off 1 st on neckline on next row = 35-38-44-47-50-56 sts left on shoulder. Continue in M.1 with 1 edge st each side and cast off with K over K and P over P when piece measures approx 77-80-83-86-89-92 cm - adjust to after the 6th or the last row in a repeat. RIGHT FRONT PIECE: Slip the 31-37-43-43-49-55 sts back on needle. Continue in M.1, AT THE SAME TIME cast on 10 new sts at the end of row towards the side for sleeve = 41-47-53-53-59-65 sts. Continue in M.1 with 1 edge st each side. AT THE SAME TIME when piece measures 53-55-57-59-61-63 cm dec 1 st for neck towards mid front - see DECREASING TIP! Repeat the dec on every 8-6-6-10-6-6 row a total of 6-9-9-6-9-9 times = 35-38-44-47-50-56 sts – NOTE: work sts not fitting into pattern when dec in rib without YO. Continue in M.1 with 1 edge st each side and cast off when piece measures approx 77-80-83-86-89-92 cm - adjust to back piece. LEFT FRONT PIECE: = 31-37-43-43-49-55 sts. Like right front piece, but mirrored. ASSEMBLY: Sew shoulder seams. Sew under arm seams inside 1 edge st. SLEEVE EDGE: Worked in the round on small circular needle. Pick up 100-104-108-112-116-120 sts inside 1 edge st round sleeve edge on small circular needle size 3.5 mm with Alpaca and Kid-Silk (= 2 threads). P 1 round, K 1 round, AT THE SAME TIME inc 20-22-24-26-22-24 sts evenly on round – see INCREASING TIP = 120-126-132-138-138-144 sts. Now continue in rib, K3/P3. When sleeve edge measures 7 cm cast off with K over K and P over P. Repeat round the other sleeve. FRONT BAND/COLLAR: Pick up from RS approx 168-174-180-186-194-200 sts along right front piece from bottom edge to mid back on circular needle size 3.5 mm with Alpaca and Kid-Silk. K 1 row from WS, AT THE SAME TIME inc evenly to 205-211-217-229-241-247 sts (divisible by with 6 + 1). Now work rib as follows, beg from RS (= bottom edge): 3 GARTER STS, rib K3/P3 until 4 sts remain and finish with K3 and 1 GARTER ST. Continue in rib like this with K over K, P over P and garter st over garter st. When front band measures 3 cm insert a marker after 37-37-37-43-43-43 sts from mid back. Continue in rib as before, AT THE SAME TIME inc 1 st in each P-section (as seen from RS) on the 37-37-37-43-43-43 sts = 6-6-6-7-7-7 inc sts (to make front band wide enough round neckline). When front band measures 6 cm make 2 BUTTONHOLES - see above. When front band measures 7 cm cast off all sts with K over K and P over P. Repeat along left front piece as follows: Pick up sts from RS from mid back to bottom edge and K 1 row from WS. Work next row as follows from RS (= mid back): 1 garter st, rib, K3/P3, until 3 sts remain, work these in garter st. NOTE: Do not make buttonholes on left front band. Sew front bands tog mid back. Sew buttons on left front band. |
||||||||||
Diagram explanations |
||||||||||
|
||||||||||
 |
||||||||||
Have you finished this pattern?Tag your pictures with #dropspattern #gothacardigan or submit them to the #dropsfan gallery. Do you need help with this pattern?You'll find 22 tutorial videos, a Comments/Questions area and more by visiting the pattern on garnstudio.com. © 1982-2026 DROPS Design A/S. We reserve all rights. This document, including all its sub-sections, has copyrights. Read more about what you can do with our patterns at the bottom of each pattern on our site. |
||||||||||


With over 40 years in knitting and crochet design, DROPS Design offers one of the most extensive collections of free patterns on the internet - translated to 17 languages. As of today we count 324 catalogues and 12290 patterns translated into English (UK/cm). 12290
We work hard to bring you the best knitting and crochet have to offer, inspiration and advice as well as great quality yarns at incredible prices! Would you like to use our patterns for other than personal use? You can read what you are allowed to do in the Copyright text at the bottom of all our patterns. Happy crafting!
Post a comment to pattern DROPS 118-30
We would love to hear what you have to say about this pattern!
If you want to leave a question, please make sure you select the correct category in the form below, to speed up the answering process. Required fields are marked *.