
Popular categories
Looking for a yarn?


Comments / Questions (55)
![]() Salambo wrote:
Salambo wrote:
Pouvez vous m'aider a réaliser le diagramme du bonnet. merci
14.12.2013 - 21:11
![]() Susanne wrote:
Susanne wrote:
Danke für eure Rückmeldung. Ich habe die festen Maschen nicht in die Vorreihe eingehäkelt, deshalb die Löcher. Habe zuerst den Schal gemacht, dann die Mütze deshalb hatte ich den Hinweis noch nicht gelesen. Jetzt ist alles fertig uns sieht gut aus.
13.11.2013 - 14:32
![]() Susanne wrote:
Susanne wrote:
Hallo liebes Garnstudio-Team, ich habe Probleme beim Schal. Bei Teil M.2 bleiben unter den 6-er Luftmaschenbögen fast faustgroße Löcher. Im Foto sieht euer Muschelmuster dichter aus. Irgendwas mache ich scheinbar falsch. Für Hilfe wäre ich dankbar.
02.11.2013 - 15:52DROPS Design answered:
Liebe Susanne, mit 6 Lm sollten keine faustgroßen Löcher entstehen. Stimmt Ihre Maschenprobe sonst?
04.11.2013 - 18:35
![]() Monika Trtková wrote:
Monika Trtková wrote:
V českém překladu je podle mě chyba. Např. v 6. řadě se háčkuje krátký sloupek do středu skupiny řetízkových ok v 5. řadě. Ale já si myslím, že by se ten ks měl dělat až do středu mušliček ze 4. řady. Jinak ve ve vzoru vznikají obrovské díry. Koukala jsem do anglického návodu, ale v angličtině nejsem nejlepší, přesto myslím, že tam je to napsáno správně.
21.10.2013 - 13:13DROPS Design answered:
Děkujeme za upozornění, návod je opravený. Hodně zdaru! Hana
28.08.2014 - 09:43
![]() Babett wrote:
Babett wrote:
Liebes Garnstudio-Team, Danke für die Antwort. Leider habe ich noch nie eine Anleitung umgerechnet. Im Internet finde ich auch keine Tipps. Leider sind die Garnalternativen für das Modell alle sehr "winterlich" außerdem habe ich das o.g. Garn jetzt auch schon gekauft :/. Sie schreiben Cotton Viscose muss 4fach verhäkelt werden. Bedeutet das, dass ich alle Angaben im Muster x4 rechne. Vielen Dank für Ihre Hilfe. Liebe Grüße Babett
06.05.2013 - 15:00DROPS Design answered:
Liebe Babett, Sie nehmen nur den Faden 4-fach und ändern die Anleitung nicht. Aber bitte eine Maschenprobe machen, damit es nachher auch passt.
07.05.2013 - 06:59
![]() Babett wrote:
Babett wrote:
Liebes Garnstudio- Team, ich würde o.g. Baske gern in mit DROPS COTTON VISCOSE häkeln. Sozusagen als leichte Sommerbaske. Ich arbeite momentan schon mit einer 4er Nadel und habe die Machenanzahl verdoppelt. Trotzdem komme ich nicht zurecht. Was mache ich falsch? Vielen Dank für Ihre Hilfe. Liebe Grüße Babett
05.05.2013 - 18:37DROPS Design answered:
Liebe Babett, da Sie die Anleitung komplett umrechnen müssten, ist schwer zu sagen, mit was Sie nicht zurechtkommen. Bitte schauen Sie doch unter Garnalternativen oder unter Garngruppen nach, wenn Sie ein Material austauschen möchten. Cotton Viscose ist Garngruppe A und muss 4-fach verhäkelt werden um die gleiche Maschenprobe zu erhalten wie Eskimo (bitte vorher ausprobieren, ob bei Ihnen die Maschenprobe so stimmt). Gutes Gelingen!
06.05.2013 - 08:55
![]() Kim wrote:
Kim wrote:
In de 4e tour staat: 1 v in elk 5-l-boogjes van de vorige tr - haak ook deze v in het stk van de 2e tr. Betekent dat 1 vaste in de middelste losse van het boogje waarbij je dan ook meteen door het stokje van de 2e tour heensteekt? Of in elk van de 5 lossen een vaste?
31.03.2013 - 20:28DROPS Design answered:
Je moet die 1 v in elk van de 5-l-boogjes van toer 3 haken EN ook in het stk van toer 2.
16.05.2013 - 12:57
![]() Margreet wrote:
Margreet wrote:
Hoeveel garen heb je nodig voor alleen de muts?
02.03.2013 - 14:32DROPS Design answered:
Dit kunnen wij op basis van het patroon niet precies aangeven. Wellicht hebt u aan de helft van het garen ruim voldoende, maar koop altijd een bol extra, dan weet u zeker dat u uitkomt.
15.03.2013 - 08:20
![]() Israel wrote:
Israel wrote:
Pour le bonnet, les 10 brides du rang2 ne suffisent pas pour les rangs suivants, il est impossible d avoir 5 coquilles.
16.12.2012 - 10:46DROPS Design answered:
Bonjour Israel, au 3ème rang, vous devez crocheter 1DB, 1ml et 1 DB dans la même maille, des parenthèses ont été ajoutées pour faciliter la compréhension. Bon crochet !
16.12.2012 - 11:56
![]() Delaspre wrote:
Delaspre wrote:
Je souhaiterai avoir la grille du bonnet, merci, cordialement
13.12.2012 - 17:44
|
||||||||||||||||||||||
Doce de Coco |
||||||||||||||||||||||
|
|
||||||||||||||||||||||
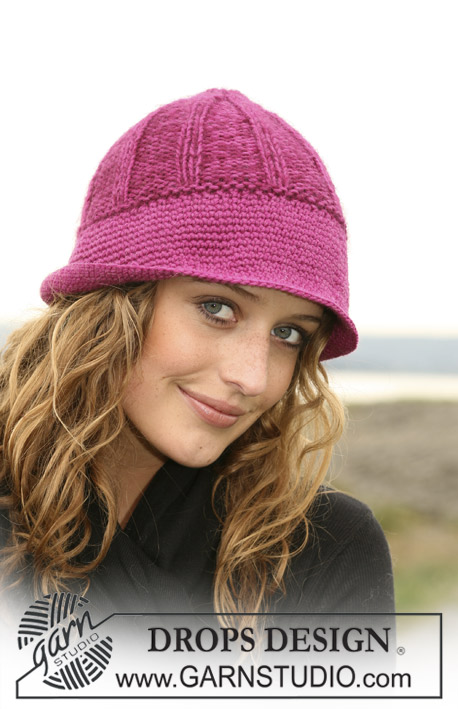
DROPS crochet beret and scarf with shell pattern in ”Snow”.
DROPS 109-49 |
||||||||||||||||||||||
|
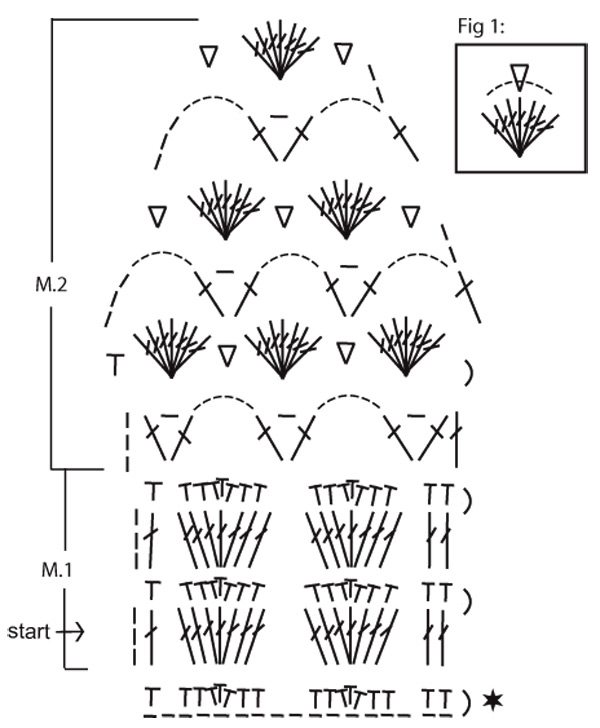
HAT Crochet tip: Always replace first dc on round with 1 ch, first tr with 3 ch and first dtr with 4 ch. Finish each round with 1 sl st in first dc/tr/dtr on round. Decreasing tip: Dec 1 dc as follows: Work 1 dc without pulling thread through sts (= 2 sts on hook). Work next dc and now pull thread through all 3 sts on hook. Hat: Work 3 ch on hook size 8 mm with Snow and form a ring with a sl st. See Crochet tip! Round 1: 5 dc in ring. Round 2: 2 tr in each dc = 10 tr. Round 3: 4 ch (= 1 dtr) + 1 ch + 1 dtr in first tr, 5 ch, * skip 1 tr, 1 dtr + 1 ch + 1 dtr in next tr, 5 ch *, repeat from *-*, finish round with skipping the last tr, 1 sl st in 4th ch from beg of round. Round 4: 1 sl st in first ch-loop, in all 1-ch-loops from previous round work 6 dtr (= 1 shell) and in all 5-ch-loops from previous round work 1 dc – crochet this dc through tr from round 2 as well - *, finish round with 1 sl st in 4th ch from beg of round = 5 dtr-groups (= 5 shells). Round 5: 4 ch (= 1 dtr), * 7 ch, skip shell, 1 dtr + 1 ch + 1 dtr + 1 ch + 1 dtr in dc between 2 shells *, repeat from *-*, and finish with 7 ch, 1 dtr + 1 ch + 1 dtr + 1 ch in the last dc and 1 sl st in 4th ch from beg of round. Round 6: Work sl st to the middle of the first ch-loop, * 1 dc in the middle of 7-ch-loop – crochet this dc down between dtr from shell on round 4 as well - 6 dtr in the first ch-loop, 1 dc in the middle of the 3 dtr, 6 dtr in the second 1-ch-loop *, repeat from *-*, and finish with 1 sl st in first dc from beg of round. Round 7: 9 ch, * skip shell, 1 dtr + 1 ch + 1 dtr in dc between 2 shells, 5 ch *, repeat from *-* and finish with 1 dtr + 1 ch in the last dc and 1 sl st in 4th ch from beg of round. Round 8: Work sl sts to the middle of ch-loop, in all 5-ch-loops work 1 dc in the middle of loop – crochet this dc through stitch from round 6 as well -, and in all 1-ch-loops work 6 dtr. Finish round with 1 sl st in first dc from beg of round (= 10 shells). Round 9: 10 ch, * skip shell, 1 dtr + 1 ch + 1 dtr in dc between 2 shells, 6 ch *, repeat from *-* and finish with 1 dtr + 1 ch in the last dc and 1 sl st in 4th ch from beg of round. Round 10: Worked sl sts to the middle of ch-loop. In all 6-ch-loops work 1 dc in the middle of loop - crochet this dc down between dtr in shell from round 8 as well - and in all 1-ch-loops work 6 dtr, finish with 1 sl st in first dc from beg of round. Round 11: 1 dc in each dtr from previous round = 60 dc. Round 12: * 1 dc in each of the first 3 dc, 2 dc tog – see Decreasing tip! *, repeat from *-* = 48 dc. Round 13: 1 dc in each dc. Round 14: * 1 dc in each of the first 2 dc, 2 dc tog *, repeat from *-* = 36 dc. Round 15 to 17: 1 dc in each dc, cut the thread. SCARF Pattern: See diagram M.1 and M.2. Scarf: Worked in 2 pieces, sewn tog in the middle afterwards. First piece: Crochet 18 loose ch with Snow (includes 1 ch to turn with) on crochet hook size 8 mm. Row 1: 1 dc in 2nd ch from hook, 1 dc in next ch, skip 1 ch, 1 dc in each of the next 2 ch, 3 dc in next dc, 1 dc in each of the next 2 ch, skip 2 ch, 1 dc in each of the next 2 ch, 3 dc in next ch, 1 dc in each of the next 2 ch, skip 1 ch, 1 dc in the last ch = 17 dc. Now continue in M.1 until piece measures approx 28 cm – adjust to a full repeat – and then work M.2. After M.2 piece measures approx 42 cm. Second piece: Like first piece until piece measures approx 17 cm. Now divide piece in the centre (creating an oblong hole to put the other piece through). Work row to the centre = 9 sts, turn piece, and work rows back and forth on these 9 sts for 10 cm, cut the tread. Repeat on the other side. Hole now measaures 10 cm. Work 1 row on all sts (= 18 sts) and now work M.2 as described for first piece. Assembly: Sew tog the 2 pieces mid back, sew edge to edge to avoid a chunky seam. |
||||||||||||||||||||||
Diagram explanations |
||||||||||||||||||||||
|
||||||||||||||||||||||
 |
||||||||||||||||||||||
Have you finished this pattern?Tag your pictures with #dropspattern or submit them to the #dropsfan gallery. Do you need help with this pattern?You'll find 7 tutorial videos, a Comments/Questions area and more by visiting the pattern on garnstudio.com. © 1982-2026 DROPS Design A/S. We reserve all rights. This document, including all its sub-sections, has copyrights. Read more about what you can do with our patterns at the bottom of each pattern on our site. |
||||||||||||||||||||||


With over 40 years in knitting and crochet design, DROPS Design offers one of the most extensive collections of free patterns on the internet - translated to 17 languages. As of today we count 324 catalogues and 12290 patterns translated into English (UK/cm). 12290
We work hard to bring you the best knitting and crochet have to offer, inspiration and advice as well as great quality yarns at incredible prices! Would you like to use our patterns for other than personal use? You can read what you are allowed to do in the Copyright text at the bottom of all our patterns. Happy crafting!
Post a comment to pattern DROPS 109-49
We would love to hear what you have to say about this pattern!
If you want to leave a question, please make sure you select the correct category in the form below, to speed up the answering process. Required fields are marked *.