
Popular categories
Looking for a yarn?


Comments / Questions (100)
![]() Susan Brunner wrote:
Susan Brunner wrote:
In the pattern after the yo in chart M1, does that mean you just go to the next box with a symbol. I am new to charts. Thank you for your time
01.06.2019 - 02:39DROPS Design answered:
Hello Susan. Yes, in chart M1, where there is the space after a yo, you go to the next box with a symbol. I.e. on first row, you work: k1, 1 yo, k2, p2 and so on. Happy knitting!
01.06.2019 - 06:46
![]() Susan wrote:
Susan wrote:
I am new to charts, in your chart M1, the space with absolutely nothing after the yo, does it mean you just go to the next st. I really like the look of the tank top and my daughter would like it, she lives in Las Vegas and this is a good one for her done in a cotton yarn. Thank you for your time.
01.06.2019 - 02:35DROPS Design answered:
Hello Susan. Yes, in chart M1, where there is the space with absolutely nothing after a yo, you work the next st. I.e. on first row, you work: k1, 1 yo, k2, p2 and so on. Happy knitting!
01.06.2019 - 06:48
![]() Jenny Strick wrote:
Jenny Strick wrote:
In der Legende gibt es nur \ aber kein /. Im Muster gibt es nur / aber kein \.
04.05.2019 - 17:17DROPS Design answered:
Liebe Frau Strick, ganz herzlichen Dank, den hatte ich verpasst! Unser Designteam wird das ändern. Viel Spaß beim stricken!
06.05.2019 - 15:40
![]() Jenny Strick wrote:
Jenny Strick wrote:
Ich hab einen Fehler im Muster entdeckt. Es wird in der Legende und im Muster / und \ vertauscht für zwei links zusammen stricken.
28.04.2019 - 10:59DROPS Design answered:
Liebe Jenny Strick, Diagram M.1 ist korrekt, Sie werden die linken Maschen 2 li zusammen stricken und die rechten Maschen werden 2 re zusamment gestrickt. Viel Spaß beim stricken!
29.04.2019 - 11:30
![]() Thomas wrote:
Thomas wrote:
Det är tomma fält mellan diagram M1, vad betyder det?
01.04.2019 - 17:54DROPS Design answered:
Hei Thomas. Det er bare lagt inn mellomrom for at alle økningne skal syntes i diagrammet (altså så du skal se hvordan det blir seende ut). Men du hopper bare over mellomrommet og strikker som om det ikke er der. God fornøyelse
02.04.2019 - 13:14
![]() Antoinetta wrote:
Antoinetta wrote:
M1 har tomma rutor hur gör jag där? Stickar XL.
31.03.2019 - 13:47DROPS Design answered:
Hej Antoinetta. Se svar över. Mvh DROPS Design
05.04.2019 - 10:30
![]() Laurie wrote:
Laurie wrote:
It would be helpful if the pattern stated the intended amount of ease. The size to fit my bust is way too small for my hips by the measuring tape. Looks like I need to make the largest size for my hips and convert to the appropriate stitch count for XL at the waist.
25.09.2018 - 21:43DROPS Design answered:
Dear Laurie, you will find all measurements for the finished garments in the chart at the bottom of the pattern. These measurements are taken flat - from side to side- in cm. compare these to a similar garment you have and like the shape to find out the matching size or adjust if required. Convert into inches and read more about sizing here. Happy knitting!
26.09.2018 - 08:26
![]() Donna Chustz wrote:
Donna Chustz wrote:
What do you mean by decreasing 1 st 5 times when shaping the armhole? Is this decreasing 5 stitches every knit row? If so how many decrease rows? Or is it decreasing 1 stitch for 5 times on the knit rows? And, where is the decrease put (1 decrease on each side of the 3 garter st? That would be 2 decreases per every knit row.
29.04.2018 - 05:09DROPS Design answered:
Hi Donna, You work all decreases from the right side and you decrease one stitch every other row (in other words, every row from the right side) inside the 3 garter stitches on both sides of the back piece; so you are decreasing 2 stitches each time you decrease and you do this 5 times. Happy knitting!
30.04.2018 - 09:51
![]() Monica wrote:
Monica wrote:
Chiedo scusa, essendo abituata a lavorare con ferri non circolari avevo dimenticato che invece questo modello li prevede e quindi i diagrammi indicano i ferri visti sempre dal diritto!
16.04.2017 - 19:10
![]() Monica wrote:
Monica wrote:
Buongiorno, vorrei cominciare questo modello è mi è venuto un dubbio: i diagrammi mostrano i ferri diritto e rovescio o solo i ferri a diritto? Grazie per la vostra risposta.
16.04.2017 - 18:49DROPS Design answered:
Buongiorno Monica. I diagrammi mostrano tutti i ferri del motivo visti sul diritto del lavoro. Si lavora in tondo e quindi lavora sempre sul diritto. Buon lavoro!
16.04.2017 - 19:42
|
|||||||||||||||||||||||||
DROPS 107-8 |
|||||||||||||||||||||||||
|
|
|||||||||||||||||||||||||
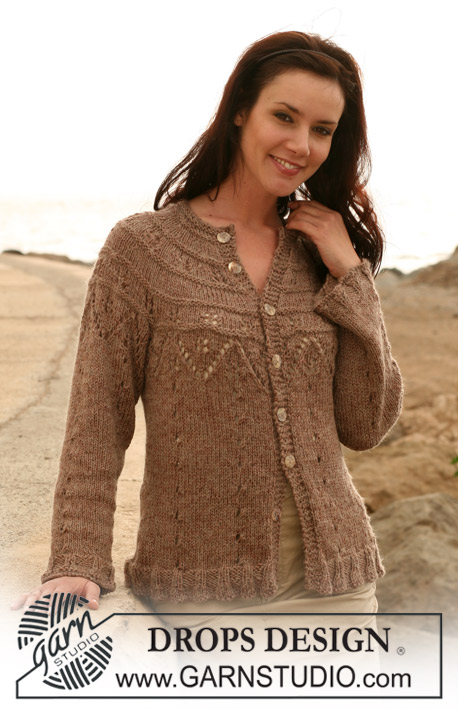
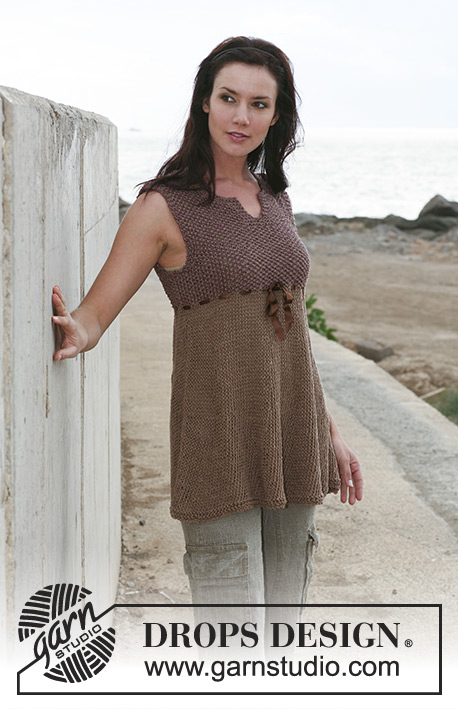
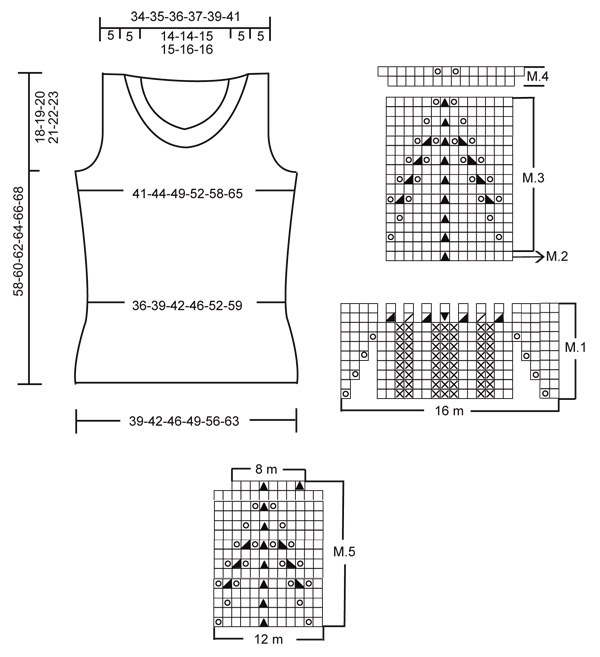
DROPS top with lace pattern in ”Cotton Viscose”. Sizes: S - XXXL
DROPS 107-8 |
|||||||||||||||||||||||||
|
Garter st , back and forth on needle: K all rows. Garter st, in the round: K 1 round, P 1 round. Pattern: See diagrams M.1 to M.5. Note! M.1 varies from 16 to 24 sts. Decreasing tip (for armhole): Dec inside 3 garter sts. Make all dec from RS! Dec as follows after 3 sts: Slip 1 st as if to K, K1, psso. Dec as follows before 3 sts: K2 tog. Front and back piece: Worked in the round on circular needle. Loosely cast on 176-192-208-224-256-288 sts on circular needles size 3.5 mm. Work 3 vertical repeats of M.1 and then 1 vertical repeat of M.2 (= 1 round) = 154-168-182-196-224-252 sts. Continue in M.3 until piece measures approx 30 cm – adjust to 1 whole pattern repeat, then work 1 vertical repeat of M.4 (= 2 rounds) = 176-192-208-224-256-288 sts. Insert a marking thread or stitch marker each side (= 88-96-104-112-128-144 sts on front and back piece). Continue in stocking sts. Remember knitting tension! At the same time when piece measures 32-32-33-33-35-35 cm inc 1 st on each side of both marking threads or stitch markers on every 6 round a total of 3-3-4-4-3-3 times = 188-204-224-240-268-300 sts. When piece measures 39-40-41-42-43-44 cm work 4 rows garter st on 12-14-16-18-20-22 sts each side (i.e. 6-7-8-9-10-11 sts on either side of marking thread), work remaining sts in stocking st as before. Now cast off 6-8-10-12-14-16 sts each side for armhole and complete front and back pieces separately. Front piece: = 88-94-102-108-120-134 sts. Continue in stocking st with 3 garter sts each side. At the same time dec to shape the armhole each side on every other row – read Decreasing tips: 1 st 5-7-10-11-15-20 times. Continue with 3 garter sts each side towards armhole. At the same time when piece measures 41-42-43-44-45-46 cm slip the middle 20-20-22-22-24-24 sts on a thread or stitch holder for neck. Cast off to shape the neckline on every other row: 3 sts 1 time, 2 sts 4 times and 1 st 7 times = 11-12-12-14-15-17 sts left on shoulder. Cast off when piece measures 58-60-62-64-66-68 cm. Back piece: = 88-94-102-108-120-134 sts. Dec for armhole as described for front piece = 78-80-82-86-90-94 sts. Continue with 3 garter sts each side until piece measures 53-55-57-59-61-63 cm. Now cast off the middle 42-42-44-44-46-46 sts for neck and cast off to shape the neckline on every other row: 2 sts 1 time and 1 st 5 times = 11-12-12-14-15-17 sts left on shoulder. Cast off when piece measures 58-60-62-64-66-68 cm. Assembly: Sew shoulder seams. Neckline: Pick up 168-168-168-180-180-180 sts round neckline (includes sts on thread or stitch holder at front) on circular needle size 3.5 mm. P 1 round, then work M.5. After M.5 there are 112-112-112-120-120-120 sts on round. P 1 round and cast off. |
|||||||||||||||||||||||||
Diagram explanations |
|||||||||||||||||||||||||
|
|||||||||||||||||||||||||
 |
|||||||||||||||||||||||||
Have you finished this pattern?Tag your pictures with #dropspattern or submit them to the #dropsfan gallery. Do you need help with this pattern?You'll find 22 tutorial videos, a Comments/Questions area and more by visiting the pattern on garnstudio.com. © 1982-2026 DROPS Design A/S. We reserve all rights. This document, including all its sub-sections, has copyrights. Read more about what you can do with our patterns at the bottom of each pattern on our site. |
|||||||||||||||||||||||||


With over 40 years in knitting and crochet design, DROPS Design offers one of the most extensive collections of free patterns on the internet - translated to 17 languages. As of today we count 324 catalogues and 12290 patterns translated into English (UK/cm). 12290
We work hard to bring you the best knitting and crochet have to offer, inspiration and advice as well as great quality yarns at incredible prices! Would you like to use our patterns for other than personal use? You can read what you are allowed to do in the Copyright text at the bottom of all our patterns. Happy crafting!
Post a comment to pattern DROPS 107-8
We would love to hear what you have to say about this pattern!
If you want to leave a question, please make sure you select the correct category in the form below, to speed up the answering process. Required fields are marked *.